Provisioning a Linux server begins with selecting and installing a distribution, such as Ubuntu, Debian, Fedora, or Arch Linux. Then, you must install the required software packages, create user accounts, configure firewall rules, and deploy services based on the server's role.
In this guide, learn how to install and configure a secure, stable, and scalable Linux server for your specific use case.

Why Opt for a Linux Server?
Linux supports a wide range of server roles, including:
The majority of all public-facing servers worldwide run on Linux, especially in web hosting, cloud computing, and enterprise environments. Linux servers are popular because they are:
- Free and open source. Most Linux distributions are free to download, install, and update. Linux is also open source, meaning the source code is publicly available and can be modified and redistributed without fees or licensing restrictions.
- Lightweight. Linux can run with minimal CPU, memory, and disk usage. Users with limited hardware resources can set up efficient systems without unnecessary background processes.
- Compatible with a broad array of hardware. Linux supports various hardware platforms, from legacy systems to modern servers and virtual machines. Thanks to this versatility, it is often the first choice for deployments in data centers and hybrid cloud environments.
- Stable and reliable. Linux is a reliable system that can operate for long periods without a reboot. It is ideal for systems that require high availability, such as web servers, databases, and infrastructure services.
- Customizable. You can modify a Linux system to specific server requirements and only install the necessary components and services. This results in better performance, reduced overhead, and a smaller attack surface.
- Secure. Linux follows the principle of least privilege; it has built-in file permission models and supports mandatory access control systems like SELinux and AppArmor. It also benefits from a proactive development community that delivers frequent updates and security patches.
What Is Linux?
Linux is both a kernel and a broad software ecosystem. The Linux kernel is a core component that directly interfaces with underlying hardware and manages system processes. A Linux-based operating system, called a distribution or distro, combines the kernel with additional components such as software libraries, command-line tools, and package managers to form a complete environment.
Linux distributions support command-line environments (CLI) and graphical user interfaces (GUI) that allow users to interact with the system. The distributions power everything from web servers and data centers to phones, IoT devices, and desktops.
Linux Server Basics
The Linux ecosystem is highly versatile, which is the main reason behind its widespread adoption. The following section provides an overview of the core components that make up a Linux server.

Linux Server Components
In server environments, besides the hardware and kernel, a Linux distribution typically includes a minimal set of user-space components, such as shells, daemons, libraries, and system utilities.
Each running service or application runs as an isolated process with its own memory and permissions.
Bootloader
A bootloader is the first program executed on startup after the system firmware (BIOS or UEFI). Its primary role is to load the Linux kernel into memory and initiate the boot process.
The GRand Unified Bootloader (GRUB) is the most common default bootloader on Linux distributions. Based on the configuration, GRUB presents a boot menu that can load multiple kernels or operating systems.
Linux Kernel
After the bootloader loads the kernel into memory, the Linux kernel takes control of the system. Operating in privileged mode (ring 0), the kernel provides low-level services to the rest of the system. These services include:
- Scheduling processes and allocating CPU time to ensure the system can manage multiple tasks simultaneously.
- Managing physical and virtual memory, including page allocation and swaps.
- Providing a unified interface for communicating with hardware via device drivers. Devices are exposed as special files in the /dev directory.
- Using system calls as secure entry points for programs to request services like file access or I/O operations.
- Enforcing access control through user and group permissions, and supports isolation features like namespaces, cgroups, and security modules.
Note: The Linux kernel is written in C and Assembly and maintained by a global open-source community. You can view its code at kernel.org, and even recompile or customize it for specific workloads.
After completing the boot process, control is handed off to the init system, which continues the boot process and prepares the user environment.
Init System
The init system is the first user-space process started by the kernel. Its role is to initialize the user space during boot and manage services and daemons during runtime.
The init system tasks include:
- Starting, stopping, and restarting services.
- Managing system daemons.
- Coordinating the boot order.
- Mounting filesystems.
The default init system in most modern distributions is systemd. It supports parallel service startup, faster boot time, and better system management capabilities, like detailed logging through journalctl.
Alternative init systems, like SysVinit, OpenRC, or runit, are still used in minimal or custom Linux environments.
Daemons
Daemons are background processes that initiate without direct user interaction. Many are launched during system boot by the init system, while others start on demand or based on scheduled events. They are responsible for handling services like networking, printing, and scheduling.
Therefore, Linux contains numerous daemon processes, each with specific functionality, for example:
- sshd. An SSH server daemon that listens for incoming SSH connection requests, enables secure connection to a remote server, and allows file transfers.
- httpd. Web server daemon that listens for HTTP requests and serves web pages.
- cron. Executes scheduled tasks or scripts from the cron table (crontab) at requested times.
- rsyslogd. Collects and stores log messages from system services and applications.
Once activated, daemons usually continue running in the background, waiting for further trigger events or incoming requests.
Linux Shell
Linux uses a command-line interface called a shell, which allows users to type commands and interact with the operating system. Popular shell types are Bash, Zsh, Fish, etc.

Text-based commands allow users and administrators to manage files, configure system settings, perform administrative tasks, and launch various Linux utilities and tools.
Linux Libraries
A software library is a collection of reusable code that programs can call to perform common functions, thereby avoiding the need to rewrite the same logic. For instance, if multiple applications need to handle file operations or network communication, they can instead rely on the same shared library.
There are two primary types of libraries in Linux:
- Shared libraries (.so files). These libraries are loaded dynamically at runtime. They reduce memory usage and disk space since multiple programs can share the same library in memory.
- Static libraries (.a files). They are linked directly into an application's binary at build-time; these libraries increase the binary size but remove the need for the library to be present on the system at runtime.
Shared libraries are more common due to efficiency and flexibility. Common examples include:
| Library | Full Name | Purpose |
|---|---|---|
| glibc | GNU C Library | Provides the core set of C language functions used by almost every Linux application and system utility. |
| libm | Math Library | Offers a wide range of mathematical functions, such as logarithms, trigonometric functions, and exponentiation. |
| libpthread | POSIX Threads | Enables multithreading support in applications, allowing programs to perform multiple tasks simultaneously. |
| libdl | Dynamic Linking Loader | Allows applications to load additional libraries dynamically during runtime. |
| libX11 | X Window System | Provides the foundational code for GUI applications to communicate with the display server. |
Therefore, to see which shared libraries a program uses, enter the following command in your terminal:
ldd /usr/bin/your_programThis shows the dynamic library dependencies resolved at runtime by the system's dynamic linker.
Linux Process and Utilities
A running command or program in Linux is called a process. Each process has a unique identifier, a process ID (PID). The kernel manages all processes and tracks their lifecycle from creation to termination.
Processes have several different states:
- Running. The state of a process currently executing in the CPU.
- Sleeping. A state where a process is waiting for resources or a specific event.
- Zombie. A defunct process that has completed its execution but still remains in the process table. This happens because the process's exit status has not yet been read by its parent process.
- Stopped. A state where a process is not running and, hence, is ready to be resumed or terminated.
- Orphaned. A process whose parent process ended.
Linux provides various utilities and tools to manage processes:
ps. Displays a snapshot of current processes.- top/
htop. Live, interactive view of CPU and memory usage. kill,pkill,killall. Commands to terminate (kill) a process.
Graphical Environment (Optional)
Most Linux servers are deployed without a graphical interface to conserve system resources and reduce the attack surface. However, a GUI is sometimes installed in:
- VNC-enabled remote desktop setups.
- Development environments.
- Admin-friendly local or virtual machines.
The graphical server is a low-level system component responsible for drawing windows and handling input from devices like the keyboard and mouse. There are two main protocols:
- X11. The component implements the X Window System (X11 or X) and enables window management, keyboard/mouse input, and multiple display support.
- Wayland. A newer, simplified protocol intended to replace X11. It offers improved performance, modern architecture, and better security.

A desktop environment is a collection of software that provides the visual interface and user tools layered on top of the graphical server. This includes, for example, text editors, configuration tools, web browsers, and other utilities.
Popular desktop environments include:
- GNOME. Default in many distros; clean and minimal.
- KDE Plasma. Highly customizable, feature-rich interface.
- XFCE/LXDE. Lightweight environments ideal for low-resource systems or remote access.
DEs are distribution-independent and can often be installed alongside others, depending on preference or use case.
Note: Installing a desktop environment requires significant system resources and is not recommended for performance-critical or security-hardened production servers.
File System Types
The Linux file system defines how data is stored, organized, and accessed on storage devices, such as a solid-state drive (SSD) or hard disk drive (HDD). The choice of file system affects performance, reliability, and scalability, depending on your workload and deployment environment.
File systems used in Linux include:
- ext2. Available on many early Linux systems. It lacks journaling, which makes it faster for certain use cases but more prone to corruption after crashes or power loss.
- ext3. An improved version of ext2, which adds journaling to track file system changes.
- ext4. The default file system in most modern Linux distributions. It supports large files and volumes, offers improved performance, and includes backward compatibility with ext3 and ext2.
- Btrfs (B-tree file system). Offers advanced features, such as RAID support, snapshots, checksumming, and self-healing.
- XFS. A high-performance file system optimized for large-scale storage and parallel I/O. Commonly used in enterprise and database-heavy environments.
Filesystem Hierarchy Standard (FHS)
Linux follows a standardized directory structure under the root directory (/). This results in a consistent and predictable directory structure across distributions. Understanding the Linux directory structure is essential for:
- Navigating the system.
- Troubleshooting configuration and runtime issues.
- Writing automation scripts.
- Managing software packages and services.
Most system services, logs, configuration files, and binaries follow this layout:
| Directory | Purpose |
|---|---|
| /etc | System configuration files. |
| /var | Log files, mail spools, and runtime variable data. |
| /usr | User-level applications, shared libraries, and documentation. |
| /home | Personal directories for non-root users. |
| /bin, /sbin | Essential binaries for users and superusers. |
| /lib, /lib64 | Shared libraries required by essential binaries. |
How to Choose the Right Linux Distribution
Currently, there are several hundred actively maintained Linux distributions. However, only a few dozen are widely used in servers, desktops, and embedded systems. Most of the others are designed for very specific tasks. For example, Kali Linux is used for penetration testing, and Alpine Linux is used for lightweight container environments.
When choosing a Linux distribution for your server, consider:
- Purpose. Some distributions are better suited as server operating systems, while others focus on the desktop experience. Research and select a distribution based on the role of your server, for example, install Alpine if you primarily work with containers.
- User experience. Your previous experience with Linux matters. Some distributions, such as Ubuntu, Fedora, or Mint, are better suited for new users. Advanced users who prefer full customization options would look to Gentoo or Arch Linux.
- Hardware requirements. Make sure the distribution supports your hardware setup. Some require manual configuration or third-party drivers, while others offer out-of-the-box compatibility. Check official documentation and forums for known hardware issues.
- Community and documentation. Larger communities typically offer more tutorials, troubleshooting help, and active development, which helps ensure regular updates and long-term stability.
- Package managers and tooling. Choosing a Linux distribution depends on what matters most to you: package managers (APT, DNF, Pacman), default desktop environments, system philosophies, or user experience. Therefore, each distribution offers a unique workflow and ecosystem.
Linux Distributions: Use Cases and Features Summary
The following table lists Linux distributions along with their best use cases and notable features:
| Distribution | Base | Package Manager | Use Case | Best For | Notable Features |
|---|---|---|---|---|---|
| Ubuntu | Debian | APT (.deb) | General-purpose computing, cloud, servers. | Beginners, system administrators. | LTS releases; strong community support; user-friendly. |
| Linux Mint | Ubuntu/Debian | APT (.deb) | Desktop operating system. | New Linux users, multimedia/home users. | Out-of-the-box media support; Cinnamon desktop. |
| Debian | Independent | APT (.deb) | Base for other distros, server workloads. | Experienced users, minimal setups. | Stability; huge repository; multi-arch. |
| Fedora | Independent (RHEL upstream) | DNF (.rpm) | Developer platforms, testing new tech. | Developers, security-conscious setups. | Advanced packages; SELinux; upstream to RHEL. |
| Arch Linux | Independent | pacman | Custom, rolling-release systems. | Advanced users who prefer manual control. | User-controlled setup; excellent documentation (Arch Wiki). |
| Rocky Linux | RHEL | DNF (.rpm) | Enterprise servers, CentOS replacement. | Organizations needing long-term stability. | RHEL-compatible; actively maintained; community-driven. |
| Alpine Linux | Independent | apk | Container-based and minimalist environments. | Advanced users, Docker users, and embedded systems. | Extremely lightweight, security-focused, musl libc and BusyBox based. |
| AlmaLinux | RHEL | DNF (.rpm) | Server deployments, enterprise workloads. | Cloud/server admins replacing CentOS. | RHEL-compatible; free and open-source; stable releases. |
| openSUSE Leap | SUSE Linux Enterprise | zypper | Enterprise desktops and servers. | Sysadmins, developers in stable environments. | YaST management tool; tested against SLE. |
| openSUSE Tumbleweed | Independent | zypper | Rolling-release development environments. | Power users who want the latest software. | Always up-to-date; suitable for dev/testing. |
How to Choose the Right Server Hardware
Every server role has different resource and configuration requirements. Identify the role your Linux server will perform and create a list that includes:
- Expected workloads.
- Required software and services like MySQL, Docker, or OpenSSH.
- Estimated concurrent users or connections
Note: Add approximately 15% overhead to CPU, memory, and network capacity to handle usage spikes and avoid performance bottlenecks.
- CPU. A consumer-grade CPU like Intel Core or AMD Ryzen is sufficient for simple tasks like a lightweight Linux web server. A high-demand workload like a database or virtualization setup may require server-grade CPUs like Intel Xeon or AMD EPYC.
- RAM. Linux handles memory efficiently, but RAM must match workload and allow headroom for the kernel, daemons, and caching. Select a minimum of 8–16 GB for basic tasks, and 64–128 GB+ for database servers, containers, or virtual machines.
- Storage. Use SSDs for OS and frequently accessed data, and add HDDs for bulk storage. Pay attention to partitioning schemes and file systems like ext4, xfs, and Btrfs for flexibility and reliability.
- Motherboard. Ensure the motherboard is compatible with your CPU, RAM, and storage. Confirm BIOS/UEFI support for Linux, especially for secure boot and virtualization extensions.
- Network Interface Card (NIC). A gigabit NIC is a standard server configuration. Consider 10 GbE for high-throughput needs. Even though Linux has broad driver support, confirm compatibility with distros like Debian or Fedora.
- Power Supply Unit (PSU). Use a reliable PSU rated for at least 80+ Bronze efficiency. Include a redundant PSU for mission-critical servers.
- Cooling. Linux does not require special cooling, but performance degrades quickly if components overheat. Ensure airflow is optimal if passive cooling is used..
- GPU. Required only for compute-intensive or media-heavy Linux applications like machine learning inference.
- Hardware RAID (Optional). While Linux supports software RAID via tools like mdadm, hardware RAID can offer performance benefits and additional features for specific use cases.
The following table includes example configurations for common scenarios:
| Scenario | Example Hardware Configuration |
|---|---|
| Basic Web Server/File Server | Intel Core i5 / AMD Ryzen 5, 8–16 GB RAM, 256 GB SSD, 1 Gbps NIC |
| Home Lab/NAS | Intel Core i3 / Low-power ARM board, 4–8 GB RAM, SSD + HDD combination |
| High-Traffic Web or Database Server | Intel Xeon / AMD EPYC, 64+ GB ECC RAM, NVMe SSDs (RAID 10), Dual 10 Gbps NICs |
| Virtualization Host | Multi-core Xeon/EPYC, 128+ GB ECC RAM, NVMe Storage, Redundant PSU |
| Media Server with Transcoding (e.g., Plex) | Ryzen 7 / Intel i7 + NVIDIA GPU, 32 GB RAM, SSD + Large HDDs, Enhanced Cooling |
| High-Performance Computing (HPC) Node | Dual-socket EPYC/Xeon, 256+ GB RAM, High-speed Interconnect (e.g., InfiniBand), Active Cooling |
| Container-Oriented Infrastructure (e.g., Kubernetes) | 8+ Core CPU, 64–128 GB RAM, Fast SSDs, NIC Bonding Support |
| Backup/Archive Server | Low-power CPU, 8 GB RAM, High-capacity HDDs, Basic RAID or JBOD Setup |
How to Choose the Right Virtual Machine
Virtual machines (VMs) are used to deploy Linux servers in both on-premise and cloud environments. A Linux server running inside a VM behaves just like a physical server, but with added flexibility, scalability, and isolation.
A Linux server VM is created by running a guest Linux operating system on top of virtualized hardware managed by a hypervisor. Key components include:
- Hypervisor. The hypervisor manages physical hardware resources and allocates them to VMs.
- Host System. The physical machine that runs the hypervisor and provides resources to guest VMs.
- Guest System. The Linux server runs inside the VM. Each guest has its own isolated OS and application.
- Virtual Hardware. The VM sees virtual CPUs, memory, disks, and network interfaces, which are mapped to physical components by the hypervisor.
- Guest Linux OS. You can run different Linux distributions like Ubuntu Server, Rocky Linux, or Debian, depending on your server role and preference.
Types of Virtualization for Linux Servers:
- Full Virtualization. The guest Linux OS is unaware it is virtualized. This is the most common setup, supported by tools like Proxmox or VMware ESXi.
- Paravirtualization. The Linux guest OS is modified to interact more efficiently with the hypervisor (e.g., Xen-based environments).
- Hardware-Assisted Virtualization. Uses Intel VT-x or AMD-V to reduce virtualization overhead. Most modern hypervisors and CPUs support this.
- Containerization (OS-level Virtualization). Tools like Docker and LXC run multiple isolated Linux instances (containers) on a shared kernel, which is ideal for microservices and lightweight apps.
| Scenario | Example Virtualization Setup |
|---|---|
| On-prem production VM | Type 1 hypervisor (KVM or VMware ESXi), pass-through hardware for performance, guest: Ubuntu Server, Rocky Linux. |
| Local development or testing | Type 2 hypervisor (VirtualBox, VMware Workstation), guest: Ubuntu, Debian, Fedora. |
| Lightweight services/microservices | Containers (Docker, LXC), host: Debian/Alpine, managed via Docker Compose or Kubernetes. |
| High-availability enterprise workload | Bare-metal Type 1 hypervisor with hardware-assisted virtualization (VT-x/AMD-V), VM redundancy, shared storage. |
| Virtual desktop or GUI apps | VirtualBox or KVM with GPU passthrough (if needed), guest: Ubuntu Desktop or Fedora Workstation. |
| Educational or training labs | Type 2 or cloud-based VMs (e.g., on Proxmox, VMware Workstation), snapshot support, lightweight base images. |
| Nested virtualization testing | Host with VT-x/AMD-V and EPT support, KVM on Linux or Hyper-V on Windows, guest VMs can run their own hypervisors. |
| Mixed-OS environment (Windows + Linux) | Use Proxmox or VMware vSphere, assign resource pools, isolate OS types with templates. |
How to Install Linux Server
The steps for provisioning a Linux server depend on your infrastructure setup and hosting provider. Some of the more common scenarios include:
- Cloud providers like AWS and Azure allow users to select a prebuilt Linux image, for example, Ubuntu, and provision the server through a web console, CLI, or API.
- Managed hosting providers like Hetzner or OVH have automated installation tools. Users select an OS via a control panel, and the provider handles the complete installation process.
- One of the best ways to test different distributions is to use virtual machines. You can mount an ISO image in a hypervisor (KVM, VMware, Proxmox, VirtualBox) and install the OS as virtual boot media.
- If provisioning a remote Bare Metal Server, you can use the BMC interface to mount a virtual ISO, initiate a PXE boot, or automate installation using tools like MAAS, Foreman, or Ansible.
- If you have physical access to a local machine, you can create a bootable physical media USB/DVD and boot from it to install Ubuntu. Depending on the operating system and preference, tools like Rufus, dd, or balenaEtcher are used to create the bootable media.
The following section explains how to install an Ubuntu Server instance on a local virtual machine using VirtualBox.
Note: If working with a different Linux distribution, we also offer detailed guides for installing:
Step-By-Step Installation Process for Ubuntu Server
To install and configure Ubuntu Server 24.04 on a local VM, you need:
- A virtualization hypervisor (this guide uses VirtualBox 7).
- At least 4 GB of RAM.
- 25 GB of free disk space.
Step 1: Download Ubuntu Server
To download the latest Ubuntu Server version:
1. Open a web browser and go to the official Ubuntu download page.
2. Click the Ubuntu Server 24.04 LTS Download button.
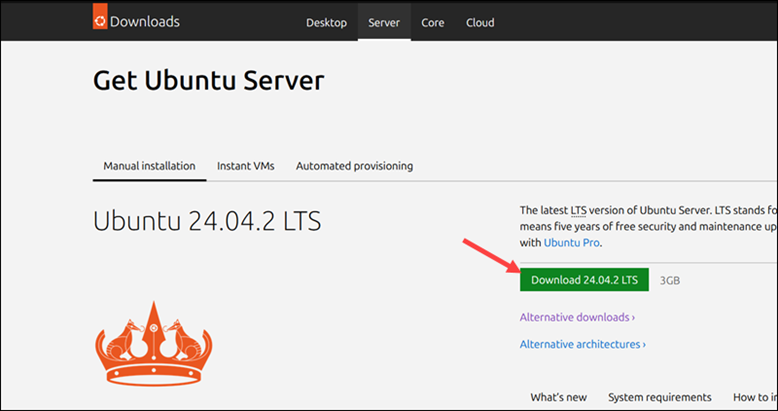
Note: Ubuntu Server uses a text-based installer and does not include a graphical interface. If you prefer a desktop environment, refer to our Install Ubuntu Desktop tutorial.
Step 2: Create a Virtual Machine
To create a new virtual machine (VM):
1. Open VirtualBox and select New.
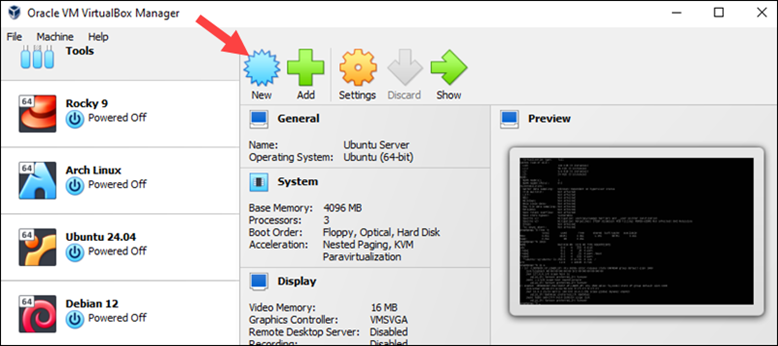
2. In the pop-up window:
- Name. Enter a name for the VM.
- Folder. Choose the VM storage folder.
- ISO Image. Specify the location of the ISO image you downloaded.
- Type and Version. VirtualBox automatically guesses the OS type and version based on the selected ISO file.
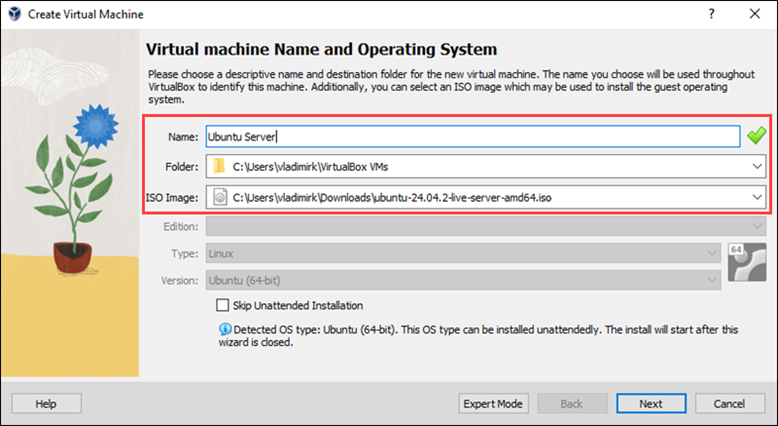
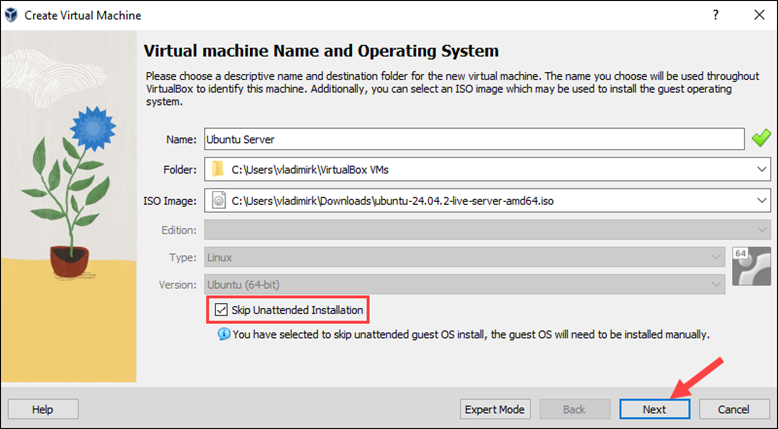
3. Check the Skip Unattended Installation box and click Next.
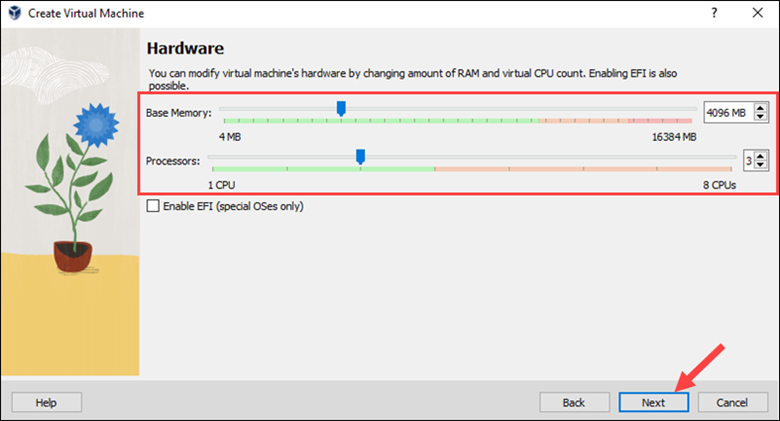
4. Drag the slider or type in the desired RAM amount. Allocate at least 4 GB (4096 MB) of RAM.
5. Set 2 or more cores, depending on your host system. Click Next.
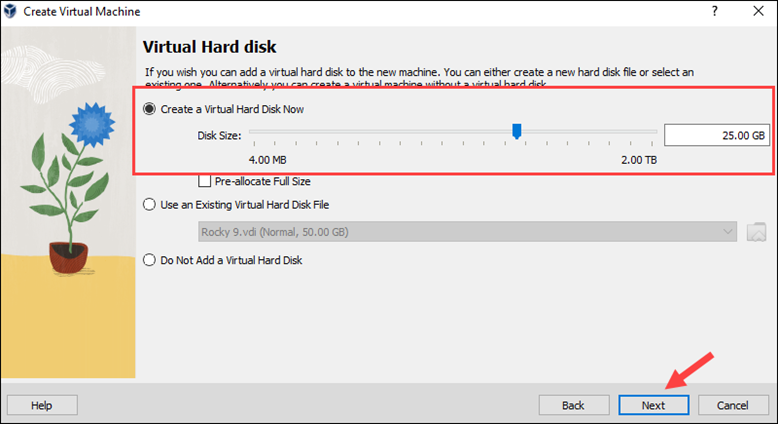
6. Select the Create a Virtual Hard Disk Now option and set the Disk Size to a minimum of 25 GB. Click Next to proceed.
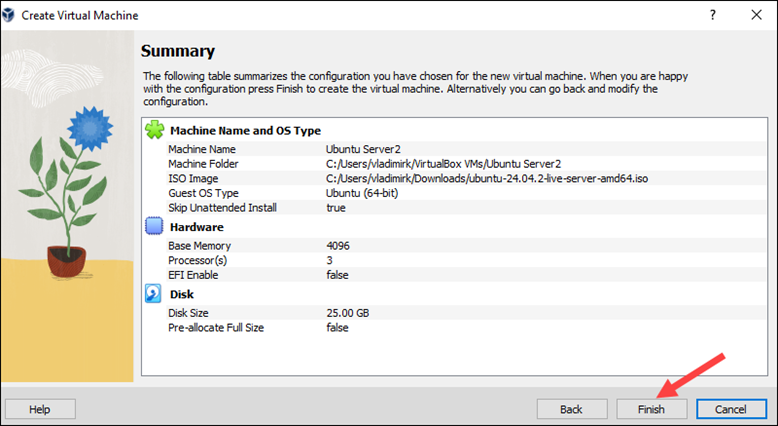
7. Review your settings on the Summary page and click Finish to create the VM.
Step 3: Launch the Installer
To start the Ubuntu Server installation:
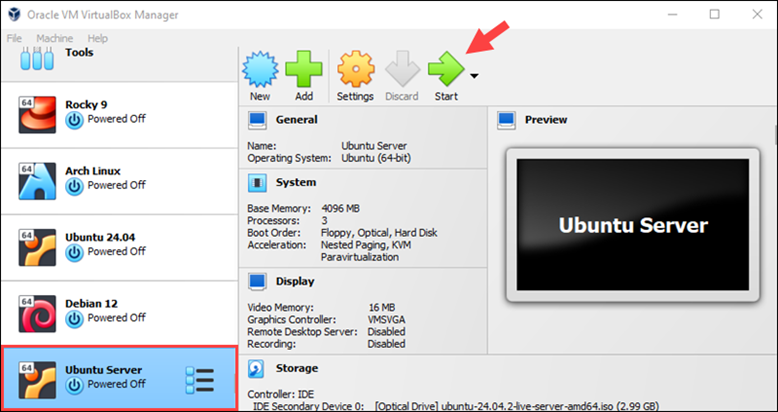
1. In VirtualBox, select the Ubuntu Server VM and click Start.
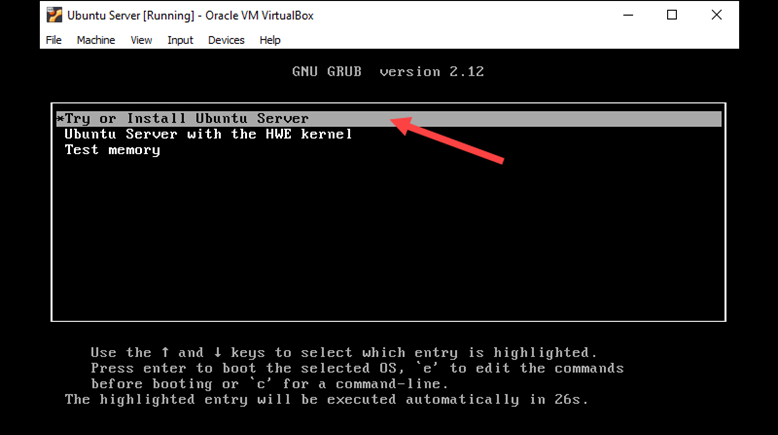
2. Select the Try or Install Ubuntu Server option and press Enter to confirm.
3. Select your preferred language and press Enter.

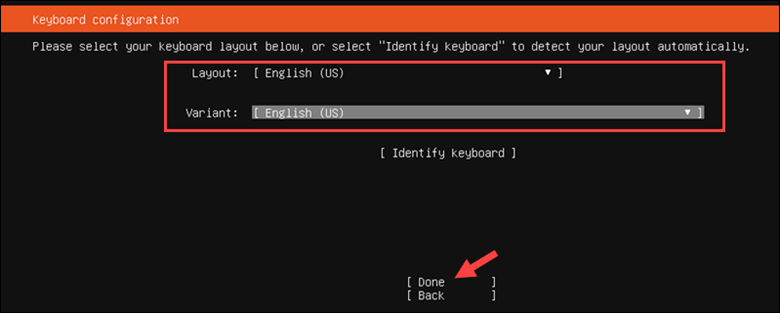
4. Choose a keyboard layout and select Done.
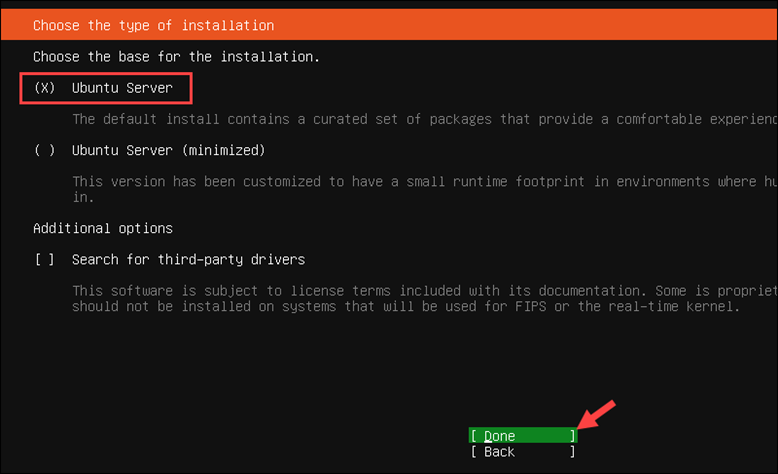
5. Select the Ubuntu Server installation type and click Done.
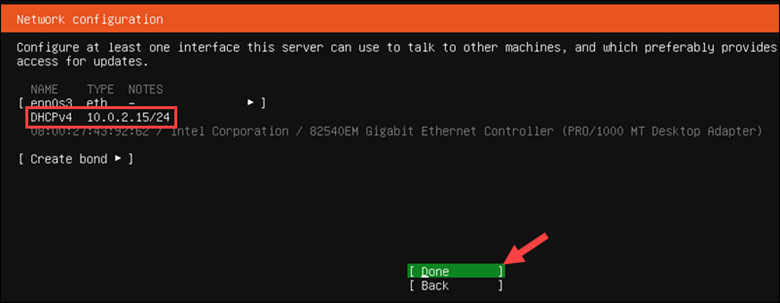
Step 4: Configure Network
In the Network configuration section:
1. Leave the default (DHCP) setting. Alternatively, configure a static IP address. Select Done to continue.
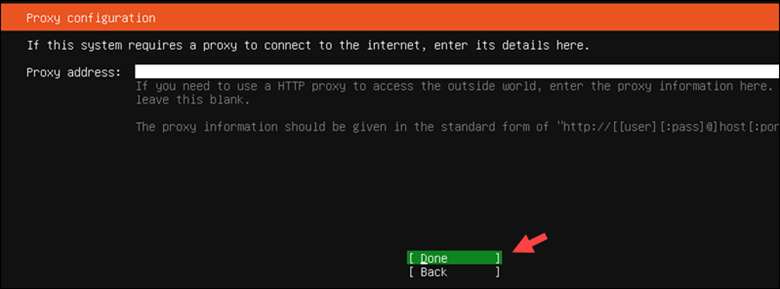
2. Unless you plan to use a proxy IP, leave the field blank and select Done.
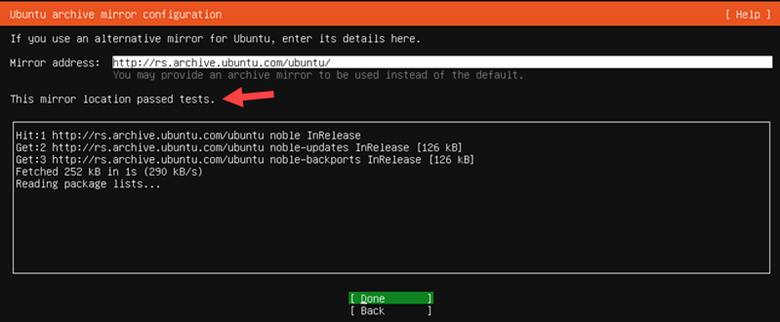
3. After the automated check is complete, accept the default Ubuntu mirror and click Done.
Step 5: Configure Storage
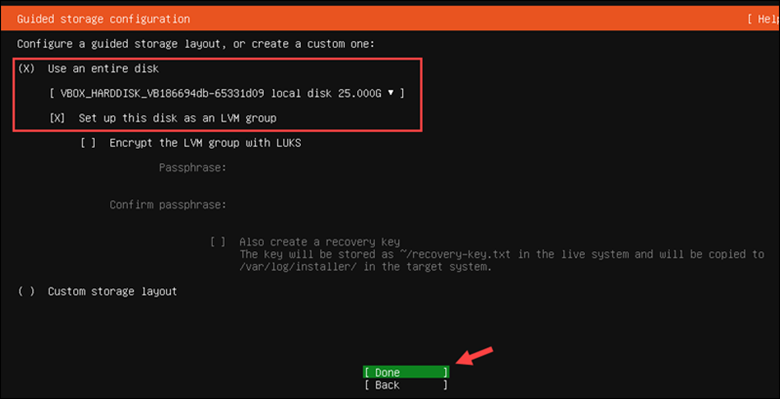
1. Select Use an entire disk and choose the virtual storage disk created earlier.
2. Leave the default Set Up this disk as an LVM group setting enabled and select Done.
3. Review the partitioning summary and click Done if everything is correct.
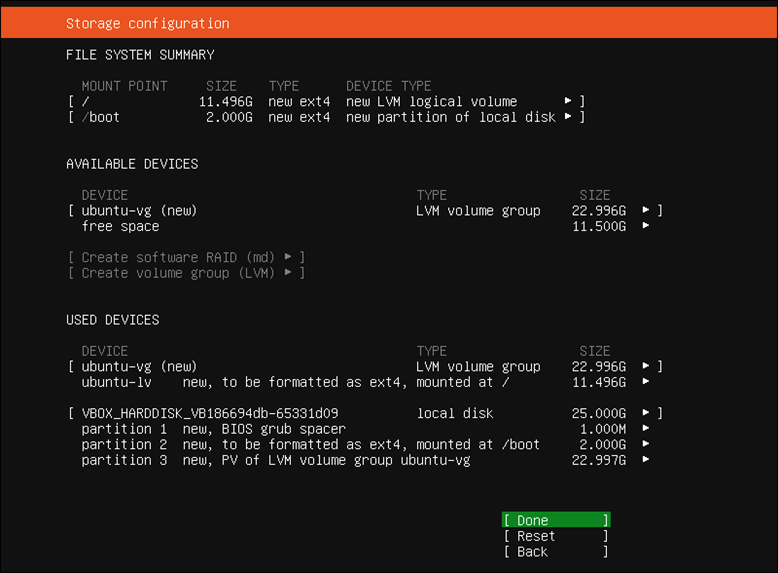
4. A pop-up window informs you that the selected disks are going to be formatted. Press Continue to proceed with the installation.
Step 6: Create User Account
To create a user account for the Ubuntu Server:
1. Enter your name, the computer name, and a username/password for the root user.
2. Select Done to proceed.
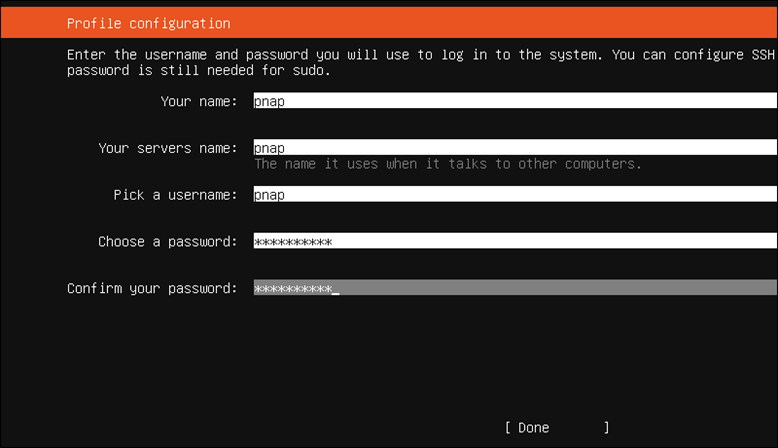
Note: Use a secure password. Refer to our article on strong password ideas or try our free password generator.
Step 7: Configure Optional Features
After you press Continue to skip the Upgrade to Ubuntu Pro prompt:
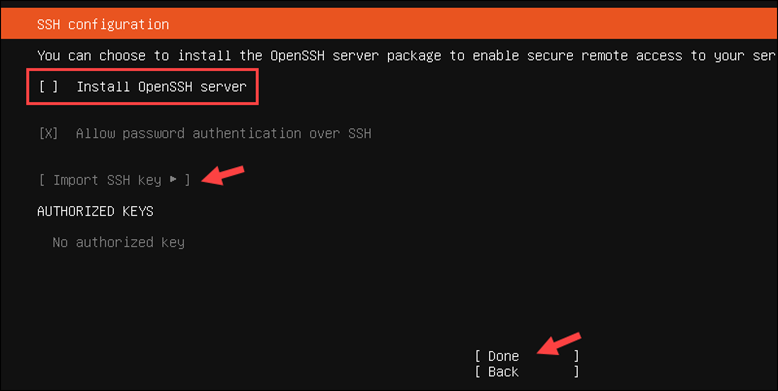
1. Select the Install OpenSSH server option. Optionally, import an SSH key if you have one.
2. Press Done to continue.
3. The Featured Server Snaps screen allows you to get a jump start and install popular tools. Select the desired snaps and press Done to initiate the installation.
Step 8: Finish Installation
Wait for the Ubuntu Server to finish installing. Once complete, select Reboot Now.
VirtualBox will prompt you to remove the mounted ISO during reboot:
1. Go to the Devices > Optical Drives > Remove Disk from virtual drive.
2. Press Enter to boot the newly installed server.
Step 9: Post-Installation Check
Once the system boots into the shell:
1. Log in using the username and password created during installation.
2. To verify the setup, review the CPU system info using the following command:
lscpu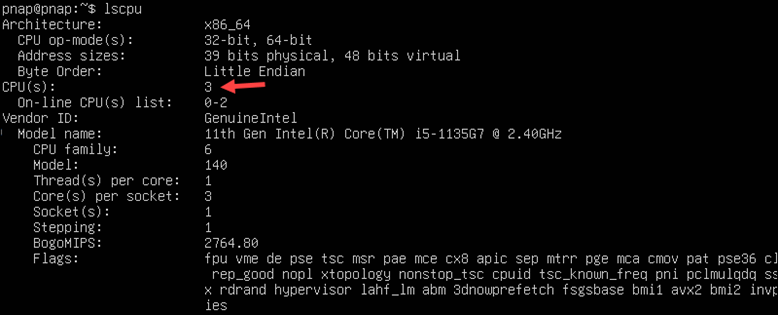
3. Check RAM, cache, and swap memory usage with:
free -h
4. Use the following command to inspect the disk layout and partitions:
lsblk
Now you can install additional software and configure your server for its specific role.
How to Configure Linux Server
After installing Ubuntu Server, you must configure the network, set up a firewall, enable remote access, and install the necessary software.
Follow the instructions in the sections below.
System Updates
After installing a new Linux server, ensure that security patches and system improvements are applied promptly. This reduces the probability of system vulnerabilities being exploited.
Enter the following command to update the package list and upgrade all installed packages on the Ubuntu Server. Use this command:
sudo apt update && sudo apt upgrade -y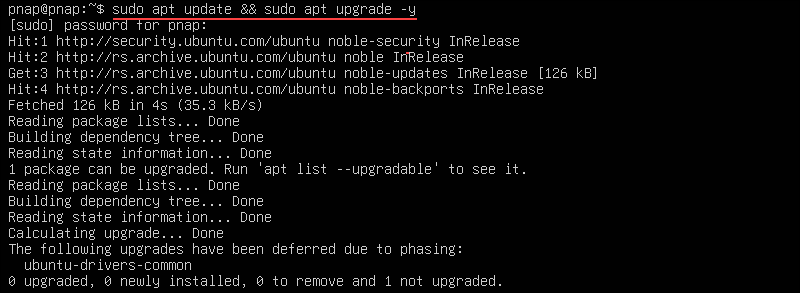
It is recommended that the package list be updated every time before installing new software to avoid unexpected reboots or service restarts due to incompatibility. The following table lists system update and upgrade commands for common Linux distributions:
| Distribution | Update Package List | Upgrade Packages | Remove Unused Packages |
|---|---|---|---|
| Ubuntu/Debian | sudo apt update | sudo apt upgrade -y | sudo apt autoremove -y && sudo apt clean |
| RHEL/Rocky | sudo dnf check-update | sudo dnf upgrade -y | sudo dnf autoremove -y |
| Fedora | sudo dnf check-update | sudo dnf upgrade -y | sudo dnf autoremove -y |
| Arch Linux | sudo pacman -Sy | sudo pacman -Su | sudo pacman -Rns $(pacman -Qdtq) |
| openSUSE | sudo zypper refresh | sudo zypper update -y | sudo zypper packages --orphaned |
| Apline Linux | sudo apk update | sudo apk upgrade | sudo apk cache clean |
Note: In some instances, it can be difficult to perform regular manual system updates. Find out how to automate security updates in Linux.
Configure Network Settings
Linux supports various network interfaces, including Ethernet, Wi-Fi, and virtual network interfaces. To view active interfaces, enter:
ip a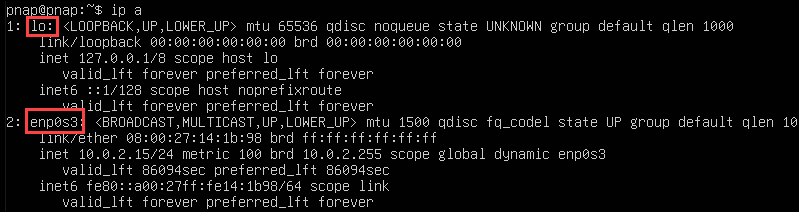
Each interface has a unique name, such as:
- eth0. Traditional Ethernet interface.
- lo. The loopback interface used for internal communication.
- enp0s3. A more predictable naming format for Ethernet.
- wlan0. Wireless LAN interface.
In Linux, network settings are managed through configuration files. The location and format of these files differ between distributions:
| Distribution | Network Tool Used | Configuration File Location |
|---|---|---|
| Ubuntu Server (18.04+) | Netplan | /etc/netplan/*.yaml |
| Ubuntu Desktop | NetworkManager (GUI & CLI) | /etc/NetworkManager/ |
| Debian 11+ | ifupdown or Netplan | /etc/network/interfaces or /etc/netplan/*.yaml |
| RHEL 8+/Rocky/AlmaLinux | NetworkManager | /etc/NetworkManager/system-connections/ |
| Fedora | NetworkManager | /etc/NetworkManager/system-connections/ |
| Arch Linux | systemd-networkd or netctl | /etc/systemd/network/ or /etc/netctl/ |
| openSUSE | Wicked/NetworkManager | /etc/sysconfig/network/ifcfg-* |
| Alpine Linux | ifupdown or manual configs | /etc/network/interfaces or /etc/network/interfaces.d/* |
For example, Ubuntu Server uses the Netplan utility to manage network settings. To configure a static IP address:
1. Open the Netplan configuration file using the Nano text editor:
sudo nano /etc/netplan/00-installer-config.yaml2. Replace or append the following static IP configuration (adjust interface name and IP settings as needed):
network:
  version: 2
  ethernets:
    enp0s3:
      dhcp4: no
      addresses: [192.168.1.50/24]
      gateway4: 192.168.1.1
      nameservers:
        addresses: [8.8.8.8, 1.1.1.1]
3. Press Ctrl+X, then y, followed by Enter to save and exit the file.
4. Apply the changes with:
sudo netplan applyNetplan displays an error message in case of a syntax error.
Configure SSH
The Secure Shell (SSH) protocol allows users to access a remote system over an untrusted network securely. This is an essential feature for managing Linux servers. OpenSSH is the default SSH client and server on most modern Linux distributions.
Default SSH settings may leave a server vulnerable to brute-force attacks or scanning bots. To improve security, users can customize SSH settings in the /etc/ssh/sshd_config file, including:
- Changing the default port number.
- Disabling remote root access to the server.
- Enabling key-based SSH authentication. (Optional)
- Restricting access to specific IP addresses or users.
To configure SSH on your Ubuntu Server:
1. Enter the following command to install the OpenSSH service:
sudo apt install openssh-server -y2. Use a preferred text editor, such as Nano, to access the SSH config file:
sudo nano /etc/ssh/sshd_config3. In the configuration file, find the following line:
#Port 22Uncomment the line and change it to the port you want. For example, set the service to listen on TCP port 2477:
Port 2477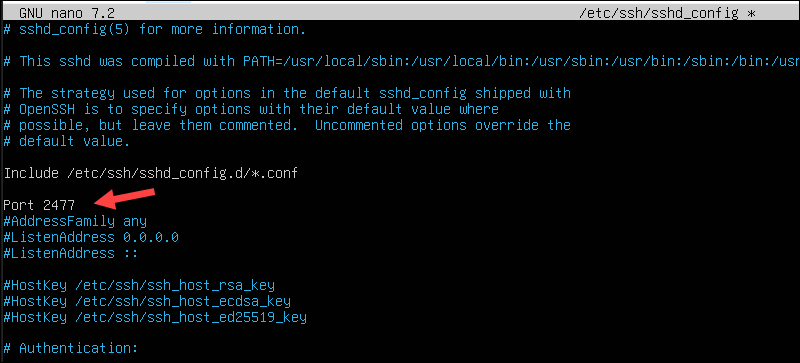
4. Ensure the root user cannot be used remotely via a password. Find the following line:
#PermitRootLogin prohibit-passwordIf you uncomment the line, password-based root logins will be disabled, and root users can only log in if they have the corresponding SSH key.
PermitRootLogin prohibit-passwordTo prohibit root logins entirely, enter:
PermitRootLogin no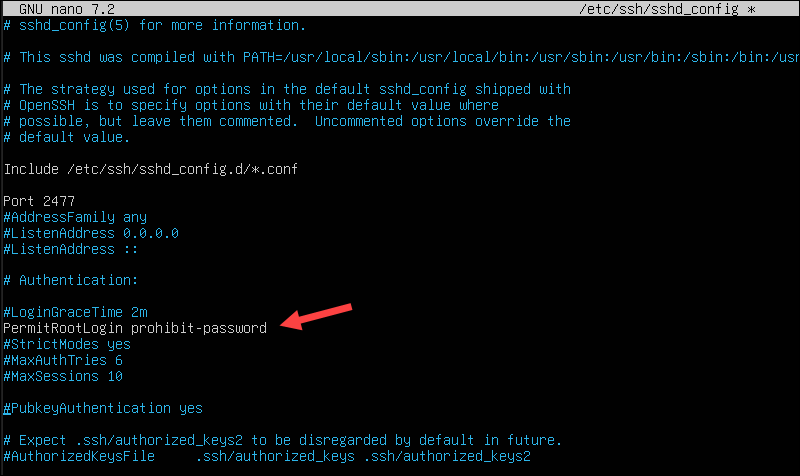
This setting forces users to log in with regular user accounts and elevate privileges with sudo. It provides maximum security but is slightly less flexible.
5. Press CTRL+X, then Y, followed by Enter to save the changes and exit the file.
6. Restart the SSH service to apply the changes with the following command:
sudo systemctl restart sshd.serviceThese are just a few basic steps to secure SSH connections. For even greater protection, explore our guide on Linux SSH security.
Set up a Firewall
A firewall monitors and controls incoming and outgoing traffic to and from the server. It is designed to protect systems from unauthorized access, particularly from untrusted external networks.
Most Linux distributions support firewall tools built on top of iptables or nftables. The table below lists recommended firewall tools for major Linux distributions, along with commands to install and enable them:
| Distribution | Recommended Tool | Install Command | Enable and Start Command |
|---|---|---|---|
| Ubuntu/Debian | ufw (Uncomplicated Firewall) | sudo apt install ufw | sudo ufw enable |
| RHEL/Rocky | firewalld | sudo dnf install firewalld | sudo systemctl enable --now firewalld |
| Fedora | firewalld | Preinstalled (usually) | sudo systemctl enable --now firewalld |
| Arch Linux | iptables or ufw | sudo pacman -S ufw or sudo pacman -S iptables | sudo systemctl enable --now ufw (or iptables) |
| openSUSE | firewalld | sudo zypper install firewalld | sudo systemctl enable --now firewalld |
| Alpine Linux | iptables | Built-in (via the iptables package) | Rules applied via /etc/network/interfaces |
Ubuntu Server ships with UFW preinstalled. To confirm the firewall is installed, run:
sudo ufw version
By default, UFW is disabled. When enabled, it denies all incoming connections to protect the server and allows all outgoing connections so the server can communicate with external services.
To view the firewall status and active rules, enter:
sudo ufw status verbose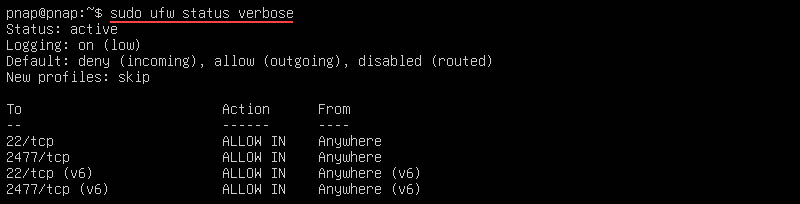
The output shows the status, default settings, and open ports.
Before enabling UFW, define which incoming connections are necessary for your server setup. For example, if the system uses IPv4 and IPv6, modify the UFW configuration file to support both protocols:
1. Open the default UFW configuration file:
sudo nano /etc/default/ufw2. Check the IPV6 value. If the value is no, change it to yes to enable IPv6 use.
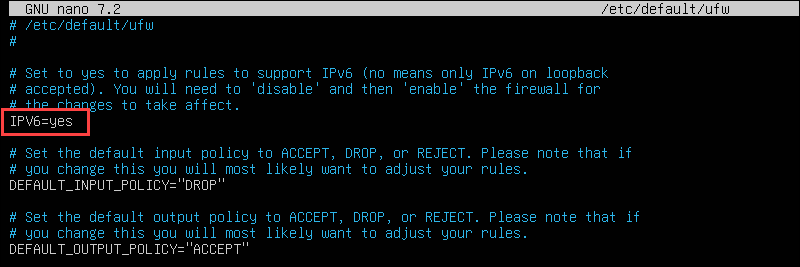
3. Save the changes and close the file.
4. Set up UFW to allow incoming SSH connections using the following command:
sudo ufw allow ssh
The command adds a rule for IPv4 (and IPv6 if enabled) to allow incoming and outgoing traffic from SSH connections.
5. Optionally, specify the custom port defined in the SSH section using the following command:
sudo ufw allow 2477/tcp6. After configuring the settings, enable the UFW firewall to apply the changes:
sudo ufw enable
The firewall is now active and will start automatically on boot. Continue customizing it to suit your needs with our guide on advanced UFW settings for Ubuntu.
Manage User Accounts and Permissions
Linux enforces access controls using a permission model built into the file system. Every file and directory has an owner, an associated group, and permissions for three user categories:
- User (u). The owner of the file or directory.
- Group (g). Other users in the owners group.
- Others (o). Everyone else on the system.
Each of these user categories can be granted the following permissions:
| Permission | Symbol | Description |
|---|---|---|
| Read | r | A user can view file contents or list directory contents. |
| Write | w | A user with write permissions can create, move, and delete files or directories, as well as modify or remove file contents. |
| Execute | x | Allows a user to run script/executable files or enter/traverse directories. |
Use the ls command to view permissions for a file or directory:
ls -lThe output displays a list of users and their permissions.
$ ls -l
total 17
-rw-r--r--  1 boss staff   2048 May 14 09:00 report.txt
-rw-rw----  1 boss staff   1024 May 13 16:30 draft.docx
-rwxr-xr-x  1 boss staff    512 May 12 14:12 run.sh
drwxr-xr-x  2 boss staff   4096 May 10 12:01 projects
drwx------  3 boss staff   4096 May 10 12:05 private
-rw-r--r--  1 root root    3072 May 11 11:11 system.conf
-rw-------  1 boss staff   5120 May 14 08:00 secrets.txt
lrwxrwxrwx  1 boss staff     14 May 10 13:00 shortcut -> /var/www/html
crw-rw-r--  1 root tty    4, 0  May 14 10:00 /dev/tty0
The first column, for example, -rw-r--r--, shows permissions for each file and directory:
- The owner
bosshas read and write permissionsrw-. - The group
staffhas read-only permissionsr--. - Everyone else has read-only permissions
r--.
When you install Ubuntu Server, the default user created typically has sudo privileges, which allow them to perform administrative tasks. Most Linux distributions use the same set of commands for managing users and file permissions.
The following table lists the most commonly used commands:
| Command | Function |
|---|---|
| adduser or useradd | Creates a new user. |
| usermod | Modifies user properties (e.g., add to group). |
| passwd | Sets or updates the user password. |
ls -l | Displays file permissions. |
| chmod | Changes file permissions. |
| chown | Changes the file owner and group. |
Enter the following command on your Ubuntu Server to create a non-root admin user:
sudo adduser newuserFollow the prompts to set a password and optional user details.
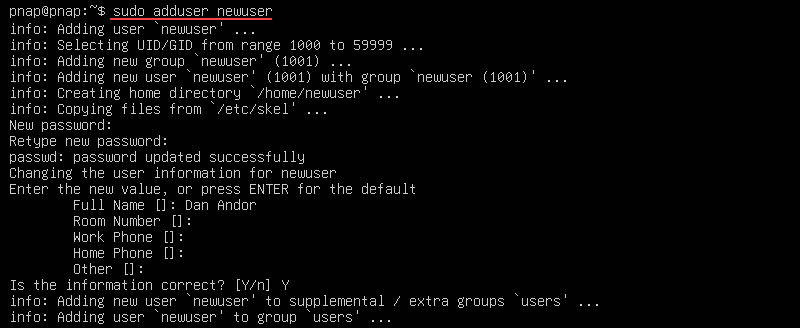
Next, add the new user to the sudo group:
sudo usermod -aG sudo newuserThis grants the user administrative privileges while keeping root access disabled.
Use the chmod command to change file permissions:
sudo chmod 755 filenameThe 755 permission gives the owner full access (read/write/execute) and read/execute access to the group and others.
The chown command changes the file owner and group:
sudo chown newuser:newuser filenameThis sets newuser as both the file owner and the group owner.
Install and Manage Software Packages
A package is a compressed archive that contains all the data and dependencies required to install a complete software application. This is the standard way to distribute software on Linux-based systems.
Linux distributions use package managers to install, remove, and update software packages. These tools automatically resolve dependencies and update package repositories to maintain consistency.
Each distribution has its default package manager:
| Distribution | Package Manager | Example Commands |
|---|---|---|
| Ubuntu/Debian | APT | sudo apt install nginx |
| RHEL/Fedora | DNF | sudo dnf install nginx |
| Arch Linux | Pacman | sudo pacman -S nginx |
| openSUSE | Zypper | sudo zypper install nginx |
| Alpine Linux | apk | sudo apk add nginx |
When using a package manager to install new software, it is recommended first to update the package list and upgrade existing packages:
sudo apt update && sudo apt upgrade -yThis ensures that your system always works with the latest available software versions.
One of the key benefits of a package manager is that you can install multiple tools or even entire software stacks with a single command:
Web Server (LAMP Stack):
sudo apt update && sudo apt install apache2 mysql-server php libapache2-mod-php php-mysql ufw -yDocker host:
sudo apt update && sudo apt install docker.io docker-compose git curl -yDeveloper workstation:
sudo apt update && sudo apt install build-essential git curl vim python3 python3-pip -y These setups are fully customizable, and package managers make adding new packages, tools, or language runtimes easy, while keeping everything compatible with your existing environment.
Server Monitoring and Management
System administrators must continuously monitor key server metrics. This includes memory usage, CPU load, hard disk activity, application performance, and network traffic to:
- Detect performance bottlenecks.
- Prevent unexpected outages.
- Identify unusual behavior or potential security intrusions.
- Plan for future resource scaling and capacity management.
Popular tools for system monitoring and management include:
| Tool | Purpose | Available On | Install Method |
|---|---|---|---|
| top | Real-time CPU/memory usage | All Linux systems | Preinstalled |
| htop | Enhanced top with color & UI | Debian, Ubuntu, Fedora, Arch | apt, dnf, pacman |
| glances | All-in-one system overview | Most major distros | Python-based (apt, dnf, pip) |
| vmstat | Memory and process statistics | All Linux systems | Usually preinstalled |
| iostat | CPU and I/O device stats | Most distros (via sysstat) | apt install sysstat |
| ss | Socket statistics (modern netstat) | All modern Linux systems | Preinstalled |
| dstat | Combined CPU, disk, and network usage | Debian, RHEL | apt, dnf |
| Netdata | Web-based real-time dashboard | All major Linux systems | Shell script installer or packages |
| Nagios | Enterprise-grade alerting and metrics | Debian, RHEL, SUSE | Manual install, package managers |
| Prometheus+Grafana | Metrics+Visualization | Cloud/server monitoring stacks | Manual or automated (Docker/K8s) |
A lightweight, terminal-based tool like htop is ideal for quick system diagnostics. In Ubuntu Server and many other Linux distributions, htop is often included by default.
You can launch the tool directly in the terminal using the following command:
htopThe interactive viewer displays real-time CPU, process, and memory usage.

When ready, press q to exit htop and return to the terminal. For a real-time, interactive dashboard for monitoring Linux server performance, look to modern tools like Prometheus/Grafana or Netdata.
Additional Linux Server Configurations (Optional)
Your Ubuntu Server 24.04 is secured, up-to-date, and ready for workload-specific roles such as web hosting, containers, or database services.
How to Set Up a Web Server
To convert your Linux server into a web server, you must install and configure the following core components:
- Web Server. Listens for HTTP/HTTPS requests and serves static and dynamic web content. Popular web server solutions include Apache, NGINX, and Lighttpd.
- Application Runtime. Executes server-side code for dynamic content. Examples include PHP, PHP-FPM, Node.js, and Python.
- Database Server. Stores and retrieves structured application data, such as content, user accounts, and settings. Common database servers include MariaDB, MySQL, PostgreSQL, and SQLite.
- SSL/TLS Tools. Secure web traffic by enabling HTTPS via digital SSL certificates. Tools like Certbot (Let's Encrypt) and OpenSSL are commonly used to manage these certificates on Linux systems.
Depending on the application architecture and runtime environment, you can install different technology stacks. For example:
| Stack | Web Server | Runtime | Database | Frontend | Use Case |
|---|---|---|---|---|---|
| LAMP | Apache | PHP (mod_php) | MySQL / MariaDB | HTML/CSS/JS | Classic PHP applications, a CMS like WordPress. |
| LEMP | NGINX | PHP-FPM | MySQL / MariaDB | HTML/CSS/JS | Efficient PHP apps with high concurrency |
| MEAN | NGINX/Node | Node.js + Express | MongoDB | Angular | Full JavaScript stack, SPAs |
| MERN | NGINX/Node | Node.js + Express | MongoDB | React | Full JS stack with React frontend |
| JumpStack | NGINX/Apache | PHP, Markdown tools | None or SQLite | HTML/CSS/JS | Lightweight static/dynamic content sites |
Install Web Server
This section provides a general overview with Ubuntu-specific commands for setting up a basic LAMP stack. Use the following command to install Apache, MariaDB, PHP, and Certbot:
sudo apt update && sudo apt install apache2 mariadb-server php libapache2-mod-php php-mysql certbot python3-certbot-apache -yAfter installing the core components, you must configure each to create a secure and functional web server.
Configure Web Server
Complete the steps in the following sections to configure the Apache web server.
Step 1: Configure Firewall
Use the UFW tool to allow web traffic to Apache:
sudo ufw allow 'Apache Full'This command enables both HTTP (port 80) and HTTPS (port 443) access to the Apache web server.

Verify the changes by checking the UFW status:
sudo ufw status
Step 2: Secure the Database
Execute the secure installation script to harden MariaDB (or MySQL):
sudo mysql_secure_installation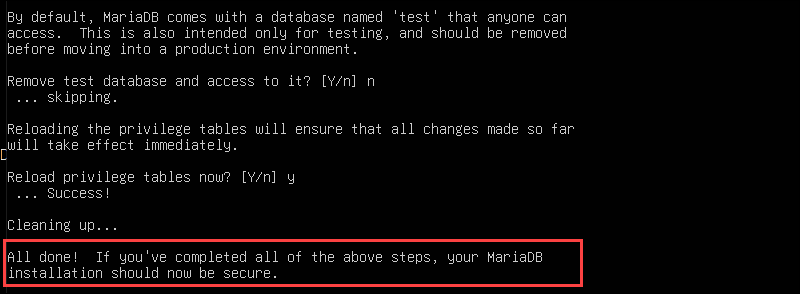
Answer the prompts to set a root password, remove test databases, and disallow remote root login.
Step 3: Deploy Your Website
Place your files in the default Apache web root at /var/www/html/:
sudo cp -r your_website/* /var/www/html/Set correct ownership and permissions to enable Apache to serve and manage files:
sudo chown -R www-data:www-data /var/www/htmlsudo chmod -R 755 /var/www/htmlIf you plan to host multiple domains on the web server, find out how to configure virtual hosts on Ubuntu.
Step 4: Enable HTTPS with Let's Encrypt (Recommended)
Use Certbot to install and configure your SSL certificate automatically:
sudo certbot --apacheFollow the interactive prompts to get a free SSL certificate.
Test Web Server
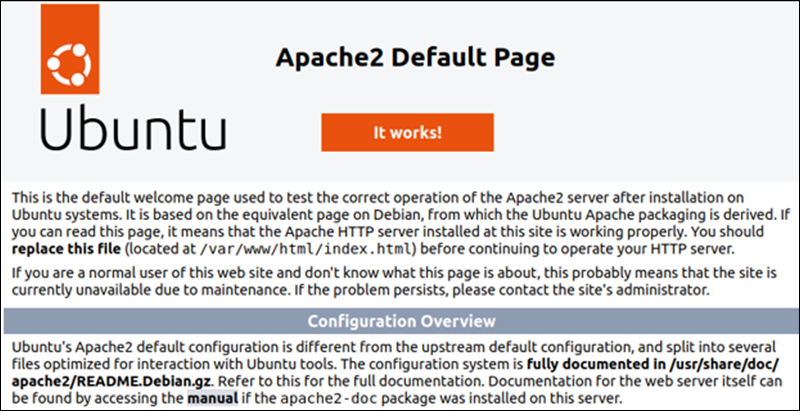
Open a web browser and enter the web server's IP in the address bar:
http://[local_server_ip]Replace [local_server_ip] with the IP address of your server. If you are unsure of the correct IP address, use the following command:
hostname -I | awk '{print $1}'The output returns your server's IP address. The browser opens the Apache2 Default Page.
You now have a functioning web server running on your Linux machine. From here, you can install content management systems like WordPress, build custom web apps, or host static sites.
Note: To help protect your server from intrusion and DDoS attacks, consider installing additional Apache modules such as mod_security and mod_evasive.
How to Set up a Database Server
To provision a dedicated database server on a Linux system, you must install and configure a database engine. A database engine stores, retrieves, and manages structured application data.
Popular engines include MariaDB, MySQL, PostgreSQL, and SQLite. There are several different types of databases designed to handle structured, semi-structured, and unstructured data. The choice of engine depends on the type of data your application processes and stores.
Install Database Server
Enter the following command to install the latest MariaDB database server:
sudo apt update && sudo apt install mariadb-server -yAfter installing MySQL, perform an initial security setup by executing the mysql_secure_installation script:
sudo mysql_secure_installationThe system prompts you to set the root password, disable root login, and remove test tables and users.
Note: MariaDB is a popular fork of MySQL, and the commands in this article largely apply to MySQL as well. See this guide for detailed instructions for installing MySQL on Ubuntu.
Configure Database Server
Complete these additional steps to create a functional database server:
Step 1: Start and Enable MariaDB
The following command enables MariaDB and ensures it starts automatically every time the system reboots:
sudo systemctl enable --now mariadbConfirm that the service is running:
sudo systemctl status mariadb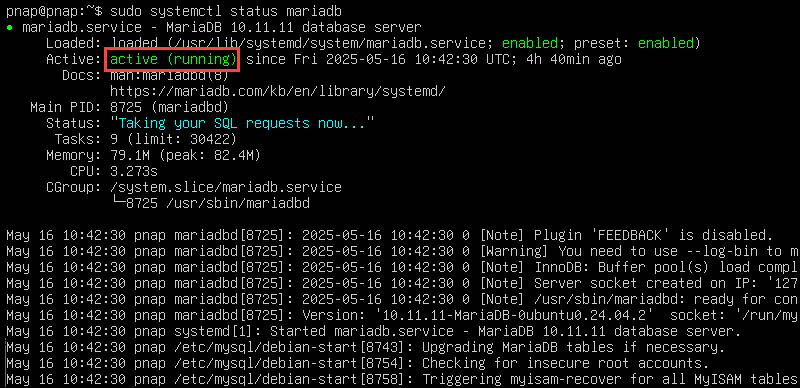
Step 2: Create New Database and User
Access the MariaDB shell:
sudo mariadbInside the prompt, run the following SQL commands:
CREATE DATABASE myapp_db;
CREATE USER 'youruser'@'localhost' IDENTIFIED BY 'yourpass';
GRANT ALL PRIVILEGES ON myapp_db.* TO 'youruser'@'localhost';
FLUSH PRIVILEGES;
EXIT;
Replace youruser and yourpass placeholders with your desired username and password.
Note: MariaDB supports multiple user permission levels. Find out how to set up different types of users in MariaDB.
Step 3: Allow Remote Access (Optional)
To allow external connections, edit the server's /etc/mysql/mariadb.conf.d/50-server.cnf file.
1. Open the configuration file:
sudo nano /etc/mysql/mariadb.conf.d/50-server.cnf2. Find the following line:
bind-address = 127.0.0.13. Change the line to:
bind-address = 0.0.0.0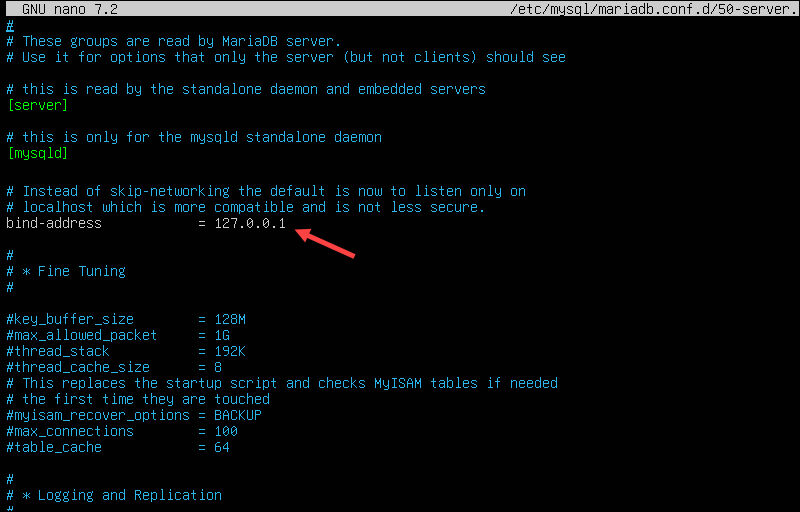
4. Press CTRL+X, then y, followed by Enter to save the changes and close the file.
5. Open port 3306 in UFW:
sudo ufw allow 3306/tcp6. Restart the MariaDB service:
sudo systemctl restart mariadbEnsure access is limited to trusted IPs and that strong passwords or SSL/TLS are used.
Test Database Server
To confirm the database is functional, access it as root:
sudo mysql -u root -pTo check if the database and user were created, type:
SHOW DATABASES;SELECT User, Host FROM mysql.user;The test a remote connection (if enabled), enter:
mysql -u youruser -p -h your_server_ipReplace youruser with the database username and your_server_ip with your server's IP address.
You now have a fully functional database server. Applications and web servers can now connect to it for data storage and access.
How to Use and Manage a Linux Server
Linux has a wide range of beginner-friendly utilities to help users interact with and administer servers. The following section introduces frequently used tools and commands.
How to Log into a Remote Linux Server
The most common way to access a remote Linux server is via SSH (Secure Shell).
Step 1: Install SSH Client and Server
To use SSH, you must install the necessary packages on both the client and server machines. OpenSSH, discussed in an earlier section, includes both the client and server components.
- The server machine, the one you are connecting to, needs openssh-server.
- The client machine, the one you are connecting from, needs openssh-client.
If OpenSSH is not installed, use the corresponding command for your distribution:
| Distribution | Command to Install SSH Client and Server |
|---|---|
| Debian/Ubuntu | sudo apt install openssh-client openssh-server |
| RHEL/Fedora | sudo dnf install openssh-clients openssh-server |
| Arch Linux | sudo pacman -S openssh |
| openSUSE | sudo zypper install openssh |
| Alpine Linux | sudo apk add openssh-client openssh |
The SSH service (sshd) starts automatically after installation. To confirm it is active, enter the following command:
sudo systemctl status sshdNote: On some systems, the name of the service is ssh instead of sshd. If that is the case, replace sshd with ssh in the commands.
Step 2: Connect to Remote Server via SSH
After installing and setting up the SSH client and server on both machines:
1. Establish a secure remote connection using the SSH command:
ssh [username]@[host_ip_address]Note: If you changed the default port on the remote server (e.g., 2477), specify it using the -p flag.
Replace [username] with your actual Linux username and [host_ip_address] with the IP address of the remote server. If the username is the same on both machines, you can omit it from the command:
ssh host_ip_address2. When connecting to the server for the first time, the following message appears:
The authenticity of host '192.168.1.10' can't be established.
ECDSA key fingerprint is SHA256:...
Are you sure you want to continue connecting (yes/no)?
3. Type yes and press Enter to trust the server and save its key to your local system.
4. Provide the password when prompted (characters do not appear as you type) and press Enter.
Note: If SSH responds with a Connection refused message, refer to the How to Fix The SSH "Connection Refused" Error article for possible solutions.
How to Transfer Files to/from a Linux Server
Rsync is a free command-line utility for transferring files and directories both locally and between local and remote systems. It is preinstalled on most modern Linux distributions.
Use the command for your distribution to verify the installation or install rsync:
| Distribution | Command to Install SSH Client and Server |
|---|---|
| Debian/Ubuntu | sudo apt install rsync |
| RHEL/Fedora | sudo dnf install rsync |
| Arch Linux | sudo pacman -S rsync |
| openSUSE | sudo zypper install rsync |
| Alpine Linux | sudo apk add rsync |
When performing remote data transfers, you must specify the address of the remote host. Use the following syntax to upload local files and directories to a remote server:
rsync [OPTION] [SOURCE] [USERNAME]@[HOSTNAME_OR_IP]:[DESTINATION]You can also download files and directories from a remote system to your local machine:
rsync [OPTION] [USERNAME]@[HOSTNAME_OR_IP]:[SOURCE] [DESTINATION]Rsync is a versatile synchronization tool that can be customized for specific use cases. The -a option enables archive mode (preserving symbolic links, permissions, timestamps, etc.) and -v enables verbose output.
The following examples cover the most common scenarios.
| Description | Command |
|---|---|
| Upload a file to a remote server. | rsync -av /home/user/file.txt user@192.168.1.10:/home/user/remote/ |
| Upload a directory to a remote server. | rsync -av /home/user/project user@192.168.1.10:/home/user/remote/ |
| Upload as a different user. | rsync -av /home/user/test_project test@192.168.1.10:/home/test/remote/ |
| Upload multiple local directories. | rsync -av /dir1 /dir2 user@192.168.1.10:/home/user/remote/ |
| Download a file from a remote server. | rsync -av user@192.168.1.10:/home/user/file.txt /home/user/local/ |
| Download a directory from a remote server. | rsync -av user@192.168.1.10:/home/user/project /home/user/local/ |
| Download multiple remote directories. | rsync -av user@192.168.1.10:{/dir1,/dir2} /home/user/local/ |
| Use rsync over SSH | rsync -av -e ssh /home/user/file.txt user@192.168.1.10:/home/user/remote/ |
How to Schedule Tasks on Linux Server
Updating software, creating backups, or clearing caches are essential server management tasks. Linux provides a built-in utility for automating these tasks, called cron.
The cron utility reads the crontab (cron table) file and executes scheduled commands or scripts at specified times and intervals. A cron job line in a crontab file must follow this format:
MIN HOUR DOM MON DOW CMD| Field | Description | Example Value |
|---|---|---|
| MIN | Minute (0–59) | 0 |
| HOUR | Hour (0–23) | 9 |
| DOM | Day of Month (1–31) | 1 |
| MON | Month (1–12) | 1 (January) |
| DOW | Day of Week (0–7, Sun=0) | * (any day) |
| CMD | Command or script to run (script must be executable) | /path/to/script.sh |
For example, the following line prompts Cron to execute a script on January 1st at 9 AM:
0 9 1 1 * /path/to/your_script.shThe asterisk (*) wildcard in the DOW field instructs Cron to run the job regardless of the day of the week. For a more detailed explanation of wildcards and scheduling syntax, refer to our complete guide on cron expressions.
Other examples of cron jobs include:
| Task | Schedule | Crontab Line |
|---|---|---|
| Run a backup script every day at 2 AM | Daily | 0 2 * * * /home/user/scripts/backup.sh |
| Clear temp files every Sunday night | Weekly | 0 23 * * 0 rm -rf /tmp/* |
| Run a system update on the 1st of every month | Monthly | 0 4 1 * * apt update && apt upgrade -y |
To view the current user's scheduled cron jobs, enter:
crontab -lTo edit the crontab file:
crontab -eThis opens crontab in the system's default text editor, where you can add, remove, or change scheduled tasks.
To remove your crontab and all scheduled jobs, enter:
crontab -rUse this command with caution as it permanently deletes all cron jobs for the current user.
You can combine cron with session management tools like Byobu to monitor logs or watch script output in real-time.
How to Manage Terminal Sessions in Linux
Administrators often need to manage multiple terminal sessions from a single interface. This is especially useful for server administration, scripting, or working over SSH connections. If the session drops or you need to step away, the tasks keep running in the background.
Terminal multiplexers like Byobu, tmux, and screen allow you to:
- Run multiple terminal sessions within a single SSH connection.
- Split the terminal into resizable horizontal and vertical panes.
- Keep tasks running even if your session disconnects.
- Detach and reattach to sessions without losing state.
The table lists commonly used commands and shortcuts for Byobu, tmux, and screen:
| Function | Byobu | tmux | screen |
|---|---|---|---|
| Start a session. | byobu | tmux | screen |
| Detach a session. | Ctrl+A, then D (or byobu detach) | Ctrl+B, then D | Ctrl+A, then D |
| Reattach a session. | byobu attach | tmux attach | screen -r |
| Create a new window. | Ctrl+A, then C | Ctrl+B, then C | Ctrl+A, then C |
| Next window. | Ctrl+A, then N | Ctrl+B, then N | Ctrl+A, then N |
| Previous window. | Ctrl+A, then P | Ctrl+B, then P | Ctrl+A, then P |
| Horizontal split. | Ctrl+A, then Shift+S | Ctrl+B, then " (double quote) | No built-in split support |
| Vertical split. | Ctrl+A, then ` (backtick) | ` (backtick) | Ctrl+B, then % |
| Move between panes. | Ctrl+A, then arrow keys | Ctrl+B, then arrow keys | Not applicable |
| Close the current window/pane. | exit | exit or Ctrl+D | exit or Ctrl+D |
Byobu is preinstalled on Ubuntu Server. It is built on top of tmux or screen and offers a slightly more user-friendly interface.
It’s a good choice for beginners, as its keybindings are somewhat simpler than those of the other two multiplexers.
Basic Linux Commands
Some of the first linux commands you will start using include:
| Command | Description |
|---|---|
| ls | List files and directories in the current location. |
| cd | Change the current directory. |
| pwd | Print the current working directory. |
| cp | Copy files or directories. |
| mv | Move or rename a file or directory. |
| rm | Delete files or directories. |
| mkdir | Create a new directory. |
| touch | Create an empty file or update the timestamp. |
| cat | Display the content of a file. |
| less | View the file content one screen at a time. |
| head | Show the first few lines of a file. |
| tail | Show the last few lines of a file. |
| echo | Print text or variables to the terminal. |
| grep | Search for patterns in text. |
| find | Search for files and directories recursively. |
| chmod | Change file or directory permissions. |
| chown | Change file or directory ownership. |
| df | Show disk space usage. |
| du | Show file/directory size. |
| top | Real-time view of system processes and resource usage. |
| htop | Enhanced version of top with a user-friendly interface |
| ps | List running processes. |
| kill | Send a signal to a process (often to terminate it). |
| sudo | Run a command with superuser (admin) privileges. |
| apt | Manage packages on Debian-based systems. |
| dnf | Manage packages on RHEL/Fedora systems. |
| pacman | Manage packages on Arch-based systems. |
| wget | Download files from the internet. |
| curl | Transfer data to/from URLs (supports multiple protocols). |
| man | Display the manual for a command. |
| history | Show previously run commands. |
Conclusion
You have installed and set up a Linux server and learned the most commonly used Linux commands for managing files, users, software, and the system itself.
If you are new to the terminal, check out our complete Linux command guide. The guide comes with a downloadable cheat sheet to help you start using the command line with more confidence.