The chmod (change mode) command modifies file and directory permissions in Linux. It sets who can read, write, or execute a file or search a directory, based on defined permission rules.
Every file and directory in Linux has three types of permissions: read (r), write (w), and execute (x), assigned to three categories of users: owner, group, and others. The chmod command changes these permissions using either symbols or numbers to control access.
This tutorial will explain how chmod works, its syntax, options, modes, and how to use the tool.
Prerequisites
- Linux system.
- Access to the terminal.
- User account with sudo or root permissions (in some cases).
chmod Command Syntax
The chmod command syntax is:
chmod [options] [mode] [file_or_directory]The syntax consists of:
[options]. Flags that change howchmodoperates.[mode]. The permission settings to apply. Use a symbolic or numeric value.[file_or_directory]. The target file or directory whose permissions you want to change.
The chmod command cannot run on its own. It needs at least one argument, which is a mode (symbolic or numeric) and a target file or directory.
chmod Command Options
The chmod command includes several options that modify how permissions are applied to files and directories. The table below lists the most common options used with chmod:
| Option | Description |
|---|---|
-R | Applies permission changes recursively to all files and subdirectories. |
-v | Outputs a diagnostic message, but only for files that were changed. |
-c | Outputs a diagnostic message but only for files that were changed. |
-f | Suppresses most error messages. |
--reference=RFILE | Sets permissions to match those of a reference file. |
--no-preserve-root | Allows recursive changes on the root directory (/) if explicitly specified. |
--preserve-root | The default behavior, which prevents recursive operations on /. |
--help | Displays help information for the command. |
--version | Shows the version of chmod. |
chmod Command Modes
Another chmod command part is the mode, which defines the permissions to apply. Modes are specified using either symbolic or numeric notation.
The following table explains the symbols and values used in both notations:
| Symbol | Meaning | Numeric Value | Binary |
|---|---|---|---|
u | User (file owner) | – | – |
g | Group | – | – |
o | Others | – | – |
a | All (user, group, others) | – | – |
r | Read permission | 4 | 100 |
w | Write permission | 2 | 010 |
x | Execute/search permission | 1 | 001 |
- | No permission | 0 | 000 |
= | Set exact permissions | – | – |
+ | Add permission | – | – |
- | Remove permission | – | – |
rwx | Full permission | 7 | 111 |
rw- | Read and write | 6 | 110 |
r-x | Read and execute | 5 | 101 |
r-- | Read only | 4 | 100 |
| -wx | Write and execute | 3 | 011 |
-w- | Write only | 2 | 010 |
--x | Execute only | 1 | 001 |
--- | No permissions | 0 | 000 |
The table below shows common symbolic modes, their numeric equivalents, and what they mean in terms of access:
| Symbolic Mode | Numeric Equivalent | Description |
|---|---|---|
u=rwx,go=rx | 755 | The owner can read and write; the group and others can only read. |
u=rw,go=r | 644 | The user has full access; the group and others have no permissions. |
u=rwx,go= | 700 | The owner can read and write; the group and others have no permissions. |
u=rw,go= | 600 | All users have read and write permissions. |
u=r,go=r | 444 | Everyone has read-only access. |
a=rwx | 777 | All users have full permissions. |
a=rw | 666 | The file owner gets execute permission. |
a=r | 444 | Everyone has read-only permissions. |
u+x | — | All users receive read and write permissions. |
go-w | — | Group and others lose write permission. |
a+rw | — | Sets the setuid bit (the file runs with the owner's privileges). |
o=r | — | Others can only read. All other permissions removed. |
g=u | — | Sets group permissions to match user permissions. |
u+s | 4### | Assigns the setuid bit (file runs with owner's privileges). |
g+s | 2### | Sets the setgid bit (executes with group privileges). |
+t | 1### | Enables the sticky bit (only file owners can delete/rename). |
Note: For setuid, setgid, and sticky bit modes, replace
###with the usual three-digit permission. For example,4755,2755, or1777.
chmod Examples
The chmod command allows users to change permissions for files and directories. By setting specific permissions, you control who can read, write, or execute a file.
To show the practical chmod command usage, create sample files and directories. Take the following steps:
1. Use touch to create three files called file1, file2, and file3:
touch file1 file2 file3The command has no output but creates these files in the Home directory.
2. Run mkdir to create two directories: dir2 and dir2.
mkdir dir1 dir2The command also produces no output. However, it creates two directories.
Verify these files and directories exist with the ls command:
ls
The output shows all three files (in white) and two directories (in blue) created in the Home directory.
3. Create file4 and file5 inside those directories:
touch dir1/file4 dir2/file54. Verify file and directory permissions with the ls -l command. The general output looks like this:
[file_type] [permission_type] [number_of_inks] [owner] [group] [file_size] [date] [file_name]The output covers:
[file_type]. Represents the type of the file or directory. It can be-for regular files,dfor directories,lfor symbolic links,cfor character device files,bfor block device files,sfor socket files, orpfor named pipes.[permission_type]. Indicates the read (r), write (w), and execute (x) permissions for the owner, group, and others. These permissions are represented by three sets of characters (e.g.,rwx), where each set corresponds to the permissions for the owner, group, and others, respectively.[number_of_inks]. Shows the number of hard links for the file.[owner]. Shows the user who owns the file.[group]. Shows the group associated with the file.[file_size]. Represents file size in bytes.[date]. Shows the last modification date.[file_name]. Prints the name of the file or directory.
In this example, run:
ls -l file1 file2 file3 dir1/file4 dir2/file5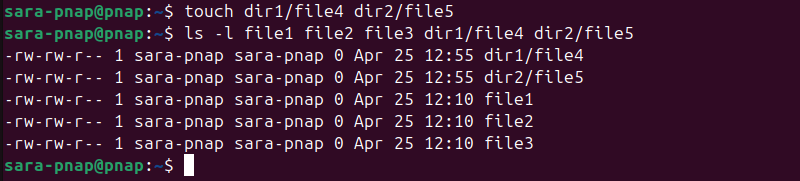
In this case, the output shows all regular files and directories have read and write permissions for the owner and the group and read-only permissions for others. It also shows that the number of hard links is one and that the size of said files is zero.
The date, file, and directory names are also visible.
The following text covers common chmod usage examples and explains how symbolic and numeric modes work in practice.
Symbolic Mode Examples
Symbolic mode is useful for specifying permissions for the user (owner), group, and others using symbolic letters and operators (+, -, =). For example, use chmod in symbolic mode to:
- Grant execute permission to the file owner:
chmod u+x file1This command adds execute permission for the user (file owner) of file1. There is no output. Therefore, verify the change with:
ls -l file1
The output shows the owner now has execute permissions (x), in addition to read and write permissions, as opposed to the original setup (rw).
- Remove write permission for the group:
chmod g-w file2This removes the write permission for the group on file2, leaving other permissions intact.
To verify, run:
ls -l file2
The output indicates the group is missing write permissions (w) and has only read permissions.
- Grant read and write permissions to others:
chmod o=rw file3This grants read and write permissions to others while leaving the owner's and group's permissions unchanged.
Verify with:
ls -l file3
The output shows the rw- in the others' permissions field.
- Set permissions for the owner and group, adding multiple permissions.:
chmod u=rw,go=r file1The command sets read and write permissions for the owner and read-only permissions for the group and others
To verify, run this command:
ls -l file1
The output shows rw-r--r-- for the set permissions.
Numeric Mode Examples
Numeric mode (also known as octal mode) allows you to set permissions using numbers instead of symbols. Each digit represents a specific permission setting for the user, group, and others.
Use numeric mode to:
- Set file1 to be readable and writable by the owner (6), and readable by the group and others (4). Use the following:
chmod 644 file1Verify with:
ls -l file1
The result shows -rw-r--r--.
- Set permissions recursively for a directory. This is useful when you need to apply permission changes not just to a single file but to a directory and all its contents. For example, run:
chmod -R 755 dir1This command recursively applies 755 permissions to all files and directories within dir1. In this case, the owner gets full access (rwx), while the group and others get read and execute permissions (r-x).
Verify with:
ls -lR dir1
The output shows the updated permissions for all files and directories within dir1.
Special Permission Example
Special permissions, like the Set-User-ID (SUID) and Set-Group-ID (SGID) bits, allow a file to be executed with the permissions of the file's owner or group, rather than the permissions of the user running the command. These permissions are mainly used to enhance security and control access to certain system resources.
The following example shows how to set the Set-User-ID (SUID) Bit. SUID allows a file to be executed with the file owner's privileges, even if the user executing the file does not have those permissions.
This is often useful for files that require elevated privileges. For example, run the following:
sudo chmod u+s /usr/local/bin/my_test_fileThis command affects /usr/local/bin/my_test_file, a file that requires elevated permissions. Therefore, sudo is used. The command grants execute permissions with the file owner's privileges (usually root). Therefore, when a user accesses the file, they do so with root privileges, even if they are not the root user.
To verify the SUID has been set, run:
ls -l /usr/local/bin/my_test_file
The output verifies the file in question exists, requires root permissions, and provides a complete set of instructions for setting the SUID bit.
To reverse the SUID bit settings, run:
chmod u-s /usr/local/bin/my_test_fileThis command removes the special permission, ensuring the file no longer runs with the file owner's privileges.
Conclusion
This tutorial explained the chmod command and how it works. It also touched upon its syntax, options, and modes. The text also described different use case examples for the chmod command.
Next, learn about the chown and chown recursive commands to change the ownership of a file or directory. Unlike chmod, which modifies file permissions, chown focuses on changing the ownership of a file or directory.