In Linux, every file is associated with an owning user or group. The chown command allows users to change the ownership of a file, directory, or link. Configuring file and directory permissions is crucial to ensure system security and prevent unauthorized access or modifications.
In this tutorial, learn how to use the Linux chown command using the provided examples.
Prerequisites
- A Linux or UNIX-like system.
- Access to a terminal/command line.
- A user with root privileges to change the ownership.
Note: Learn more about Linux permissions to fully understand the purpose of chown.
chown Command Syntax
The basic chown command syntax is:
chown [OPTIONS] USER[:GROUP] FILE[OPTIONS]– Additional options that provide extra control over howchownworks.[USER]– The username or the numeric user ID of the new file owner.[:]– Used when changing the file group.[GROUP]– The group ownership of a file.FILE– The target file or files.
The chown command requires superuser permissions and requires at least one argument - the new owner (or user and group) and the target file or directory. The additional options are described in the section below.
chown Command Options
The options modify how the chown command changes file and directory ownership, allowing control over recursive operations, symbolic link handling, and error suppression.
The following table shows the most common chown options and their descriptions:
| Option | Description |
|---|---|
-f | Suppresses all error messages except for essential usage messages. If chown encounters an error (e.g., an inaccessible file), it does not print the error message, but it continues to process other files. |
-h | Modifies the ownership of a symbolic link rather than the target file or directory the link points to. This is useful when you want to change the ownership of a link without affecting the destination. |
--reference=RFILE | Uses the specified reference file's (RFILE) owner and group rather than specifying the owner and group values. |
--from=OWNER:GROUP | Changes ownership only if the file currently has the specified owner and group. The option ensures that ownership is updated only when the existing ownership matches the given values. This is useful for selective ownership changes where multiple users or groups might have access. |
-H | When used with -R (recursive), it changes ownership of directories referenced by symbolic links on the command line and applies the change to all files inside those directories. This flag does not affect symbolic links encountered during directory traversal. |
-L | When used with -R, it follows symbolic links to directories during recursive traversal. It changes the ownership of the directories and all files beneath them by following symbolic links. |
-P | When used with -R, it changes ownership of symbolic links without following them. This prevents chown from modifying files or directories pointed to by the symbolic links. |
-R | Recursively changes ownership of all files and directories beneath a specified directory. It processes each file or directory it encounters but does not follow symbolic links unless combined with -h, -H, -L, or -P. This option is crucial for applying ownership changes to entire directory trees. |
Note: Learn more about symbolic links in Linux, including how to create them.
Refer to the sections below for hands-on examples of using the chown command.
chown Examples
Before using chown to change ownership of a file or directory, you need to know the original file owner or group. The easiest way to check ownership is to use the ls command.
To check the group or ownership of Linux files and directories in the current location, run the following command:
ls -lAn example output of the ls command looks like this:

The output lists three files and the following details:
- File permissions. The first column indicates the file permissions for each file.
- Owner and group. The second and third columns denote the file owner and group. In the example above, all files are owned by
bosko(user) and belong to theboskogroup. - File size. The fourth column denotes the file size.
- Last modified date. The fifth column shows the last modified date.
After you learn the file owner and group, you can use chown to change it if necessary.
Change File Owner
Changing the owner of a file with chown requires you to specify the new owner and the file. The syntax for changing the file owner is:
sudo chown [new_user] FILEFor example, the following command changes the ownership of the example.txt file from the user bosko to the user root:
sudo chown root example.txt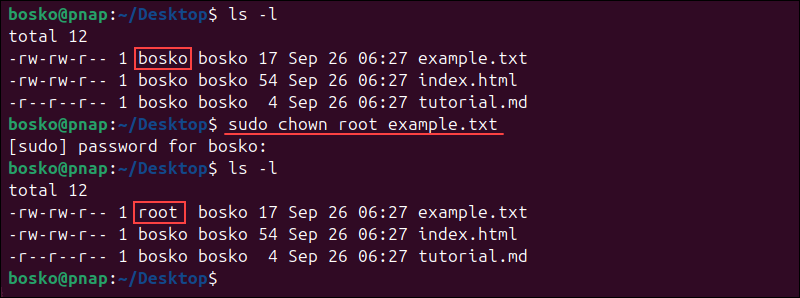
Use the same syntax to change the ownership for files and directories. You can also specify multiple files separated by a space.
Change File Owner with UID
Instead of a username, you can specify a user ID to change the ownership of a file. For example:
sudo chown 1000 example.txtTo check a user's ID, run the following command in the terminal:
id -u [USERNAME]
Important: Make sure there is no user with the same name as the numeric UID. If there is, chown gives priority to the username, not the UID.
Change Ownership of Multiple Linux Files
List the target file names after the new user argument to change the ownership for multiple files. Use single spaces between the file names.
In the following example, the root user will be the new owner of files sample2 and sample3.
sudo chown root sample2 sample3Combine file names and directory names to change their ownership with one command. For example:
sudo chown root sample3 Dir1Do not forget that the commands are case-sensitive.
Note: The chown command can be used with wildcard characters, such as *, to change the ownership of multiple files that share a similar naming pattern. For example, the command chown root sample* changes the ownership of all files in the current directory that begin with "sample" (e.g., sample1.txt, sample2.md, etc.). This can save time when applying changes to a group of files with a common prefix or pattern.
Change File Group
Use chown to change a group for a file or directory without changing the owning user. The result is the same as using the chgrp command.
Run the chown command using the colon and a group name:
sudo chown :NewGroup FILEThe following example changes the group of the example.txt file from bosko to grouptest.
sudo chown :grouptest example.txt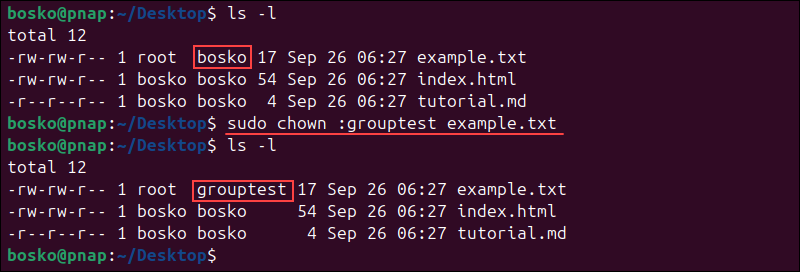
List multiple names of files or directories to make bulk changes.
Change File Group Using GID
Similar to user ID (UID), use a group ID (GID) instead of a group name to change the group of a file.
For example:
sudo chown :1003 example.txtChange Owner and the Group
To assign a new owner and owning group of a file at the same time, run the chown command in this format:
sudo chown NewUser:NewGroup FILETherefore, to set root as the new owner and grouptest as the new group of the file index.html, run:
sudo chown root:grouptest index.html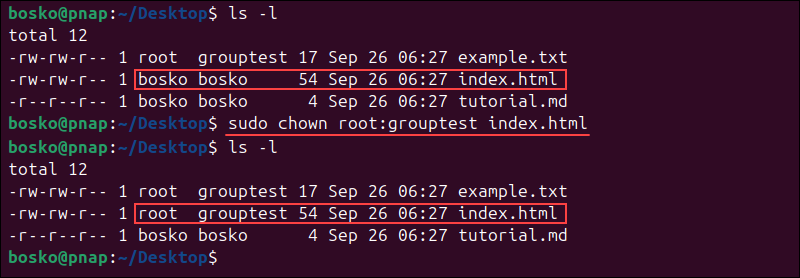
Remember that there are no spaces before or after the colon.
Change Group to a User's Login Group
The chown command assigns the owner's login group to the file when no group is specified. A login group is the default group assigned to a user when they log in, and, by default, it has the same name as their username.
To change the group, define a new user followed by a colon, space, and the target file:
sudo chown NewUser: FILEThe following example changes the group ownership of the sample.txt file to the login group of linuxuser:
sudo chown linuxuser: sample.txtTransfer Ownership and Group Settings from One File to Another
Rather than changing the ownership to a specific user, you can use the owner and a group of a referenced file. Add the --reference option to the chown command to copy the settings from one file to another.
The syntax is:
sudo chown --reference=RFILE FILEFor example:
sudo chown --reference=tutorial.md index.html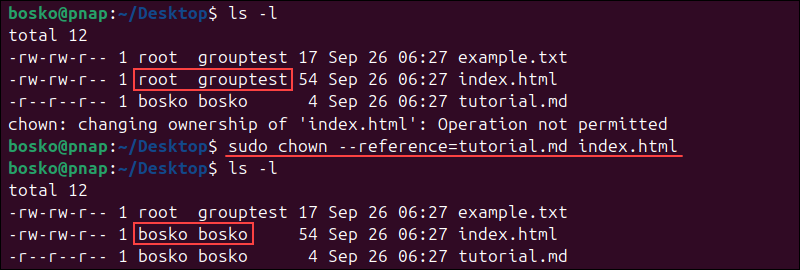
The example above shows that chown uses the tutorial.md file as a reference and adjusts the index.html file's owner and group to match the ones of the reference file.
Check Owner and Group Before Making Changes
The --from option lets you verify the current owner and group and then apply changes. The syntax for checking the user and group and then changing them is:
sudo chown --from=CurrentUser:CurrentGroup NewUser:NewGroup FILEThe example below shows we first verified the ownership and the group of the file sample:
sudo chown --from=root:group2 linuxuser:grouptest sampleThen chown changed the owner to linuxuser and the group to grouptest.
Check Owner Only
The --from option can be used to validate only the current user of a file.
sudo chown --from=CurrentUser NewUser FILEFor example:
sudo chown --from=root linuxuser sampleCheck Group Only
Similar to the previous example, you can validate only the group of a file using the --from option:
sudo chown --from=:CurrentGroup :NewGroup FILEIn the example below, we verify the current group before changing it:
sudo chown --from=:group3 :group4 FILERemember to use the colon for both group names to avoid error messages.
Recursively Change File Ownership
The chown command allows changing the ownership of all files and subdirectories within a specified directory. Add the -R option to the command to do so:
sudo chown -R NewUser:NewGroup DirNameOrPathIn the following example, we will recursively change the owner and the group for all files and directories in Dir1.
sudo chown -R linuxuser:group3 Dir1Change Symbolic Link Owner
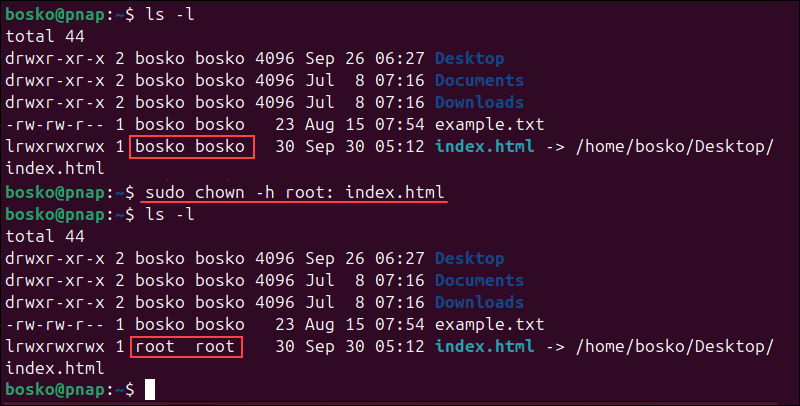
To change the ownership and group of a symbolic link in Linux, use the chown command with the -h option. The -h option ensures that the ownership and group of the symbolic link itself are changed, not the target file it points to.
The syntax is:
sudo chown -h NewUser:NewGroup SymLinkIn the following example, we change the owner and the group of a symbolic link to root, and the root user's login group:
Display chown Command Process Details
By default, the terminal does not display the chown process details. To see what happens under the hood, use one of the two command line flags:
- The
-voption. Outputs the process details even when the ownership stays the same. - The
-coption. Displays the output information only when the owner or group of the target file changes.
For example, if you specify the current owner as a new owner of the file:
chown -v bosko index.htmlThe terminal produces the following output:

Switch from -v to -c and there will be no messages in this case. This happens because there are no owner or group changes.
The information is particularly useful with the chown recursive option, allowing you to see the changes that took place:

In this example, the output lists all objects affected after running the command.
Suppress Chown Command Errors
To avoid seeing potential error messages when running the chown command, use the -f option. The syntax is:
sudo chown -f NewUser FILEThe example below shows the error message for a non-existent file or directory:

Adding the -f flag suppresses most error messages. However, if you specify an invalid username, the error message appears:

Note: To manage file and directory permissions beyond just ownership, learn how to use the chmod command.
Conclusion
The guide showed you how to use chown command in Linux to change a file's user and/or group ownership. Take extra caution when changing the group or ownership of a file or directory, as it affects who can access and make changes to it.
Next, see how to create a file in Linux or copy files and directories in Linux.

