In Linux, permissions control who can read, write, or execute files and directories. Each file has an owner, a group, and a set of permission flags that define access for the owner, the group, and other users.
The chown command allows users to change the ownership of files or directories. When used with the -R (--recursive) option, chown applies the ownership change to the specified directory but also to all files and subdirectories within it, ensuring consistent ownership across an entire directory tree.
In this tutorial, you will learn to use the chown command recursively.
Prerequisites
- A system running Linux.
- A user account with root privileges.
What Is chown Command?
The chown command is a core Unix utility that allows users to change a file's or directory's metadata -specifically, their ownership attributes. Every file and directory in Linux has two ownership types:
- User ownership. The user account that owns the file.
- Group ownership. The group associated with the file.
The ownership information is stored as a numeric user ID (UID) and group ID (GID) in the file's inode. The inode is a low-level data structure used by the filesystem. The chown command interacts directly with the inode data to change the UID and/or GID associated with a file or directory.
Note: Only the root user (or a user with appropriate capabilities) can change the ownership of a file to someone else. Regular users cannot give away their files or change the ownership arbitrarily.
Why Use Chown Recursive?
Chown recursive is a term for using the chown command with the -R (--recursive) option. Here, recursive means that chown will traverse the entire directory structure, starting from the specified path, and apply the ownership change to every file and directory it encounters.
During this process, chown:
1. Calls the lstat() system function on each file and subdirectory to get inode info.
2. Uses the chown() syscall to change the UID/GID for each item.
Chown recursive is useful in various situations, including:
- Fixing ownership after copying files as root or another user.
- Transferring directory ownership to another user or team.
- Automating permission corrections in scripts to set proper ownership for logs, configs, caches, etc.
- Restoring ownership during recovery or after restoring backups.
Important: Using the recursive option on the wrong directory (like / or /etc) could break your system. Always double-check the path and use ls -l to inspect before specifying the -R option.
chown Recursive Syntax
The syntax for chown recursive is:
chown -R [OWNER][:GROUP] [FILE or DIRECTORY PATH]In the syntax:
[OWNER]is the username or UID of the new owner.:is the separator between owner and group. Required if you also specify a group.[GROUP]is optional and it is the group name or GID to assign.[FILE or DIRECTORY PATH]is the target file or directory to change the ownership on.
Note: If you omit the group, only the owner is changed. If you include a colon but leave the group blank, the group is set to the owner's default group.
How to Use chown Recursive
We will demonstrate how to use chown recursive through practical examples in Ubuntu. The syntax and usage apply to the GNU coreutils implementation of chown. BSD/macOS variants differ slightly, so if you are using one of these operating systems, run man chown for detailed information.
Change Ownership
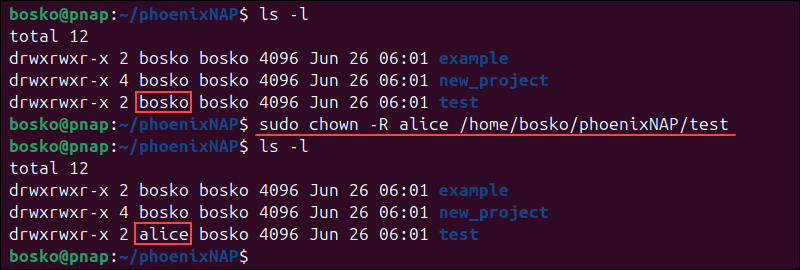
To recursively change the user ownership of a directory and everything inside it, use chown with the -R (--recursive) flag. This feature is useful when transferring full ownership of a folder tree, like handing over a project directory to a different user.
For example:
sudo chown -R alice /path/to/directoryThe command recursively changes the owner of a directory and all its contents to alice. Check the results with ls command:
Change Group Ownership
If you only want to change the group ownership, prefix the group name with a colon and use -R to apply the change recursively. Use this feature in team environments where files need to be accessible to a shared group.
For example:
sudo chown :developers /path/to/directory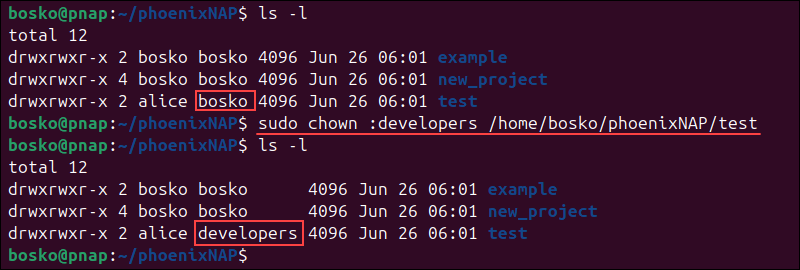
In the example above, the command changes the group of the test directory to developers.
Using chown Recursive with --verbose
The -R (--recursive) option combined with -v (--verbose) causes chown to print a line for every file and directory it processes. This feature is useful for tracking exactly what is being changed, especially in large trees.
For example, the following command recursively changes the owner to john and group to developers, and shows each change:
sudo chown -R --verbose alice:developers /var/www/html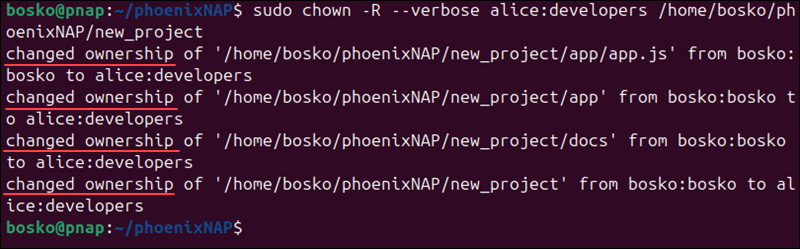
Using chown Recursive with --no-dereference:
The --no-dereference option instructs chown not to follow symbolic links and to change the ownership of the symlink itself rather than the file it points to. This option prevents unintended changes to the target files.
For example:
sudo chown -R --no-dereference alice:developers /srv/appThe command recursively changes ownership but leaves symlink targets untouched.
Using chown Recursive with --preserve-root
By default, chown recursive on / is refused for safety. The --preserve-root flag explicitly enforces this protection to prevent accidental ownership changes on the entire filesystem root. It is enabled by default, but you can specify the option to document your intent.
For example, the command below throws an error if you try to chown /:
sudo chown -R --preserve-root root:root /
Using chown Recursive with --from=CurrentOwner:CurrentGroup
The --from flag restricts changes only to files that already match the specified owner and group. This option is handy when you want to selectively update ownership without touching files that have already been adjusted.
For example:
chown -R --from=olduser:oldgroup newuser:newgroup /home/projectsThe command only changes ownership for files currently owned by olduser:oldgroup.
Symlink Handling Options
When you need finer control over how ownership changes propagate through a directory tree, the standard -R flag may not always be enough. Advanced recursive options let you tailor chown to avoid unintended side effects, such as accidentally changing system-critical files, following (or not following) symlinks, or even overriding site-wide aliases that enforce recursion by default.
Different projects have different policies about symbolic links:
- -P (never follow).The default behavior - only the link itself is chowned, not its target. Use
-Pin environments with many symlinks to avoid touching real data. - -H (follow command-line links only). Links you explicitly name on the command line are followed, but links found in subdirectories are not. Use
-Hwhen you trust only the links you have explicitly specified. - -L (follow all links). Every symlink encountered is followed, and ownership applies to the linked file or directory. Use
-Lfor one-off fixes when your directory tree is organized via symlinks and you want a uniform change.
For example, the command below follows only the top-level symlink(s), but skips any deeper ones:
chown -R -H alice:staff /srv/appConclusion
This tutorial showed how to use the chown command recursively to change the user and group ownership of multiple files and directories. Use chown recursive to efficiently change ownership of an entire directory and all its contents in one command.
Next, learn everything about chmod recursive as an alternative to chown for changing file and directory permissions recursively.