The passwd command modifies passwords for user accounts and manages the password validity period. This is a must-know utility for user account administration.
This article shows examples of how to use the passwd command in Linux, its syntax, all the available options, and examples.

Prerequisites
- A Linux system.
- Access to the terminal.
- A user with sudo or root privileges.
Linux passwd Command Syntax
The passwd command syntax is:
passwd [options] [username]Options modify the command behavior, while [username] represents the account whose password you want to manage. If not specified, the command assumes you want to manage the password for the currently logged-in user.
Linux passwd Command Options
Many options modify the passwd command output. The following table presents the commonly used options.
| Option | Description |
|---|---|
-d | Deletes the password for the user, allowing login without a password. |
-e | Forces the user to change their password at the next login. |
-l | Locks the user's account by disabling the password. |
-u | Unlocks the user's account. |
-S | Displays the specified user password status. |
-n | Sets the minimum number of days before the password can be changed. |
-x | Sets the maximum number of days a password is valid before it must be changed. |
-w | Sets the number of days before expiration to warn the user to change the password. |
-i | Sets the number of days after a password expires before the account is disabled. |
-r | Changes the password for a specific repository. |
Files Used by the Linux passwd Command
The passwd command in Linux relies on several system files to manage user accounts and passwords.
The primary file is /etc/passwd, which contains basic information about each user, such as the username, user ID (UID), group ID (GID), home directory, and login shell. However, this file does not store passwords but has an entry that points to the /etc/shadow file for password information.
The /etc/shadow file stores encrypted passwords as well as settings like password aging, expiration dates, and inactivity periods.
Group information is stored in /etc/group, which maps group names to group IDs (GID) and lists the users belonging to each group. If groups have passwords, they are stored in the /etc/gshadow file, which is similar to /etc/shadow but specific to groups.
The /etc/login.defs file provides system-wide configuration for user account settings, such as default password aging policies, minimum or maximum password lengths, and behavior for newly created accounts. This file is relevant when enforcing rules during password changes or account creation.
The passwd command behavior is influenced by Pluggable Authentication Modules (PAM), which are configured in the /etc/pam.d/passwd file. PAM modules enforce policies such as password complexity, reuse prevention, or integration with external authentication systems.
passwd Command Exit Values
The passwd command provides specific exit values to indicate the outcome of its execution. The exit values are:
- 0 (Success). The command completed successfully.
- 1 (Permission Denied). The command failed because the user lacked sufficient privileges to perform the requested operation.
- 2 (Invalid Combination of Options). Invalid options are provided to the command.
- 3 (Unexpected Failure, Nothing Done). An unexpected error occurred, and no changes were made to the system.
- 4 (Unexpected Failure, passwd File Missing). The operation failed because the required /etc/passwd file is missing.
- 5 (passwd File Busy, Try Again). The command could not proceed because the /etc/passwd file was in use or locked by another process.
- 6 (Invalid Argument to Option). An invalid or unrecognized argument was passed to an option in the command.
By checking the exit status, administrators and scripts identify specific issues and take appropriate corrective actions, such as retrying the operation, correcting arguments, or resolving file access issues.
Linux passwd Command Examples
The passwd command in Linux manages user account passwords and related settings. Below are examples demonstrating how to use the command in various scenarios.
Change Password
The basic passwd command usage is to change a user password. A superuser changes and modifies settings for any user. Regular users are only allowed to change their own password.
For example, run:
passwd
The terminal prints out the user for whom you are changing the password. Type your current password, and then define and confirm your new password.
Any password that does not meet basic requirements is rejected, and a user must re-enter a new password.

Use a strong password as it is an important security aspect, and it helps prevent brute force attacks.
See Password Status Info
Using passwd with the --status option displays all the information about a password and the validity periods. The shorter version is -S:
passwd -S
Check another user's password status by entering:
sudo passwd -S [username]For example, to check the password status for user1, run:
sudo passwd -S user1
The password status has seven fields:
- A user's login name.
- Whether a user has a locked password (
L), no password (NP), or a password (P). - Date of last password change.
- Minimum password age.
- Maximum password age.
- Warning period for password change.
- Inactivity period for the password change.
The last three fields are represented in days.
See Password Status Info for All the Accounts
Check the status info for all accounts using passwd with the sudo command with the -S and -a options, or the extended version --all:
sudo passwd -S -a
Change User Password
To change a specific user's password, run the passwd command with sudo privileges and the account you wish to update:
sudo passwd [username]For example, to change the password for user1, run:
sudo passwd user1
This option comes in handy if a user has forgotten their password.
Note: Reset or change the sudo or root password in case you forget it.
Delete User Password
If a user has a password and you need to remove it, use:
sudo passwd -d [username]For example, to remove the password for user1, run:
sudo passwd -d user1
When you check the password status, it changes the second field from P to NP:
Expire Account Password
To force expire a password, use the --expire or -e options with the passwd command:
sudo passwd -e [username]For instance, expire user1's password with:
sudo passwd -e user1
When you check the status, the last password change date is 01/01/1970. The next time this user logs in, they must change their password.
Set Number of Days After the Password Expires and the Account Deactivates
An account automatically deactivates after its password has expired and is not changed for a certain number of days. Use the -i or --inactive option and set the number of days as an integer:
sudo passwd -i [number of days] [username]For example, to deactivate the user2 account after five days, type:
sudo passwd -i 5 user2
Set the Minimum Number of Days Between Password Changes
To change the minimum number of days between password changes, use the --mindays or -n option with the number of days as an integer:
sudo passwd -n [number of days] [username]For instance, to change the minimum number of days between password changes for the user2 to 30, type:
sudo passwd -n 30 user2
In the status report for that user, the set number appears after the date.
Set the Maximum Number of Days for Which the Password Remains Valid
To change the maximum number of days between password changes, use the --maxdays or -x option with the number of days as an integer:
sudo passwd -x [number of days] [username]For example, to change the maximum number of days between password changes for the user2 to 60 days, run:
sudo passwd -x 60 user2
That user's status shows the maximum number of days for the password validity has changed.
Change the Expired Password
Once a password expires, a prompt appears during the next login to change the password. Enter the old password and then a new one twice for confirmation.
Display the Warning for Expiring Password
The warning message appears when a password is nearing its expiration. Use the option --warndays or -w to set how many days before the expiry the warning appears:
sudo passwd -w [number of days] [username]For example, to set the warning ten days before the expiry for user2, run:
sudo passwd -w 10 user2
Lock the Password
Locking a password makes the user unable to log in using their password. However, they are still able to log in using other authentication methods. To lock a password, use:
sudo passwd -l [username]For example, lock password for user2 with:
sudo passwd -l user2
The password status for that user changes from P to L:
Unlock the Password of an Account
To unlock a password for a locked account (L), use the --unlock or -u option:
sudo passwd -u [username]For example, to unlock the password for user2, run:
sudo passwd -u user2
The password status changes from locked (L) to the previous state of the password for the account, allowing the user to log in regularly.
Use the Quiet Mode
Quiet mode hides the "Changing the password for [username]" message. Run:
passwd -q
The passwd -q command is useful when you do not want to display the username for which you are changing the password on your screen.
Change Password for Repository Named "Repo"
The passwd command handles password changes for different authentication repositories, such as local files, Network Information Service (NIS), or Lightweight Directory Access Protocol (LDAP).
Note: If NIS is enabled and users are not logged into the NIS server, they are sometimes unable to change their password on the system.
This is managed using the -r option, which specifies the repository in which the password change occurs. The repositories available are defined in the /etc/nsswitch.conf file, which determines how system lookups for user account information are handled.
To change the password for a specified user in the specified authentication repository, run:
sudo passwd -r [repository] [username]For example, to change the password for the user user2 in the local authentication repository, run:
sudo passwd -r files user2
Change the Root Directory for the passwd Command Process
The passwd command can operate on a different root directory using the --root option. This allows administrators to manage user passwords within a specific directory structure, such as a chroot environment or an alternate Linux installation.
To use this option, run:
sudo passwd --root [directory path] [username]To illustrate this example, we'll create a fake root directory on your current system where the passwd command can operate as if it were in a different root filesystem without needing an actual chroot or mounted filesystem.
Take the following steps:
1. Create a simulated root directory using the mkdir command:
sudo mkdir -p /tmp/fake_root/etcThe command has no output.
2. The passwd command requires the /etc/passwd and /etc/shadow files to function. Copy these files into the fake root using the cp command:
sudo cp /etc/passwd /tmp/fake_root/etc/
sudo cp /etc/shadow /tmp/fake_root/etc/
sudo cp /etc/group /tmp/fake_root/etc/
The commands have no output.
3. Run the passwd command with the --root option specifying the fake root directory:
sudo passwd --root /tmp/fake_root your-usernameReplace your-username with a username that exists in the copied /tmp/fake_root/etc/passwd file. For example:
sudo passwd --root /tmp/fake_root sara
See All passwd Commands
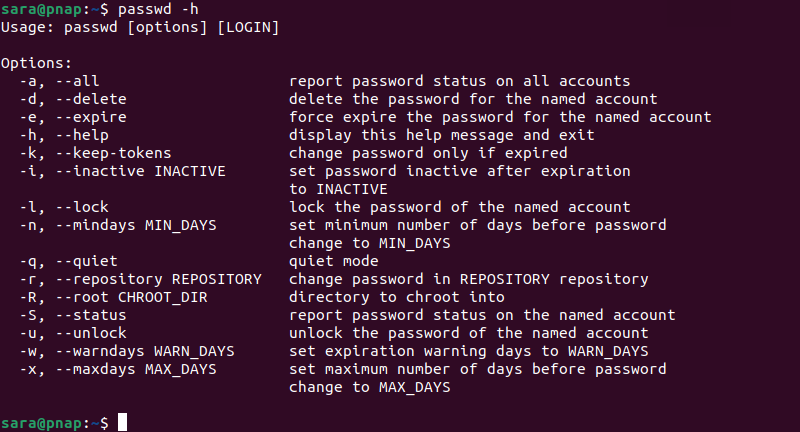
There are numerous commands to use with the passwd tool. List all the options with:
passwd -h
A list of all the options, along with a short description, prints out:
Using passwd in Shell Scripts
Using the passwd command in shell scripts automates password management tasks, like creating or updating user passwords. It is useful in large environments where managing multiple accounts manually is time-consuming.
By including the passwd command in scripts, administrators simplify routine tasks, and maintain consistency across systems. This approach is often used in user account setup or regular maintenance workflows.
For example, the following script streamlines the process of changing a password for user2 by automating the setup and cleanup around the passwd command. The script is:
#!/bin/bash
username="user2"
echo "Changing the password for $username."
sudo passwd "$username"
echo "Password change process for $username completed."
The script consists of the following:
#!/bin/bash. Specifies the script should run using the Bash shell.username="user2". Sets a variable username to the user account (user2) whose password is to be changed.echo "Changing the password for $username."Prints a message to inform the user what the script is doing using the echo command.sudo passwd "$username".Triggers thepasswdcommand for the specified user, requiring manual input for the new password and its confirmation.echo "Password change process for $username completed.". Prints a message to confirm the password change process has been completed.
To execute the script, save it to a text file and make it executable. Take the following steps:
1. Create a file using a text editor of choice. For example, name it change_password.sh.
Use a text editor like Vim:
vim change_password.sh2. Paste the script into the editor, then save and exit.

3. Use the chmod command to give the script executable permissions:
chmod +x change_password.shThe command has no output.
4. Execute the script using the following command:
./change_password.sh
Linux passwd Command Alternatives
Several passwd command alternatives exist, each offering unique features or automation capabilities. The following text presents common passwd command alternatives:
- The chpasswd command. Performs bulk password updates by reading user-password pairs from standard input. It's useful in scripts or large-scale setups where you need to update passwords for multiple users simultaneously.
For example, the following command updates the password for user2 to NewP@ssw0rd123.
echo "user2:NewP@ssw0rd123" | sudo chpasswdThe command has no output.
- The usermod command. Modifies user account settings and sets a new password if combined with the
--passwordoption. The password must be encrypted before being passed to this command.
For example, the following command sets an encrypted version of newpassword as the password for user2:
sudo usermod --password $(openssl passwd -1 newpassword) user2The command has no output.
- The
vipwcommand. Opens the /etc/passwd file in a text editor, allowing direct manual editing of user information, including encrypted passwords. It's powerful but should be used with caution to avoid corrupting the file.
For example, run:
sudo vipwThe command allows you to choose the text editor to open the file.
Conclusion
The passwd command is vital for managing account security, both for an individual user and a system administrator. Automating password validity periods is convenient and easily configurable.
If you find it hard to keep track of all the different passwords and changes, there are many enterprise solutions for password management.


