Secure Shell (SSH) is a network protocol that enables secure connections between two systems. System administrators use SSH utilities to manage remote machines and transfer files securely over encrypted channels.
This article lists the most popular SSH commands in Linux with practical examples.
Prerequisites
- SSH client on the local machine.
- SSH server on the remote machine.
- IP address or hostname of the remote server.
How to Access a Remote Server
Follow the steps below to obtain access to a remote server:
1. Open a terminal window on a local Linux machine and enter the ssh command followed by the remote machine's IP address:
ssh 192.168.56.101Or use the hostname instead:
ssh test.server.com2. When establishing a connection for the first time, the client asks the users if they want to continue. Type yes and press Enter to proceed.

3. If the remote server is password-protected, enter the password to continue.
The system establishes a secure connection. The user can now control the remote machine by entering standard Linux commands within the SSH shell.
Run SSH Command Without Shell Session
SSH also allows users to execute a single command on the remote server without opening an interactive shell session. To execute a command from the local machine, append an additional command to the SSH command. For example, to delete a file on the remote server, enter:
ssh test.server.com rm ~/directory/sample4Enter the password if prompted. The system deletes the sample4 file on the remote server without opening a new shell session.
This method pairs well with passwordless SSH authentication. It allows embedding SSH commands directly into local scripts to automate tasks on remote machines.
Common SSH Commands
To effectively manage remote servers via SSH, use both interactive SSH sessions and direct SSH commands. This table provides an overview of frequently used commands:
| Description | Direct SSH Command | SSH Shell Command |
|---|---|---|
| Connect as a specific user. | ssh [username]@[hostname_or_IP] | N/A |
| Connect using a non-standard port number. | ssh -p [port] [username]@[hostname_or_IP] | N/A |
| Disconnect from the remote session. | N/A | exit or logout |
| Generate SSH keys to streamline authentication. | ssh-keygen -t rsa | N/A |
| Copy the local SSH public key to the remote server's authorized_keys file. | ssh-copy-id [username]@[hostname_or_IP] | N/A |
| Copy a file from the local machine to a remote directory. | scp [filename] [username]@[hostname_or_IP]:/remote/directory | N/A |
| Copy a file from the remote server to the local machine. | scp [username]@[hostname_or_IP]:/remote/file/path /local/directory | N/A |
| Recursively copy a local directory to the remote server. | scp -r /local/directory [username]@[hostname_or_IP]:/remote/destination | N/A |
| Transfer files between systems via SFTP. | sftp [username]@[hostname_or_IP]put local.fileget remote.file | N/A |
| Compress and transfer a directory from local to remote server. | tar -czf - /path/to/local/directory | ssh [username]@[hostname_or_IP] 'tar -xzf - -C /path/to/remote/directory' | - |
| Compress and transfer a remote directory to a local machine. | ssh [username]@[hostname_or_IP] 'tar -czf - /path/to/remote/directory' | tar -xzf - -C /path/to/local/directory | - |
| Synchronize files from remote to local server. | rsync -avz -e ssh [username]@[hostname_or_IP]:/remote/file.name /local/file.name | - |
| Synchronize files from local to remote server. | rsync -avz -e ssh /local/file.name [username]@[hostname_or_IP]:/remote/file.name | - |
| List the contents of a remote directory. | ssh [username]@[hostname_or_IP] 'ls -l /remote/directory' | ls -l /remote/directory |
| Move or rename a file on the remote server. | ssh [username]@[hostname_or_IP] 'mv /path/source/file /path/destination/directory' | mv [filename] /path/destination/directory |
| Create a new directory on the remote server. | ssh [username]@[hostname_or_IP] 'mkdir /path/new_directory_name' | mkdir /path/new_directory_name |
| Delete a file on the remote server. | ssh [username]@[hostname_or_IP] 'rm /path/to/file' | rm /path/to/file |
| Change file permissions. | ssh [username]@[hostname_or_IP] "chmod [permission] /path/to/file_or_directory" | chmod [permission] /path/to/file_or_directory |
| Change file ownership. | ssh [username]@[hostname_or_IP] "chown new_owner:group /path/to/file_or_directory" | chown new_owner:group /path/to/file_or_directory |
| Check disk space usage on the remote server. | ssh username@hostname_or_IP 'df -h' | df -h |
| Monitor the syslog file on the remote server in real-time. | ssh username@hostname_or_IP 'tail -f /var/log/syslog' | tail -f /var/log/syslog |
Monitor remote system performance using <strong>htop</strong>. | ssh [username]@[hostname_or_IP] "htop" | htop |
| Set up local port forwarding. | ssh -L local_port:destination_server_ip:remote_port [username]@[hostname_or_IP] | N/A |
| Set up remote port forwarding. | ssh -R remote_port:localhost:local_port [username]@[hostname_or_IP] | N/A |
| Set up dynamic port forwarding. | ssh -D [local_port] [username]@[hostname_or_IP] | N/A |
| Mount a remote directory on your local machine via SSHFS. | sshfs [username]@[hostname_or_IP]:/path/to/remote/directory /path/to/local/directory | N/A |
| Keep SSH connection alive. | ssh -o "ServerAliveInterval=60" [username]@[hostname_or_IP] | N/A |
1. Specify a Username for SSH Connection
SSH uses the current system username by default when accessing a remote server. The following command format allows connecting to the remote server as a different user:
ssh [username]@[hostname_or_IP]Replace the values with the actual username and the remote server's hostname or IP address. For example:
ssh testuser@10.0.0.55Note: If you encounter the Connection refused error, refer to our SSH Connection Refused guide for solutions.
2. Use Custom Port Number for SSH Connection
SSH servers are preconfigured to listen for connections on port 22. If the default SSH port number has been modified, specify the new port; otherwise, you may encounter the Connection refused error.

Use the -p flag to connect to a remote host with a custom SSH port number:
ssh -p 3322 test.server.comThis command tells SSH to connect to test.server.com on port 3322 instead of the default port 22.
3. Disconnect from Remote Server
Enter the following command in the SSH shell to exit the session and disconnect from the remote server:
exitYou can also use the logout command:
logoutBefore exiting an SSH session, save your work and stop unwanted processes to prevent them from consuming resources on the remote server.
4. Generate SSH Keys Using SSH Keygen
SSH key pairs automatically authenticate clients to servers and improve the security of SSH connections. The pair consists of a public and private key. The public key can be shared with the remote server, while the private key must remain secure.
Generate a key pair on the local machine using the ssh-keygen utility:
ssh-keygen -t rsa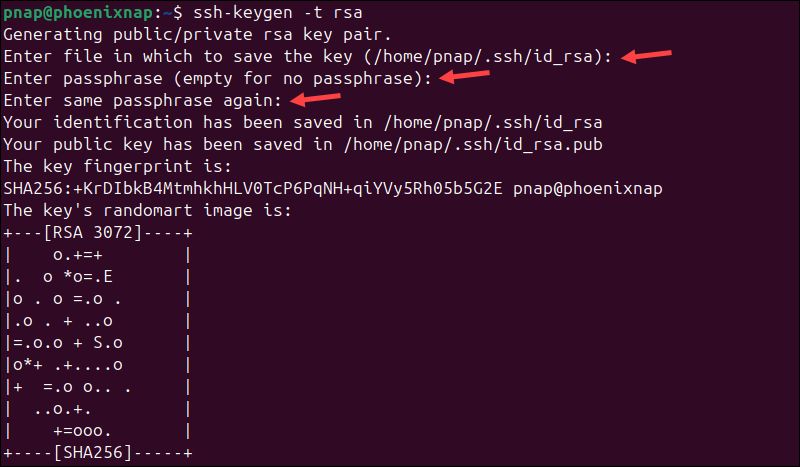
Press Enter when prompted for the file location and a passphrase to apply default settings.
5. Copy Public SSH Key
After generating an SSH key pair for SSH authentication, copy the public key to the remote server. The public key is stored in the id_rsa.pub file, which was created using the ssh-keygen utility.
To copy the public key to a remote server, enter the following command on the client machine:
ssh-copy-id [hostname_or_IP]To specify a different username, include it in the command:
ssh-copy-id [username]@[hostname_or_IP]When prompted, enter the password to authenticate the request. Once the key is copied, the password is no longer necessary to connect to the remote server.
6. Copy File From Local to Remote Machine with SCP
The SCP command allows users to securely copy files over SSH. It is specifically designed for file transfers and is installed alongside SSH on Linux systems. The basic syntax is:
scp [filename] [username]@[hostname_or_IP]:/remote/directoryFor example, enter the following command in the local terminal to copy the sample3 file to the remote server's Desktop under the username test:
scp sample3 test@192.168.56.101:/home/test/Desktop
The output displays a summary of the operation, including the file transfer progress and completion status.
Note: Use the uppercase -P flag to specify a custom port number when transferring files via SCP.
7. Copy File From Remote to Local Machine with SCP
Use SCP to retrieve a file from the remote machine and save a local copy using the following command syntax:
scp [username]@[hostname_or_IP]:/remote/file /local/directoryFor example, the following command copies the sample3 file from a remote Desktop to the Documents directory on the local machine:
scp test@192.168.56.101:/home/test/Desktop/sample3 ~/Documents/Replace the values in the example command with the actual values on the system.
8. Copy Directory via SCP
Use the -r (recursive) flag to transfer an entire directory with all its subdirectories and files from a local machine to a remote server via SCP:
scp -r /local/directory [username]@[hostname_or_IP]:/remote/destinationThe -r flag ensures that all directory contents are copied and the file structure is preserved. It can also be used to transfer an entire directory from a remote server to a local machine:
scp -r [username]@[hostname_or_IP]:/remote/directory /local/destinationThe syntax is the same, but the source and destination paths are reversed.
9. Use SFTP to Transfer Files
SFTP operates over the SSH protocol, allowing users to manage and transfer files to and from the remote server through an encrypted channel.
Connecting to an SFTP session uses the same syntax as connecting to a remote system via SSH. The following SFTP command opens an interactive session with the remote system:
sftp [username]@[hostname_or_ IP]Once connected, use the get command to download a file from the remote server to your local machine:
get remote.fileUse the put command to upload a file from the local machine to the remote server:
put local.file10. Compress and Transfer Directory via SSH
It is more efficient to compress large directories before transferring them via SSH. The following command allows you to compress and transfer a directory from the local machine to a remote server:
tar -czf - /path/to/local/directory | ssh [username]@[hostname_or_IP] 'tar -xzf - -C /path/to/remote/directory'You can also transfer a compressed directory from the remote server to the local machine:
ssh [username]@[hostname_or_IP] 'tar -czf - /path/to/remote/directory' | tar -xzf - -C /path/to/local/directoryThe tar command works seamlessly over SSH and is an essential utility for reducing file transfer times.
11. Synchronize Files and Directories
Synchronize files and directories between a remote server and the local machine using the rsync command.
The command uses the following syntax:
rsync -avz -e ssh /local/file.name [username]@[hostname_or_IP]:/remote/file.nameThe file on the local machine is synchronized with the file on the remote server. The rsync utility transfers data only when it detects changes to the file.
The synchronization also works in the opposite direction, from the remote server to your local machine:
rsync -avz -e ssh [username]@[hostname_or_IP]:/remote/file.name /local/file.nameThe rsync command is commonly used to back up data to a remote location.
12. List Files and Directories
Use the ls command within an SSH shell session or as a direct SSH command to list the content of a remote directory. The following command lists the names of directories, files, and symbolic links in a remote directory without opening an interactive SSH shell:
ssh [username]@[hostname_or_ip] 'ls -l /remote/dir'The information is displayed in the local terminal. To list the content of a remote directory in an interactive SSH shell:
1. Start an SSH session:
ssh [username]@[hostname_or_ IP]2. Navigate to the desired directory:
cd /remote/dir3. Use the ls command with necessary flags to view the contents of the remote directory:
ls -l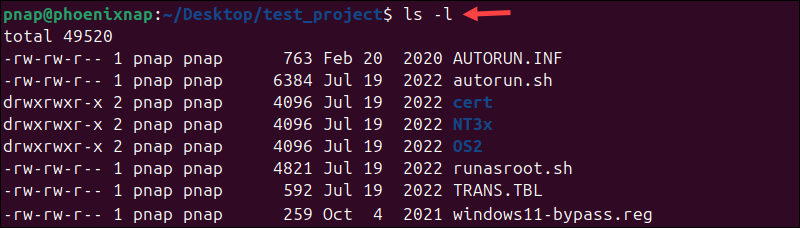
In this example, the -l flag displays the type, size, permissions, and other helpful information related to the listed files and directories.
13. Move or Rename File on Remote Server
Utilize the mv command to move files and directories from one location to another or rename them. It can be used directly within an SSH command or after establishing an SSH shell session.
If you want to move a file or directory on a remote server without opening an interactive SSH session, enter:
ssh [username]@[hostname_or_IP] 'mv /path/source/file /path/destination/directory'Use mv interactively by following the steps below:
1. Establish an SSH shell session with the remote server:
ssh [username]@[hostname_or_ IP]2. Navigate to the directory where the file is located:
cd /path/source/file3. Move the file to the desired destination:
mv [filename] /path/destination/directory14. Create a Directory
The Linux mkdir command creates new directories and can be executed directly in an SSH command or within an SSH shell session.
The following syntax allows creating a directory on a remote server without opening an interactive SSH session:
ssh [username]@[hostname_or_IP] 'mkdir /path/new_directory_name'Alternatively, follow this two-step procedure:
1. Establish an interactive SSH shell session:
ssh [username]@[hostname_or_IP]2. Enter the mkdir command followed by the full path and new directory name:
mkdir /path/new_directory_name15. Delete File or Directory
The rm command deletes files and directories on a Linux system. It can be executed directly in an SSH command or within an SSH shell session.
To delete a file or directory on a remote server without opening an interactive SSH session, enter:
ssh [username]@[hostname_or_IP] 'rm /path/to/file'To delete a directory and its content, insert the -r option:
ssh [username]@[hostname_or_IP] 'rm -r /path/to/directory'To delete a Linux file in an interactive SSH shell session, use rm and specify the file path and name:
rm /path/to/fileNote: Find out why rm is among the most dangerous Linux commands if not used carefully.
16. Change File Permissions
The chmod command allows the control of user access levels for directories and files. To change directory or file permissions on a remote Linux server using a direct SSH command, enter:
ssh [username]@[hostname_or_IP] "chmod 755 /path/to/file_or_directory"The command in the example grants the owner read, write, and execute permissions (755) for the specified file or directory on the remote server.
Alternatively, establish an SSH shell session with the remote server and use the chmod command:
chmod [permission] /path/to/file_or_directoryReplace the values in the example command with actual values on your system.
Note: Learn how to change permissions recursively and configure multiple files and subdirectories with a single command.
17. Change File Ownership
Use the following direct SSH command to change the ownership of a file or directory on a remote server:
ssh [username]@[hostname_or_IP] "chown new_owner:group /path/to/file_or_directory"This chown command changes the ownership of the specified file or directory to the designated user and group on the remote server.
If you have established an SSH shell session with the remote server, use the following syntax:
chown new_owner:group /path/to/file_or_directoryThe shell session lets the user interact with the remote server in real time, which is useful for running additional tasks.
18. Check Disk Space on Remote Server
Use the df command to check disk space usage on a remote server without opening an interactive SSH session:
ssh [username]@[hostname_or_IP] 'df -h'Alternatively, use the command within an interactive SSH shell to display the same data:
df -h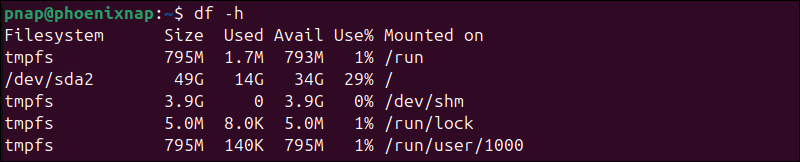
The output displays the used and available disk space on the remote server in a human-readable format.
19. Monitor the Remote Server Syslog File
The tail command with the -f flag allows monitoring the syslog file without opening an interactive SSH session:
ssh [username]@[hostname_or_IP] 'tail -f /var/log/syslog'Unlike other direct SSH commands, the connection remains open and displays the latest entries in the syslog file.
Alternatively, use the same command in an active SSH shell session:
tail -f /var/log/syslogThe terminal remains open and displays new entries in real time. Press Ctrl+C to exit the stream and return to the terminal prompt.
20. Monitor Remote Server Performance
Monitor remote server performance using tools like top, htop, or vmstat. For example, to launch htop on the remote server, enter the following command:
ssh [username]@[hostname_or_IP] "htop"Use the htop command within an active SSH shell session to display metrics from the remote machine:
htop
htop displays real-time performance metrics in an interactive and user-friendly interface.
21. Set Up Local Port Forwarding
Securely forward traffic from a local port on your machine to a port on a remote server through an SSH tunnel. This process is called local port forwarding or SSH tunneling.
The following command specifies the local port, the destination server, and the remote port to which traffic should be forwarded:
ssh -L [local_port]:[destination_server_ip]:[remote_port] [username]@[hostname_or_IP]A practical example of an SSH port forwarding command is:
ssh -L 3306:188.17.0.5:5432 pnap@ssh.server.comIn the example above, traffic sent to port 3306 on the local host is forwarded to port 5432 on the remote server located at 188.17.0.5.
22. Set Up Remote Port Forwarding
Remote port forwarding is the inverse of local forwarding. It allows the remote server to access resources on your local machine.
The basic syntax for a remote port forward command is as follows:
ssh -R [remote_port]:localhost:[local_port ssh_server_hostname]In the following example, the remote server ssh.server.com forwards connections directed at port 5432 to the local resource listening on port 3306:
ssh –R 5432:localhost:3306 pnap@ssh.server.comUsers who connect to port 3306 on the remote server can access the service on port 5432 on the local machine.
23. Set up Dynamic Port Forwarding
Use an SSH client to create a SOCKS proxy on the local Linux machine. This feature is useful for bypassing firewalls, securing an internet connection, or accessing remote network resources.
The syntax for creating a dynamic port forward is:
ssh -D [local_port] [username]@[hostname_or_IP]For example, the following command opens a SOCKS proxy at port 5534 on the local machine:
ssh -D 5534 pnap@ssh.server.comThe terminal stays connected to the remote server, and the proxy is active as long as the SSH session remains open. Configure applications, like a browser, to use localhost:5534 as a SOCKS proxy to route traffic through the remote server.
24. Mount a Remote Filesystem Using SSHFS
SSH File System (SSHFS) is a command-line tool for mounting a remote directory on the local machine over SSH. The remote directory appears as part of the local file system.
The following command mounts the remote directory to the specified local directory:
sshfs [username]@[hostname_or_IP]:/path/to/remote/directory /path/to/local/directoryOnce the directory is mounted, manage remote files using regular tools and applications on the local machine. No particular configuration is needed on the remote system.
25. Keep SSH Connection Alive
The SSH ServerAliveInterval option sends periodic messages (keep-alive packets) to the remote server. This feature prevents the connection from being closed due to inactivity.
To keep an SSH connection alive and active, use the -o option to specify the ServerAliveInterval interval:
ssh -o "ServerAliveInterval=60" [username]@[hostname_or_IP]The command keeps the SSH connection alive by sending a keep-alive packet every 60 seconds.
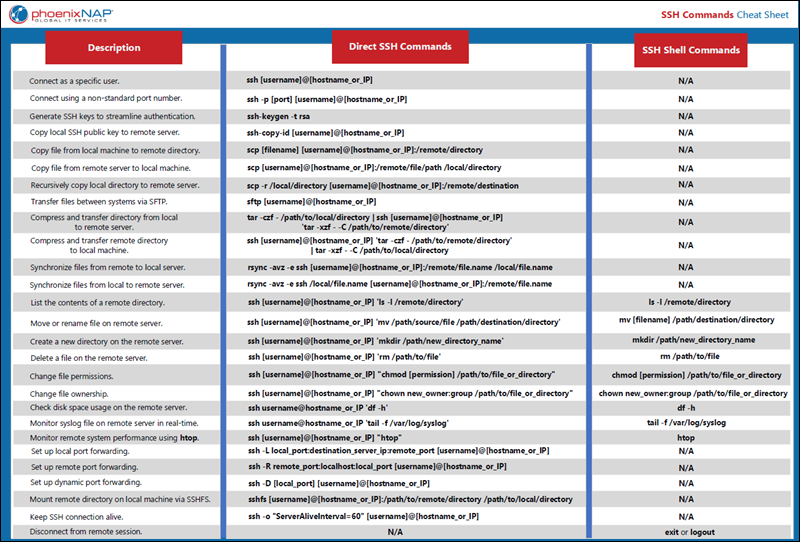
SSH Commands Cheat Sheet
Download the SSH Commands Cheat Sheet in PDF format. Use this one-page reference sheet to quickly access essential SSH commands whenever you need them.
Conclusion
This article covers 25 practical commands for using the SSH tool effectively. Download the SSH command cheat sheet and manage remote servers confidently, knowing you have these commands at your fingertips.
If you work in distributed environments with Docker, also learn to SSH into a Docker container.