Secure Shell (SSH) is a cryptographic network protocol that ensures the security and integrity of data transmission over the Internet. In Git, SSH boosts data transmission security and serves as a powerful tool for authentication and data exchange. The protocol facilitates a secure and efficient version control workflow.
This tutorial will walk you through setting up SSH and cloning Git repositories using SSH.
Prerequisites
- Git installed (install Git on Ubuntu, macOS, Windows, CentOS 7, or CentOS 8).
- A remote and local Git repository.
- An account with administrator privileges.
Set up SSH
To establish an SSH connection, you must create a pair of keys (private and public), share the public key with the service you want to connect to, and set up an SSH agent. The connection requires the user to sign in once, and the SSH agent handles the rest of the authentication throughout the session.
Follow the steps below to set up SSH on Linux or in Git Bash on Windows:
Step 1: Generate SSH Key Pair
The first step is to generate the SSH key pair. Unix systems have a built-in SSH module, while Windows does not. However, it is possible to use the Git Bash terminal on Windows to generate the keys.
Note: If you are on Windows and don't have Git Bash, check out our tutorial for other ways to generate an SSH key.
Open a bash terminal on Linux or Git Bash on Windows and use the following syntax to generate the SSH keys:
ssh-keygen -t ed25519 -C "[info]"- The
-tflag allows you to specify the key type. The most commonly used key type for Git ised25519. - The
-Cflag is optional and provides additional information about the key, such as its purpose or the creator.
For example:
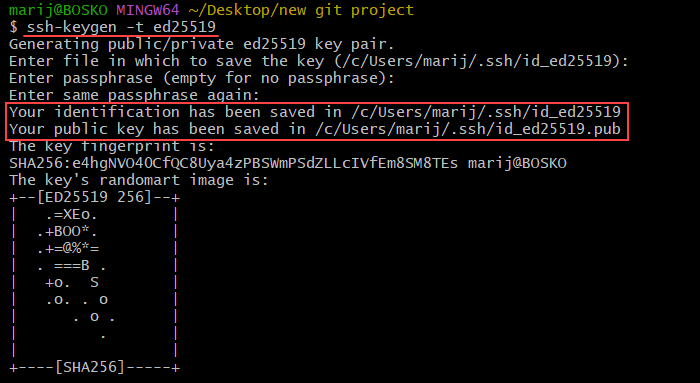
The command prompts you for a location to save the files and a passphrase. To keep the default values, leave everything blank and press Enter to confirm. The command creates a pair of keys whose default file names are id_ed25519 and id_ed25519.pub and saves them in the specified location.
Note: If you have previously created SSH keys, the ssh-keygen command asks if you want to overwrite the existing key. In that case, it is better to create a custom-named SSH key. To do so, specify the -f flag followed by the path to the key with your custom key name.
Step 2: Add Key To GitHub
After generating the key pair, add the public key to the service you want to connect to over SSH. In this tutorial, we will use GitHub.
Follow the steps below:
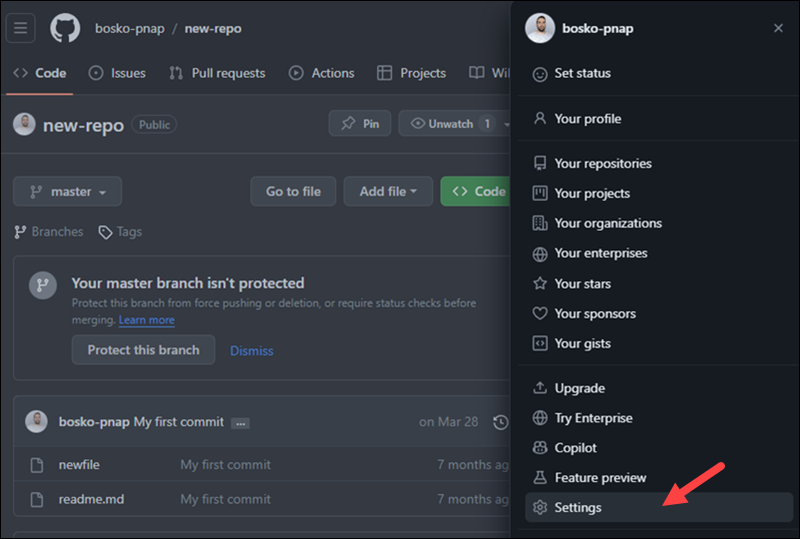
1. Log in to your GitHub account.
2. In the top right corner, click your account image and select Settings.
3. Click the SSH and GPG keys section and select the New SSH key button.
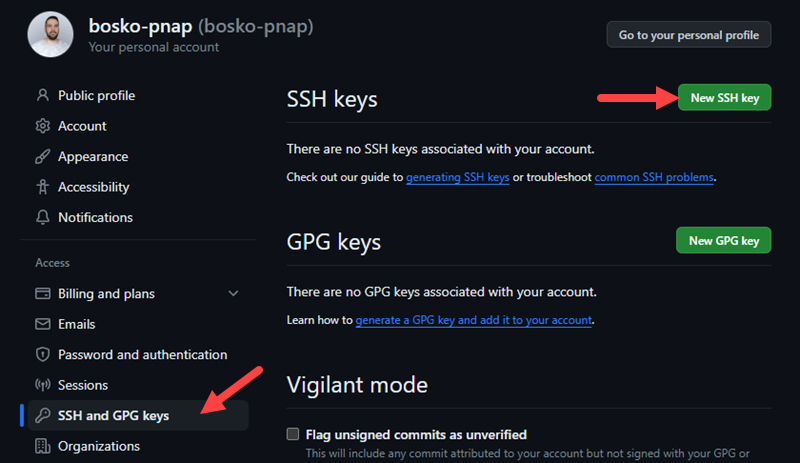
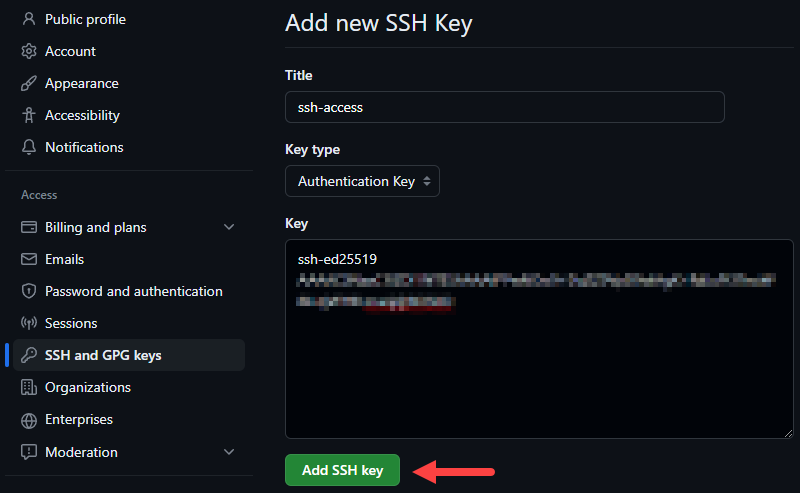
4. On the Add new SSH Key page, provide a name for your SSH key. Since you can assign multiple keys to your account, give them descriptive names to make navigation easier. Make sure to add the public key you have previously generated, not the private one. Copy the key contents to the designated field.
For example:
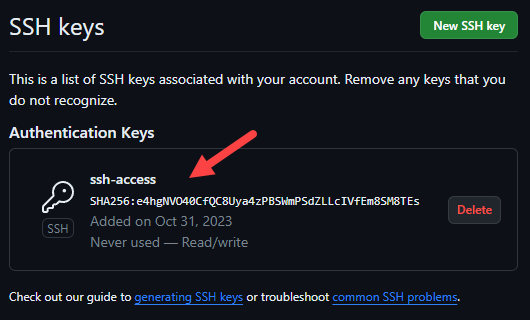
After adding the key, it should appear in the Authentication Keys section:
Step 3: Test the Connection
After adding a new key, test your connection to ensure everything works as expected. In the terminal or Git Bash, run the following command:
ssh -T git@github.com
The command output states that you have successfully authenticated. However, in case you get an error saying "permission denied," make sure that you have correctly set up everything. If the error persists, you can delete the keys (locally and in GitHub), generate a new pair, and try again.
Step 4: Check Local SSH Agent
The SSH agent is part of the SSH toolkit. It comes by default in the Unix-like systems and in Git Bash. The SSH agent holds the private key from the key pair we have previously generated.
Before adding the private key to the SSH agent, use the following command to make sure that it is running:
eval "$(ssh-agent -s)"
The output shows that the SSH agent is up and running and displays the process ID.
Note: If you are on Linux, prepend the command with sudo.
Step 5: Add Keys to SSH Agent
The next step is to add the keys to the SSH agent. Use the following syntax:
ssh-add [path-to-private-key]Specify the entire path to the private key you generated earlier.
For example:

The command adds the key to the agent, and you are now ready to clone the repository.
Clone Repository Using SSH Protocol
To clone a Git repository using SSH, use the git clone command followed by a valid SSH URL. The command syntax is:
git clone git@host:username/repository.githostis the domain name or the IP address of the hosting server. In our case, it is github.com.usernameis your user account on GitHub.repositoryis the name of the Git repository you want to clone.
You can find all the information on your repository page. Follow the steps below:
Step 1: Go to Repository Page
Log in to your GitHub account and go to the repository page you want to clone.
Step 2: Obtain SSH URL
On the repository page, click the <> Code button to obtain the SSH URL:
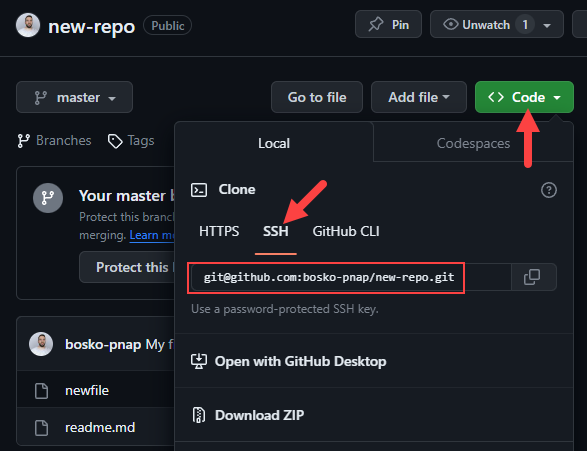
Make sure to select the SSH option and copy the code snippet.
Step 3: Clone Repository
Paste the SSH URL as an argument to the git clone command in Git Bash. For example:
git clone git@github.com:bosko-pnap/new-repo.git
The command clones the repository to your local machine over SSH.
Cloning with SSH vs. HTTPS
Cloning a Git repository with SSH instead of HTTPS offers advantages in terms of authentication and security. When using HTTPS, Git requires you to enter your username and password during authentication, which can pose a security risk if not managed carefully.
On the other hand, SSH provides a more secure way to clone repositories. Instead of transmitting sensitive credentials over the network, SSH uses cryptographic keys for authentication. This approach enhances security and eliminates the need to enter login details repeatedly.
With SSH, only the machines with the corresponding key file can access the repositories, reducing the likelihood of unauthorized access. Even if the SSH key file gets stolen, the potential damage is limited since it doesn't grant access to the entire account. Additionally, you can easily revoke and replace the compromised key, further improving the security of your Git workflow.
Conclusion
This tutorial has outlined the steps required to create an SSH key pair and add it to your GitHub account. The instructions showed how to clone repositories with improved security and reduced reliance on sensitive credentials.
Next, learn the difference between SSH and SSL or see how SSH differs from Telnet.