GitHub is an online platform for version control and collaboration. It combines Git, a version control system, with a user-friendly web interface and enables developers to collaborate on projects efficiently. It is widely used for software development, open-source contributions, and project management.
This guide walks you through GitHub's key features and tools and shows how to use GitHub effectively.
What Is GitHub?
GitHub is a cloud-based platform for hosting Git repositories. It allows teams to manage code, track changes, and collaborate. GitHub offers features like pull requests, issues, and integrated tools to streamline workflows and improve team productivity.
In addition to version control, GitHub is a hub for community engagement and open-source contributions. Developers can share their work, review each other's code, and contribute to various projects globally. It integrates with IDEs, CI/CD pipelines, and project management software, making it a great choice for individuals and organizations.
What Is GitHub Used For?
GitHub goes beyond just storing and managing code. It supports a wide range of use cases, making it a valuable tool for developers, organizations, and open-source communities. It provides a collaborative environment and advanced features to simplify workflows, enhance teamwork, and foster innovation.
Below are some of the primary uses of GitHub:
- Code collaboration. Share and merge code changes in a streamlined manner.
- Version control. Track changes and maintain project history.
- Open-source projects. Host and contribute to publicly available software projects.
- Project management. Organize tasks with built-in project boards and issue tracking.
- CI/CD integration. Automate testing and deployment with GitHub Actions.
How to Use GitHub?
To get started with GitHub, set up an account, configure basic security, and adjust preferences. Once you complete the initial setup, explore GitHub features and customize your profile.
Step 1: Sign up for GitHub
The first steps in using GitHub involve going through the signup process and securing the account with two-factor authentication. The sections below cover each step:
Create an Account
Visit GitHub to create an account.
1. Click the Sign Up button in the top right corner.

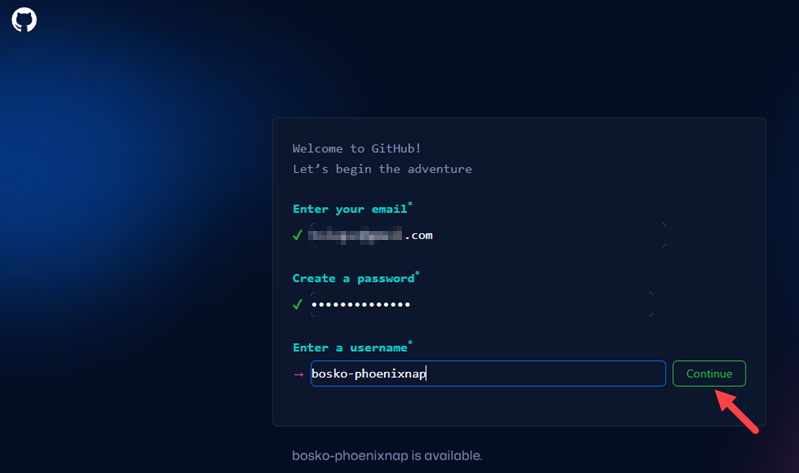
2. Follow the signup instructions:
- Provide the email address you want to use for your account.
- Make sure to use a strong, unique password to protect your account. A secure password is critical to safeguard your data and prevent unauthorized access.
- Pick a username and click Continue.
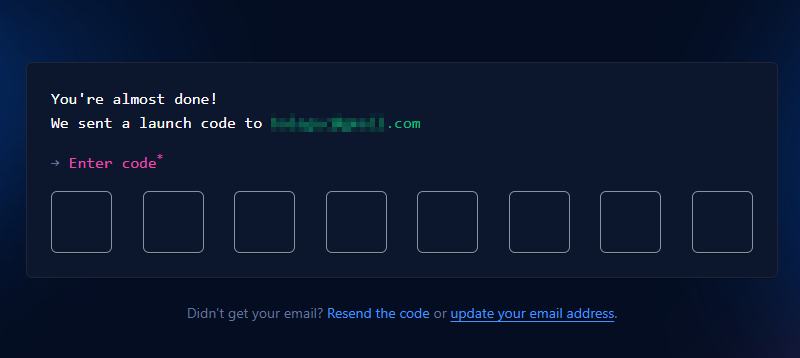
3. Solve the Captcha and enter the code you received from GitHub to verify your email address.
Personalize Account and Choose Plan
After creating the account, sign in using the credentials you provided in the previous step. The Welcome to GitHub page appears, allowing you to personalize your account:
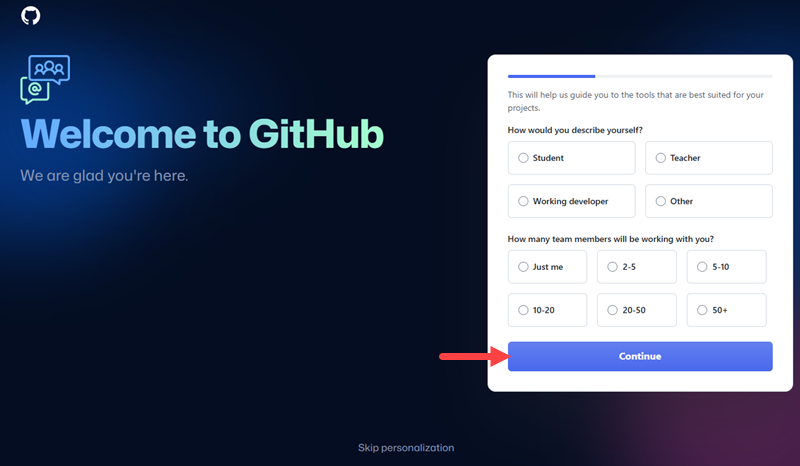
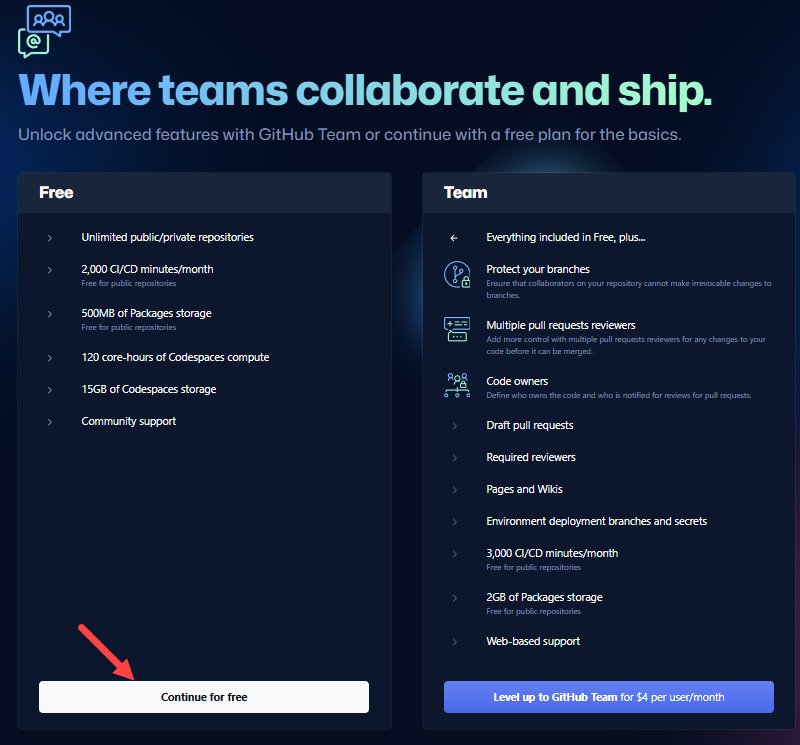
After you provide answers for account personalization, GitHub prompts you to choose the plan for your account. It offers different plans tailored to individual and organizational needs.
- GitHub Free. For personal accounts, provides basic features.
- GitHub Pro. Offers additional tools and functionalities.
If unsure, start with the free plan and upgrade later if needed. For a detailed comparison of plans, visit GitHub's plan billing page.
Set Up Two-Factor Authentication
Two-factor authentication (2FA) strengthens account security through an additional verification step during login. The step can involve a mobile app, a security key, or another secure method. Configuring 2FA to protect your data is highly recommended.
Optionally, after enabling 2FA, you can add a passkey for passwordless login. Passkeys enhance security and simplify the login process by eliminating the password prompt to access your account.
Follow the steps below:
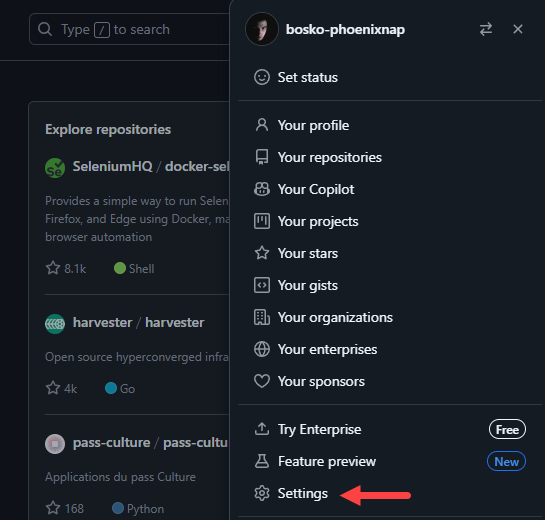
1. On the GitHub page, click your profile picture in the top right corner and select Settings.
2. On the Settings page, find and click the Password and authentication option in the left pane.
3. Scroll down to the Two-factor authentication section and click the Enable two-factor authentication button to set it up.
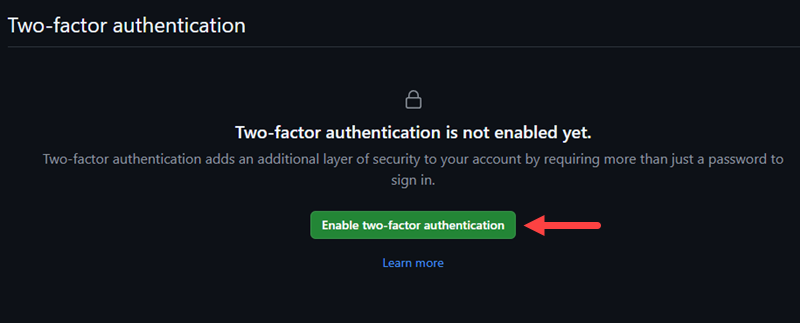
4. Enter your password to enable sudo mode and set up 2FA on an authenticator app.
Step 2: Install Git
After setting up a GitHub account, it is time to install Git. It allows you to work with repositories locally on your machine by cloning projects from GitHub, make changes offline, and pushing updates back to the platform when they are ready.
Install Git on your machine by following our step-by-step guide for your operating system:
- Install Git on Ubuntu.
- Install Git on Windows.
- Install Git on Mac.
- Install Git on FreeBSD.
- Install Git on CentOS and Rocky Linux.
Step 3: Connect GitHub Account to Git Account
After you create a GitHub account and install Git on your machine, configure your local Git installation with GitHub account details. Follow the steps below:
1. Open Git Bash and set your display name using the following syntax:
git config --global user.name "[display_name]"For "[display_name]" provide your full name or the name you want to associate with your commits. This name will be visible in the commit history and public repositories.
For example:

2. Next, set the email address that GitHub will use to associate commits with your account on GitHub. The syntax is:
git config --global user.email "[email]"Replace "[email]" with the email you want to use, in quotes.
3. Verify your configuration with the following command:
git config --global --list
Step 4: Create a Repository on GitHub
Create a new repository on GitHub, and download it in the following step.
1. In the top right corner, click the + button and select New repository:
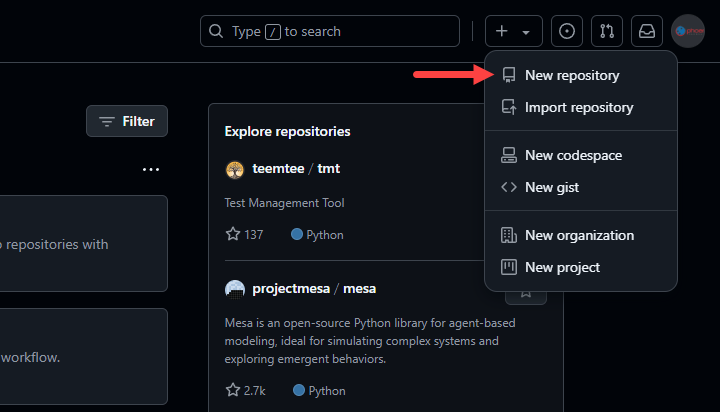
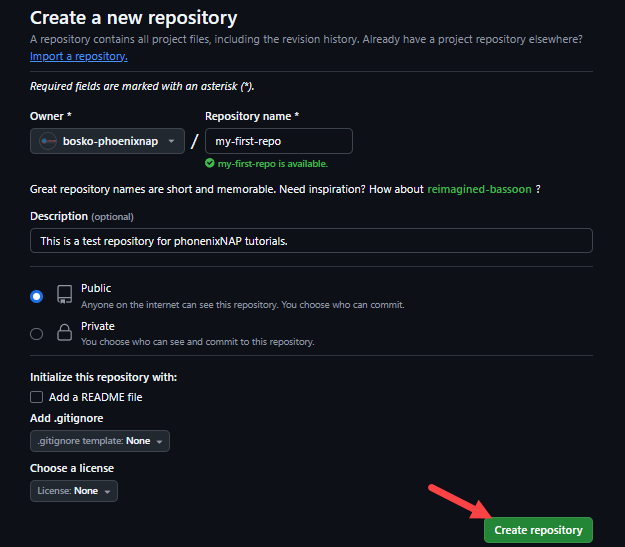
2. Add the necessary details:
- Repository name (e.g., my-first-repo).
- A short description.
- Set visibility to Public or Private, depending on your preference.
- Do not add a README file, .gitignore, or license for now.
Provide the required information and click Create repository to finish.
3. GitHub creates the repository and takes you to a new page with the repository URL. Copy the URL to connect the GitHub repository with the local installation:
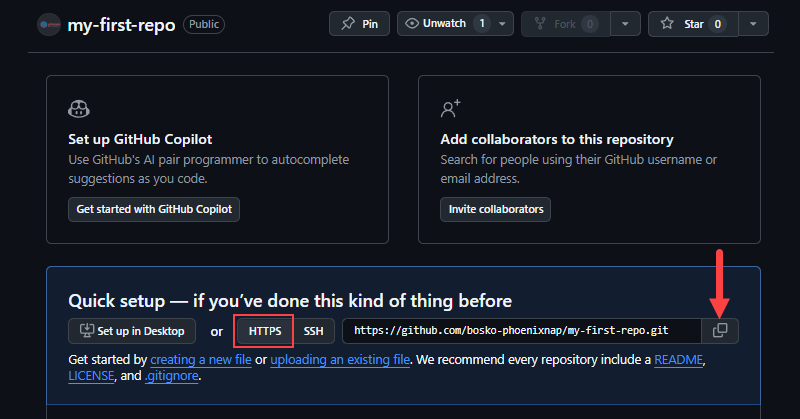
Note: Currently, GitHub recommends using HTTPS over SSH to secure the connection to your remote repository. This recommendation has changed multiple times over the years, and has now probably shifted towards HTTPS as it is the easiest way to set up Git.
To use SSH to secure your connection, see how to generate SSH keys on Debian 10, Windows 10, or Ubuntu.
Step 5: Initialize and Connect Repository
The next step is to initialize a repository on your machine, add some files, and connect it with the GitHub repository:
1. Open Git Bash and navigate to the directory where you want to keep your work.
2. Initialize a new local repository with:
git init
3. Create a README.md file. For example:
echo "# My Project" > README.md4. Add the file to the staging environment:
git add README.md5. Create a commit:
git commit -m "Initial commit"
6. Connect to the remote empty repository using the repository URL you copied in the previous step. The syntax is:
git remote add origin [URL]For example:

Step 6: Set up Access Token
An access token allows you to pull and push changes from and to the remote repository. Git does not allow basic authentication with only the username and password.
1. In the top-right corner of any GitHub page, click your profile photo and select Settings.
2. Select Developer settings from the left sidebar.
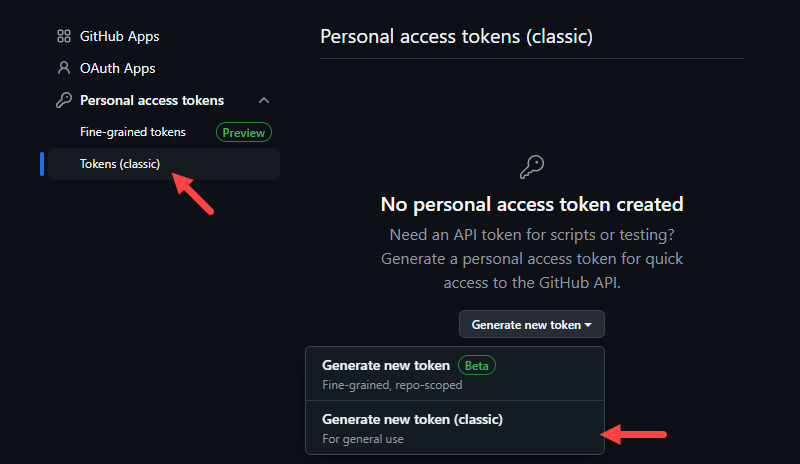
3. Under Personal access tokens, click Tokens (classic), and select Generate new token (classic) in the dropdown menu on the right.
4. Enter your account password to enable sudo mode.
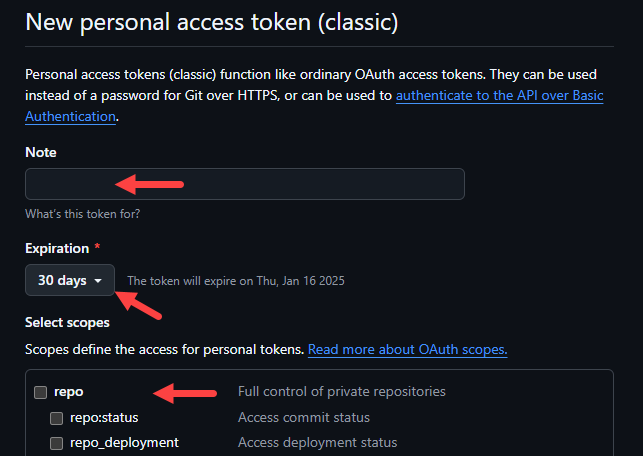
5. Provide the necessary details:
- Add a note describing the token's purpose.
- Set the token expiration time.
- Check the boxes for the scopes you want the token to have.
6. Click the Generate token button to generate the token. Copy the token now or make a note of it, as this is the only time you will see it.
7. Use the syntax below to connect your local repository to the GitHub repository:
git remote set-url origin https://[username]:[token]@github.com/[username]/[repository_name].git- Replace
[username]with your GitHub username. - Replace
[token]with the token you generated in the previous step. - Replace
[repository_name]with the name of the GitHub repository.
For example:

8. Push the README.md file to the remote repository to ensure everything works:
git push origin -u master
If there is no error in the output, you have successfully connected your GitHub and local repository.
Step 7: Create a Branch
Create a branch directly on GitHub to make it immediately visible and accessible to other collaborators on the project. Doing so involves your team from the start as opposed to creating a branch in Git locally and then pushing it to the remote repository.
1. Navigate to your repository's main page on GitHub.
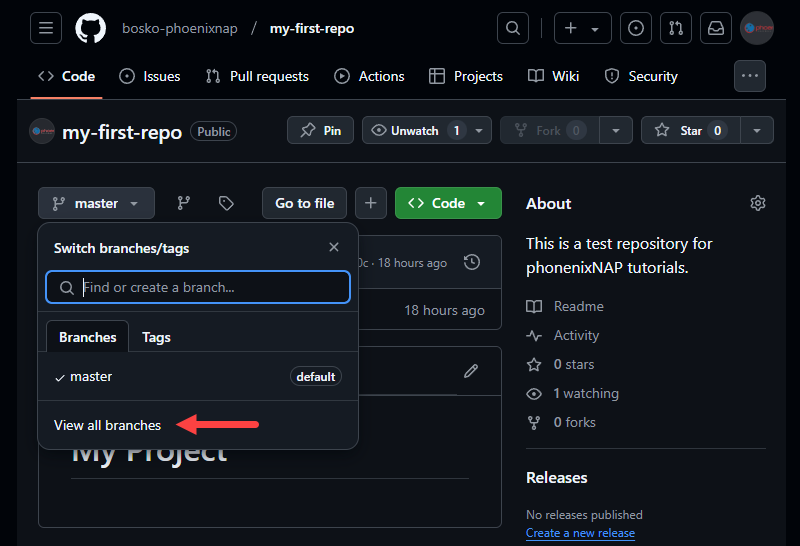
2. Click the branch dropdown menu and select View all branches.
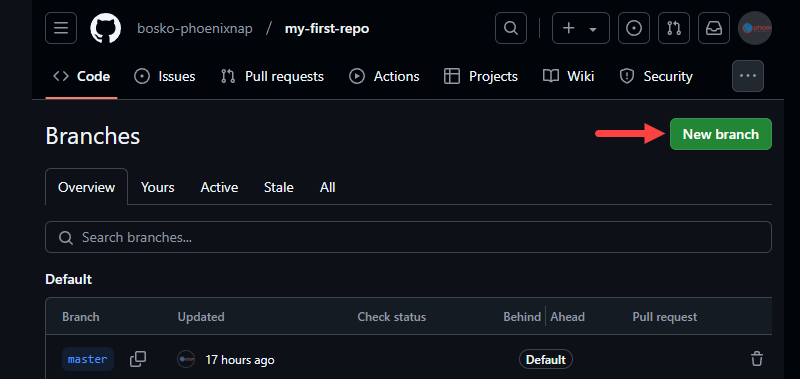
3. Click the New branch button:
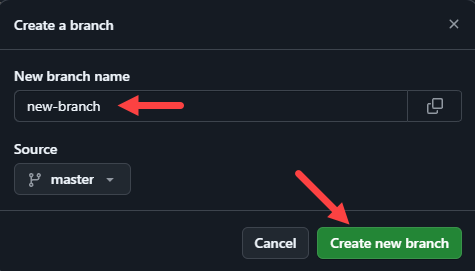
4. In the popup window, enter a name and source for the branch. Click Create new branch to create the branch.
5. To sync the changes with your local repository, use the following syntax:
git pull origin [branch_name]Replace [branch_name] with the name of the created branch. For example:
git pull origin new-branch
The command fetches the new branch and sets it to follow the remote branch.
Step 8: Open a Pull Request
A pull request is a way to suggest changes to a repository. Use it to share your work with others and ask for feedback or approval. Create a pull request when your work on a branch is ready to merge into the master (main) branch or any other branch.
1. Navigate to your repository's main page.
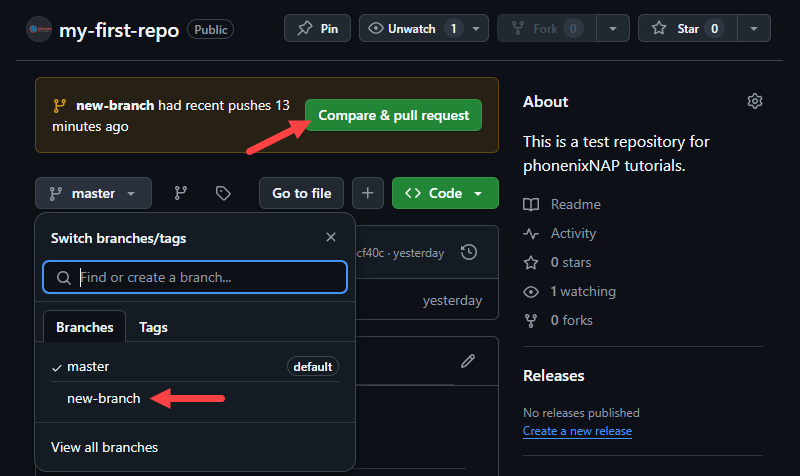
2. When new changes are pushed to the repository, GitHub notifies you in a yellow banner above the file list. If this is the branch that you made changes to and want to include in your pull request, click the Compare & pull request button.
If this is not the branch you wanted to create a pull request for, select the appropriate branch that contains your commits from the Branch menu and click the Compare & pull request button.
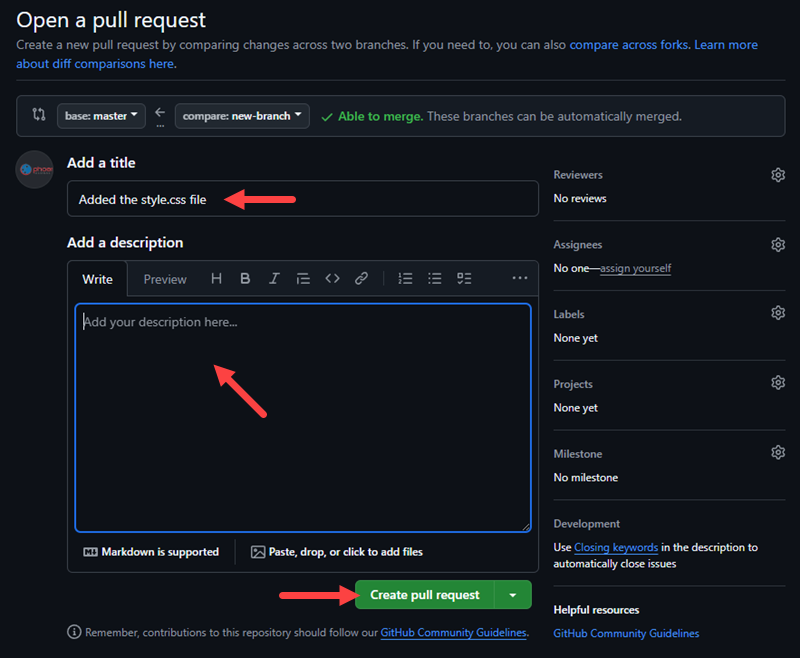
3. On the Open a pull request page:
- Use the base branch dropdown menu to select the branch you want to merge your changes into.
- From the compare branch dropdown menu, select the branch that contains your commits.
- Enter a title and description for your pull request.
- Click the Create pull request button when the pull request is ready for review.
Step 9: Merge Pull Request
Merge a pull request into the upstream branch after reviewing the changes. Any collaborator who has push access to the repository can merge the pull request.
1. Click the Pull requests tab on your repository's main page.
2. From the Pull Requests list, choose the pull request you want to merge. There are several merge options that depend on your repository settings:
- Merge pull request. Merges all the commits into the base branch.
- Squash and merge. Squash all the commits into a single commit.
- Rebase and merge. Rebase the commits individually onto the base branch.
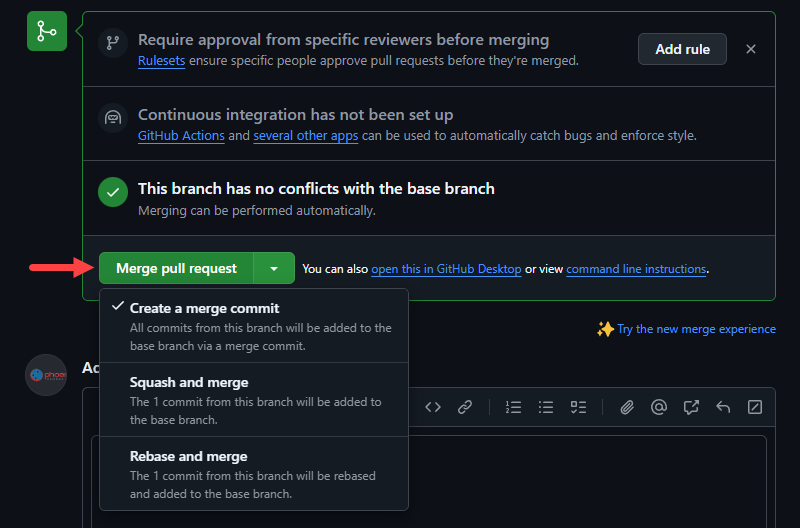
3. Confirm by clicking Confirm merge, Confirm squash and merge, or Confirm rebase and merge, depending on which option you selected.

4. After the merge, you can delete the branch to keep the repository tidy. GitHub automatically prompts you to delete it after the merge. Click the Delete branch button to delete it.

Step 10: Manage Your Files on GitHub
While developers mostly work on files locally, GitHub also allows them to create, edit, move, and delete files in a repository directly on the website. This section shows how to manage files using GitHub.
Create New File
Create a new file on GitHub to ensure all collaborators have instant access to it.
1. Navigate to the main page of your repository.
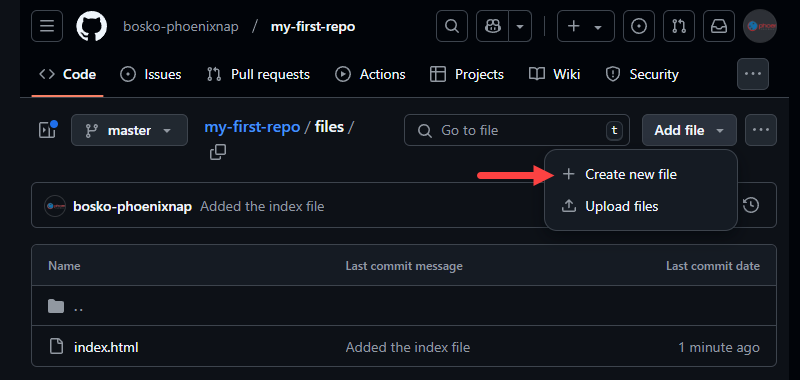
2. Browse to the directory where you want to create a new file and click the Add file button. Select the Create new file option to create a new file, or Upload files if you would like to upload a file from your machine.
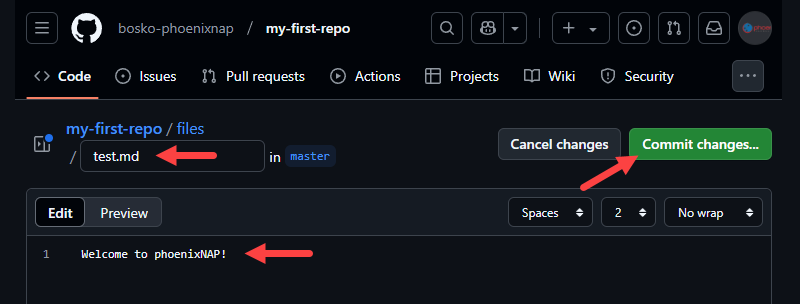
3. Name the file and provide its contents in the editing window. When ready, click Commit changes… to save the file.
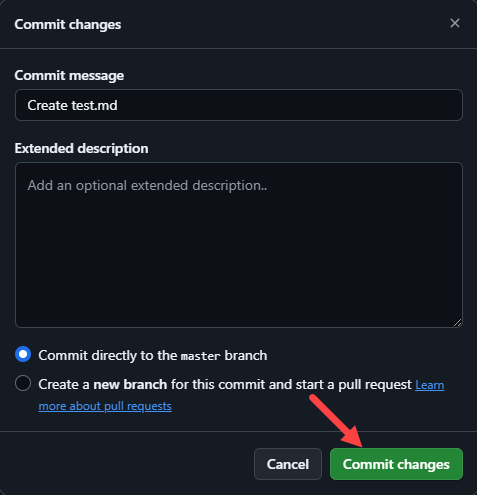
4. In the popup window, provide a commit message and description for the commit. The prompt also allows to the previously selected branch, or to create a new branch and start a pull request. When ready, click Commit changes.
Move/Edit/Rename a File
GitHub allows users to rename, edit, or move a file to a new location in the repository.
1. Navigate to the file you want to adjust.
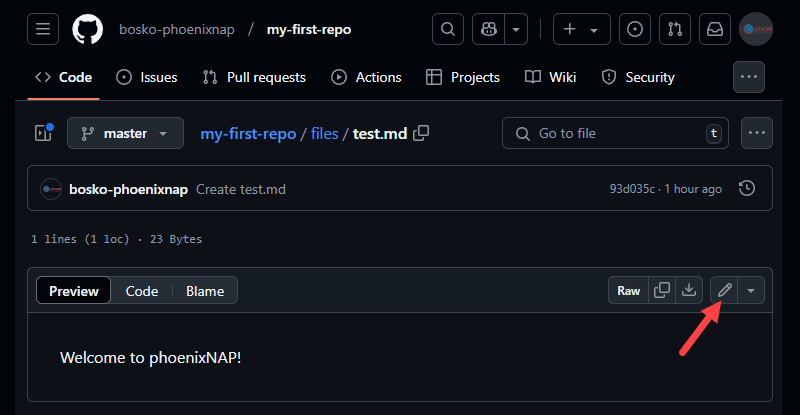
2. Click the pen symbol in the top-right corner to edit the file in a file editor.
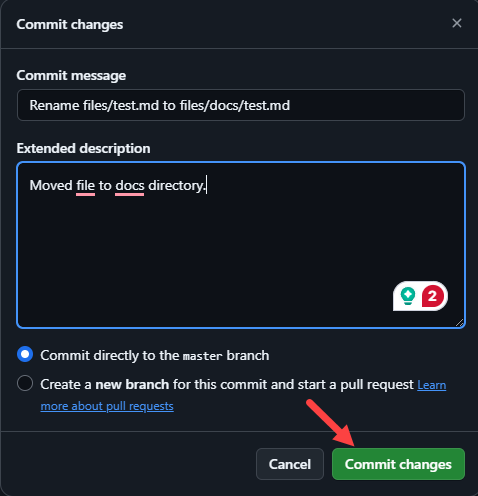
3. Use the editor to make changes to the file. Change a file's name in the file name field. To move a file, specify the new location in the file name field. For example:
- Move the file into a subdirectory by typing the folder name followed by a slash (/) before the file name. If the current file name is test.md and you want to move it into a subdirectory called docs, change the name to docs/test.md.
- Move the file one directory above the current location by typing ../ in front of the file name.
4. Click Commit changes… to apply the changes. When prompted, enter a commit message, add a short description to describe what you did, and click the Commit changes button to save.
Delete File/Directory
Delete a file or directory directly on GitHub to ensure everyone gets the changes the next time they perform a git pull.
1. Navigate to the file or directory you want to delete.
2. Select the three dots (…) from the top right corner and choose Delete file/Delete directory.
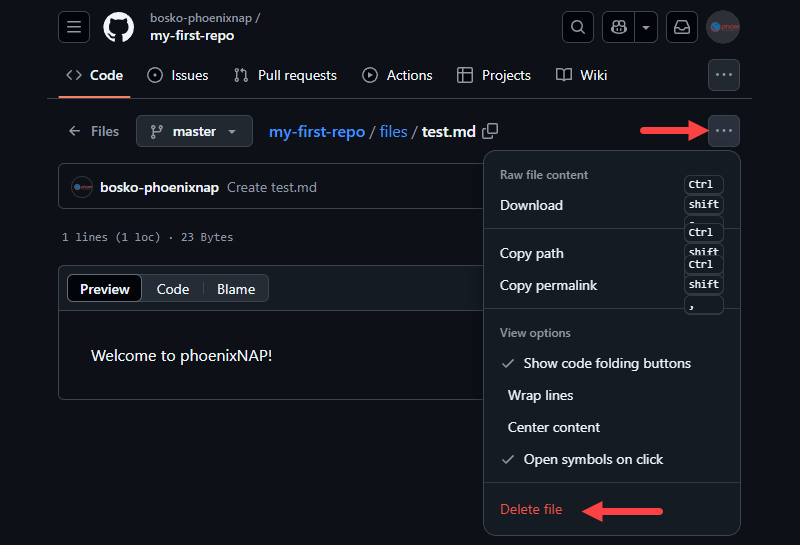
3. Click the Commit changes… button and, when prompted, provide a commit message and a short description for the action. When ready, click Commit changes to delete the file/directory.
How to Customize Your GitHub Profile
Customize your GitHub profile so that your collaborators and other people on GitHub can get to know you and your work. You can add personal information in your bio, such as previous workplaces, projects, or interests.
Create a public repository with the same name as your username and place the desired information in a README.md file in the repository root. The profile page automatically displays the information.
Other ways to customize your GitHub profile are:
- Change your profile photo on the Settings page, use a Gravatar, or an identicon (randomly generated when you sign up on GitHub).
- Change your profile name.
- Add your pronouns.
- Set your location and time zone.
- Link your social accounts.
- Add a badge to your profile.
- Earn various achievements (e.g., badges for contributing to various projects and repositories).
- Set an availability status, and more.
How to Write on GitHub
GitHub uses Markdown, a lightweight markup language for formatting text in files like README.md, issues, pull requests, and comments. Markdown is simple but also powerful as it allows users to structure and style their content without the need for complex tools. It ensures your documentation is readable both as plain text and rendered text, making it ideal for collaboration.
Basic Formatting with Markdown
This section outlines key ways to use Markdown to format text and write on GitHub.
Headings
Headings organize content into sections and they are created with the # symbol. The number of # symbols determines the heading level:
# H1 - Main Title
## H2 - Section Title
### H3 - Subsection
Text Styles
Markdown allows you to emphasize text for clarity:
- Bold. Wrap text in
**to make it bold:**important**-> important. - Italic. Use
*for emphasis:*example*-> example. Strikethrough. Use~~to indicate removed text:~~outdated~~->outdated.
You can also combine styles, e.g., **_very important_** -> very important.
Lists
Lists structure the content into readable bullet points or steps.
For unordered lists use - or *:
- Item 1
- Item 2
Ordered lists use numbers followed by periods:
1. First step
2. Second step
Links and Images
Markdown also supports embedding links or images in text.
Add hyperlinks with:
[Link Text](URL)For example:
[phoenixNAP](https://www.phoenixnap.com)The syntax to add images is similar, but with an exclamation mark (!):
Alt text is essential for accessibility and describes the image.
Code
Markdown is developer-friendly and supports code formatting:
Use backticks ` for inline code snippets:
Use the `git status` command to check changes.Use triple backticks for multi-line code (code blocks):
```git add .
git commit -m "Updated documentation"```
Tables
Use tables to present data in a clear and organized way. Create tables in the following manner:
| Feature        | Description          |
|----------------|----------------------|
| Easy to use  | Markdown is a simple markup language. |
| GitHub support | Fully supported on GitHub.     |
Align columns by adjusting spaces in the header row. For more details, check the GitHub Markdown Guide.
How to Search on GitHub
GitHub provides powerful search tools to help you find repositories, code, issues, pull requests, and more. Master GitHub search to improve productivity and easily navigate repositories, especially when collaborating with others.
To perform a basic search, use the search bar at the top of any page. Enter keywords, and GitHub returns results across repositories, code, issues, discussions, and more.
However, you can also perform advanced searches that provide precise results.
Search Operators
GitHub supports operators to refine your search. Combine them for precise results:
- User and repository search. Find repositories by name, author, or topic:
user:torvalds repo:linux- File content. Search for specific code or text in files:
"encase text or code in double quotes"- Language filter. Narrow down results by programming language:
language:python- Filename search. Locate specific files:
filename:README.mdFilters for Issues and Pull Requests
When working with issues or pull requests, use filters to locate them based on specific criteria:
- Status. The status filters allow you to specify open or closed issues and pull requests:
is:open/closed- Author. Find items created by a specific user:
author:john-doe- Label. Search by labels:
label:bug- Assignee. Locate items assigned to a user:
assignee:meCheck out GitHub's search documentation for more details.
How to Use GitHub Marketplace
GitHub Marketplace is a platform where developers discover tools to enhance and streamline their GitHub workflows. It serves as a hub for free and paid tools for various development needs.
GitHub Marketplace offers two types of tools:
- GitHub Actions. Developers publish actions that automate workflows directly within GitHub. While anyone can contribute actions, GitHub identifies certain verified partner organizations. Actions from these organizations display a "verified creator" badge that provide added confidence.
Note: Check out phoenixNAP's Bare Metal Cloud GitHub actions that act as an automated task runner. The actions react to GitHub events in your Git repository.
- Apps. Developers share applications that integrate with GitHub. These apps range from code review tools to project management integrations. Apps are available to all users for free, but only organizations are permitted to sell their apps on the platform.
For comprehensive guides on publishing GitHub Actions or apps, refer to GitHub's official documentation on publishing actions or listing apps.
How to Promote Your GitHub Profile
A GitHub profile is a powerful way to showcase development skills, projects, and contributions to the community. Promote it effectively to attract collaborators, grow your network, or stand out to potential employers or clients.
Some key steps to promote your GitHub profile are:
- Build an impressive profile README. Personalize your profile with a README that introduces you, highlights your skills, and showcases your best projects.
- Create high-quality repositories. Focus on significant projects with clear README files, meaningful commit messages, and well-documented code to demonstrate your expertise.
- Contribute to open-source projects. Collaborate on open-source projects. Submit pull requests, report issues, or improve documentation to showcase your teamwork and technical skills.
- Share your work on social media. Promote your repositories and projects on platforms like LinkedIn or Twitter. Explain their purpose and value to increase visibility.
- Add GitHub links to your portfolio. Include your GitHub profile or specific projects in job applications and professional profiles to provide concrete proof of your skills.
- Keep your profile active. Regularly update your repositories and push new commits to show consistent engagement and growth as a developer.
Focus on these essential tips to effectively promote your GitHub profile and make a lasting impression in the development community.
Conclusion
This tutorial provided an in-depth look at GitHub, explained its key features, tools, and use cases. After reading it, you should be able to set up and use GitHub effectively, manage your repository, and collaborate with other developers.
Next, learn to use Git in our tutorial for beginners, or learn about Git upstream and how to set it up.
