Secure Shell (SSH) is a method to establish secure remote connections between two computers. SSH is usually used to log in and manage remote servers.
This guide will help you generate and set up an SSH key pair on Debian Linux.
Prerequisites
- A system running Debian Linux (we're using Debian 12).
- Access to a terminal window/command line.
- A user account with sudo or root privileges for the local system.
- A user account and hostname for the remote server.
- SSH server installed and enabled.
Step 1: Check for Existing SSH Keys on Debian
If the system has previously connected to the remote server via SSH, it already has SSH keys. Check for pre-existing keys with the following command:
ls -l ~/.ssh
If the command responds that there is no such file or directory, there are no pre-existing SSH keys.
If the command lists files, it has an SSH key pair. To continue using this key pair, skip to Step 3. Alternatively, back up this key pair, then generate a new SSH key pair.
Step 2: Generate an SSH Key Pair on Debian
To create a public and private SSH key, follow the steps below:
1. In the terminal, enter the following command:
ssh-keygenThe command creates a 2048-bit RSA key pair by default. For added security, create a 4096-bit RSA key pair instead:
ssh-keygen -b 40962. The system processes the request and then prompts for the location to save the key pair.

The default location is ~/.ssh/id_rsa. Press Enter to accept the default location or provide a different path or key name.
3. If a key already exists on this system, it prompts you to overwrite the old key. The system will no longer be able to authenticate using the old key. Press y to continue.

4. Enter and confirm a passphrase. The passphrase is an added layer of SSH security that forces users to enter a password when connecting via SSH.

Set and confirm a passphrase, or leave it blank and press Enter to skip this step.
5. The command shows the identification and public key location, the key fingerprint, and the key's randomart image.
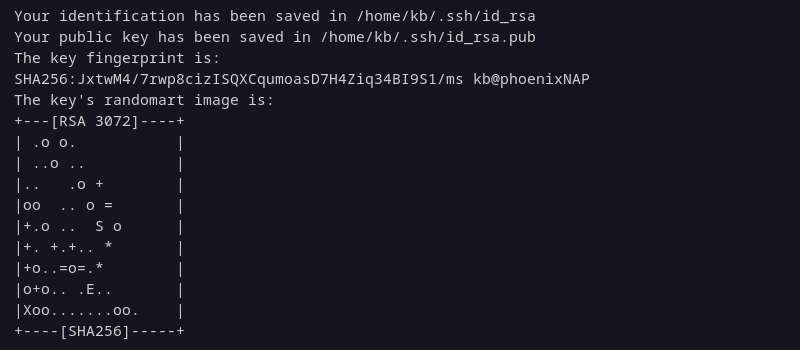
The keys are now available in the ~/.ssh directory unless saved at a different location. The public key default file name is id_rsa.pub, while the private key is id_rsa.
Step 3: Copy the Public Key to the Remote Server
There are two ways to copy the public key to the remote server. The SSH utility has a copy function, which is helpful for remote servers. Alternatively, copy the key manually if you have physical access to the remote server.
Copy Public Key Using SSH
Copy the public key to the remote server:
1. Enter the following command:
ssh-copy-id [username]@[hostname_or_IP]Replace [username] and [hostname_or_IP] with the values for the remote server.
2. The system now attempts to connect to the remote system using provided credentials. On the first connection, the system responds that the host's authenticity cannot be established.

Type yes and press Enter to continue connecting.
3. The system scans the local system for the id_rsa.pub key file generated in Step 2. Then, it prompts for the password for the user account on the remote system.
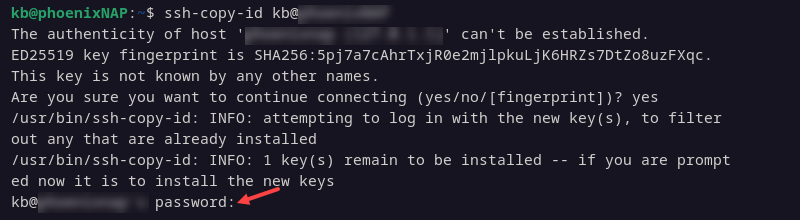
Provide the password and press Enter.
4. The system shows the number of keys added and the instructions for logging in to the remote system.

Note: By default, Debian 10 and later includes the ssh-copy-id command. If it's not included, it is part of the openssh-server package: sudo apt install openssh-server.
Copy the Public Key Manually
Alternatively, copy the key manually. Follow the steps below:
1. Display the SSH key with the following command:
cat ~/.ssh/id_rsa.pub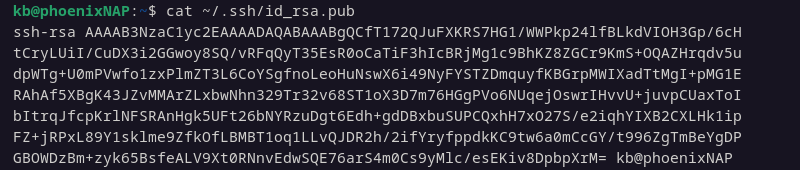
The cat command shows the contents of the SSH public key file. Copy the output.
2. Access the remote server.
3. Open a terminal and create a new hidden directory called .ssh in the home directory using the mkdir command:
sudo mkdir -p ~/.sshNote: If the ~/.ssh directory already exists, the command will exit without making changes.
4. Next, add the public key to the authorized_keys file by entering the following:
sudo echo [id_rsa.pub] >> ~/.ssh/authorized_keys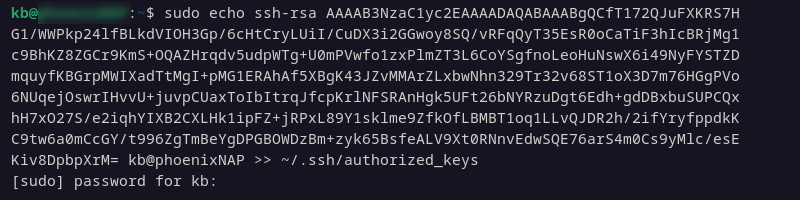
Replace [id_rsa.pub] with the actual public key displayed in Step 1.
5. Set the correct permissions for the new directory:
sudo chmod -R go= ~/.ssh6. If you're using the root Debian user account on the server, the directory owner must be set to the user account that will be logging in remotely to the server:
sudo chown -R [username]:[username] ~/.sshThe chown command changes the directory's ownership.
Step 4: Log in to Remote Server
With the public key copied to the remote server, SSH access is now available:
1. From the client system, open a terminal window and enter the following:
ssh [username]@[hostname_or_IP]Replace the placeholders with the actual values.
2. The system may display that the authenticity of the host can't be established. Type yes and press Enter.
3. If you set a passphrase, enter it when prompted.
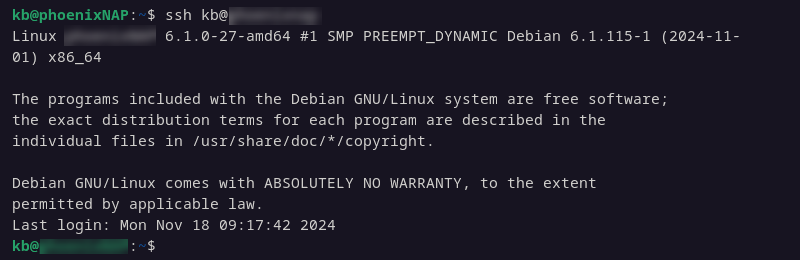
You should now have an SSH connection to the remote server.
Step 5 (Optional): Disable Password Authentication
Disabling password authentication is a security precaution. It prevents brute-force attacks from intruders attempting to log in to the server.
Before continuing, double-check the following:
- You can log into the server without a password (such as using an SSH connection with a key pair).
- You are logging into the server with a sudo user account.
To disable password authentication, edit the SSH config file:
1. Log into the remote server:
ssh [username]@[hostname_or_IP]The provided username should have sudo privileges.
2. Edit the sshd_config file in a text editor of your choice (we are using nano):
sudo nano /etc/ssh/sshd_config3. Find and modify the following lines. They should look like the following:
PasswordAuthentication no
ChallengeResponseAuthentication no
Alternatively, add them to the file if they do not exist.
4. Write the changes, then exit the editor.
5. Restart the SSH service to apply the changes:
sudo systemctl restart sshThe system no longer allows password authentication for logins.
Conclusion
This guide showed how to set up and generate SSH keys on Debian. Now, you can configure and connect to a remote system using SSH key pairs.
Next, learn more about how SSH works or master common SSH commands.