Hidden files and directories in Linux have a dot (.) prefix in their file name. They usually store system and user configuration data and facilitate program operation and customization without cluttering the user's workspace.
Hidden files often contain settings for shells, editors, and environment variables, and their hidden state is often a measure to prevent unwanted changes to critical configurations.
In this tutorial, you will learn to create hidden files and directories in Linux.
Prerequisites
- A system running Linux.
- Access to the terminal.
How to Hide Files and Folders in Linux
The process for hiding files and directories in Linux is the same across different Linux distributions. The convention is to place a dot (.) at the beginning of the name of a file or directory to hide it. For example, to hide myfile, rename it to .myfile, and mydirectory to .mydirectory.
However, there are some differences based on the desktop environment or file manager your system is using. This section shows how to hide a file or directory using the Linux command line and GUI.
Hide File or Directory Using the Linux Command Line
Hide a file or directory in Linux by placing a dot (.) at the start of the file name. The easiest way to do this is with the mv command. The syntax is:
mv [file/directory] .[file/directory]For example, to hide a file named example.txt, run:
mv example.txt .example.txtVerify that the file is hidden using the ls command:
ls
The file does not appear unless you include the -a option, which displays hidden files:
ls -a
Remove the dot prefix to unhide the file. For example:
mv .example.txt example.txtHide File or Directory in Graphical User Interface (GUI)
Depending on which operating system you use, the steps for hiding a file or directory via the GUI may slightly differ.
The table below lists the key desktop environments, their associated Linux distributions, the designated file manager, and the keyboard shortcut for showing/hiding hidden files:
| Desktop Environment | File Manager | Key Distributions | Show Hidden Files Shortcut |
|---|---|---|---|
| GNOME | Files (Nautilus) | Ubuntu, Fedora, Debian (GNOME edition), Arch Linux (GNOME edition) | Ctrl + H |
| KDE Plasma | Dolphin | Kubuntu, Fedora KDE Spin, openSUSE, Debian (KDE), EndeavourOS KDE, Arch Linux (KDE) | Alt + . |
| XFCE | Thunar | Xubuntu, Fedora XFCE Spin, Debian (XFCE), Manjaro XFCE, EndeavourOS XFCE | Ctrl + H |
| Cinnamon | Nemo | Linux Mint Cinnamon, Fedora Cinnamon Spin, Arch Linux Cinnamon, EndeavourOS Cinnamon | Ctrl + H |
| MATE | Caja | Ubuntu MATE, Fedora MATE Spin, Linux Mint MATE, Arch Linux MATE, Manjaro MATE | Ctrl + H |
When you determine which desktop environment your OS uses, refer to the sections below to hide files or directories in the appropriate GUI.
GNOME Desktop Environment
The GNOME desktop environment is used by distributions such as Ubuntu and Fedora. The procedure for hiding files is outlined below:
1. Open the Files app (also known as Nautilus).
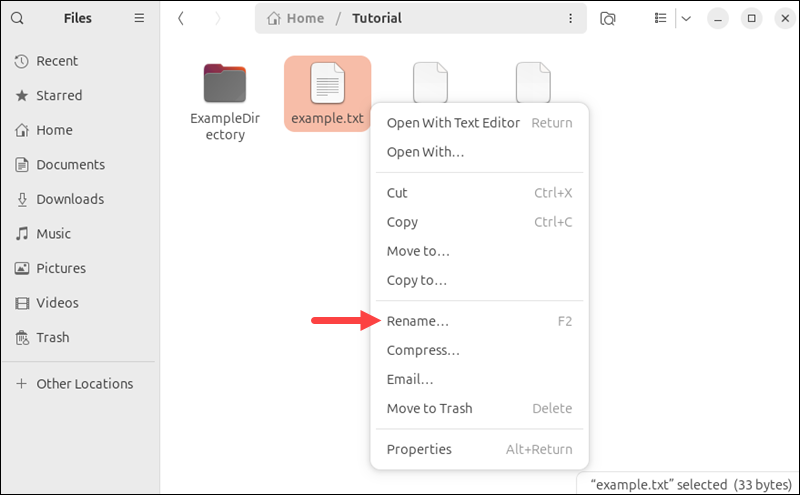
2. Right-click the file or directory you want to hide and select Rename.
3. Add a . (dot) at the beginning of the file or directory name (e.g., rename example to .example).
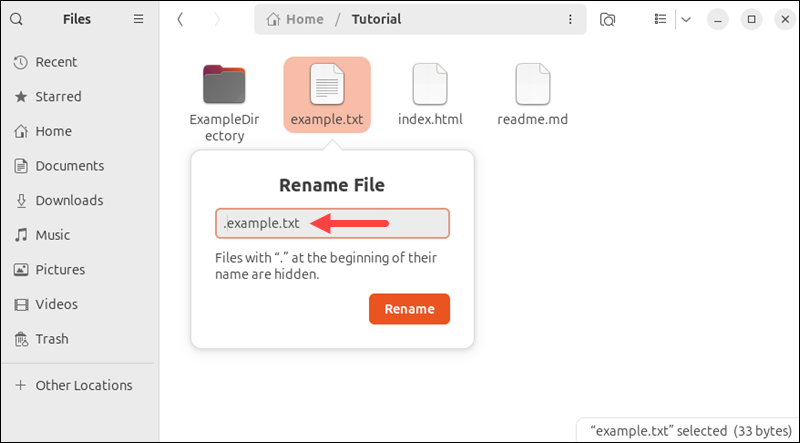
4. Press Enter to save the change. The file or directory is now hidden.
5. Press Ctrl + H to toggle the visibility of hidden files.
KDE Plasma Desktop Environment
KDE is a desktop environment used in distributions such as Kubuntu (Ubuntu's KDE edition), Fedora KDE Spin, openSUSE, and Debian KDE edition. Follow the steps below to hide files and directories in KDE-based distributions:
1. Open Dolphin (the KDE file manager).
2. Right-click the file or directory you want to hide and select Rename.
3. Add a . (dot) at the start of the name (e.g., change example to .example).
4. Press Enter to apply the change.
5. Press Alt + . (dot) to toggle hidden files in Dolphin.
XFCE Desktop Environment
The XFCE desktop environment is used in Xubuntu (Ubuntu's XFCE edition), Fedora XFCE Spin, Debian XFCE edition, Manjaro XFCE, and others. The steps below show how to hide files and directories in XFCE-based distributions:
1. Open Thunar (the XFCE file manager).
2. Right-click the file or directory, select Rename, and add a dot . at the beginning of the name (e.g., example to .example).
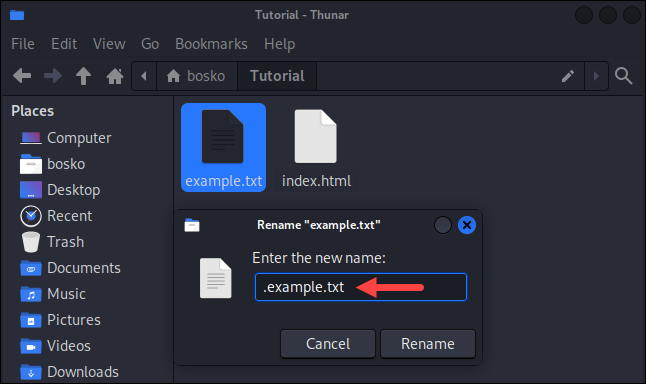
3. Press Enter to save.
4. Press Ctrl + H to show or hide hidden files.
Cinnamon Desktop Environment
Cinnamon is a desktop environment used in distributions such as Linux Mint Cinnamon and Fedora Cinnamon Spin. Follow the steps below:
1. Open Files (Nemo, the Cinnamon file manager).
2. Right-click the file or directory, select Rename, and add a dot . (dot) at the start of the name.
3. Press Enter to confirm.
4. Press Ctrl + H to toggle visibility.
MATE Desktop Environment
The MATE desktop environment is used in Ubuntu MATE, Fedora MATE Spin, and Linux Mint MATE. Follow the steps below to hide files and directories in MATE-based distributions:
1. Open Caja (the MATE file manager).
2. Right-click the file or directory, select Rename, and add a .(dot) to the beginning of the name.
3. Press Enter to apply the change.
4. Press Ctrl + H to reveal or hide hidden files.
How to Create Password-Protected Hidden Files
In Linux, you can create files that are both hidden and password-protected, which combines security and concealment. The sections below show how to do that via the command line and GUI.
Create Password-Protected, Hidden File from Command Line
This section provides two methods for creating a password-protected, hidden file using the command line in Linux. Follow the steps below.
Using GnuPG
The gpg command (GNU Privacy Guard) provides secure file protection by encrypting files with a passphrase or public/private key pair. Follow these steps to protect a hidden file with a password and increase file security:
1. Open the terminal.
2. Use the cd command to navigate to the directory that contains the file you want to protect with a password.
3. Within the directory, encrypt the file with the following command:
gpg -c [filename]For example, to encrypt the hidden .example.txt file, run:
gpg -c .example.txt4. When prompted, enter a passphrase for the file and reenter it in the box below to verify it. You can also check the Save in password manager box if you want to save the password using the system's password manager app. Confirm with Enter.
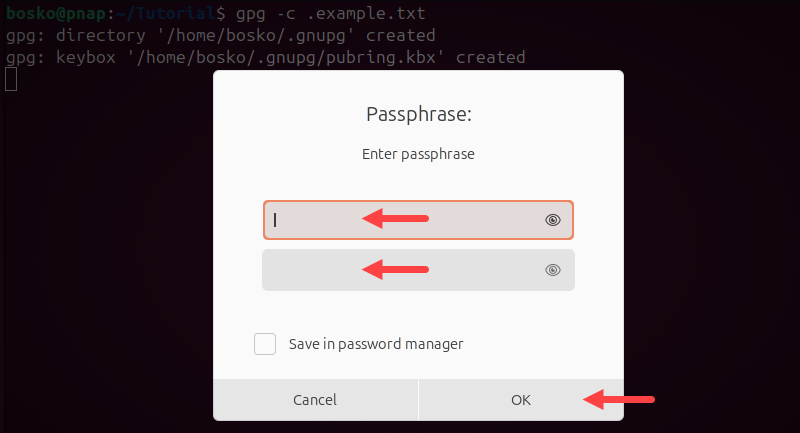
GnuPG creates an encrypted file with a .gpg extension in your current working directory.
5. Delete the unencrypted file with rm:
rm .example.txt6. To access the encrypted file, you must decrypt it first. The syntax to decrypt the file is:
gpg [filename].gpgWhen prompted, provide the passphrase you set for the file and press Enter. GnuPG creates a decrypted version of the file in your current working directory.
Using zip
The zip command compresses files into a single archive and can apply password protection. These features make the files portable and secure for distribution.
Follow the steps below to create a password-protected hidden file in Linux:
1. Open the terminal and navigate to the directory with the files you want to encrypt with the cd command.
2. Use the following syntax to create a password-protected zip file:
zip --password [your_password] [archive_name].zip .[file1] .[file2] …- Replace
[your_password]with the password you want to use to encrypt the archive. - Replace
[archive_name]with the file name you want to give to the archive. - For
[file1],[file2], etc., provide the names of all the hidden files you want to compress.
For example:
zip --password Str0ngPassW0rd protectedarchive.zip .example.txt
The command above creates the protectedarchive.zip archive with the .example.txt hidden file within it.
3. Unzip the archive and enter your password to access the compressed file. For example:
unzip protectedarchive.zipProvide your password when prompted and hit Enter to decrypt the file.
Create a Hidden, Password-Protected File from the Graphical User Interface
Follow the steps below to create a hidden, password-protected file using a GUI tool:
1. Open the file manager for your distribution (Files, Dolphin, Nemo, etc.) and navigate to the directory containing the hidden files.
2. Use the key combo for your file manager to show hidden files (Alt + . or Ctrl + H).
3. Right-click the hidden file you want to protect with a password and select the Compress… option:
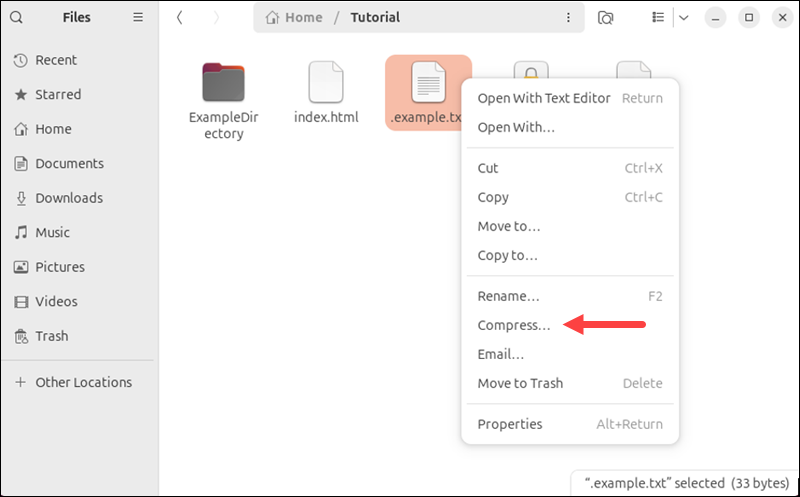
4. From the dropdown menu, select the .zip 🔒 option and enter the password you want to use for the file. Repeat the password and press Enter to create a password-protected archive with your hidden file:
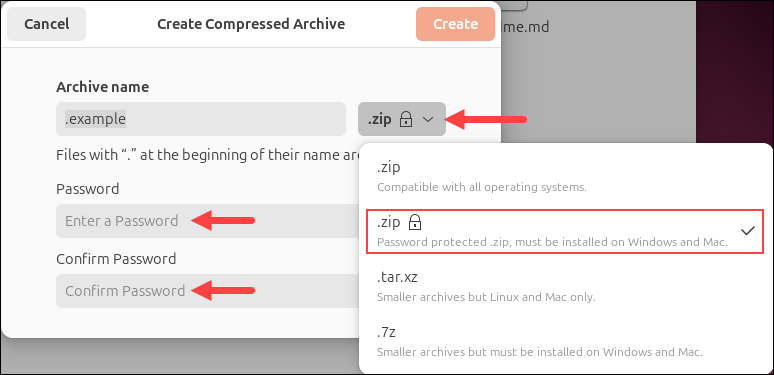
The file manager places the hidden file in the archive and protects it with the password you provided.
Conclusion
This tutorial showed how to create a hidden file and password-protected hidden file in Linux using several different methods, depending on your OS and desktop environment. Such files add an extra layer of privacy and security, making them ideal for storing sensitive information.
Next, learn about Linux file permissions to safeguard your data further and learn how to use the chmod command to change file and directory permissions.


