Git is an open-source version-control system for tracking changes during the software development life cycle. Its mutually independent branching model makes it stand out from other version-control systems.
Branches in Git represent a parallel version of the main repository that allows developers to work on a feature without affecting the main codebase.
This guide will provide multiple options for creating a new branch in Git.

Prerequisites
- A Git installation (see our tutorials for installing Git on Ubuntu, macOS, Windows, CentOS 7, or CentOS 8).
- Access to a terminal window/command line.
- A local or remote Git repository.
git branch Command Overview
The git branch command is versatile, allowing users to manage branches and obtain insights into branch relationships within the repository. The command has the following syntax:
git branch [options] [branch_name]The [options] are not mandatory. Running git branch without options performs basic operations, like listing branches.
The git branch command has multiple uses, including:
- Creating new local branches. Users can create a new branch with the specified name based on their current branch.
- Deleting existing branches. Specifying the
-doption instructs Git to delete a merged branch, while the-Doption deletes a branch regardless of its merge status. - Listing branches. Running
git branchwithout options displays all local branches, while specifying the-aoption displays remote branches as well. - Renaming branches. Specifying the
-moption allows users to rename the current branch.
The sections below explain the different uses of git branch and how it can be used for branch management.
Create New Branch in Git
There are many ways to create a new Git branch. In most cases, it comes down to whether you are creating a branch from the main (master) branch or, for example, a new commit or tag.
One common method of creating a new branch is to use the syntax below:
git branch [new_branch_name]Replace [new_branch_name] with the name of the branch you want to create.
Note: When choosing a name for your new branch, the best practice is to adhere to Git branch naming conventions to ensure your codebase remains clear and organized.
The command creates the branch but does not automatically switch to that branch. To switch to the branch, use git checkout or git switch:
git checkout [new_branch_name]or
git switch [new_branch_name]
Note: Learn the difference between git switch and git checkout.
Create New Git Branch From Current Branch
The easiest and most popular way of creating a Git branch from the current branch is to use the git switch or git checkout command with the -c and -b options, respectively. The syntax for both commands is shown below:
git checkout -b [new_branch_name]or
git switch -c [new_branch_name]The example below shows the use of git switch for creating a new branch and automatically switching to that branch:

Create New Git Branch From Different Branch
To create a new branch from a different branch, use the syntax below:
git checkout -b [new_branch_name] [specific_different_branch]Replace [new_branch_name] with the name of the new branch and [specific_different_branch] with the name of the existing branch from which the new one should be created. For example, to create a branch called new_branch from the master branch, enter:
git checkout -b new_branch master
Create a Branch from a Commit
A Git commit represents a snapshot of your repository as it saves the changes made in the code. A project can have multiple commits as it is revised and improved. Each commit has a unique ID called a hash, which can be used to create a branch based on that specific commit.
Find the hash key for a specific commit using the following git log command:
git log --onelineThe log contains the hash keys:

To create a branch from a commit, use the syntax below:
git branch [new_branch_name] [commit_hash]For example:

Creating a branch from a commit is especially helpful if you need to go back to a previous software version to fix a bug without removing any existing features.
Create a Branch from a Tag
A tag is a reference to a specific point in a project's history, usually a final, unchangeable version of a commit. To create a new branch from a tag, use the syntax below:
git branch [new_branch_name] [tag_name]For example:

For more details, check our in-depth Git checkout tag guide.
Create a Branch Using Detached HEAD State
A detached HEAD state happens when you check out a commit that is not formally part of a branch. The state allows you to make changes and commit them, but no branch is tracking the changes.
To create a branch using the detached HEAD state, check out a specific tag or commit. Obtain the commit hash by running git log --oneline, and use it in the following command:
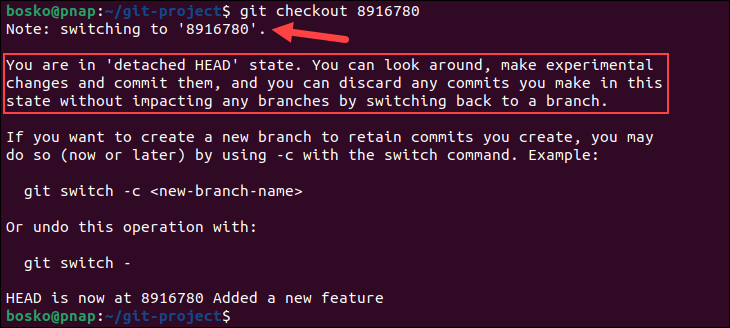
git checkout [commit_hash]The system prints the following output:

As the warning outlines, you can make changes based on the commit. However, changes are lost if you don't save them because no branch is set to track them.
To save the changes, create a new branch using the git branch command and switch to it with git switch. Then, stage the changes, and create a new commit. When you finish working, you can merge the changes into the master branch.
Create a Branch from a Remote Branch
To create a new branch locally based on an existing remote branch, use the git branch command with the --track option:
git branch --track [new_branch] [remote_repository]/[remote_branch]- Replace
[new_branch]with the name you want to give to the local branch. - Replace
[remote_repository]with the name of the remote repository that holds the remote branch. If you haven't changed the default name, it isorigin. - The
[remote_branch]is the name of the remote branch from which you want to create a new one.
In the following example, we created a new branch called new_branch based on the remote test-branch located in the origin repository:

Alternatively, use the git checkout command to keep the original remote branch name:
git checkout --track [remote_repository]/[remote_branch]The git checkout command automatically creates the remote branch locally with the original name.
Create a Branch in a Remote Repository
After creating a branch in the local repository with git branch, use the git push command to create that branch in a remote repository based on the local branch. The syntax is:
git push -u [remote_repository] [local_branch]For example, the following command creates the branch newbranch in the remote origin repository and ensures there is a tracking connection:
git push -u origin newbranchHow to Delete a Git Branch
Use the -d option with git branch to delete a merged local Git branch which has been pushed to the remote repository. On the other hand, use the -D option to delete a branch regardless of its merge status.
The syntax is:
git branch -d|-D [branch_name]The following example illustrates how to delete a local, merged branch:

The output confirms that the branch has been deleted.
However, if you want to delete a remote branch, use the following syntax:
git push [remote_repository] --delete [branch_name]Conclusion
You now know how to create and manage branches in Git using git branch. Branches are useful for testing features before integrating them or for fixing bugs.
Next, learn about Git branching strategies to decide which strategy best fits your needs.


