Rocky Linux is an open-source server-oriented Linux distribution based on the Red Hat Enterprise Linux (RHEL) code. The OS's main features are stability, performance, and thriving community support and development.
Installing Rocky Linux on a virtual machine allows you to divide resources between multiple operating systems, improve security, and make the OS portable.
In this tutorial, you will learn to install Rocky Linux on VirtualBox.
Prerequisites
- A Windows or Linux host machine.
- VMware Workstation (see how to install VMware on Ubuntu).
Installing Rocky Linux 9 on VirtualBox
Rocky Linux 9 is the latest Rocky Linux version with performance and security improvements and a new reproducible build system. Install Rocky Linux on VirtualBox by following the steps outlined in the sections below.
Important: Some users may encounter a kernel panic error while installing Rocky Linux 9. The error occurs with some AMD CPUs, and it is usually caused either by the CPU's lack of support for x86-x64-v2 architecture or by VirtualBox settings. However, there is not a definitive solution for the issue, and it depends on the system.
Download ISO and Set Up VirtualBox
Before installing Rocky Linux, download the Rocky Linux 9 ISO and create a VM in VirtualBox by following the instructions below.
Step 1: Download Rocky Linux ISO
Browse to the Rocky Linux Download page and download the Rocky Linux ISO image based on your CPU architecture. The ISO comes in three flavors:
- Minimal and Boot. For installing the OS from another source (such as an HTTP repository) or entering the Rescue Mode.
- DVD. A full Rocky Linux installation that ships with the BaseOS and AppStream repositories. This is the easiest and most common method of installing Rocky 9.
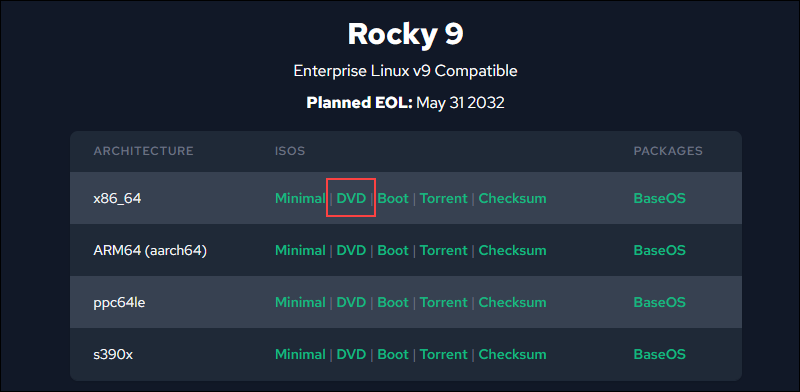
In this tutorial, we will use the DVD version.
To skip the VirtualBox configuration steps and start the OS installation, navigate to the Install Rocky Linux section.
Step 2: Create New VM
Open VirtualBox and click New to create a new virtual machine:
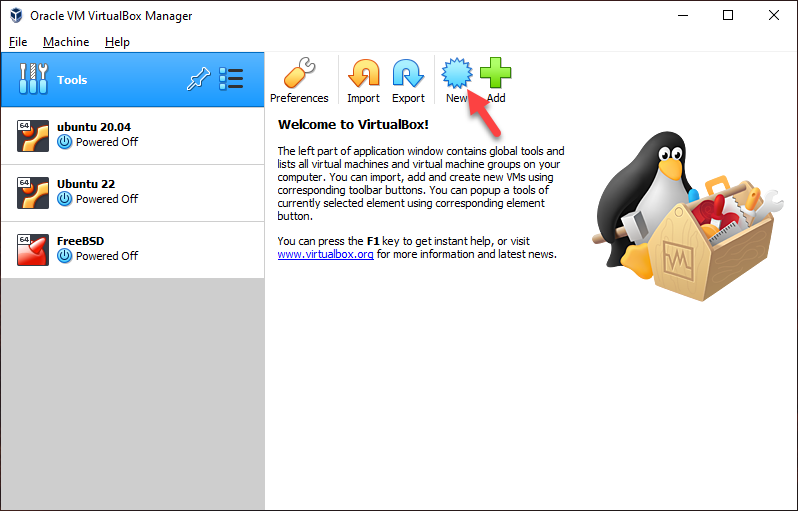
Step 3: Select OS Type
In the popup window, configure the following settings:
- Name: Give the VM a name to indicate which OS it is running.
- Machine Folder: Specify where to store the files required to run the VM. If it's not important for you, keep the default destination.
- Type: VirtualBox automatically guesses the OS type based on the VM name and should preselect Linux. If not, choose Linux from the dropdown menu.
- Version: Select Red Had (64-bit) if you are on a 64-bit architecture. Alternatively, select Red Hat (32-bit) if you are on x86 architecture.
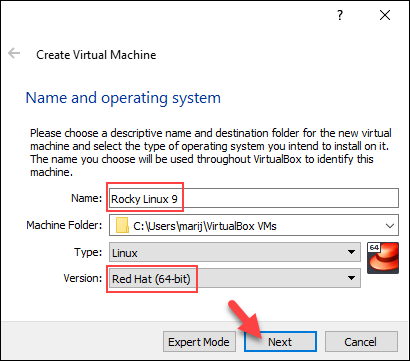
After configuring all the parameters, click Next.
Note: Learn the difference between x86 and x64 architectures.
Step 4: Select RAM Size
Based on your host machine resources, allocate the amount of RAM for the VM. The recommended amount is 2GB, but more RAM provides better performance.
Drag the slider or type in the desired RAM amount, expressed in megabytes.
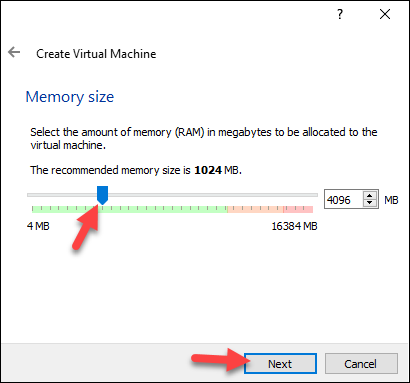
Click Next to move on to the next step.
Note: Install Rocky Linux in RAM using the Custom OS feature on our Bare Metal Cloud and maximize the performance of cloud-native dedicated servers.
Step 5: Create Hard Disk
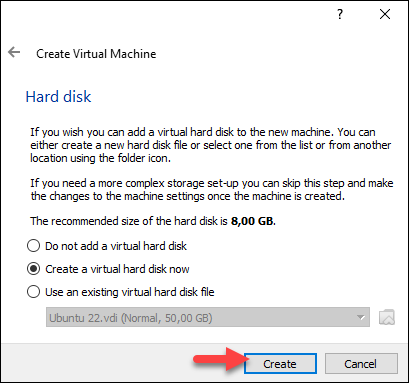
The next step is to create a virtual hard disk for the virtual machine. Select the Create a virtual hard disk now option and click Create.
Alternatively, you can select an existing hard disk file or skip this part if you want to create one later.
Step 6: Select Hard Disk Type
Choose one of the three types of virtual hard disks. All three types support dynamically allocated storage.
- VDI. The native disk format for VirtualBox. While other virtualization software lacks support for VDI, it's easy to convert VDI to other formats.
- VHD. The native format for Microsoft Virtual PC. Its successor is VHDX, but VirtualBox doesn't support VHDX.
- VMDK. Developed by VMWare but supported by VirtualBox. Select VMDK for broad compatibility with other virtualization software. Additionally, VMDK can split the storage file into files of less than 2GB each, which is useful for file systems with a small file size limit.
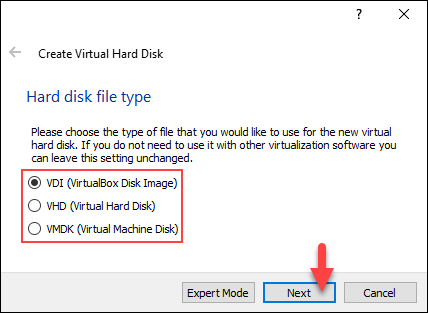
In this tutorial, we will use VDI. Select a hard disk file type and click Next.
Step 7: Choose the Storage Type
VirtualBox offers dynamically allocated storage or fixed-size storage. The fixed size is faster to use, but the size is not changeable later.
Dynamic storage uses more space as it fills up, up to a maximum fixed size, but it is not shrinkable.

In this tutorial, we will use a fixed-size hard disk. Select your type and click Next.
Step 8: Configure Disk Size and Location
Specify the disk file location or leave the default one.
Set the disk size using the slider or the box The minimum disk size for Rocky Linux is 20GB, and the recommended size is 40GB.
Depending on the disk type you chose in the previous step, either set the fixed, general disk size, or specify the maximum size for dynamic storage types.
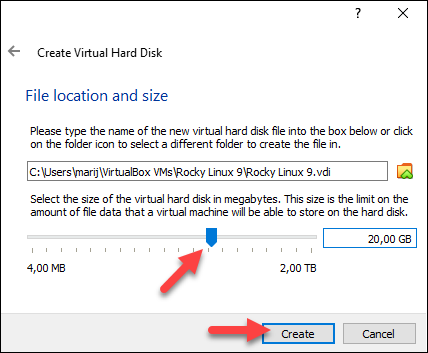
We chose a fixed disk size of 30GB. Click Create and wait for the process to finish.
Step 9: Configure VM Settings
When the disk creation completes, the creation wizard exists, and the new VM appears on the left side of the VirtualBox home screen.
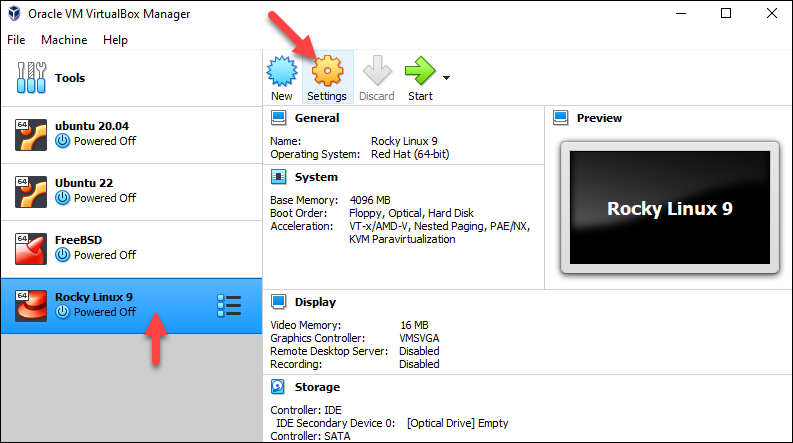
Select the new VM and click Settings to configure the new VM for Rocky installation.
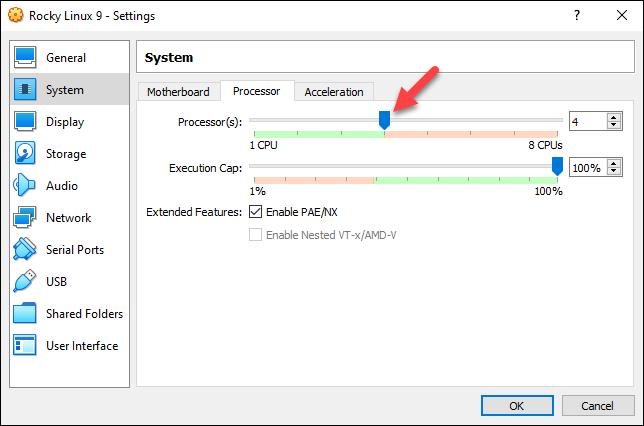
Step 10: Configure CPU
Ensure the best performance for the VM by allocating a sufficient number of processor cores.
1. Under the System settings, click the Processor tab. Drag the slider to allocate the desired number of cores, or type in the number in the box.
2. Click OK to save the changes.
Step 11: Insert Rocky ISO
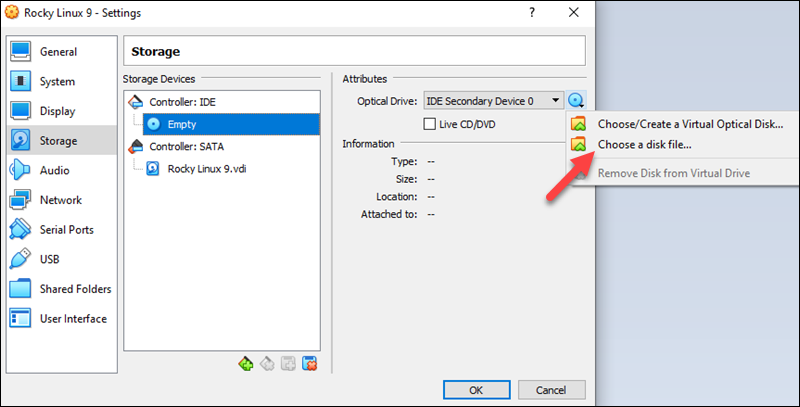
To boot from the downloaded Rocky ISO image, mount it in the virtual CD drive:
1. Select the Storage settings and click the disk icon labeled Empty.
2. Under the Attributes section on the right side of the screen, click the disk icon and select the Choose a disk file... option.
3. Locate and select the downloaded Rocky Linux ISO image.
When you successfully mount the ISO image, it appears in the Storage Devices section, under Controller: IDE:
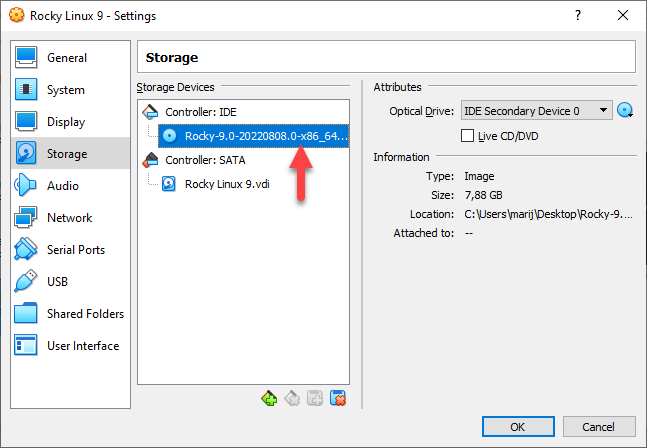
Click OK to save the changes.
Install Rocky Linux
After configuring the VM in VirtualBox, follow the steps below to install Rocky Linux.
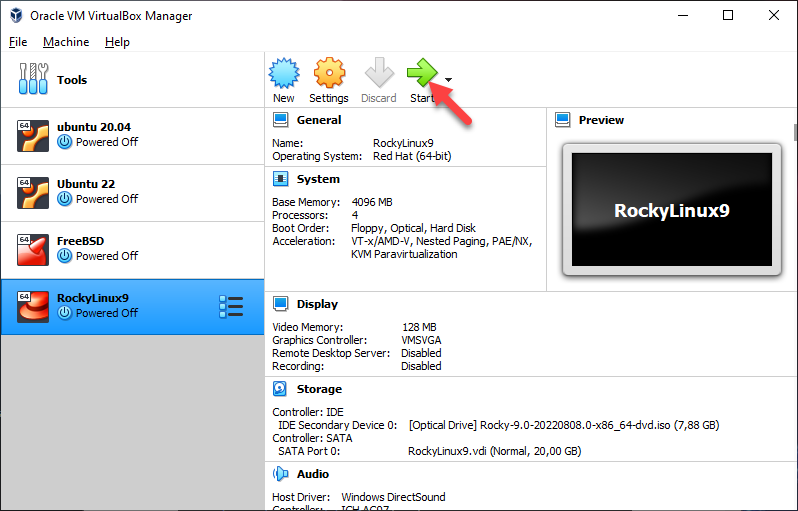
Step 1: Start VM
Boot up the virtual machine with the Rocky ISO mounted by clicking Start. This starts the OS installation.
Step 2: Start Rocky Installation
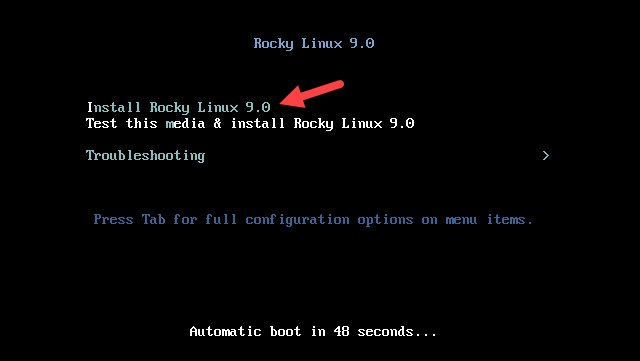
After starting the VM, the Rocky boot menu appears.
1. Select the Install Rocky Linux 9.0 option and press Enter to start the installation.
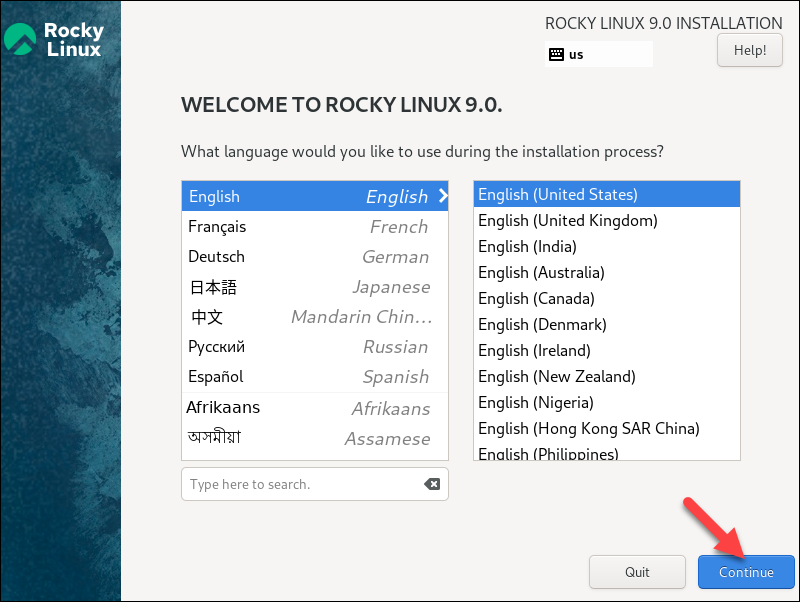
2. When the installer boots, select the language to use during the installation and click Continue:
Step 3: Configure Rocky Installation
The installer starts with an installation summary menu allowing you to configure the most important parameters for the OS installation:
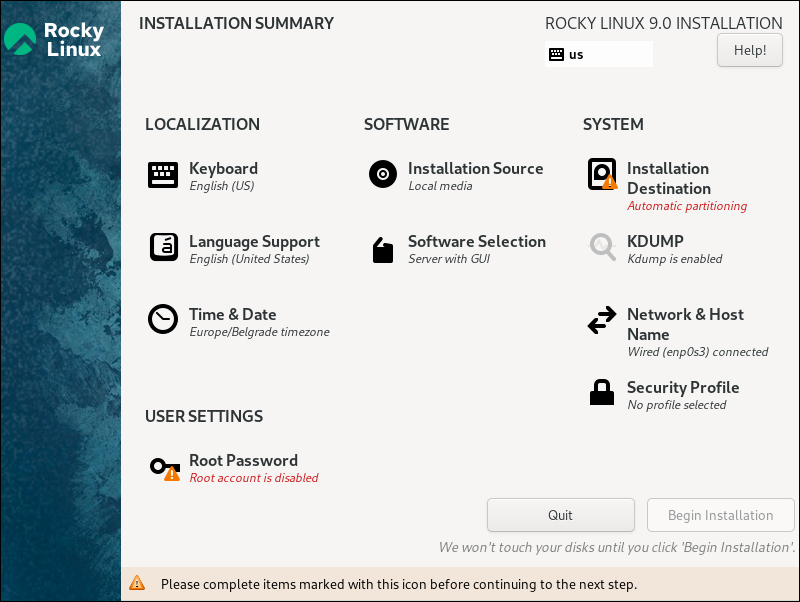
The settings are divided into four categories:
- Localization. Settings related to language, time, and date.
- Software. Settings allow you to choose a custom base and additional software.
- System. Configuration related to disk partitions, network settings, and security.
- User settings. User account and password creation settings.
Follow the steps below to configure the crucial parameters and install Rocky Linux.
Keyboard
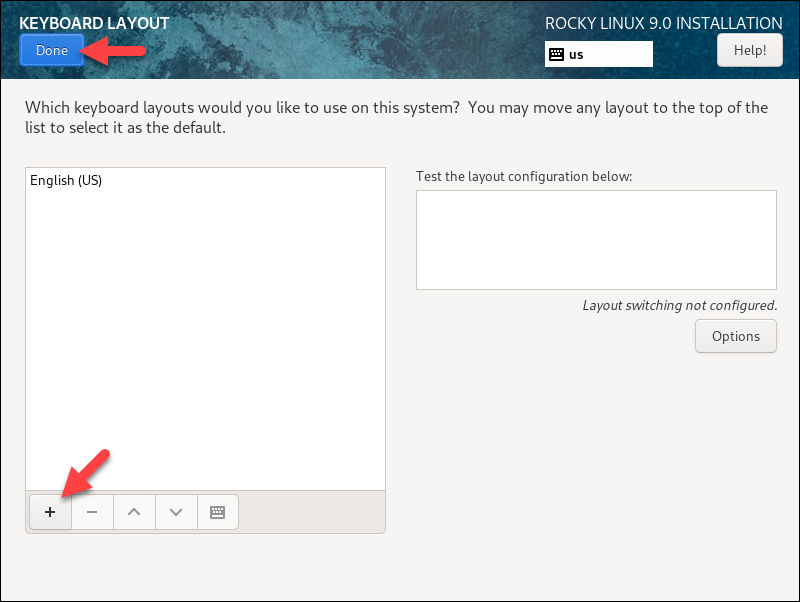
The Keyboard option allows you to add keyboard layouts. The default keyboard layout is already added based on the language you selected for the installation process.
Add a keyboard layout by clicking the + button and choosing from the list of supported layouts. Test the layout in the textbox on the right to ensure it is the correct one.
When finished, click Done to save the changes and return to the menu.
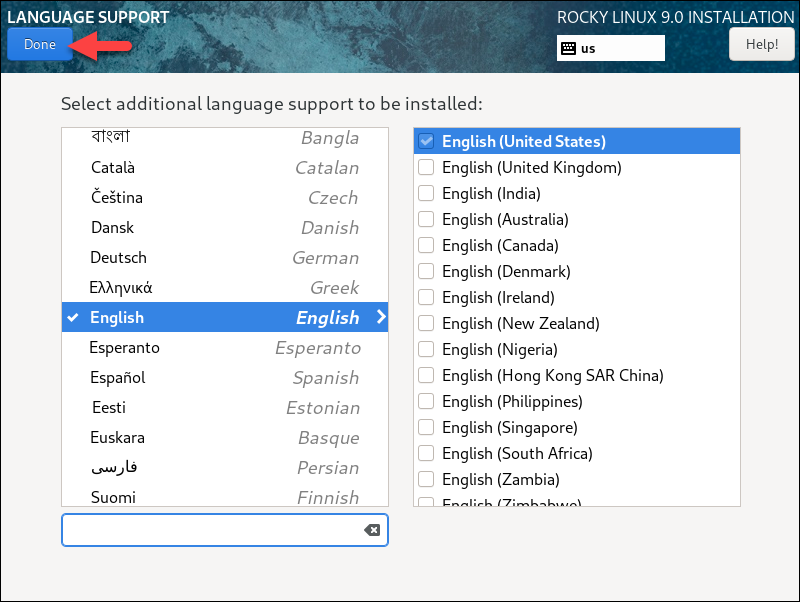
Language Support
The Language Support item allows you to install additional languages. Select from the list of available languages, and when finished, click Done.
Time and Date
The Time & Date option configures the time and date for your OS. The region and time zone are automatically detected if you have Internet access and the Network Time switch is on.
If you don't have Internet access, set up each parameter manually by selecting the region and city from the dropdown menu and setting the time and date in the bottom part of the screen.
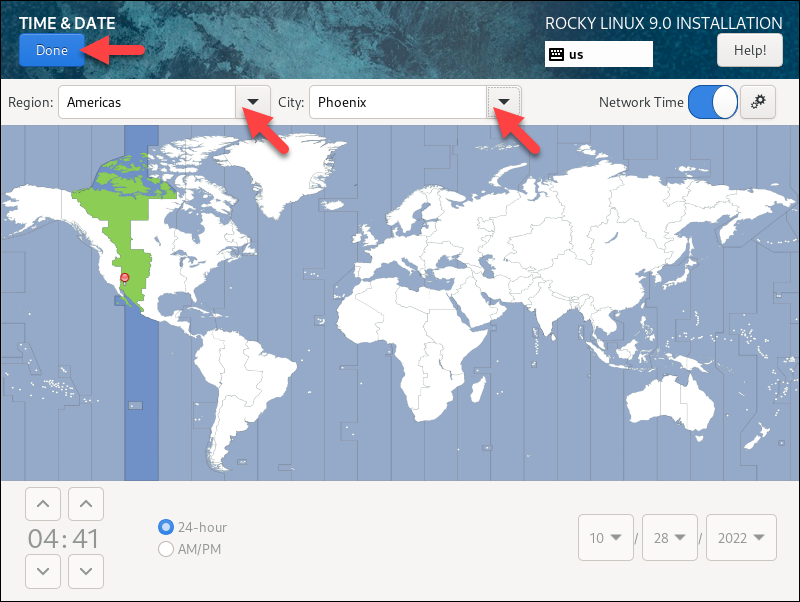
When finished, click Done to save the changes and go back.
Software Selection
The Software Selection item allows you to choose from a variety of base environments and additional software. Select an appropriate base environment and any additional software to install from the Additional Software section.
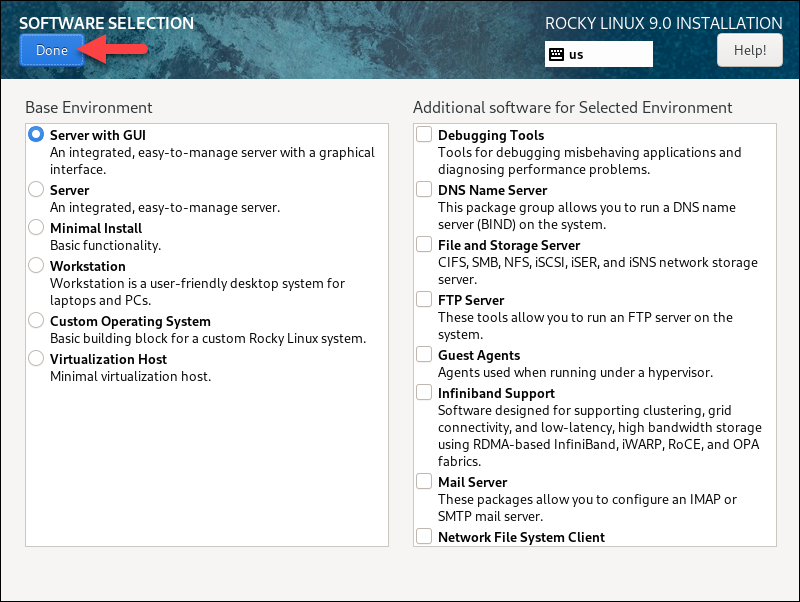
When finished, click Done to save the configuration and return to the installation menu.
Installation Destination
The SYSTEM section contains the settings pertaining to the installation destination and network settings.
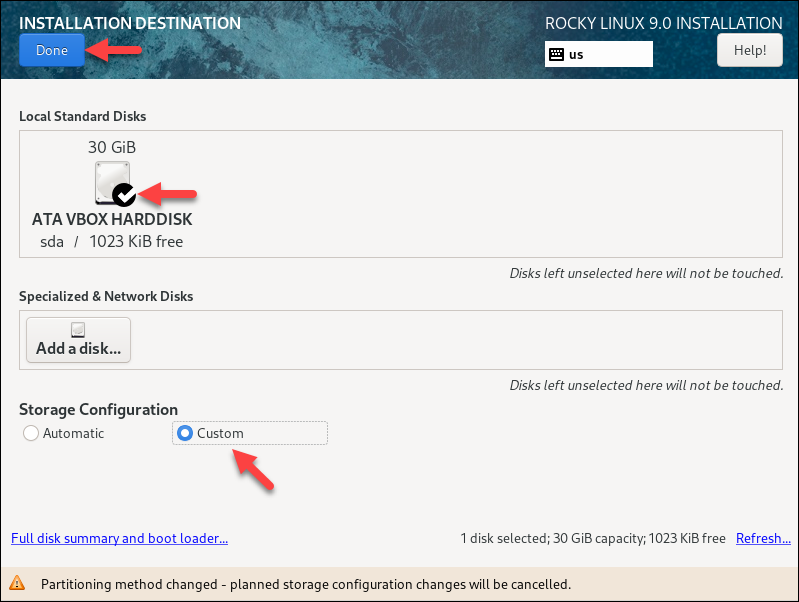
1. Click the Installation Destination item to select the destination disk and choose partitioning options. Make sure to click the disk you want to install Rocky Linux to and that there is a check mark on it.
2. Under Storage Configuration, choose Automatic to configure the storage automatically or Custom to create custom partitions on the disk.
For this tutorial, we will select Custom partitioning.
3. Click Done, and a Manual Partitioning window appears.
Note: If you select Automatic, skip the next step.
Manual Partitioning
Manual partitioning lets you create custom partitions on the disk before installing Rocky Linux. Follow the steps below:
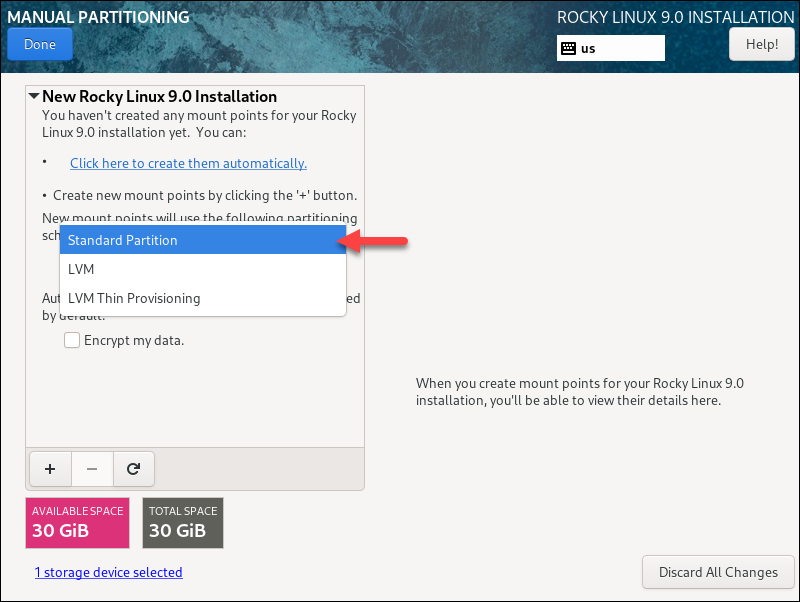
1. From the dropdown menu, select the partitioning scheme. We will be using Standard Partition:
2. Add a new partition by clicking the + button. Specify the partition mount point by selecting it in the dropdown menu, and enter the partition size:
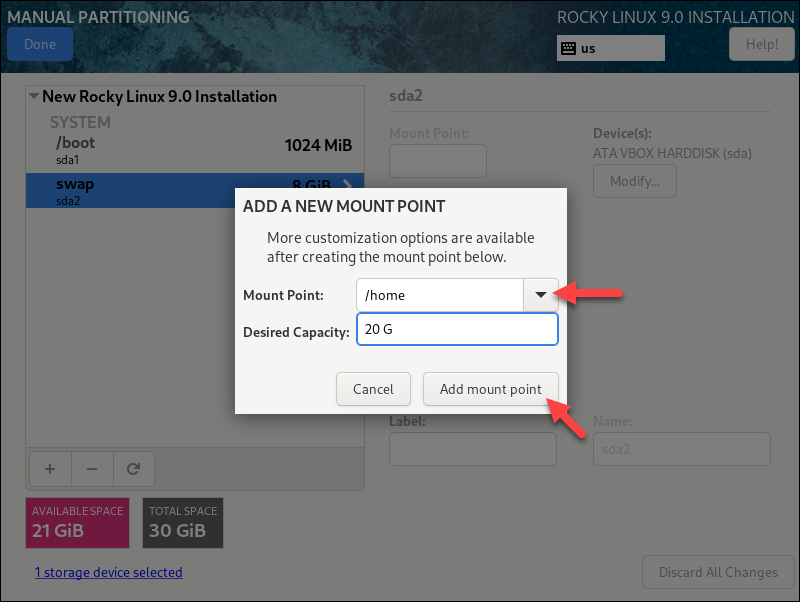
3. Click the Add mount point button to create the partition. Repeat the steps for each new partition you create.
An example partition scheme we will use in this tutorial is:
- /home - 20 GiB
- /boot - 1 GiB
- swap - 8 GiB
4. When you add all partitions, click Done to exit the partition manager.
5. The installer shows a summary of changes to be written to disk:
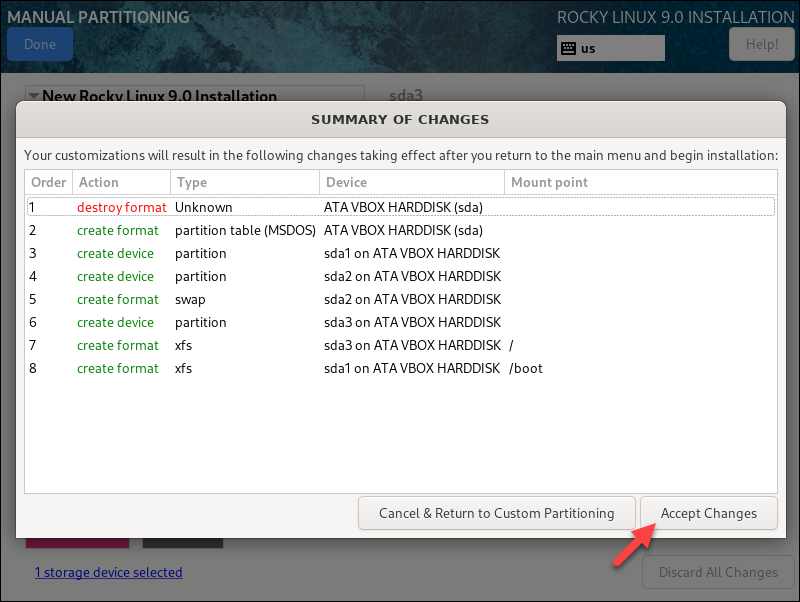
Click the Accept Changes button to proceed with the partitioning or Cancel to go back and make further adjustments. When the partitioning finishes, the installation menu appears for further customization.
Root Password
The Root Password item allows you to set up the system administrator password. Enter a strong password and confirm it in the field below.
The latest Rocky Linux version disables remote logins via SSH by default. Check the Allow root SSH login with password option to enable it.
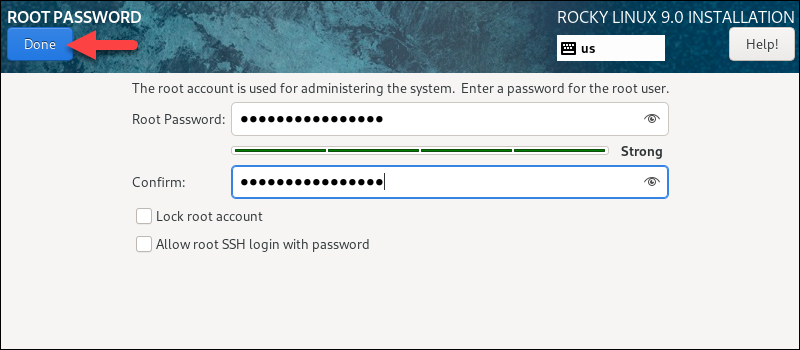
Click Done to save the root password and return to the installation menu.
User Creation
Click the User Creation item to create a new user for the OS. Enter your name and choose a username and a strong password. Retype the password and check the password strength indicator.
Make the user a system administrator by checking the Make this user administrator box.
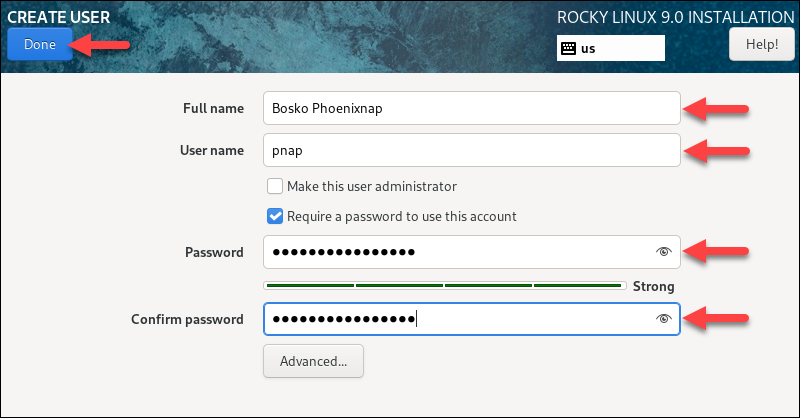
When finished, click Done to save the changes.
Install Rocky Linux
When you configure all the settings in the installation menu, click the Begin Installation button to complete the Rocky Linux installation.
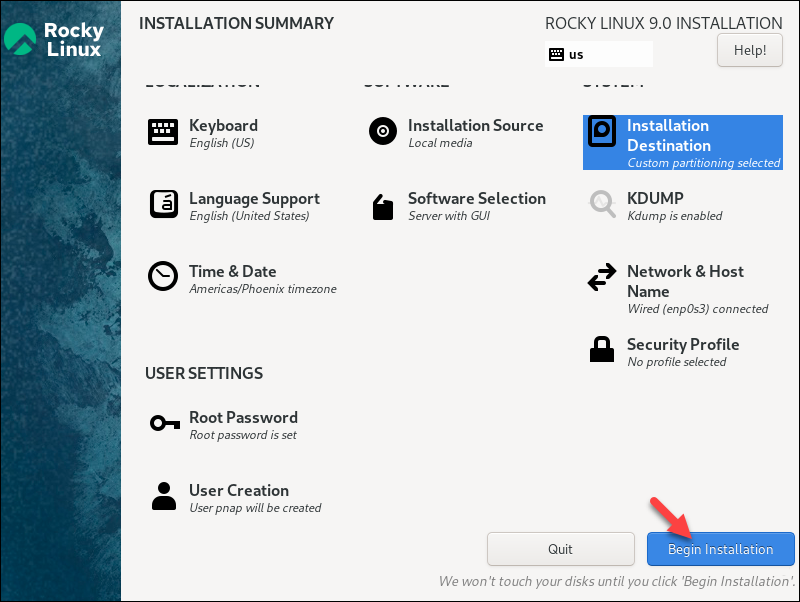
Wait for the Installation complete message. Don't reboot the system, as it will boot into the installation menu again. Instead, do the following:
1. Exit (power off) the VM.
2. Go to Settings -> Storage. Click the disk image to unmount the ISO and select the Remove Disk from Virtual Drive option.
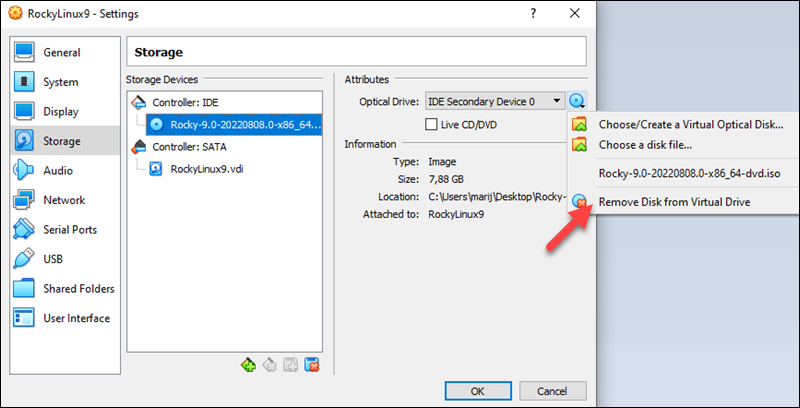
Start the Rocky VM and wait for the system to boot up.
Log in to Rocky Linux
When the system boots up, the login screen appears with the user account(s) you have created during the installation:
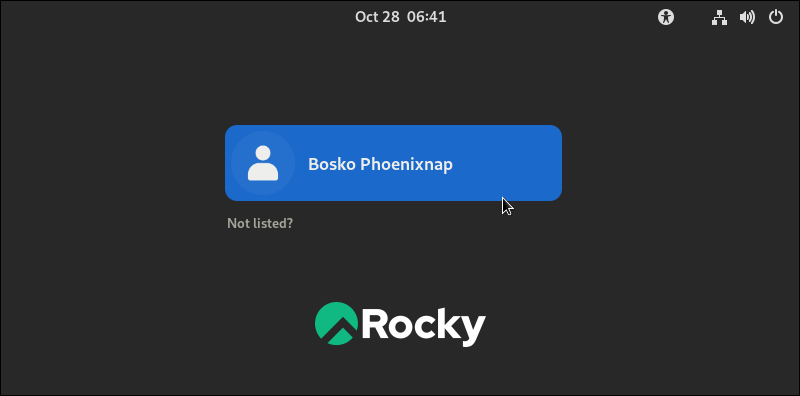
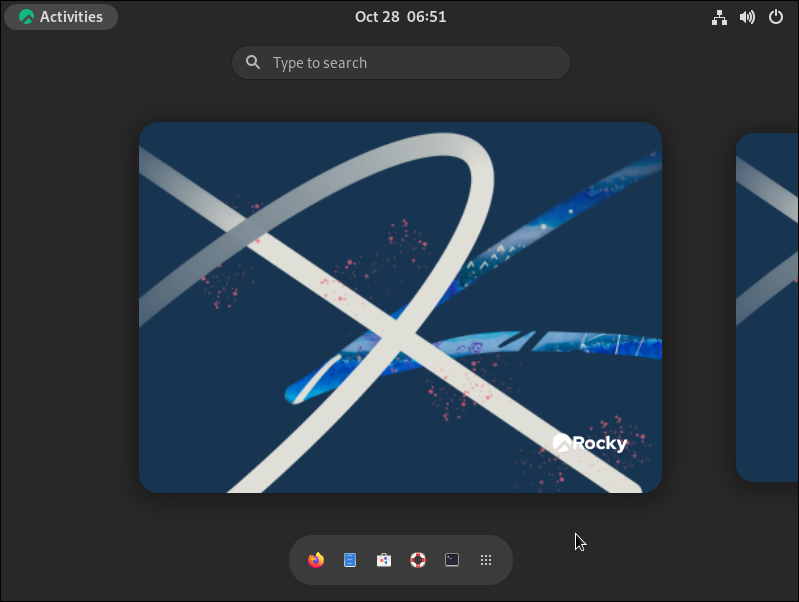
Select the user you want to use and enter the password. After logging in, the Gnome desktop environment appears.
Conclusion
This guide showed how to install the latest Rocky Linux on VirtualBox. The benefits of using virtual machines are numerous, but the most prominent one is that you can divide your resources across multiple OSes.
However, if you decide to install Rocky Linux on your machine and not use VirtualBox, follow our Rocky Linux installation guide.
