Disabling a firewall is sometimes necessary for testing, but it should be re-enabled immediately. A firewall on a production server protects sensitive data and creates a network security layer.
The default firewall for CentOS and Rocky Linux is firewalld. When properly configured, the firewall management tool helps secure the system and prevents unwanted entries.
This tutorial shows how to enable and use firewalld on CentOS and Rocky Linux.
Prerequisites
- A user with sudo privileges.
- Access to a command line/terminal.
- A CentOS or Rocky Linux machine.
Note: Firewalld is a dynamically managed firewall and the default firewall manager on CentOS and Rocky Linux. It uses both default and custom zones to allow or block incoming traffic.
How to Check firewalld Status on CentOS and Rocky Linux
Boot up the server and check whether firewalld is running. Open the terminal and run the following command:
sudo systemctl status firewalldThe sections below describe the different possible outputs depending on the firewall status.
Active: active (running)
The firewall is active if the output shows Active: active (running).
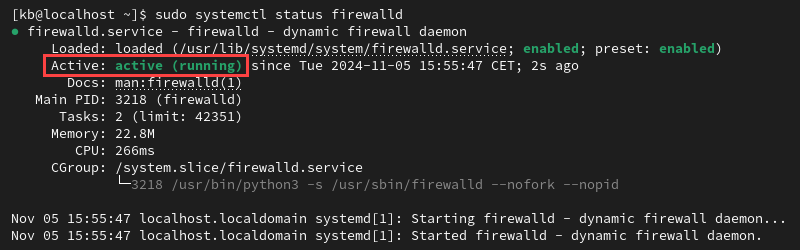
If the firewall manager did not start after rebooting, consider enabling the firewall.
Active: inactive (dead)
If the output reads Active: inactive (dead), the firewall is not running.
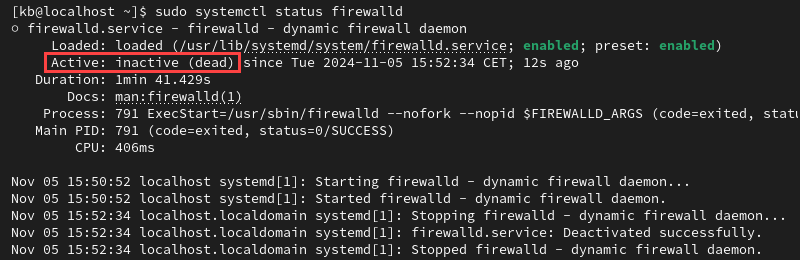
Start the firewall and optionally enable it to persist after rebooting.
Loaded: masked
If the output shows Active: inactive (dead) and Loaded: masked, the service is inactive and masked with a symlink.
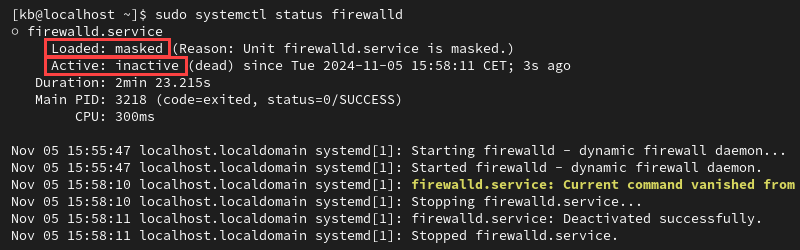
Admins may mask the service so other software packages wouldn't activate it automatically. Unmask the service with:
sudo systemctl unmask --now firewalld
The output shows the symlink has been removed.
How to Enable and Start firewalld on CentOS and Rocky Linux
To enable and start firewalld on CentOS or Rocky Linux:
1. Run the following command as sudo:
sudo systemctl enable firewalld2. After enabling the firewall, start the firewalld service:
sudo systemctl start firewalldWhen the system executes the command, there is no output.
3. Verify whether the firewall has been activated successfully:
sudo systemctl status firewalld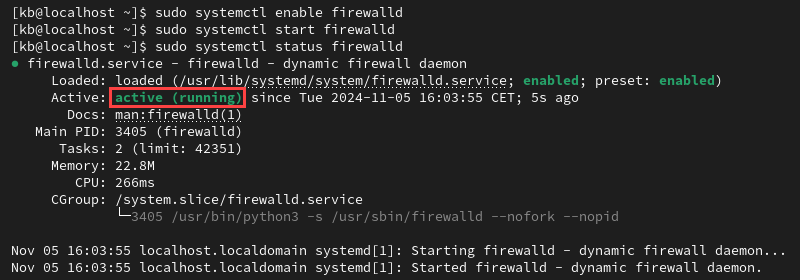
The output shows firewalld is active and running.
Firewall Zones
firewalld defines zones and categorizes all incoming traffic into zones. Each network zone has rules that determine whether it accepts or declines incoming traffic.
Zones determine which packet is allowed and which are blocked. This approach is more flexible than iptables, as you can set different zones for specific networks.
To view a list of all available zones, run:
sudo firewall-cmd --get-zones
The output shows pre-configured zones. The list below is zones ordered according to the level of trust, from the least to the most trusted:
drop. Drops all incoming connections without reply, and only outgoing connections are possible.block. Rejects incoming requests with anicmp-host-prohibitedoricmp6-adm-prohibitedmessage.public. Represents public, untrusted networks. Allows selected incoming connections.external. Defines the external networks when using the firewall as a gateway. It is configured for NAT masquerading, so the internal network remains private while still being reachable.internal. Specifies the gateway's internal network. The computers are trustworthy, and some additional services are available.dmz. Used for computers located in a demilitarized zone (DMZ). These isolated computers will not have access to the rest of the network. Only certain incoming connections are allowed.work. Used for work machines. Trusts most of the computers in the network. A few more services might be allowed.home. Defines a home environment. This implies that the computers in this network are trusted and that a few more services are acceptable.nm-shared. Allows access to a host's shared network.trusted. Trusts all machines on the network. The most open zone that should be used sparingly.
To verify which zone is the default, run:
sudo firewall-cmd --get-default-zone
The command prints the currently set default zone.
Verify Active Firewall Zone
To verify which zone is active, type:
sudo firewall-cmd --get-active-zones
The output shows the active zone and the network interfaces it controls. Without additional configuration, the default zone is the only active zone.
Firewall Zone Rules
To see which rules are associated with the default zone, use:
sudo firewall-cmd --list-all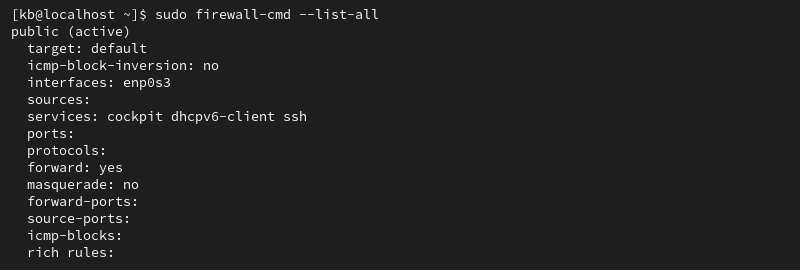
The elements are:
target. Indicates if it is a default zone.icmp-block-inversion. An optional element that inverts ICMP-block handling.interfaces. Lists all network interfaces controlled by this zone.sources. Specifies the sources for this zone (IP addresses).services. Shows allowed services. For example, it shows service names like ssh or dhcpv6-client. For a complete list of services available through firewalld, run:firewall-cmd --get-services.ports. Lists port numbers allowed through the firewall. This allows services that are not predefined in firewalld.protocols. Shows the protocols associated with the zone.masquerade. Displays if IP masquerading is enabled. When enabled, it allows IP forwarding, enabling your server to act as a router.forward-ports. Shows a list of all forwarded ports.source-ports. Lists all source ports and protocols relating to this zone.icmp-blocks: Displays blocked ICMP traffic.rich rules. A list of all advanced rules.
To get a list of rules for a specific zone, add the --zone= parameter and provide the zone name to the --list-all command:
sudo firewall-cmd --zone=work --list-all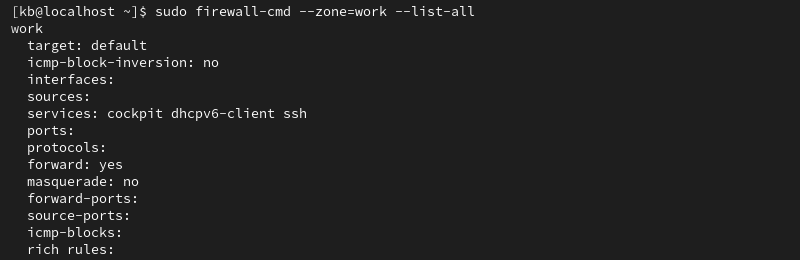
The command above will generate a list of rules associated with the work zone.
How to Change the Zone of an Interface
Reassigning another zone to a network interface is simple. Use the --zone flag to specify the zone and then add the --change-interface option to specify the network interface. For example:
sudo firewall-cmd --zone=home --change-interface=eth1Verify whether the changes took effect:
firewall-cmd --get-active-zones
The firewall applies the zone to all incoming traffic from the eth1 network interface.
Warning: Changing the zone of an interface affects active services. For example, if you're working through SSH and move a network interface to a zone that does not support the SSH service, your connection drops, and you will not be able to log in.
Change Default firewalld Zone
Use the --set-default-zone flag to change the default zone. For example:
sudo firewall-cmd --set-default-zone=workThe output indicates that the change was successful. Verify the modification with:
sudo firewall-cmd --get-default-zone
The output shows that the work zone is the new default one.
Conclusion
This guide showed how to check the firewalld status and enable and start the firewall on CentOS and Rocky Linux. We also covered the basics of firewall zones and how to manage them.
Next, read more about the different types of firewalls.