SSH is a secure network protocol that enables the execution of administrative tasks on remote devices, including Raspberry Pi.
This guide shows how to enable and use SSH on Raspberry Pi for different setups and operating systems.
Prerequisites
- Raspberry Pi with Raspberry Pi OS installed on a microSD/SD or flash drive.
- Access to a computer with a microSD/SD card reader if using a card.
- Access to an SSH client: PuTTy in Windows (or PowerShell) or terminal in Linux/macOS.
- Administrative access on the local system.
Enable SSH on Raspberry Pi in Headless Mode
Headless mode on Raspberry Pi means no peripherals (monitor, keyboard, and mouse) are connected to the device. To enable SSH in headless mode, follow the steps below depending on whether Raspberry Pi OS is installed on the card.
Enable SSH on Raspberry Pi During Installation
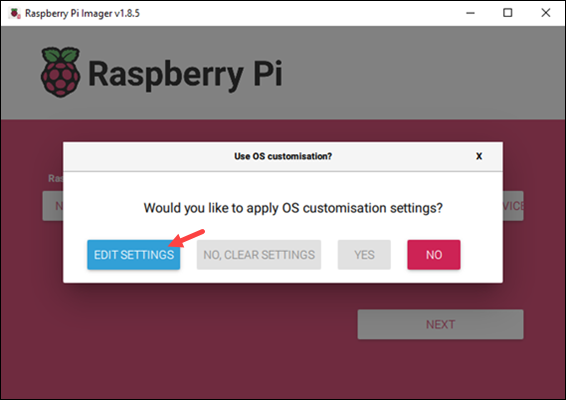
The Raspberry Pi imager tool writes the Raspberry Pi OS to a storage device. To enable SSH on Raspberry Pi during storage device setup, do the following:
1. Click Edit settings when prompted to use custom OS settings.
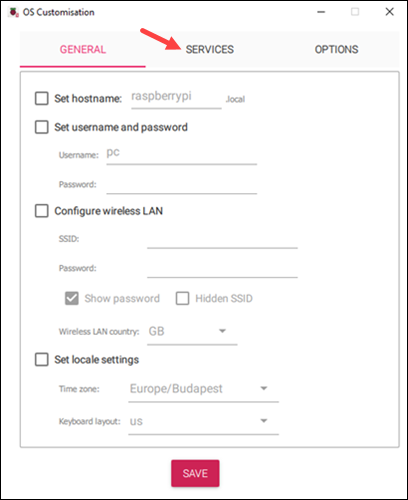
2. Open the Services tab.
3. Tick the Enable SSH checkbox and choose whether to use a password or public key authentication. To generate a key pair, click Run ssh-keygen.
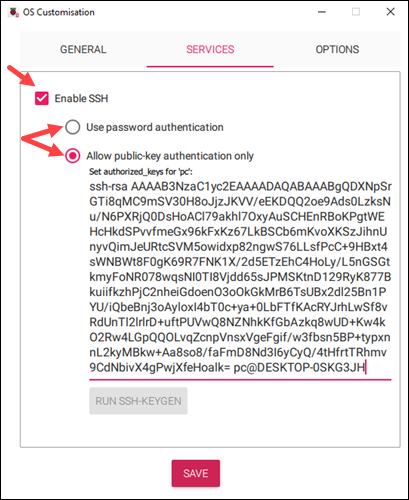
4. Click Save to save the configuration.
5. Click Yes to apply the configuration and continue the formatting process.
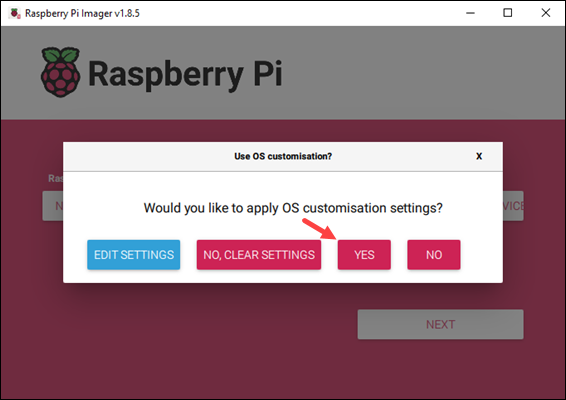
SSH is enabled immediately upon booting up the OS.
Enable SSH on Raspberry Pi After Installation
To enable SSH on Raspberry Pi in headless mode, create a file called ssh in the boot or bootfs directory. The directory name depends on whether Raspberry Pi OS has been started before or not.
Note: The commands below will use /bootfs. Switch the directory name in the commands if using /boot instead.
Follow the steps below:
1. Ensure Raspberry Pi OS is installed on the storage device. Turn off the Raspberry Pi device and remove the card if it's connected and running.
2. Place the storage device into your computer's card reader or USB port.
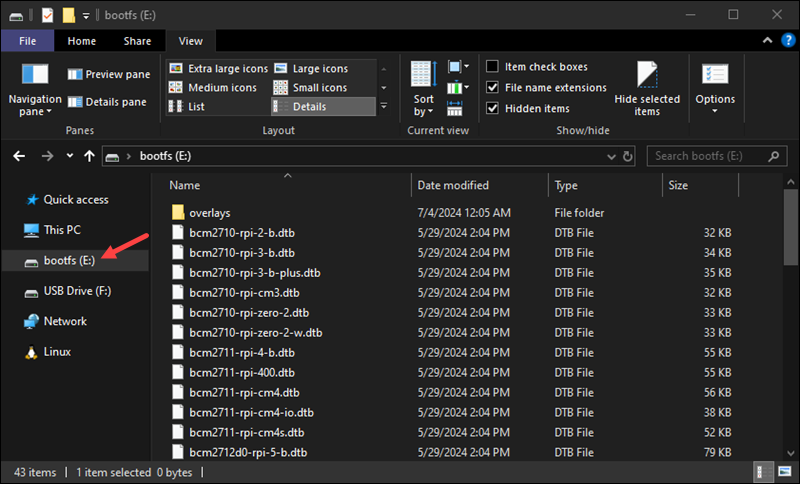
3. Navigate to the /bootfs directory. The steps differ depending on the OS:
- For Linux, run the following cd command in the terminal:
cd /media/[username]/bootfs
Replace the [username] with the actual system user.
- For macOS, use:
cd /Volumes/boot- For Windows, use the GUI file manager to navigate to the bootfs partition on the storage device.
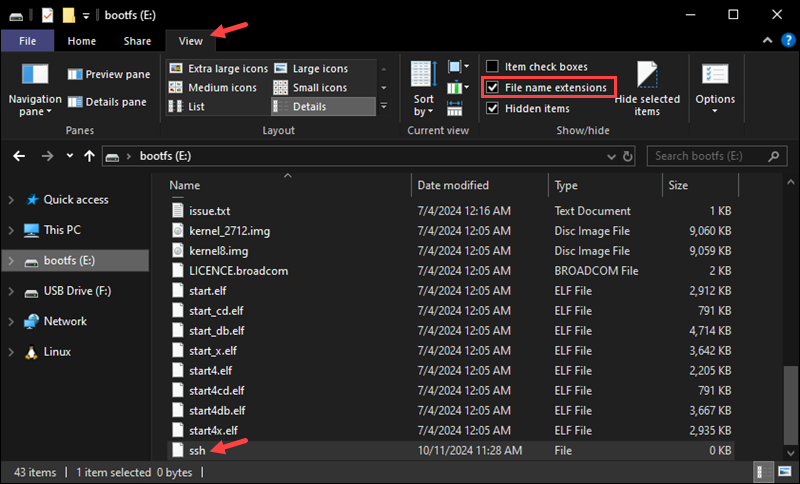
4. Create a new file in the /bootfs directory called ssh without extensions.
- For Linux and macOS, use the touch command:
touch ssh- For Windows, enable file extension visibility (View->File Name Extensions), then right-click->New->Text Document. Delete the .txt extension and name the file ssh.
5. Safely remove the card or flash drive and insert it into the Raspberry Pi again.
6. Boot up the device. The operating system automatically looks for the file and enables SSH.
Enable SSH on Raspberry Pi via GUI
You can enable SSH through the GUI if you have a monitor and other peripherals connected. Follow the steps below:
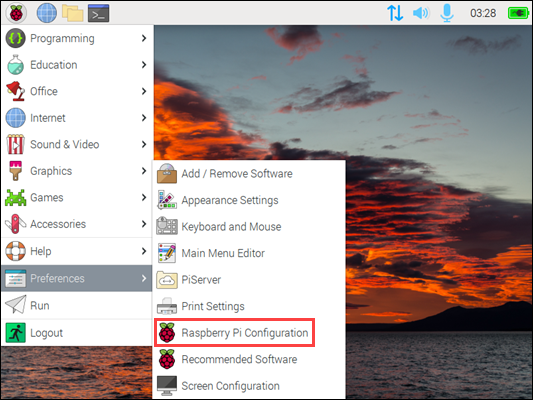
1. Open the applications menu. Click the Raspberry Pi logo in the top-left corner.
2. Choose Preferences->Raspberry Pi Configuration.
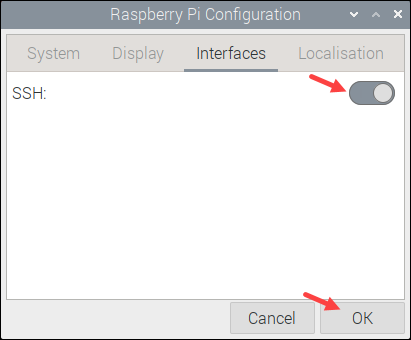
3. Switch to the Interfaces tab in the configuration window.

4. Enable SSH by toggling the switch to On and then click OK to save and apply the changes.
SSH is now enabled and ready to use for remote connections.
Enable SSH on Raspberry Pi in the Terminal
If you're running Raspberry Pi without a desktop interface or prefer using the terminal, there are several ways to enable SSH. The sections below cover how to enable SSH with the raspi-config tool, using systemctl, or manually. Choose a method that you prefer and follow the steps below.
Enable SSH on Raspberry Pi with raspi-config
To enable SSH using the raspi-config tool, do the following on the Raspberry Pi:
1. Open the terminal and run:
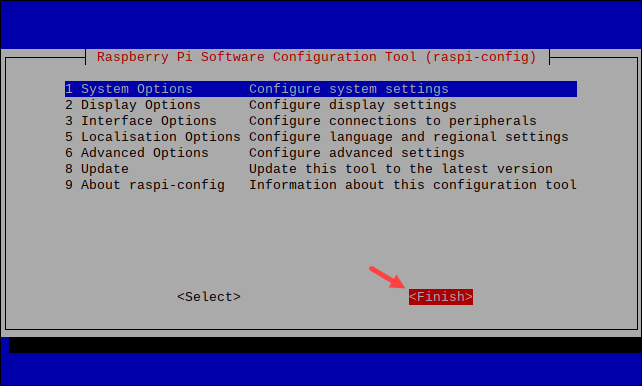
sudo raspi-configThe raspi-config tool loads.
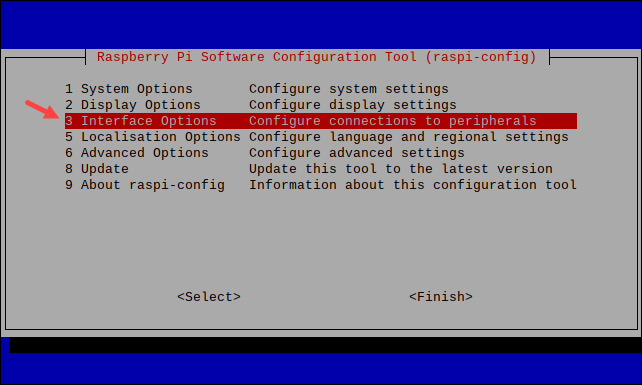
2. Use the arrows on your keyboard to navigate to Interface Options and press Enter to select it.
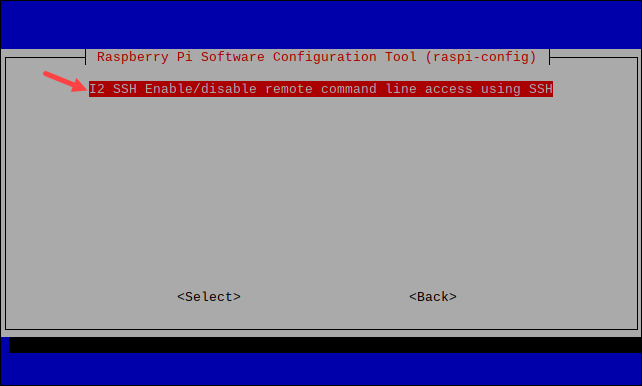
3. Choose SSH from the list and press Enter.
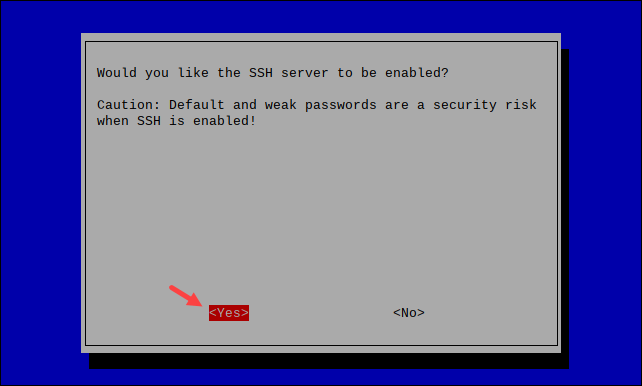
4. Select Yes when prompted to enable the SSH server.
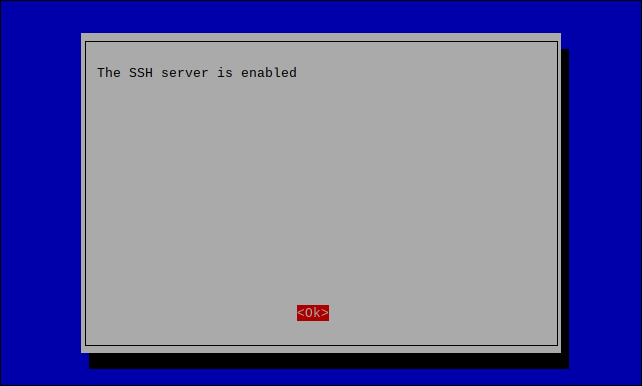
5. The following window confirms that SSH is enabled. Press Enter to exit the prompt.
6. Press Tab twice and Enter to select Finish and close the program.
The device is ready to accept SSH connections.
Enable SSH on Raspberry Pi Using systemctl
Another way to enable SSH on a Raspberry Pi is to use systemctl to start the service:
1. Open the terminal and run:
sudo systemctl start sshThe command starts the SSH service without showing any output.
2. Enable the service with:
sudo systemctl enable ssh
The command enables the service automatically after every restart.
3. Check that the service is running:
sudo systemctl status ssh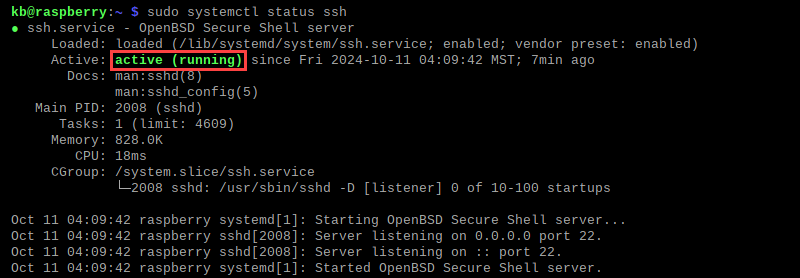
The output shows the service as active (running).
Enable SSH on Raspberry Pi Manually
To manually enable SSH on Raspberry Pi,
1. Create an empty file in the /boot directory called ssh:
sudo touch /boot/ssh

2. Reboot the device:
sudo rebootThe system looks for the empty ssh file. If found, it enables the service and deletes the file.
How to SSH Into Raspberry Pi
Once enabled on the Raspberry Pi, use SSH to connect from a remote machine. To establish a connection, first find the IP address of the Raspberry Pi device.
How to Find the IP Address of Raspberry Pi
While logged in the Raspberry Pi OS, open the terminal and run:
hostname -I
Alternatively, run the ifconfig or ip a command to find the IP address.
Note: Learn how to set up a static IP address for Raspberry Pi.
Connect to Raspberry Pi via Terminal or PowerShell
SSH enables connecting to Raspberry Pi from Windows, Linux, or macOS through the terminal/PowerShell. Follow the steps below to connect:
1. Run the following command from the macOS/Linux terminal or Windows PowerShell:
ssh pi@[IP_address]Replace the IP address with the IP found in the previous step.
Note: pi is the default user account on a Raspberry Pi. If you're using another name, replace it in the command.
2. The first time you connect to your Raspberry Pi, you will get a prompt to continue connecting without authentication. Type yes and press Enter to proceed.

3. When prompted, enter the password. The default password is raspberry unless previously changed.
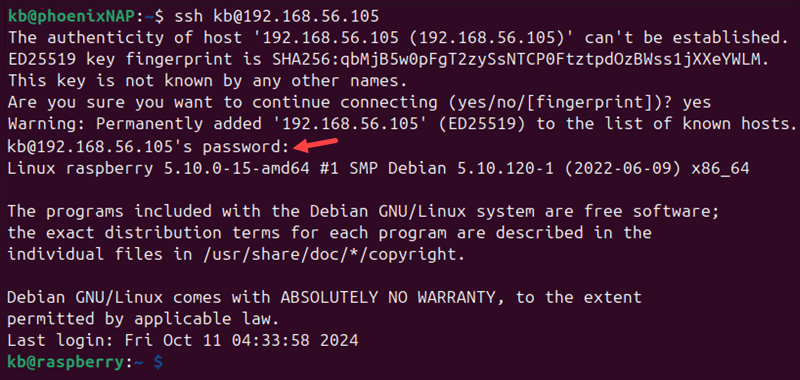
The prompt switches to the Raspberry Pi device, indicating a successful connection.
Connect to Raspberry Pi via PuTTY
Windows users often use PuTTY to establish SSH connections through a GUI. The section below shows how to connect using both methods.
Note: PuTTY is also available for Mac and Linux users. To install it, follow the steps in one of our guides:
SSH Into Raspberry Pi Using PuTTy
Windows users can SSH into Raspberry Pi using PuTTY. Start the tool and select SSH as the connection type. Provide the IP address of the Raspberry Pi device and set the port to 22.
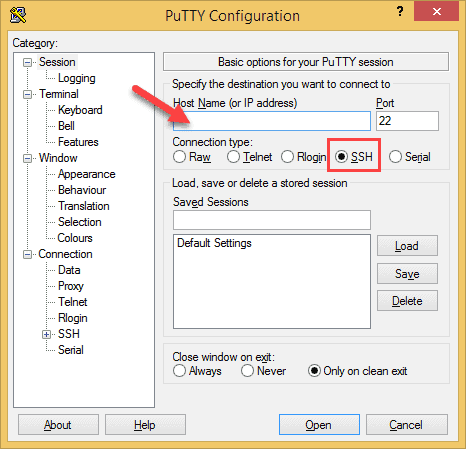
Click Open to start a new session. Enter your Raspberry Pi account username and password (default is pi and raspberry).
Troubleshooting Raspberry Pi SSH Issues
When encountering connection issues with SSH connections to Raspberry Pi, use the table below as a reference for diagnosing and troubleshooting. The table contains common errors and corresponding solutions.
| Error | Issue | Solution |
|---|---|---|
| Connection refused | SSH is not enabled, or the firewall is blocking the connection. | Enable SSH using one of the methods from the previous sections. Allow SSH connections through the firewall. |
| No route to host/Connection timed out | Provide the correct username/password. Check if the correct SSH key is provided and if the file is accessible. | Double-check the IP address with the host -I command and ensure Raspberry Pi is connected to the same network (Wi-Fi or Ethernet). |
| Permission denied | Authentication problems. | Provide the correct username/password. Check if the correct SSH key is provided and if the file is accesible. |
| Raspberry Pi not responding | Outdated/corrupted system or SD card. | Reinstall the OS image on another device or update the OS. |
Getting Started With SSH on Raspberry Pi
SSH enables managing a Raspberry Pi device remotely without a direct physical connection. The sections below show essential commands and operations to get started with SSH on Raspberry Pi.
Note: Check out our in-depth list of common SSH commands, which includes a free PDF cheat sheet.
Copying Files using scp
The Secure Copy Protocol (scp) is a protocol for transferring files between a local and remote machine (Raspberry Pi). To transfer a file from the local machine to Raspberry Pi, use the scp command:
scp [local_directory] pi@[IP_address]:[destination_directory]Alternatively, transfer files from Raspberry Pi to the local machine:
scp pi@[IP_address]:[local_directory] [destination_directory] The protocol uses SSH to transfer the data to ensure the transfer is secure.
Sync Files using rsync
The rsync command synchronizes files and directories between two devices. Compared to scp, rsync only transfers changes, making it suitable for large files or directories.
To use rsync, run:
rsync -avz [local_directory] pi@[IP_address]:[destination_directory]The command compresses data during transfer and ensures a secure connection through SSH. If using password-based authentication rsync requires entering the password for every transfer.
Note: Alternatively, use a tool like SSHFS to mount remote file systems.
Run Commands Remotely
SSH also allows commands to be executed remotely without connecting to an interactive session. Use the ssh command to connect and add a command as a string at the end:
ssh pi@[IP_address] '[command]'For example, to reboot the device, run:
ssh pi@[IP_address] 'sudo reboot'Use this method to run scripts or automation tasks remotely without connecting to a session.
Close SSH Session
If using an interactive session, returning to the original shell is simple. Close the session by typing:
exit
The command terminates the session and returns to the local machine.
Secure SSH Connection to Raspberry Pi
SSH security is essential on Raspberry Pi and prevents unauthorized access to the device. Take the steps described in the sections below to ensure a secure SSH connection to Raspberry Pi.
Change Default Password
The default username on Raspberry Pi is pi and the password raspberry. After enabling SSH, change the default password immediately. To change the password from the Raspberry Pi, run the passwd command:
passwd
Provide the current and new password when prompted. Use a strong and secure password for password-based authentication.
Note: There are other ways to change the password on a Raspberry Pi, such as through raspi-config, the Raspberry Pi configuration via GUI, or Raspberry Pi imager tool. Use a method that best suits your setup.
Use Public-Key Authentication
Configure SSH with a key to access the device using a cryptographic key pair instead of password authentication. Passwordless SSH is simple to set up and safeguards against brute-force attacks.
Follow the steps below to generate an SSH key pair and disable password authentication:
1. Generate an SSH key pair with the following command:
ssh-keygen -t rsa -b 4096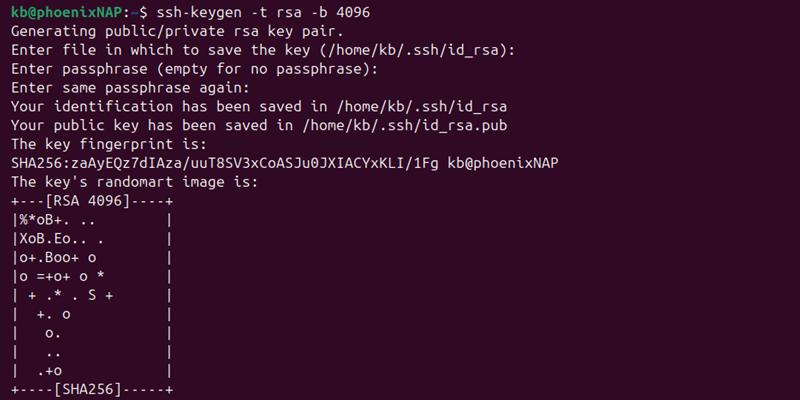
The command can be used to generate SSH keys on Windows, Linux, and macOS, and Windows.
2. Copy the public key to Raspberry Pi:
ssh-copy-id pi@[IP_address]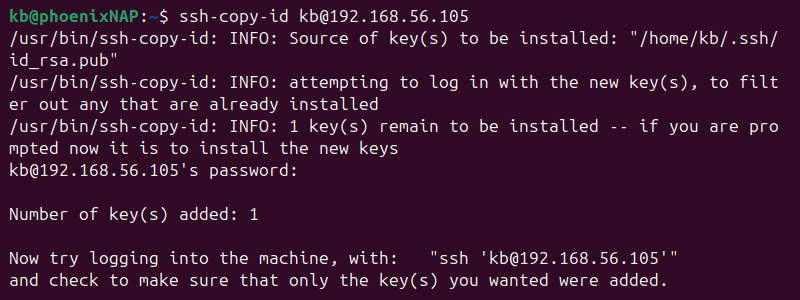
Keep the private key secure, as the system's security depends on safeguarding the private key.
3. Disable password authentication in the SSH config file on Raspberry Pi. Open the configuration file in a text editor, such as nano:
sudo nano /etc/ssh/sshd_config4. Locate or add the following line:
PasswordAuthentication no
Modify the directive to disable password authentication.
5. Save and close the configuration file.
6. Restart the SSH service:
sudo systemctl restart sshThe restart applies the new configuration.
7. Connect to Raspberry Pi via SSH again:
ssh pi@[IP_address]
The connection no longer requires entering Raspberry Pi's password. Instead, it connects based on public key authentication.
Change the Default SSH Port
Changing the default SSH port (22) is simple and enhances SSH security. To change the default port to another port number:
1. Open the SSH config file on Raspberry Pi:
sudo nano /etc/ssh/sshd_config2. Find the directive where the port is defined. By default, the line is commented:
#Port 223. Remove the comment and change the port number to another number. For example:
Port 20200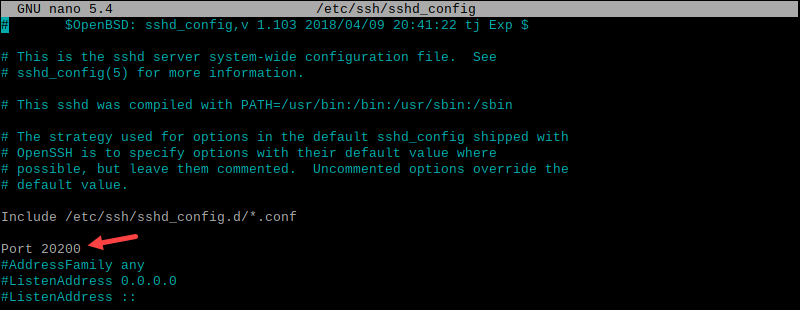
4. Save the changes and close the editor.
5. Restart the SSH service:
sudo systemctl restart sshThe restart applies the changes immediately.
6. Connect to Raspberry Pi and provide the new port number using the -p option. For example:
ssh pi@[IP_address] -p 20200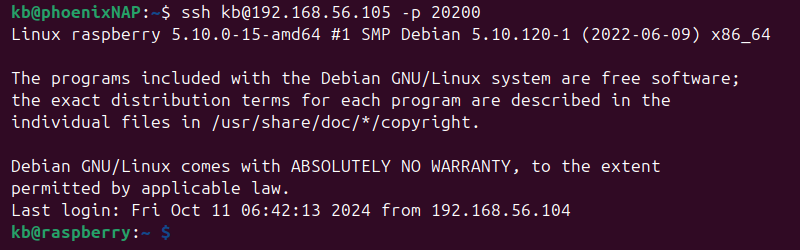
The connection is established through the custom port instead of the standard port number.
Set up a Firewall
Adjust the firewall settings to allow SSH traffic. Firewalls enable access control based on an IP address or port. If you changed the SSH port, allow traffic to pass through the new port to enable SSH connections.
The steps to change these settings depend on the firewall and operating system. Windows and macOS users have a built-in firewall. Linux typically uses UFW or iptables to control firewall rules.
Note: Learn how to monitor network traffic on Raspberry Pi.
Conclusion
This guide showed how to enable SSH on Raspberry Pi through different setups and operating systems.
Next, see our guide on how to set up a Raspberry Pi as a DNS server.