Setting up a static IP address on Raspberry Pi facilitates access and management (e.g., over SSH) by ensuring the device's private IP address does not change. Since most networks use DHCP to dynamically assign IP addresses to clients, setting up a static IP on the Raspberry Pi is necessary to avoid access issues.
This tutorial shows you how to set up a static IP address on a Raspberry Pi.

Setting Up Static IP for Raspberry Pi
Raspberry Pi runs the Debian-based Raspberry Pi OS, so the network configuration options are similar to those in other Debian-based Linux distributions.
Follow the steps below to gather the necessary network information and configure a static IP address on a Raspberry Pi.
Step 1: Obtain Current IP Address
Using the system's current private IP address as a new static IP is the easiest way to prevent conflicts with other network devices. To find out the current IP address of the Raspberry Pi system, use the hostname command with the -I option.
hostname -IWrite down the IP address displayed in the command output.

Note: Skip this step if you want to use another private IP address.
Step 2: Identify Default Network Interface
Computers can have multiple network interfaces active simultaneously. To properly configure a static IP address, you must identify the default interface.
1. Use the ip command to find out the IP address of the default interface.
ip r | grep defaultThe output displays the router's address.

2. To obtain the name of the network interface, use the following command:
route | grep '^default' | grep -o '[^ ]*$'The command uses grep regex to extract the interface name from the larger output.

Step 3: Obtain DNS Address
The last necessary piece of information is the router's Domain Name System (DNS) address. Find it in the resolv.conf file located in the /etc directory.
Open the file in a text editor, such as Nano:
sudo nano /etc/resolv.confLook for the line that starts with the word nameserver and write down the DNS IP address.

Step 4: Edit Network Settings
Once you have all the necessary information, set up a static private IP address on your Raspberry Pi by employing one of the two methods described below.
Set up Static IP Address via CLI
The command-line interface method for static IP setup involves editing the DHCP configuration file.
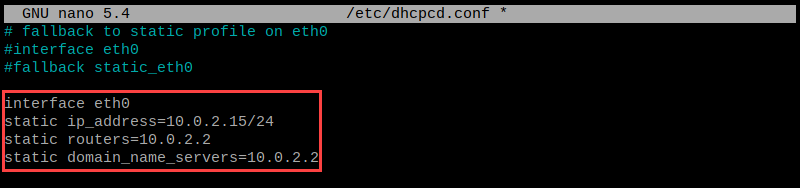
1. Open the dhcpcd.conf file in a text editor.
sudo nano /etc/dhcpcd.conf2. Scroll to the bottom of the file and add the lines below with the information you obtained in the previous steps of this tutorial.
interface [interface-name]
static ip_address=[ip-address]/[cidr-suffix]
static routers=[router-ip-address]
static domain_name_servers=[dns-address]
The screenshot below shows an example configuration.
Save the file and exit.
3. Reboot Raspberry Pi by typing:
sudo shutdown -r nowSet up Static IP Address via GUI
You can also set the static private IP address for your system through the Raspberry Pi OS GUI. The steps below demonstrate the GUI procedure.
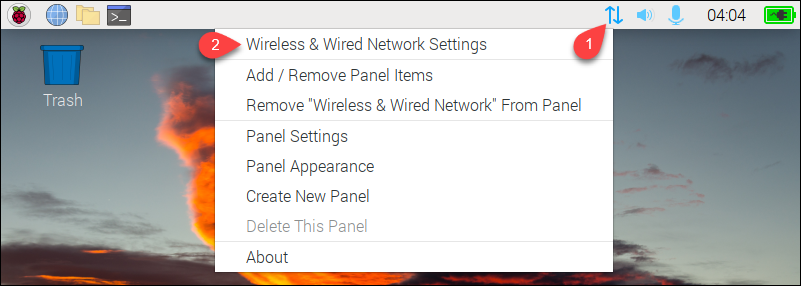
1. Right-click the network adapter icon on the right side of the top panel.
2. Select the Wireless & Wired Network Settings item to open Network Preferences.
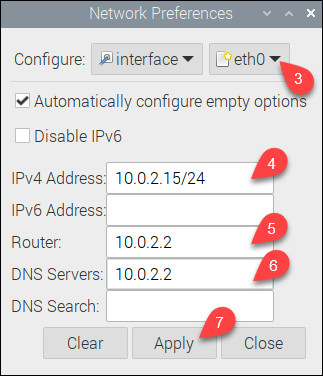
3. Select the default network interface in the drop-down menu.
4. Type in the desired static IP address in the IPv4 Address field. Follow the address with the CIDR suffix.
5. Enter the router's IP address in the Router field.
6. Type the DNS address in the DNS Servers section.
7. Select Apply.
Testing the Static IP
After the system boots up, test the configuration by executing the hostname command.
hostname -ICheck whether the IP address in the output matches the static IP you configured.

Note: Refer to our article on how to monitor network traffic on Raspberry Pi that features two different methods.
Conclusion
The article provided the command-line and GUI methods for IP configuration on the Raspberry Pi operating system. After you complete the tutorial, your Raspberry Pi system will be configured to use a static IP address for communication with the rest of the network.