One of the top features in Git is the ability to share your local work with others by sending the committed changes to a remote repository hosted on websites like GitHub or GitLab.
Syncing the changes with a remote repository ensures your code is safely stored outside your local machine and keeps your team or automation systems up to date with the latest changes.
This tutorial will show you how to use the git push origin command to sync your changes with a remote repository.
Prerequisites
- Git installed (install Git on Ubuntu, macOS, and Windows).
- A remote Git repository.
What Is git push origin Command?
The git push origin command is a way to tell Git to transfer the commits from your current branch up to the remote repository named origin (which, by convention, is the URL you cloned from). If that branch already exists on the remote repository, and if that branch's upstream is already set to origin, the new commits are appended. If the branch does not exist yet, Git creates it.
The command syntax is:
git push origin [branch]Specify the exact [branch] name to avoid mistakes when you have multiple remotes configured (for example, upstream, staging, etc.), because it forces you to specify exactly where your changes should go. If the [branch] name is left out, Git falls back on your push.default setting to decide what to send.
Note: Your push.default configuration (typically set to simple, which pushes the current branch to its upstream). Use the command below to check your setting:
git config --get push.default
git push origin vs. git push
The primary difference between git push origin and git push is that git push uses your branch's configured upstream to decide what and where to send, whereas git push origin explicitly targets the origin remote.
To explain further:
git pushrelies on your branch's configured upstream (remote and branch) and yourpush.defaultsetting to decide what and where to push. If your current branch already tracks a remote counterpart (e.g.,origin/main), thengit pushwill send your new commits there. If no upstream is set, Git throws an error prompting you to specify one.git push originexplicitly names the remote (origin) but still uses your current branch's upstream orpush.defaultto infer the branch name on that remote. As long as your branch tracksorigin/[branch], you can omit the branch name on the command line, and Git will push tooriginby default.
In practice, once you establish tracking, git push and git push origin behave identically and push your current branch's commits to origin. However, git push origin is slightly more explicit about which remote you intend to update. This helps prevent accidental pushes if you have multiple remotes configured in your repo.
git push origin Flags
The git push origin flags allow you to tailor how refs (branches and tags) are pushed to your remote. Use the flags for different scenarios, whether you want to push everything, clean up, set tracking, or handle complex forced updates.
The table below provides some key flags along with their descriptions:
| Option | Description |
|---|---|
--all | Push all local branches to the remote. Cannot be combined with specific refspecs. |
--prune | Delete remote branches that no longer exist locally. |
--mirror | Mirror everything (branches, tags, remotes) on the remote, including deletions. |
-n, --dry-run | Show what would be pushed without actually sending anything. |
--tags | Push all tags in addition to other specified refs. |
--follow-tags | Push annotated tags pointing to commits you are pushing. |
-u, --set-upstream | Set upstream tracking for a branch. |
-f, --force | Force update remote refs, bypassing non-fast-forward checks. Use with caution. |
--force-with-lease | Safer force push: only if the remote has not changed since the last fetch. |
-q, --quiet | Suppress most messages in the output. |
-v, --verbose | Print more details in the output. |
Note: Decide between using SSH or HTTPS for connecting to a remote Git repository by reading the linked article.
How to Use git push origin
The git push origin command sends your local commits to a remote repository named origin. By default, origin refers to the clone URL you copied when you cloned the repo. You can push to any branch on the remote, or configure upstream tracking so that future pushes are simpler.
The sections below show how to push to a branch and how to set up upstream tracking for the main branch or any other branch.
Push to a Branch
Before setting up upstream tracking, you can explicitly specify both the remote (origin) and the branch name. This is useful when you want to push to a branch that doesn't yet exist on the remote.
git push origin to Main Branch
Use the command below to push your local main branch to the remote's main branch:
git push origin mainThe command uploads your local main commits to origin/main.
If you are still using master instead of main for your main branch, specify master instead:
git push origin master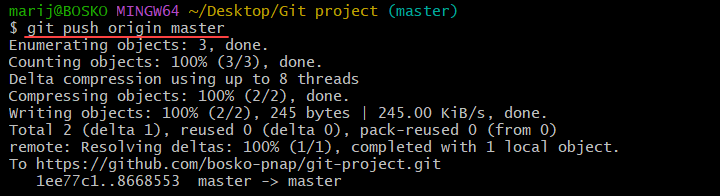
git push origin to Specific Branch
You can also push your commits to a specific branch other than the main one. For example, if you are working on a feature branch named feature/login, push it with:
git push origin feature/loginThe command ensures your feature/login branch is available on the remote.
Set Up Upstream Tracking
Upstream tracking links a local branch with a remote branch. Once you set up an upstream branch, you can simply run git push or git pull without specifying origin or the branch name each time.
You only need to set upstream once per branch. After that, Git remembers where to push and pull.
Note: You must be on that specific branch when setting up upstream tracking. Git assigns the tracking information to your currently checked-out branch. Switch to the branch you want to set upstream tracking for and refer to the sections below.
Setting Up Upstream Tracking for Main Branch
To configure your local main branch to track origin/main, first make sure you're on the main branch:
git switch mainIf your main branch is master, use:
git switch masterNext, run the command below to set up upstream tracking for the main branch:
git push --set-upstream origin mainIn the command:
--set-upstream(or-u) tells Git to record the remote branch as the upstream for your current branch.originis the remote name.mainis the branch you want to track. If you still use the old naming convention, replacemainwithmaster.
Now you can use git push (or git pull) while on main, and Git will know to push to and pull from origin/main.
Setting up Upstream Tracking for Specific Branch
If you are working on a branch like feature/login, you must first switch to that branch. This ensures Git knows which local branch should track which remote one. Run the command below:
git switch feature/login
Next, set up upstream tracking with:
git push -u origin feature/login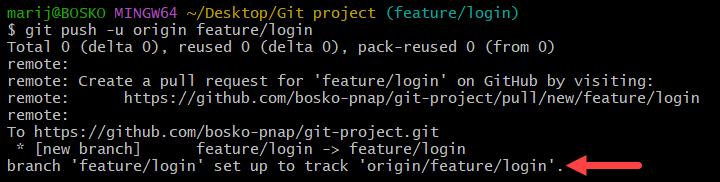
Once set, you can run git push or git pull without additional parameters while on that branch. It streamlines your workflow and avoids errors.
Conclusion
This tutorial showed how to use the git push origin command to send your local changes to a remote repository hosted on GitHub or GitLab. Sync your changes regularly to ensure that all collaborators are working with the latest code versions.
Next, learn to overwrite a local branch with a remote one or see how to compare two Git branches.