Version control systems like Git allow users to create multiple branches. Branches are separate lines of development for creating new features, implementing bug fixes, or experimenting with code without affecting the main codebase.
Comparing two Git branches is a good practice before merging because it allows you to identify and resolve possible conflicts before introducing the changes.
In this article, you will learn different methods for comparing two Git branches.
Prerequisites
- Git installed (see how to install Git on Ubuntu, macOS, Windows, CentOS 7, or CentOS 8).
- A Git repository.
Compare Branches via git diff
In Git, diffing is a function that compares two input data sets and outputs their differences. The git diff command has multiple uses, as it can run a diff function on different Git data sources, such as commits, branches, files, etc.
Note: Download our Git commands cheat sheet to help you start using Git.
Using git diff allows you to see the differences between two branches to understand what would happen if you performed a git merge.
git diff with the .. Notation
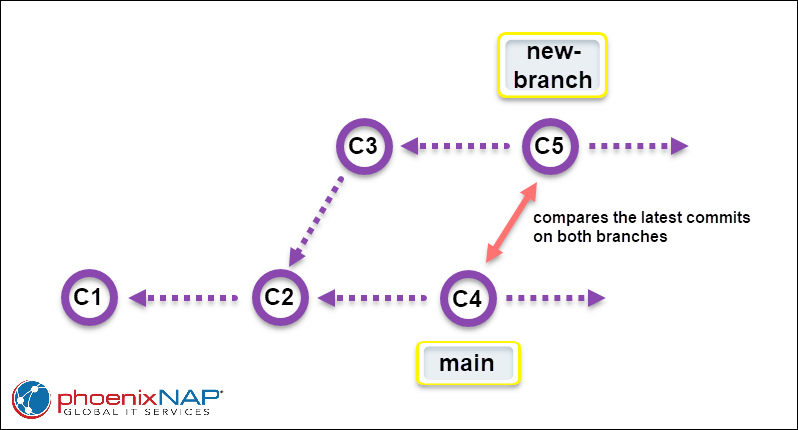
When using git diff with the .. notation, Git compares the tips (latest commits) on the specified branches and outputs the results. You can also use a single whitespace character instead of two dots (..) to specify the two branches for comparison.
Note: See how to undo the latest commit in Git.
The syntax is:
git diff [branch 1]..[branch 2]The following diagram shows how git diff compares the two branches when using the two dots (..):
In the following example, we compare the master branch and new-branch:
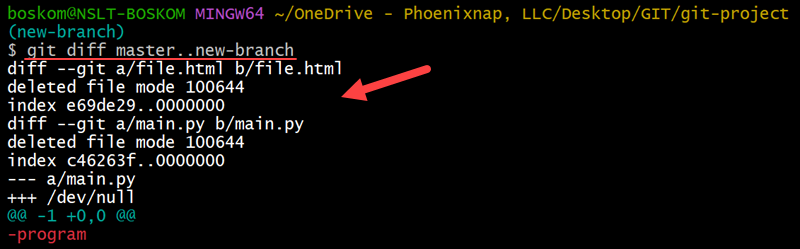
In the output above:
diff --git a/file.html b/file.html- Indicates that the comparison is for the file file.html in both branches.deleted file mode 100644- States that the file mode was100644(regular file), and it has been deleted.index e69de29..0000000- Provides index information.e69de29is a special hash representing an empty file while0000000indicates that the file is absent.diff --git a/main.py b/main.py- Indicates that the comparison is for the file main.py in both branches.--- a/main.py- Shows the file path in the original branch (masterin this case).+++ /dev/null- Indicates that the file doesn't exist in the new branch, represented as/dev/null.@@ -1 +0,0 @@- Displays where the change occurred. In this case, it shows that the change is from the first line of the file (-1) to an empty file (+0,0).-program- This line indicates that a line with the content "program" was removed in the new branch.
Overall, the output informs that both the file.html and main.py files were deleted in the new-branch compared to the master branch. The output states the specifics of the deletions, including file modes, index information, and content changes.
git diff with the ... Notation
Adding a third dot to the notation changes the comparison. Instead of comparing the tips (latest commits) of the specified branches, Git compares the tip of the feature branch and the common ancestor commit of the specified branches. The common ancestor commit is a point in the commit history where both branches share the same commit.
The following diagram shows how comparison using three dots (...) works:
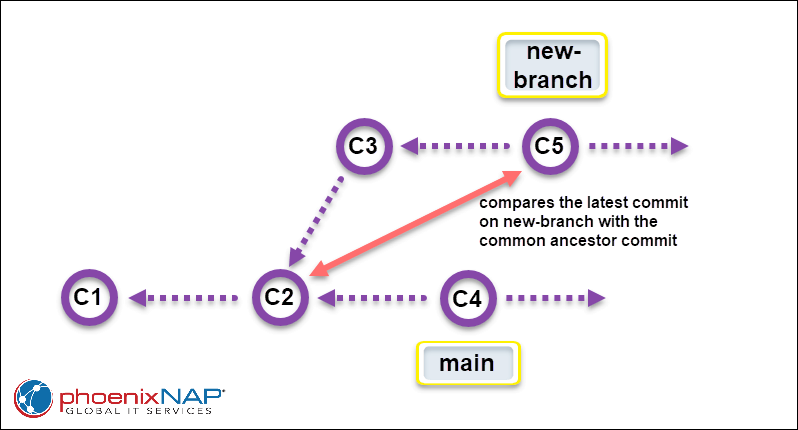
However, in most cases, using the two dots notation (..) is preferable when comparing two branches.
First, the example below shows how to compare the master branch and new-branch using the three-dot (...) notation:
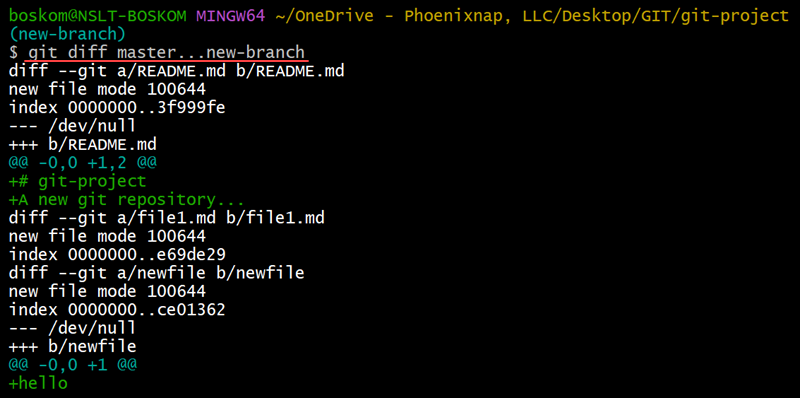
The git diff command output shows the differences between the master and new-branch. Using three dots (...) implies comparing the merge base of the two branches (the common ancestor) with the new-branch.
The output shows the following lines:
diff --git a/README.md b/README.md- Indicates that the comparison is for the file README.md in both branches.new file mode 100644- Indicates that the file is new and has the mode100644(regular file).index 0000000..3f999fe- These lines provide index information. The0000000hash represents an empty blob, and3f999ferepresents the new content's hash.--- /dev/null- Shows that the file doesn't exist in the original branch (master).+++ b/README.md- Represents the file's path in the new branch.@@ -0,0 +1,2 @@- Indicates where the change occurred. In this case, there's no content in the original branch (-0,0), and two lines of content have been added to the new branch (+1,2).+# git-projectand+A new git repository...- These lines show the added content in thenew-branch.diff --git a/newfile b/newfile- This line compares the newfile file in both branches.new file mode 100644- Indicates that the file is regular, new, and has the mode100644.index 0000000..ce01362- Provides index information. The0000000hash represents an empty blob, andce01362represents the new content's hash.--- /dev/null- This line indicates that the file doesn't exist in the original branch (master).+++ b/newfile- This line indicates the file path in the new branch.@@ -0,0 +1 @@- This context line indicates where the change occurred. In this case, it's showing that there's no content in the original branch (-0,0), and one line of content has been added to the new branch (+1).+hello- This line shows the added content in thenew-branch.
Overall, the output indicates that new files (README.md, file1.md, and newfile) were added in the new-branch compared to the master branch. The output includes the lines with details regarding these additions, including file modes, index information, and the added content.
Show Only File Names
Displaying changes for every line can clutter the output and make it difficult to see general changes. If you want only to see where the changes occurred, use the --name-only option with the git diff command.
The --name-only option is particularly useful when you want to quickly identify which files have changed without displaying the actual content of the changes. This can be helpful for scenarios like creating a list of files that need further attention or processing.
The syntax is:
git diff branch1..branch2 --name-onlyFor example:

The output lists which files are different in the master branch and the new-branch branch. In this case, those are file.html and main.py.
Comparing Specific File Between Branches
Git also provides the option to see how a file differs in two branches. Specify the two branches and provide the file path to get details on that specific file.
Use the following syntax:
git diff branch1..branch2 path/to/fileGetting the specifics on a single file removes excess information from the output and allows you to focus on a single bug or feature that you need to address.
For example:

The output above shows the differences between file.html on the master branch and new-branch and provides file specifics, such as file mode and index hash.
Compare Commits Between Branches
Git lets you compare commits between two branches and see their differences. Comparing commits is useful for understanding the history of changes, identifying when the changes were introduced, and tracking the evolution of code and features between the branches.
The syntax for comparing commits is:
git log branch1..branch2Note: The git log command doesn't show the actual file differences between the two branches but only the commits.
For example:
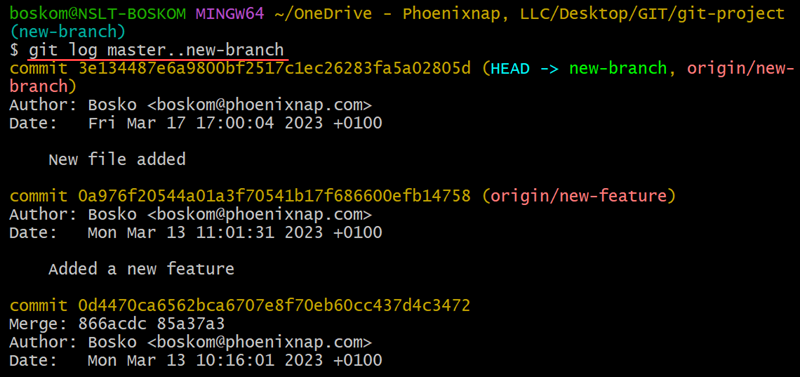
The example above shows the commit history unique to new-branch and not present in master. The commits in the list have been added to new-branch since it diverged from the master branch.
Compare Branches via git merge
Another way to compare Git branches without using the git diff command is to perform a git merge, see the changes, and then revert the process. The command requires the --no-ff and --no-commit options to ensure the command doesn't change or update the current branch.
Note: See how to merge the master branch into another branch.
For instance, the following command merges the master branch with the current branch without committing the changes:
git merge --no-commit --no-ff master
After the merge, use Git visual tools like gitk or git-gui to visualize the differences. For example, launch the gitk UI tool and inspect the differences:
gitk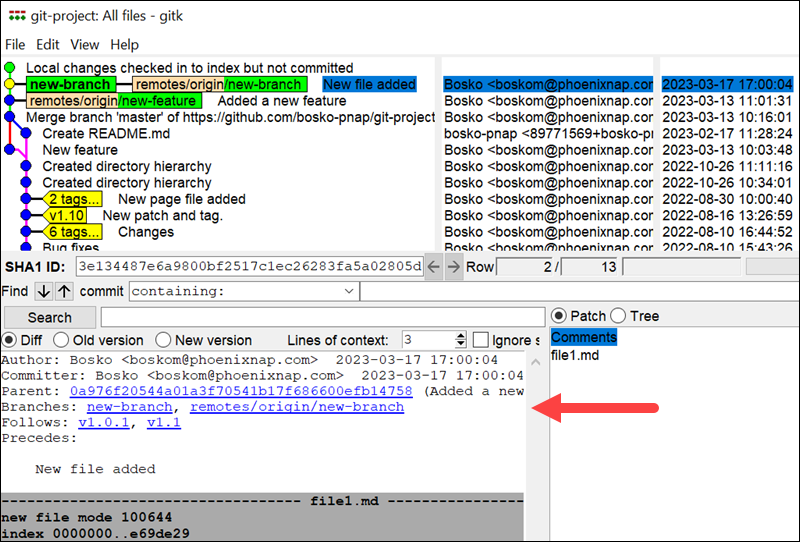
After comparing the differences, abort the merge by specifying the --abort option. The option reconstructs your repository to the pre-merge state:
git merge --abortCompare Branches via git difftool
The git difftool is a frontend to git diff that accepts the same options and arguments. The tool allows you to compare and edit files between revisions through a GUI.
Depending on whether you have already configured difftool or not, the results are either in the specified GUI app or in one of the following utilities available on your machine:
opendiff, kdiff3, tkdiff, xxdiff, meld, compare, gvimdiff, diffuse, diffmerge, ecmerge, p4merge, araxis, bc, codecompare, smerge, emerge, vimdiff, nvimdiff.
To configure a graphical difftool in your Git configuration, install the chosen difftool and then configure Git to use it. For example, a popular graphical difftool is Beyond Compare.
To configure Beyond Compare as your difftool, use the following commands:
git config --global diff.tool bc3
git config --global difftool.bc3.path "/path/to/bcomp"
Replace /path/to/bcomp with the actual path to the Beyond Compare executable on your system.
For this tutorial, we use the utility already available on the system. For example, the following command shows the difference between the master branch and new-branch:
git difftool -d new-branch master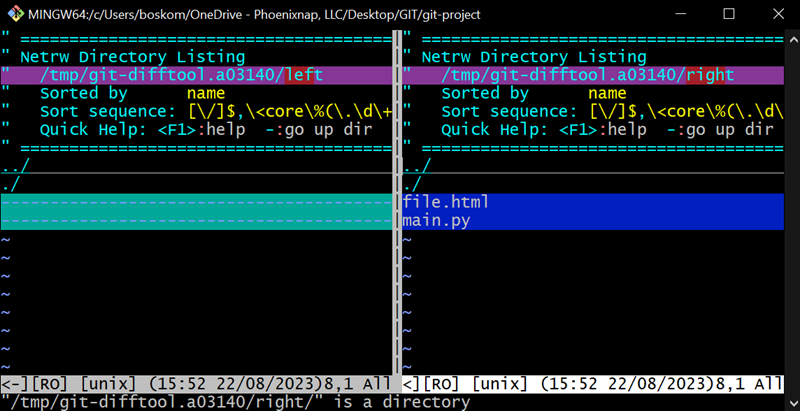
The output is color-coded and specifies the differences between the two branches.
Conclusion
This tutorial showed you how to compare two Git branches using several methods. You also know how to compare specific files or commits and ensure everything is in order before merging.
For more Git tutorials, check out our tutorials for cloning a specific Git branch or see how to list remote Git branches.