Java is a popular programming language for creating software applications, including many web applications. Although Java comes preinstalled on most Raspberry Pi systems, some may have it missing or require reinstalling.
This guide will show how to install Java, set the default version, and specify the JAVA_HOME path on a Raspberry Pi.
Prerequisites
- A Raspberry Pi with Raspberry Pi operating system (Raspbian).
- A user with sudo privileges.
- Access to a terminal/command line.
How to Install Java on Raspberry Pi
By default, Raspberry Pi uses the Raspbian operating system. Raspbian is based on Debian, so the terminal commands to install Java use the apt package manager.
Important: This guide will help you install the open-source OpenJDK version under the GNU license.
Oracle Java versions require an account to download, and most are not compatible with Raspberry Pi.
Step 1: Update Repositories
The default Raspbian repositories have a fully updated and compatible version of OpenJDK for the specific operating system version. Before installing it, update the repositories with:
sudo apt updateIf prompted, press y to update all listed packages and allow the process to complete.
Step 2. Install OpenJDK
Install the default OpenJDK with:
sudo apt install default-jdk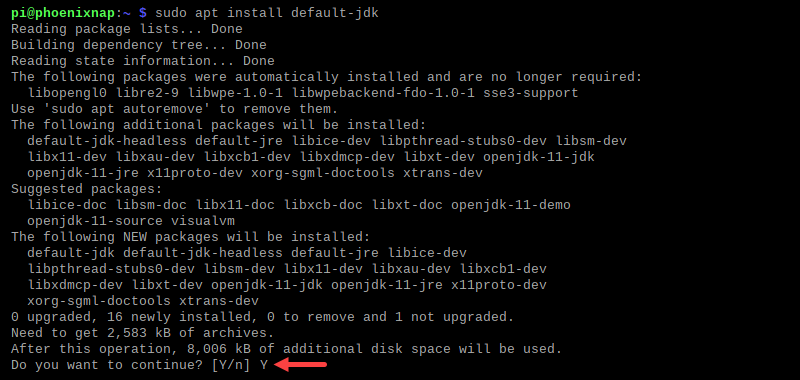
Press Y to continue the installation. The package installs the default newest stable version that is compatible with the operating system. To install a specific version, use:
sudo apt install openjdk-[version]-jdkThe specified version must be in the APT repositories and compatible with the operating system version.
Step 3: (Optional) Set Default Java Version
If multiple Java versions are installed, the system defaults to the latest one. To check the current Java version and see all available Java versions, run:
sudo update-alternatives --config java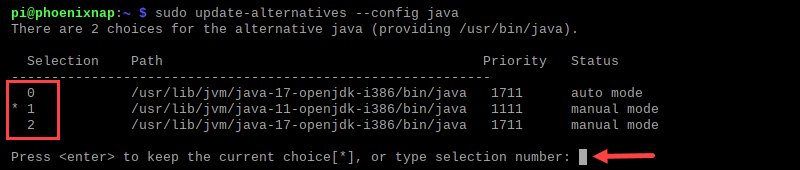
The output lists all installed Java instances on the Raspberry Pi system. The default version has an asterisk (*) next to it. Press Enter to keep the current version, or provide the selection number to switch to a different one.
To confirm the switch was successful, check the current Java version:
java –version
The new version shows as the default.
Step 4: (Optional) Set JAVA_HOME Environment Variable
Once you have set your Raspberry Pi's default Java version, you can set the <strong>JAVA_HOME</strong> path environment variable.
Note: Applications compiled in Java (e.g., Apache Tomcat) use the JAVA_HOME path environment variable to access your Java’s installation path. If not configured, you may receive an error.
To set the variable, do the following:
1. Find the location of your default Java instance:
sudo update-alternatives --config java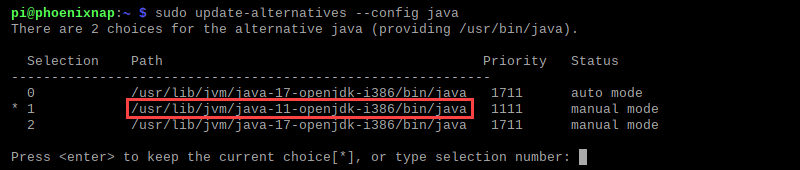
The command shows the default for each version. Press Enter to exit the prompt without making changes, and copy the path for the currently selected version.
2. Edit the /etc/environment file:
sudo nano /etc/environmentThe command opens the file in the nano text editor.
3. Add the following line to the file:
JAVA_HOME="[path]"
Paste the path from the first step in the appropriate place.
4. Save the file and exit the text editor.
5. Reboot your system for the changes to take effect:
sudo reboot6. After restart, use the echo command to verify the changes:
echo $JAVA_HOME
The command prints the JAVA_HOME path defined in the /etc/environment file.
Note: The /etc/environment file is a system-wide configuration file. Anything defined in the file will affect every user on the system. To configure the path environment variable for a single user, insert the line in the .bashrc file.
Uninstall Java on Raspberry Pi
Use the apt command to uninstall Java on Raspberry Pi. The command differs depending on which version you want to remove:
- To uninstall the default JDK, use:
sudo apt remove default-jdk- To remove a specific version, run:
sudo apt remove openjdk-[version]-jdkPress Y, then Enter to confirm, and wait for the process to complete.
Conclusion
This tutorial showed how to install Java on Raspberry Pi. The article also explained some post-setup operations, such as setting the default Java version and defining the JAVA_HOME path environment variable.
Next, see how to set up a static IP address on Raspberry Pi.