When devices cannot connect to the internet or websites load slowly, there's most likely a network issue. Network troubleshooting is a process that helps discover what is causing these problems and attempts to fix them.
Knowing how to diagnose and resolve network issues is essential for home users and network administrators. Although it's often frustrating, there is a systematic way to troubleshoot a network, resolve issues quickly, and minimize downtime.
This guide will explain network troubleshooting in clear steps. We will provide common examples and share best practices.
What Is Network Troubleshooting?
Network troubleshooting is the process of identifying, analyzing, and resolving computer network problems. The goal is to quickly restore network function and data transmission without sacrificing security.
The task is often tricky because network computing is complex. There are many different hardware components, topologies, and computer network types, but there isn't a unified approach to troubleshooting a network.
Network Events
Network events are significant indicators of network connectivity issues. The table below outlines common network event types and the situations they appear in:
| Network Event | Description | Example |
|---|---|---|
| Connection failure | Devices cannot connect to the network. | A device does not get assigned an IP address. |
| Security breach | Unauthorized access or malware affecting the network. | Repeated login failures or denied access messages. |
| Policy violation | Network speed slows down, or response times increase. | A blocked website can be accessed. |
| Performance drop | Network speed slows down or response times increase. | Different web pages load very slowly. |
| Application failure | Specific websites or programs are not functioning. | A website or dedicated game server is down. |
Common Network Problems
Both home and business networks can have many connectivity issues. Awareness of these common problems helps provide a general overview of what to check when network issues arise.
Here are the most common network problems:
- Hardware. A network includes hardware devices, such as routers, switches, cables, etc. These devices and components can be faulty or have physical damage. For example, a damaged Ethernet cable can prevent connections.
- Interference. Physical obstacles and noise from other devices can cause a poor signal. For example, elevator electricity cables, microwaves, or thick walls can result in a weak signal.
- Configuration. Incorrect device or software settings are a very common network problem. If a device receives a faulty IP address, it might not have internet access.
- DNS. DNS translates website names into IP addresses. If the DNS settings are misconfigured, websites will not load.
- Firewall. A firewall protects the network from unauthorized access and helps create network segmentation. An incorrectly configured firewall can unintentionally block traffic on a port or protocol.
- Overloading. If too many devices are connected to a network simultaneously, the network may become congested and slow down. Additional devices may not be able to connect at all.
- Breach. Malware and unauthorized access can completely block connections to a network or slow it down.
Network Troubleshooting Steps
Troubleshooting a network involves following several straightforward steps. These steps should serve as a checklist when there are suspected network problems.
Step 1: Identify the Problem
Before attempting to fix anything, identify the problem as best as possible. Define what isn't working and whether one or multiple computers are affected. See if the issue is with a wireless or wired connection (or both).
Check if there are any descriptive or error messages. Inspect the router and see if others are experiencing similar problems. Note anything that seems out of the ordinary before proceeding.
Step 2: Check Devices
Physical connectivity issues are the simplest to identify and resolve:
- Check Cables. See if all cables are connected. Loose or damaged cables can cause network connectivity issues.
- Run Power Cycle. Try to turn off devices (router, modem, and computer), wait one minute, and turn them back on again.
Step 3: Verify Configuration
Incorrect device configuration can block access to the network. Check the following:
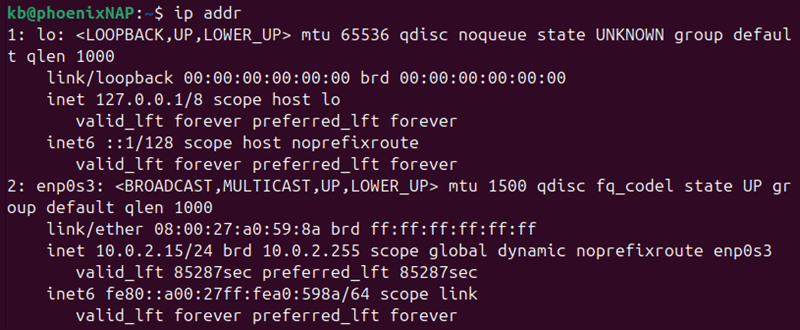
- IP Address Settings. Use the ifconfig (Linux/Mac), ip or
ipconfigcommand (Windows) to see if the computer has a valid IP address.
- DNS Configuration. Check if the computer is using the correct DNS server. Switch to a public DNS nameserver, such as Google's 8.8.8.8 or 8.8.4.4, and see if the problem persists. For additional ideas, try using the dig command, or see our detailed guide on troubleshooting DNS issues and how to flush the DNS cache.
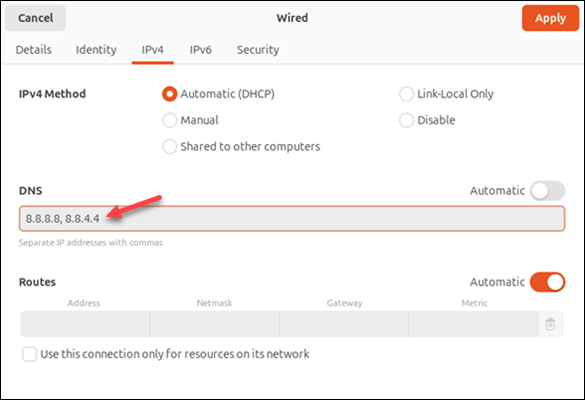
Note: A secure DNS is essential for improving network performance and security. See our list of DNS best practices to ensure business continuity.
Step 4: Test Connectivity
Use different tools to test if the network is working:
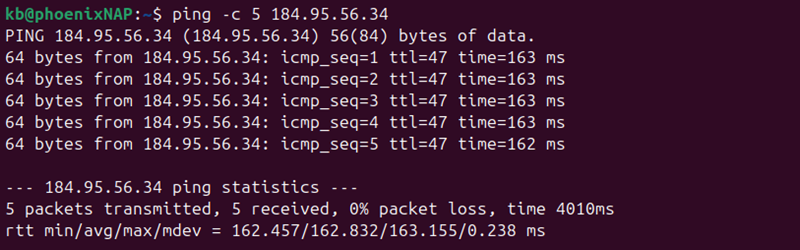
- Ping. Test connectivity by pinging a public server. If the ping works, basic connectivity is functional. However, there can be higher-layer issues.
- Traceroute. If ping works, but the network does not connect, run a traceroute to see how data travels through the network. The command shows where the connection is failing or slowing down.
Note: Use one of phoenixNAP's speedtest locations to test connectivity and latency via ping and traceroute.
Step 5: Check for Interference or Network Overload
If using a wireless connection, interference or network overload issues are possible. Try the following:
- Move Closer. Move closer to the source to see if the signal improves. See if there are any potential signal blockers or obstacles that disrupt the connection.
- Change Channels. Too many networks on the same channel result in network overload. Change to a different Wi-Fi channel through the router.
Note: Hackers can overload networks to disrupt connectivity using DDoS or similar attacks. Learn how businesses prevent DDoS attacks.
Step 6: Review Logs and Use Advanced Tools
If none of the basic checks help identify the problem, use advanced techniques instead. Networking tools and logs help provide deeper insight into network events:
- Analyze Logs. Examine router and computer logs for errors, repeated connection loss, or suspicious activity. Set up an Intrusion Detection System (IDS) to monitor and alert on unusual access patterns or events.
- Run Packet Sniffers. Packet sniffing tools help capture network traffic. They help identify where packet loss or delays are happening.
- Map Network Traffic. Various tools analyze network traffic. These tools can pinpoint which device or network is using the most bandwidth.
Step 7: Fix and Test
Once the problem is identified, make the necessary changes. Fixes may include cable replacement, adjusting IP configuration, or updating router settings, depending on the problem.
After making the necessary adjustments, rerun the tests to ensure the network is functional and the problem is resolved. Continue monitoring the network to confirm the solution is stable.
Network Troubleshooting: Best Practices
Following best practices when troubleshooting a network makes the process faster and helps prevent future issues. Below is a list of helpful best practices to implement when troubleshooting a network.
Document the Process
Write down the problem, tests you performed, and changes when you were troubleshooting a network. Documentation helps recall helpful steps if a similar problem happens again.
Create a custom checklist for future network security audits and update network security policies regularly to prevent the same issues.
Organize the Network
Staying organized helps save time. Label devices and cables to immediately see how things are connected.
Make a simple diagram to map the network and use it as a visual guide to help see how devices are connected and where connection problems can occur.
Be Systematic
Start from the easiest solutions and work up to more complex ones. Always check physical connections first because those are the easiest to identify and resolve.
Use a layered approach when troubleshooting, such as the one defined by the OSI model. After the physical layer, work up through the more abstract layers and rule out one potential cause at a time.
Use Tools
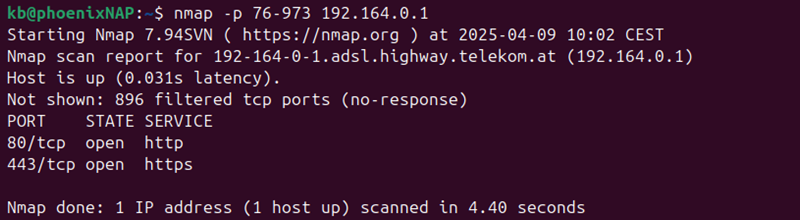
Networking tools help troubleshoot connection issues faster. Master essential tools, such as network commands and built-in network scanning tools (like Nmap) first. Learn how to use advanced scanning and security tools. If using any additional software, ensure it is updated to avoid bugs.
Communicate and Learn
If working with a team, clear communication is essential. Share reports, even if the problem is not resolved. If stuck, do not hesitate to ask for help or additional insight. Every troubleshooting experience is a chance to learn, practice, and stay informed.
Test the network regularly in an isolated environment to create more practice opportunities to improve knowledge and confidence.
Conclusion
This guide covered network troubleshooting steps in detail and provided best practices.
Next, see our list of the best network security tools for more networking topics.