Network Mapper (Nmap) is a free, open-source network security scanning tool. By sending IP packets and analyzing the responses, Nmap provides information about hosts and services on remote computer networks. It can also audit device security, identify network vulnerabilities, or perform an inventory check.
This tutorial shows how to install Nmap on Linux and explains Nmap's most important features.

Prerequisites
- A user account with root privileges.
- Access to the terminal (Ctrl + Alt + T).
Installing Nmap on Linux
Nmap comes preinstalled on Kali Linux, a distribution specifically designed for penetration testing that includes a wide range of security tools, including Nmap. If you are using some other Linux distro, then you need to install Nmap to use it on your system.
Depending on your needs and preferences, you can choose one of four ways to install Nmap:
- Using the CLI and your package manager of choice.
- Via the GUI.
- By compiling the Nmap source code.
- By installing Nmap in Docker.
The sections below cover each method and provide the necessary steps for installing the utility.
Note: This guide was made using Ubuntu 22.04, and therefore contains images showing the process of installing Nmap on Ubuntu. However, the guide applies to all Linux distributions.
Install NMAP via Package Manager/Command Line
Installing Nmap via the CLI is the easiest and most straightforward method. It involves running a few commands. Follow the steps below:
1. Update your system package repository information to ensure you install the latest Nmap version:
sudo apt update2. Install Nmap by running the following command:
sudo apt install nmap -y
3. Verify that Nmap has been installed by running:
nmap --versionIf everything installed correctly, the output prints the Nmap utility version:

Install NMAP via GUI
You can use the Ubuntu Software tool to install Nmap via the GUI. The GUI option is intuitive and useful for people who are not well-versed in using the terminal. Follow the steps below:
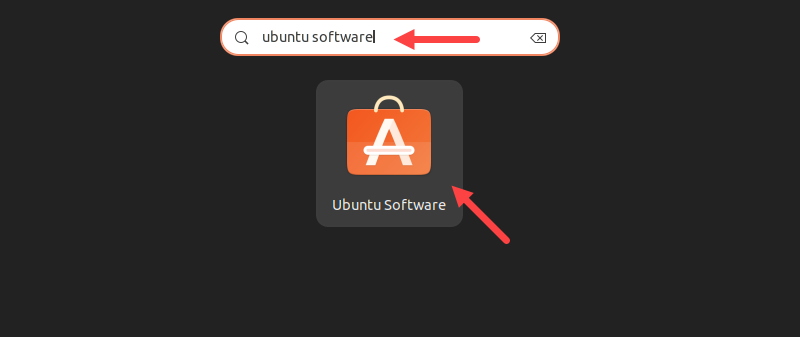
1. Click the grid button in Ubuntu to show all apps, and type ubuntu software in the search bar. From the result list, select the Ubuntu Software app.
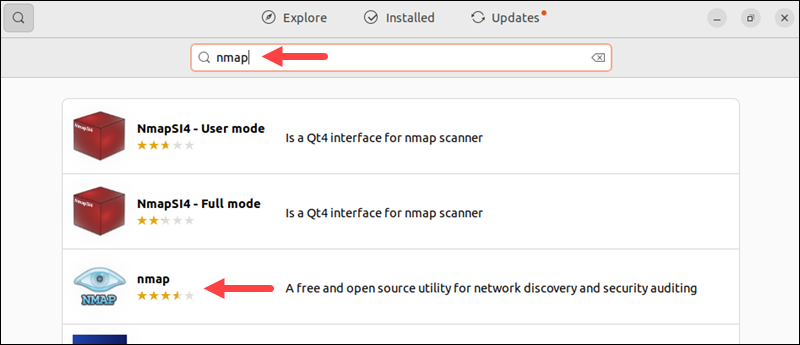
2. When Ubuntu Software opens, click the search icon and type nmap.
3. From the search results, select the Nmap utility and click the Install button.
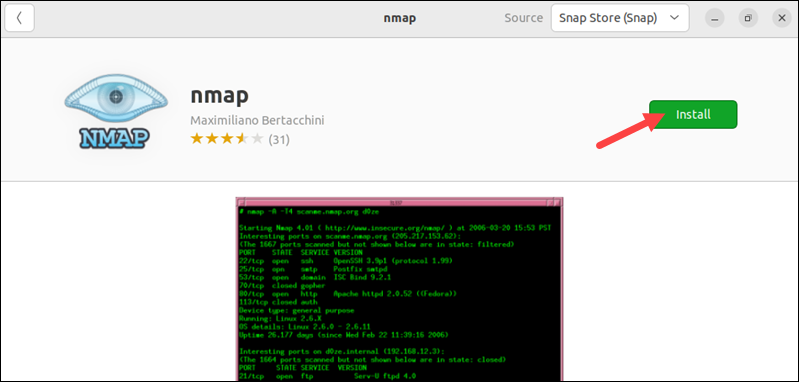
Provide your administrator password when prompted and wait for the process to finish.
Install NMAP by Compiling Source Code
Installing something by compiling it from source code means taking a program's human-readable source code and converting it into machine-readable binary code that the computer can execute.
Compiling from source often gives access to the latest features and updates before they are packaged into official releases. However, it can be complex, may lack official support, and require knowledge of dependencies and build tools.
If you decide to install Nmap by compiling it from the source code, follow the steps below:
1. Open the terminal and run the following command to install the packages required for compiling Nmap:
sudo apt install build-essential libssl-dev2. Using a browser, navigate to the official Nmap website and download the latest tarball from the Source Code Distribution section. You can either download it using the browser or by copying the download link in the wget command as follows:
wget https://nmap.org/dist/nmap-[version].tar.bz23. After the download completes, extract the tarball using the tar command:
tar jxvf nmap-[version].tar.bz2Replace [version] with the exact program version you downloaded.
4. Use the cd command to move to the extracted directory.
5. Run the following command to compile the source code:
./configure && make && sudo make install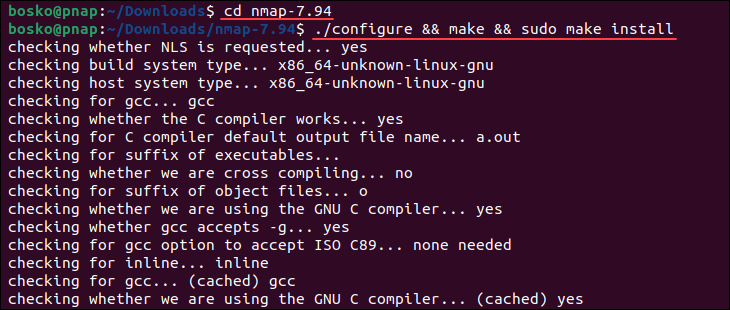
Wait for the process to complete. Compiling from source code usually takes longer than installing a package using the package manager, so give it time to finish.
Install NMAP in Docker
Docker is a platform that enables users to package, distribute, and run applications in lightweight, isolated containers. If you want to use Nmap without installing it on your system, you can run it in a Docker container for a separate, isolated environment. This method requires a working Docker installation.
Note: For more information on how to install Docker, refer to our guides:
Follow the steps below:
1. Open the terminal and pull the Nmap Docker image using the following command:
sudo docker pull instrumentisto/nmap
2. After pulling the image, run Nmap in Docker with the following command:
docker run -it --rm instrumentisto/nmap -v
When the process completes, your Docker container will run Nmap without installing it directly on your system. This method is useful if you suspect Nmap could interfere with other software.
How to Use NMAP Security Scanner on Linux
Running Nmap provides a list of scanned targets along with supplemental information based on the options and arguments used. This section covers the basic options this tool offers. For a full list of options, visit the Nmap official page or access the manual from your command line using the man command:
man nmapWarning: Aggressive port scanning to find open ports without permission can be interpreted as malicious by third-party organizations.
NMAP Help
You can access the Nmap built-in help command to list all the options that the command accepts. Since it has a lot of available options, the help command is useful when you need to refresh your memory:
nmap -h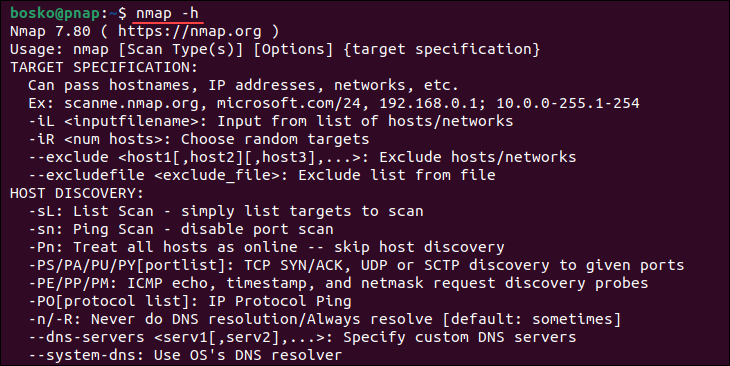
Basic Scans
The basic scan is a fundamental Nmap feature that provides a quick, efficient way to discover active devices on a network. There are two types of basic scan:
- Ping Scan. Scans the list of devices active on a given subnet. It is the easiest way to detect hosts on a network. To perform a ping scan, specify the
-spoptions. For example:
nmap -sp 192.168.0.1/24In the example above, Nmap will perform a ping scan on all IP addresses in the 192.168.0.1/24 subnet to determine which hosts are online and responding to ICMP echo requests.
- Host Scan. Scans a given IP address or host for 1000 well-known ports. These ports are used by services such as SQL, SNTP, Apache, etc. For example:
nmap scanme.nmap.orgIn the example above, Nmap scans the specified target scanme.nmap.org. It attempts to identify open ports, running services, and potentially other information about the host's network configuration and services.
Port Scanning
Nmap recognizes six port states:
- Open. Actively accepting TCP connections, UDP datagrams, or SCTP associations.
- Closed. Accessible, but no application is listening on the port.
- Filtered. Nmap cannot determine whether the port is open due to packet filtering.
- Unfiltered. The port is accessible, but Nmap cannot determine whether it is open or closed.
- Open|filtered. Nmap cannot determine if a port is open or filtered.
- Closed|filtered. Nmap cannot determine if a port is closed or filtered.
By default, Nmap scans the thousand most common ports for each protocol. However, it also provides options for specifying which ports to scan and whether the scan should be randomized or ordered.
Port scanning in Nmap can be performed in various ways:
- Using the
-pparameter to specify a single port:
nmap -p 973 192.164.0.1- By specifying the port type, such as TCP, to scan for information about a specific type of connection:
nmap -p T:7777,973 192.164.0.1- By scanning a range of ports separated by a hyphen:
nmap -p 76-973 192.164.0.1- Utilizing the
--top-portsflag to specify the top n ports to scan:
nmap --top-ports 10 scanme.nmap.orgThe command above scans the top 10 ports on the scanme.nmap.org host.
Note: Learn also how to scan with nmap -sn 192.168.1.0/24.
Host Scanning
Nmap is a powerful tool that can scan multiple hosts simultaneously, making it invaluable for managing extensive network infrastructure.
There are various approaches for scanning multiple hosts:
- Writing all the IP addresses in a single row allows you to scan all hosts simultaneously. For example:
nmap 192.164.1.1 192.164.0.2 192.164.0.2- Using the asterisk (
*) enables scanning all subnets at once:
nmap 192.164.1.*- Adding commas to separate address endings allows for efficient scanning of multiple hosts:
nmap 192.164.0.1,2,3,4- Specifying a range of IP addresses using a hyphen streamlines the scanning processes:
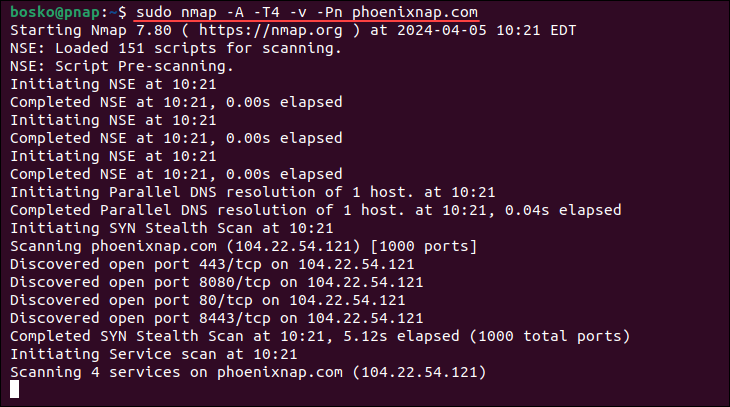
nmap 192.164.0.0-255Furthermore, Nmap provides options to enhance scanning capabilities. For instance, scan speed designations range from -T0 to -T5, with higher speeds being more aggressive. The -v option increases verbosity, providing more detailed information about the scan.
Additionally, the -A option enables comprehensive scan features, including OS detection, version scanning, script scanning, and traceroute.
Combining multiple options further enhances scanning efficiency. For example, using -A and -T4 together enables faster execution. The -Pn options instruct Nmap not to initiate a ping scan, which can be useful in certain scenarios.
For example:
sudo nmap -A -T4 -v -Pn phoenixnap.comThis command executes Nmap with comprehensive scanning options on the specified target, phoenixnap.com, without performing a ping scan:
Stealth Scanning
A stealth scan, or a TCP SYN scan, is performed by sending a SYN packet and then analyzing the response. If Nmap receives SYN/ACK, the port is open, and you can establish a TCP connection. Since this type of scan never completes TCP connections, it is often called half-open scanning.
To perform a stealth scan, specify the -sS flag:
nmap -sS scanme.nmap.orgNote that stealth scanning is slower and less aggressive than other types of scanning, so it may take some time to get a response.
Version Scanning
Another useful Nmap feature is the ability to see application versions. It is a key part of penetration testing, as it reveals vulnerabilities from the Common Vulnerabilities and Exposures (CVE) database for a particular version of the service.
To perform a version scan, specify the -sV options, followed by the target machine/domain:
nmap -sV scanme.nmap.orgThe scanme.nmap.org website is provided by the Nmap creator for testing purposes.
NMAP Outputs and Exporting
You can export Nmap scan results in several ways, depending on your needs and preferences. This section explores different formats for exporting Nmap scan results.
Default Output
By default, Nmap prints its output in the terminal. You can specify the -v option to get a verbose output, which provides additional information about the scan. Verbose output helps monitor the process step by step. For example:
nmap -v scanme.nmap.org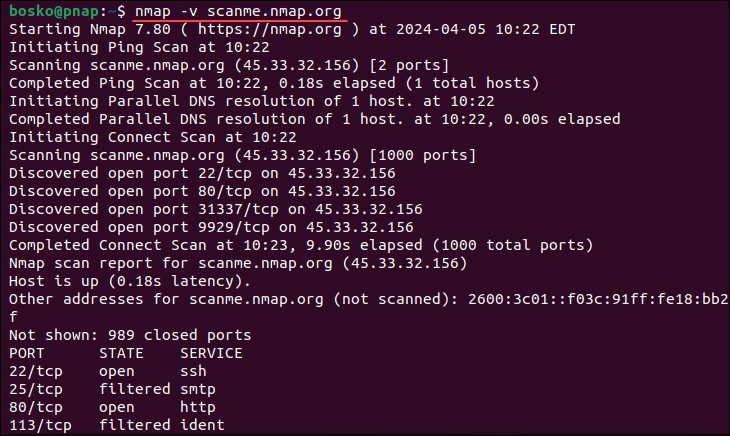
Text File Output
If you want to export the results of an Nmap scan, you can save them to a text file. The output differs slightly from the terminal output, but it includes all the essential information.
To save the output in a text file, use the following syntax:
nmap -oN [output_file_name] [domain/IP]For example:
nmap -oN output.txt scanme.nmap.orgXML Output
XML is another format that Nmap supports for exporting its scan results. At the same time, XML is also the preferred file format for most penetration testing tools because it is easily parsable when importing the results. The syntax for exporting to XML is:
nmap -oX [output_file_name] [domain/IP]For example:
nmap -oX output.xml scanme.nmap.orgGrepable Output
The Grepable format (gnmap) is designed for compatibility with grep and other Unix utilities, enabling easy parsing and manipulation of scan results. Specify the -oG option followed by the file name to export results in a grepable format:
nmap -oG [output_file_name] [domain/IP]For example:
nmap -oG scan_results.gnmap scanme.nmap.orgExport to All Formats
You can also simultaneously export the scan results in all supported formats by specifying the -oA command. For example:
nmap -oA output scanme.nmap.orgThe above command exports the scan results in three files: output.xml, output.gnmap, and output.txt.
How to Uninstall NMAP on Linux
Depending on how you installed NMAP, select one of the two methods for removing the utility from your system:
Remove Nmap Using the CLI
To remove Nmap from your system using the command line, open the terminal and run the following command:
sudo apt remove nmap -y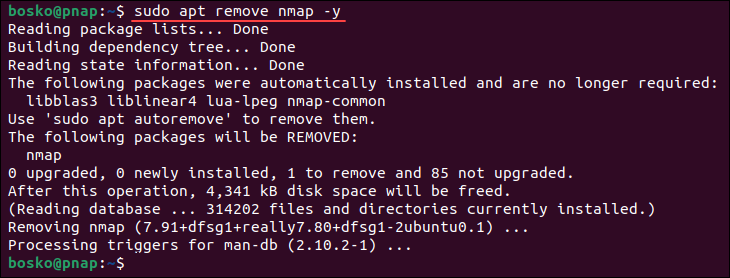
The command removes Nmap from your system.
Remove Nmap Using the GUI
If you installed Nmap using Ubuntu Software, you can also remove it the same way.
1. Find the app in the software list and select it.
2. Click the Delete icon to remove Nmap.
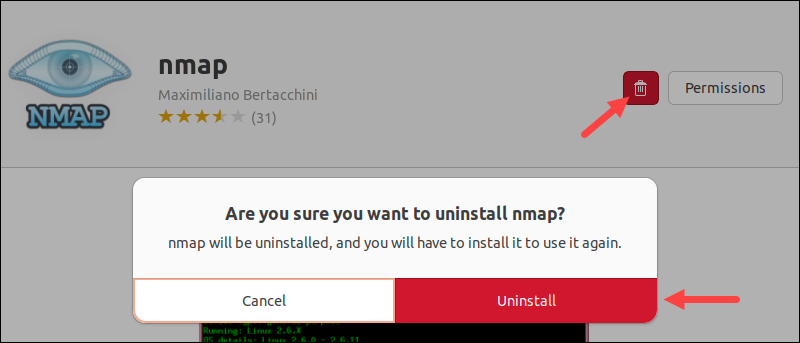
3. When prompted, provide the administrator password and wait for the process to complete.
Conclusion
Now you know how to install and use Nmap on your Linux system. Nmap has many available options and can be a powerful and versatile scanning tool for discovering network vulnerabilities.
Next, check out 17 essential Nmap commands.
