The Domain Name System (DNS) translates text-based domain names to IP addresses. By default, most networks are configured to use DNS servers provided by the Internet Service Provider (ISP). However, users can manually change the DNS nameservers.
This tutorial will show you how to change DNS nameservers on your Ubuntu machine using the terminal or Graphical User Interface (GUI).
Prerequisites
- Ubuntu system (this guide uses Ubuntu 26.04).
- Access to the terminal.
- sudo or root privileges.
Why Change DNS Nameserver on Ubuntu
In most cases, your default DNS settings offer optimal performance. However, there are scenarios in which you should consider changing the DNS server:
- Improved speed. Some DNS providers offer faster response times than the default DNS servers.
- Enhanced security. Some DNS providers offer additional security features, such as protection against phishing and malware.
- Increased reliability. Alternative DNS providers sometimes offer more reliable service with less downtime than the default DNS servers of ISPs.
- Privacy. Some DNS providers focus on user privacy and do not log your browsing data.
- Access to blocked content. In some cases, ISPs block access to certain websites by manipulating DNS responses. Changing to an alternative DNS server helps bypass such restrictions.
Note: Learn how to install PowerDNS on Ubuntu, a flexible and robust DNS solution.
How to Change DNS Nameserver on Ubuntu
There are several ways to change the DNS nameserver on Ubuntu. The following text elaborates on these methods.
Change DNS Nameserver via resolve.conf
On earlier Linux distributions, configuring DNS nameservers involved editing the /etc/resolve.conf file directly. The process consisted of adding the desired DNS server entries and saving the file. The system would use those DNS servers for name resolution.
Modern Linux distros use systemd-resolved. Therefore, the /etc/resolv.conf file is a symbolic link managed by systemd-resolved. This means the file is dynamically generated and should not be edited manually. You can still edit it manually, but the changes are not permanent. For example:
1. Access /etc/resolv.conf using a text editor. For example, we use Nano:
sudo nano /etc/resolv.conf2. Add or modify the nameserver entries with the desired DNS servers. For example:
nameserver 1.1.1.1
nameserver 1.0.0.1
3. Save and exit the file.
Note that resolv.conf is overwritten by systemd-resolved, and the changes may not be permanent.
The systemd-resolved service provides DNS resolution services, DNS caching, and other advanced features. It manages the /etc/resolv.conf file to ensure consistency.
Instead of manually editing /etc/resolv.conf, configure your DNS settings through systemd-resolved. Take the following steps:
1. Access the /etc/systemd/resolved.conf file in Nano or another text editor:
sudo nano /etc/systemd/resolved.conf2. Locate the [Resolve] section. This section contains the DNS-related settings for systemd-resolved.
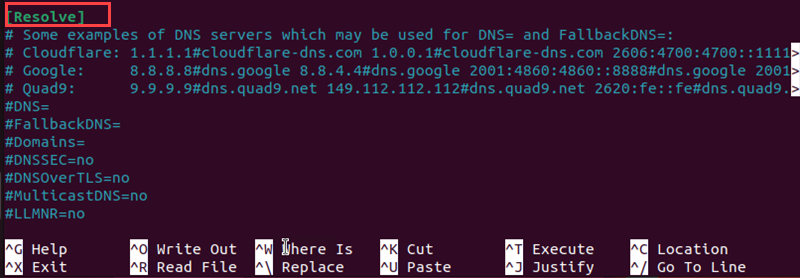
If [Resolve] does not exist, create it.
3. Add or modify the DNS settings in this file. For example, add the DNS and FallbackDNS settings.
DNS=1.1.1.1 1.0.0.1
FallbackDNS=8.8.8.8 8.8.4.4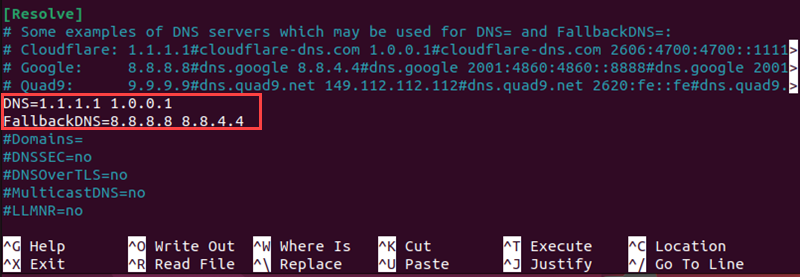
The DNS parameter specifies the primary DNS servers systemd-resolved uses for DNS resolution. In the example, 1.1.1.1 and 1.0.0.1 are used, which are the IP addresses for Cloudflare's (DNS provider) DNS servers.
The FallbackDNS parameter specifies fallback DNS servers systemd-resolved uses if the primary DNS servers specified in the DNS parameter are unavailable. In the example, 8.8.8.8 and 8.8.4.4 are used, which are the IP addresses for Google's Public DNS servers.
4. Save the file.
5. Restart the systemd-resolved service:
sudo systemctl restart systemd-resolvedThe command has no output.
Change DNS Nameserver via Netplan
Another way to change DNS settings is via Netplan. Netplan is a utility in Ubuntu that simplifies network configuration, including IP addresses, DNS servers, and routing. It uses YAML files to define network configurations. Take the following steps:
1. Go to the Netplan directory via the cd command:
cd /etc/netplan
2. List the directory contents with ls to see the name of the YAML file containing the network configuration.
ls
3. Open the file in a text editor. Your file may have a different name.
sudo nano 01-network-manager.yaml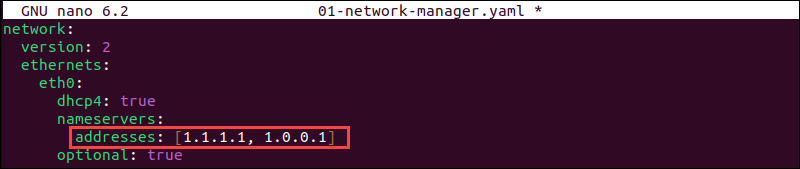
Ethernet connections are listed in the ethernets section of the file. If there are any wireless connections, they are in the wifis section. Netplan stores the current DNS configuration parameters in the nameservers subsections of each section.
4. Replace the addresses located in the file with the DNS addresses you want to use. You can enter more than two addresses.
5. Save the changes and exit.
Note: The file on your system may lack the entire ethernets or wifis section. In that case, add the lines that are missing, making sure you respect the indentation provided in the example.
6. Apply the changes you made in the config file:
sudo netplan applyIf the operation is successful, there is no output.
Change DNS Nameserver via Network Settings
Use Ubuntu Settings to complete all the steps to change DNS addresses via the GUI:
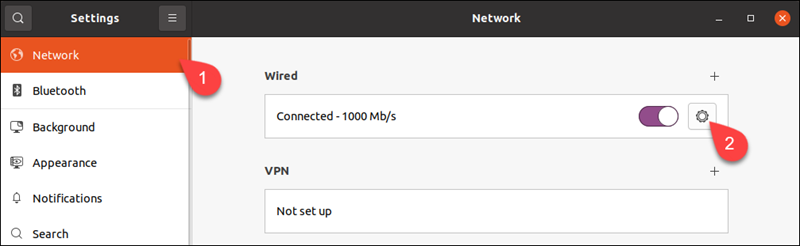
1. Launch Settings and click the Network tab.
2. Click the cogwheel next to the connection you wish to set up.
Note: To change the settings for a wireless connection, select the Wi-Fi tab, choose a wireless network, and proceed with the steps below.
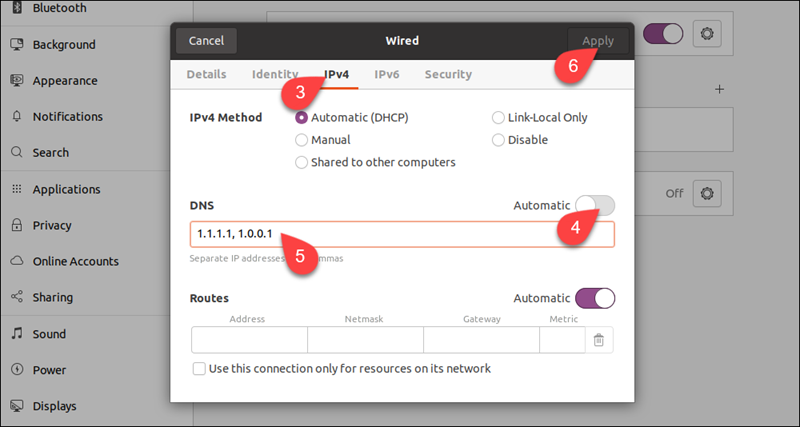
3. Go to the IPv4 tab.
4. Disable automatic DNS configuration by turning off the switch next to the DNS field.
5. Type new DNS addresses in the field.
6. Click Apply.
The system is now configured to work with the new DNS servers.
Note: If you wish to set up IPv6 nameservers, go to the IPv6 tab and enter them there. Learn here how the IPv6 address format is different from IPv4.
Change DNS Nameserver via Router Settings
Changing the DNS nameserver via your router settings centralizes DNS management for all devices on your network. To do this, follow these steps.
1. Open a web browser.
2. Enter the router's IP address.
3. Log in with your router's username and password (often found on a sticker on the router).
4. Locate DNS settings in sections like Internet, WAN, Network, or Advanced.
5. Input the desired DNS servers.
6. Save the new settings and allow the router to restart if needed.
Conclusion
This tutorial explained how to set your DNS nameservers on Ubuntu using different methods, either via a GUI or CLI.
Next, learn how to troubleshoot DNS issues.