Elasticsearch is a powerful platform for real-time full-text searches. It can efficiently aggregate and monitor Big Data at scale when combined with tools like Kibana and Logstash, forming the ELK stack.
Learn how to install, configure, and secure Elasticsearch on Ubuntu.

Prerequisites
- An Ubuntu-based system (this guide uses Ubuntu 24.04).
- Terminal or command-line access.
- A user account with sudo permissions.
Downloading and Installing Elasticsearch on Ubuntu
There are three primary ways to download and install Elasticsearch on Ubuntu:
- Install Elasticsearch using the apt Package Manager.
- Install Elasticsearch from a Deb package.
- Install Elasticsearch manually from a tar.gz archive.
Note: You do not have to install Java on Ubuntu in advance because the latest Elasticsearch versions have a bundled version of OpenJDK. If you prefer a different version or have a pre-installed Java version, confirm it is compatible by checking the Elastic compatibility matrix.
Method 1: Install Elasticsearch on Ubuntu from Repository
When you install Elasticsearch from the Debian repository, the apt package manager automatically handles dependencies and future updates. This is a significant benefit, but the drawback is that your instance is limited to software available in the official Elasticsearch repository.
Follow the steps in the sections below to complete the installation using this method.
1. Add Elasticsearch Repository
To verify the authenticity of the Elasticsearch packages, add its repository and update the GPG key. Open a terminal window and use the wget command to retrieve the public key and save it to a secure directory:
wget -qO - https://artifacts.elastic.co/GPG-KEY-elasticsearch | sudo gpg --dearmor -o /usr/share/keyrings/elasticsearch-keyring.gpg
Add the Elasticsearch repository to the system's apt sources list to tell the package manager where to find Elasticsearch:
echo "deb [signed-by=/usr/share/keyrings/elasticsearch-keyring.gpg] https://artifacts.elastic.co/packages/8.x/apt stable main" | sudo tee /etc/apt/sources.list.d/elastic-8.x.list
Note: The command retrieves keys for the latest Elasticsearch release (8.x) at the time of writing this guide. If a newer version is available, adjust the command accordingly.
2. Install Elasticsearch on Ubuntu
Before continuing with the installation, update the package index:
sudo apt updateInstall Elasticsearch from the repository using the following command:
sudo apt install elasticsearch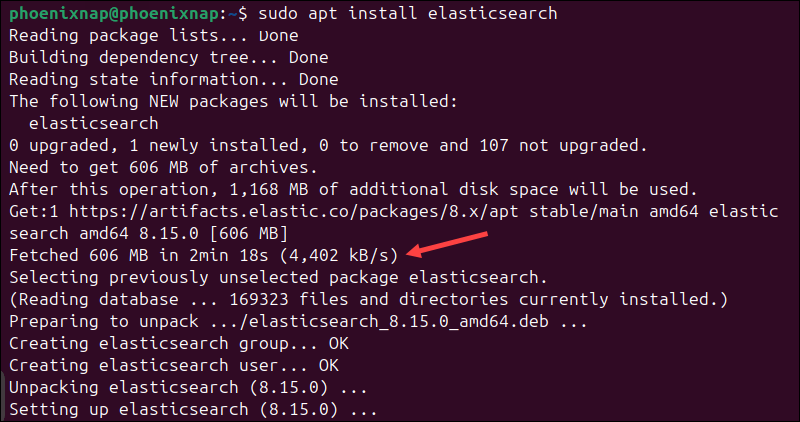
The package manager downloads Elasticsearch and installs it on your system. This process may take a few minutes.
3. Start Elasticsearch Service on Ubuntu
You need to start the Elasticsearch service manually and set it to start on boot. Reload the systemd manager configuration to ensure it recognizes Elasticsearch:
sudo systemctl daemon-reloadConfigure Elasticsearch to start automatically during system boot:
sudo systemctl enable elasticsearch.service
Use the following command to start Elasticsearch:
sudo systemctl start elasticsearch.serviceNote: Systemd service commands do not work on the Windows Subsystem for Linux (WSL). If you are using Ubuntu on WSL, use the following commands to manage the Elasticsearch service:
sudo service elasticsearch start
sudo service elasticsearch stop
sudo service elasticsearch restart
4. Check Elasticsearch Status on Ubuntu
Check the status of the Elasticsearch service:
sudo systemctl status elasticsearch.service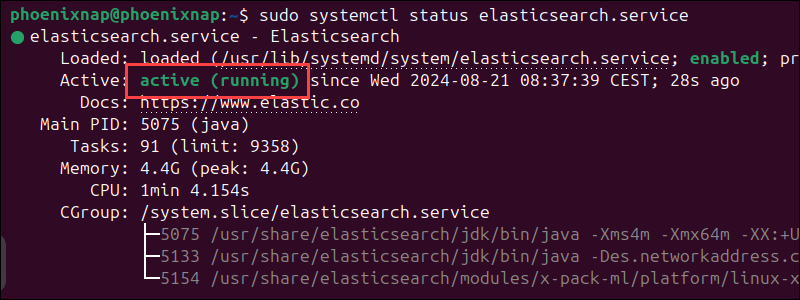
The output shows that the Elasticsearch service is active and provides information on running tasks and other relevant details.
Method 2: Install Elasticsearch on Ubuntu via Debian Package
On Ubuntu, you can download and install software from a Debian package. This is a quick and straightforward installation method. However, without a package manager like apt, users must manually download and install updates and new versions as they are released.
1. Download the Elasticsearch Debian Package
Use the wget command to download the latest Debian package from the Elastic webpage:
wget https://artifacts.elastic.co/downloads/elasticsearch/elasticsearch-8.15.0-amd64.deb
Note: Adjust the command to replace the Elasticsearch version (8.15.0) if a more recent version has been released.
Verify the integrity of the file using a checksum. Use the following command to download the SHA-512 checksum file for Elasticsearch version 8.15.0:
wget https://artifacts.elastic.co/downloads/elasticsearch/elasticsearch-8.15.0-amd64.deb.sha512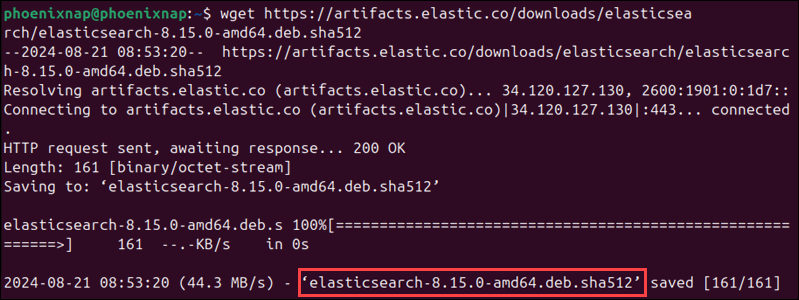
Compare the checksum of the downloaded Elasticsearch package with the one in the checksum file:
shasum -a 512 -c elasticsearch-8.15.0-amd64.deb.sha512

The OK message indicates that the file is legitimate.
2. Install the Debian Package
Install the Elasticsearch package using the dpkg command:
sudo dpkg -i elasticsearch-8.15.0-amd64.deb
Missing dependencies are a common issue on Ubuntu systems. If you encounter potential dependency errors, enter the following command to resolve them:
sudo apt install -fThis system automatically downloads and installs any missing dependencies and completes the installation.
3. Start Elasticsearch
Enter the following command to enable the Elasticsearch service:
sudo systemctl enable elasticsearch.serviceThe service will start automatically every time the system boots.
Use the following command to start Elasticsearch:
sudo systemctl start elasticsearch.service4. Verify the Installation
Check the status of the service to confirm it is active:
sudo systemctl status elasticsearch.service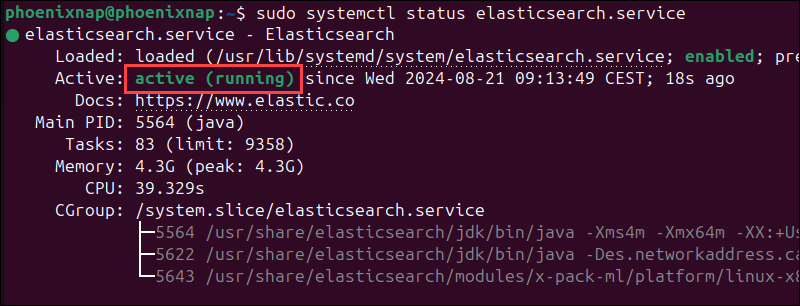
The output confirms the Elasticsearch service is active.
Method 3: Install Elasticsearch on Ubuntu Manually from Elastic Archive
You can manually download the Elasticsearch package as a compressed file from the official Elastic website and install it on your system. This approach has a few additional steps but gives you more control over the installation process.
1. Download the Elasticsearch Archive
Use wget to download the latest zipped version of Elasticsearch via the command line:
wget https://artifacts.elastic.co/downloads/elasticsearch/elasticsearch-8.15.0-linux-x86_64.tar.gz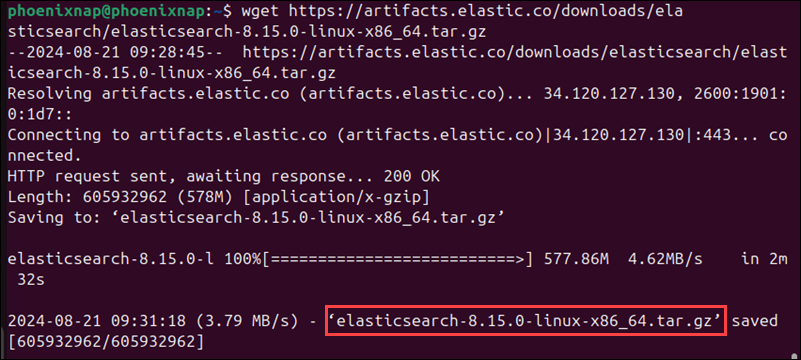
The current Elasticsearch version is 8.15.0. Update the command accordingly if you want to download a different version.
2. Extract the Archive
Extract the tar.gz archive using the tar command:
tar -xzf elasticsearch-8.15.0-linux-x86_64.tar.gzThis command creates an elasticsearch-8.15.0 directory in the current working directory. It contains the files needed to run Elasticsearch.
3. Move Elasticsearch to Different Directory
To make it easier to manage Elasticsearch, move the extracted directory to /usr/local/ or another directory where you typically store applications:
sudo mv elasticsearch-8.15.0 /usr/local/elasticsearch4. Run Elasticsearch
Start Elasticsearch manually using the following command:
/usr/local/elasticsearch/bin/elasticsearchThis command starts Elasticsearch in the foreground and displays logs in the terminal session.
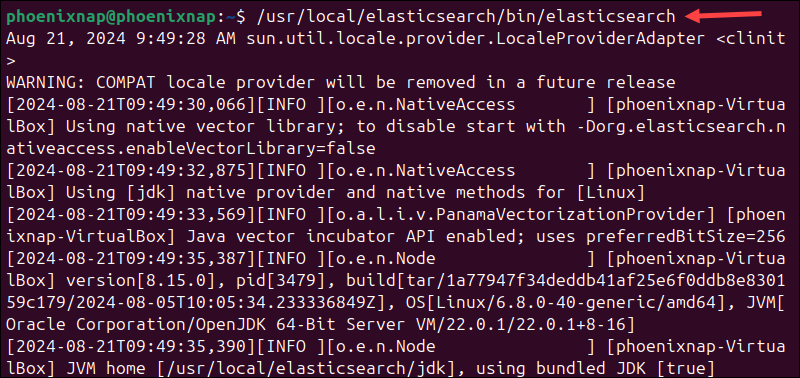
To run Elasticsearch in the background, append the -d flag to the command:
/usr/local/elasticsearch/bin/elasticsearch -dWhile Elasticsearch runs in the background, you can continue using the terminal for other tasks.
5. Set Up Elasticsearch as a Systemd Service (Optional)
You can set up Elasticsearch as a systemd service, which allows you to start, stop, and manage Elasticsearch like any other service on your system:
1. Use a text editor, like Nano, to create a new service file for Elasticsearch:
sudo nano /etc/systemd/system/elasticsearch.service2. Add the following content to the file:
[Unit]
Description=Elasticsearch
Documentation=https://www.elastic.co
Wants=network-online.target
After=network-online.target

[Service]
Type=notify
ExecStart=/usr/local/elasticsearch/bin/elasticsearch
User=elasticsearch
Group=elasticsearch
Restart=on-failure
LimitNOFILE=65536

[Install]
WantedBy=multi-user.target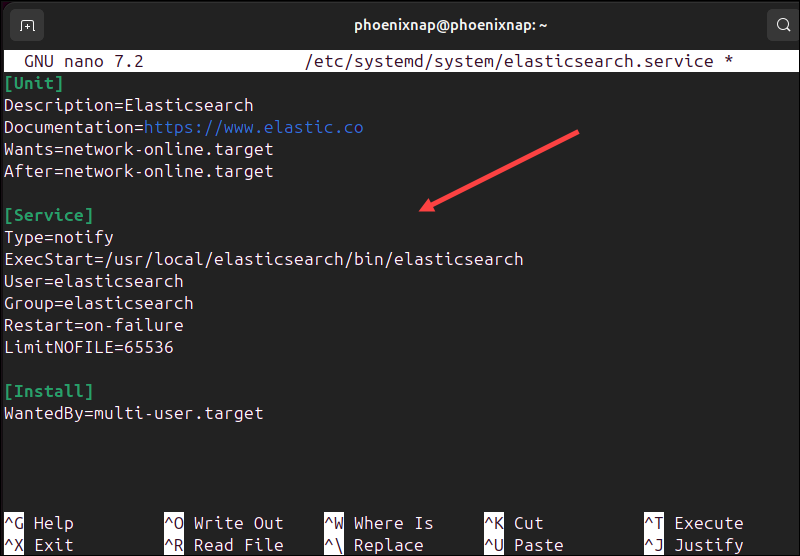
3. Press Ctrl+X, Y, and Enter to save the file and exit the editor.
4. Reload the systemd configuration to recognize the new service:
sudo systemctl daemon-reload5. Ensure Elasticsearch starts automatically whenever your system boots with the following command:
sudo systemctl enable elasticsearch.service6. Start the Elasticsearch service:
sudo systemctl start elasticsearch.service6. Verify the Installation
To ensure that Elasticsearch is running correctly, you can check its status with the following command:
sudo systemctl status elasticsearch.service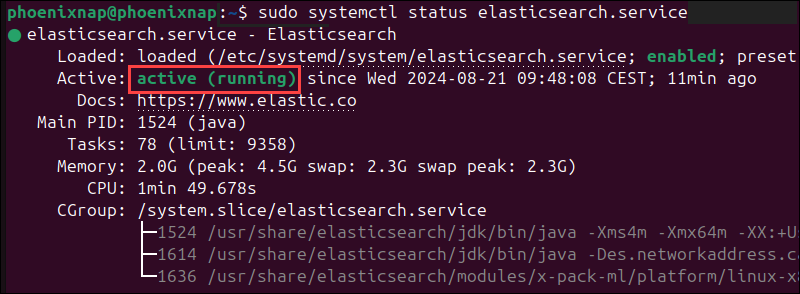
Configure Elasticsearch on Ubuntu
Elasticsearch is preconfigured for basic use case scenarios, like running a single-node environment on a local machine. Users who need advanced security features, remote access, or extended logging options must adjust the default settings in the elasticsearch.yml configuration file.
Note: YAML files use indentation to denote the structure. Make sure to maintain the indentation when editing the file.
Allow Remote Access
By default, Elasticsearch listens only on localhost for connections, which means the service cannot be accessed remotely. However, even in development and test environments, multiple nodes often need to communicate with each other.
To allow remote access to your Elasticsearch service:
1. Access the elasticsearch.yml file. If you installed Elasticsearch from a Debian repository or package, enter:
sudo nano /etc/elasticsearch/elasticsearch.ymlIf you installed Elasticsearch using an archive file, use the following command:
sudo nano /usr/local/elasticsearch/config/elasticsearch.ymlAdjust the command accordingly if you specified a different directory during installation.
2. Find the #network.host line in the Network section and uncomment it by removing the # symbol.
3. You can bind Elasticsearch to a specific network interface. For example, 109.168.86.95:
network.host: 109.168.86.95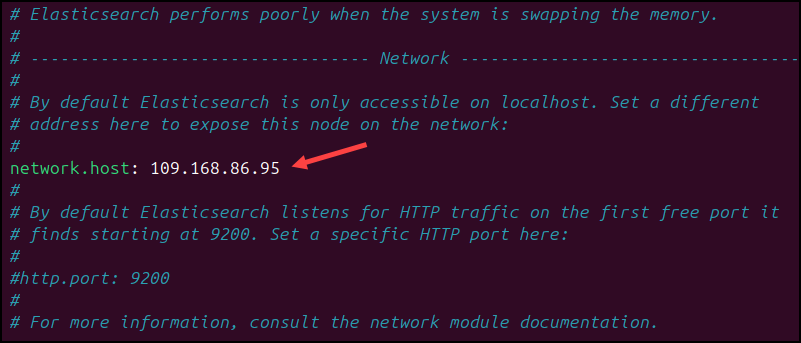
4. To listen on all available network interfaces, set the network.host value to 0.0.0.0:
network.host: 0.0.0.0This setting allows anyone to access your Elasticsearch cluster from anywhere. Use it with caution and only if you have firewall, authentication, and encryption systems in place to protect your cluster.
5. When you set network.host to a non-loopback IP address, such as 109.168.86.95 or 0.0.0.0, Elasticsearch will perform bootstrap checks before starting the cluster. To pass the checks, find the cluster.initial_master_nodes line and update it with the IP addresses of the master-eligible nodes in your cluster:
cluster.initial_master_nodes: ["109.204.44.62"]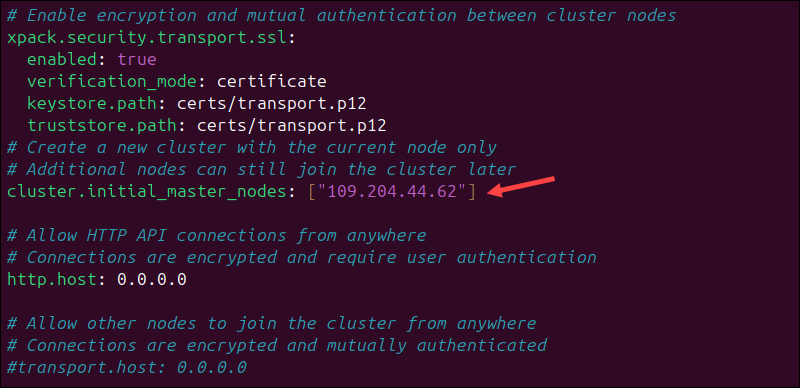
Include all master-eligible node IPs in this list when setting up a multi-node cluster.
6. Press Ctrl+X, Y, and Enter to save and close the file.
7. Restart the Elasticsearch service to apply the changes:
sudo systemctl restart elasticsearch.serviceSet Data and Logs Directory
The elasticsearch.yml file is organized into sections that control different aspects of Elasticsearch behavior. The Paths section contains directory paths that tell Elasticsearch where to store index data or logs.
You can adjust the directory paths in the Paths section to, for example, store data or logs on a disk with more capacity or a dedicated storage device.
path.data: /var/lib/elasticsearch.Path to file that stores index data.path.logs: /var/log/elasticsearch.Path to file that stores log files.

If you made any changes, save and close the file and restart the Elasticsearch service to apply them.
Secure Elasticsearch with UFW (Optional)
If you allow remote access to Elasticsearch, you must define firewall rules and enable UFW to limit network exposure. When accessing Elasticsearch over SSH, ensure you allow traffic on the default SSH port 22 or a custom SSH port:
1. Enter the following command to enable traffic on port 22:
sudo ufw allow 222. Elasticsearch listens for incoming requests on port 9200 by default. Create the rule to allow access on port 9200 using the following command:
sudo ufw allow from [external_IP] to any port 9200Replace [external_IP] with the IP of the remote machine that will be used to access Elasticsearch.
3. Enable the UFW tool:
sudo ufw enable
4. To ensure you added the rules correctly, check the status of UFW.
sudo ufw status
The tool displays its status and firewall rule details.
Configure Log Settings
When you run into potential issues, the verbosity and format of the log files can help with troubleshooting. The logging settings in Elasticsearch are managed in the log4j2.properties file.
1. To access the log4j2.properties file, enter one of the following commands based on your installation method.
Debian repository and Debian package installations:
sudo nano /etc/elasticsearch/log4j2.propertiesManual installation from the Elastic archive:
sudo nano /usr/local/elasticsearch/config/log4j2.properties2. One common action is to instruct Elasticsearch to log more detailed information by changing the following line in the log4j2.properties file:
rootLogger.level = infoto
rootLogger.level = debug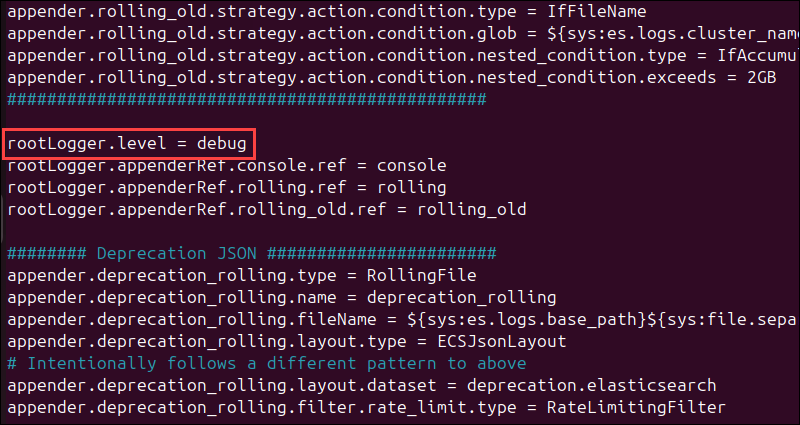
3. After editing the configuration file, save and close the file and restart the Elasticsearch service to apply the changes:
sudo systemctl restart elasticsearch.service4. Use the following command to check Elasticsearch logs:
sudo journalctl -u elasticsearch.serviceThe log will now contain more detailed entries. Note that more detailed logs can increase disk usage and impact system performance.
Store Password as Environment Variable
In your shell session, you can store the Elastic user password as an environment variable. The following command sets the password in the ELASTIC_PASSWORD variable:
export ELASTIC_PASSWORD="your_secure_password"Applications like Kibana that need the password can access it during the session. Even though this means you do not need to hardcode the password in scripts, remember that environment variables are still visible to processes and users with access to your shell.
Test Ubuntu Elasticsearch Installation
After configuring and securing Elasticsearch, test the installation to ensure everything works.
The default listening port for Elasticsearch is 9200. Use the curl command to send an HTTP request to the localhost:
curl localhost:9200If Elasticsearch is running correctly, you should see a JSON response with information about the cluster, including version details, name, and other metadata.
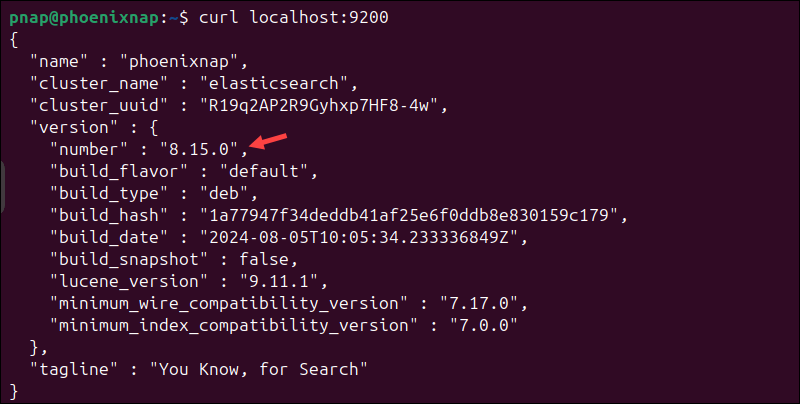
If you have enabled remote access, use the following curl request to prompt Elasticsearch:
curl -X GET http://[server_IP]:9200/Replace [server_IP] with your server’s IP address. The response should resemble the local request response.
Note: The ELK stack natively integrates with Kubernetes. Find out how to install Elasticsearch on Kubernetes manually or install Elasticsearch on Kubernetes using a Helm chart.
Conclusion
The guide showed you how to install Elasticsearch on Ubuntu using different methods, configure basic settings, and verify that the service is running.
Next, install Kibana and Logstash, the remaining ELK stack components, and fully leverage Elasticsearch and its many features.


