Apache ZooKeeper is an open-source project from the Apache Software Foundation that helps manage and monitor group services and coordinate tasks like configuration management, service discovery, and synchronization across distributed systems.
This process eliminates inconsistencies, failures, or conflicts, which ensures smooth operation, fault tolerance, and scalability in distributed applications.
In this tutorial, you will learn how to install and set up Apache ZooKeeper on Ubuntu.

Prerequisites
- A system running Ubuntu.
- Access to the terminal.
- A user account with sudo or root privileges
Installing Apache ZooKeeper on Ubuntu
Apache ZooKeeper ensures high availability, consistency, and reliability by efficiently managing configurations, synchronization, and service discovery across multiple nodes.
The following text explains how to install Apache ZooKeeper on your Ubuntu system.
Step 1: Install Java
ZooKeeper is written in Java and requires the programming language to run. Java Standard Edition (Java SE) is available through two main implementations:
- OpenJDK is open-source and comes preinstalled on most Linux distributions, making it a popular choice.
- Oracle JDK is the proprietary implementation and is often used in enterprise environments where additional features or support are required.
Both implementations are suitable for running ZooKeeper.
Since Java is often preinstalled in newer Ubuntu distributions, check whether it is already installed by running the java --version command:
java --version
If Java is already installed, you see version information, like Java 21 (Oracle JDK in this example), which works for running ZooKeeper.
If Java is not installed or you wish to install a specific version, install OpenJDK using Ubuntu's package manager. This is the quickest and easiest way to get Java on Ubuntu.
To accomplish that, take the following steps:
1. Update the system repositories:
sudo apt update2. Use apt to install Java:
sudo apt install openjdk-11-jdk -y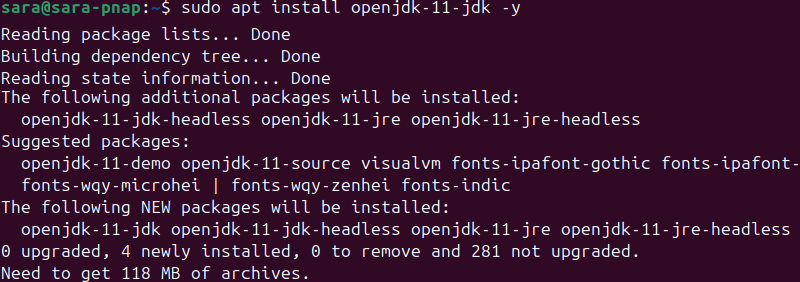
3. Verify the outcome with:
java --versionStep 2: Create User for ZooKeeper
Create a dedicated user for ZooKeeper to enhance security and ensure ZooKeeper runs with limited privileges, which reduces the risk of unauthorized access or system modifications.
To do that, take the following steps:
1. Create a separate user for the ZooKeeper service with the useradd command:
sudo useradd zookeeper -mThe -m flag creates a home directory for the user. In this case, it is /home/zookeeper. You can replace zookeeper with any name.
The command has no output.
2. Set bash as the default shell for the new user with the usermod command:
sudo usermod --shell /bin/bash zookeeperThe command doesn't have an output.
3. Use the passwd command to set a password for the user:
sudo passwd zookeeper
Tip: Check out our strong password ideas or try our free password generator.
4. Add the user to the sudoers group for it to have sudo privileges:
sudo usermod -aG sudo zookeeperThe command has no output.
5. Verify the user is now a superuser by listing the accounts in the sudoers group:
sudo getent group sudo
Step 3: Create ZooKeeper Data Directory
Before installing ZooKeeper, create a directory structure to store configuration and state data.
To store the data on the local machine, take the following steps:
1. Use mkdir to create a new ZooKeeper directory:
sudo mkdir -p /data/zookeeper2. Assign directory ownership to the ZooKeeper user using chown:
sudo chown -R zookeeper:zookeeper /data/zookeeperThese commands have no output.
Step 4: Downloading and Installing ZooKeeper
To ensure you have the latest stable version configured for your system, take the following steps and download and install ZooKeeper:
1. Navigate to the Apache ZooKeeper Download Page in your web browser and locate the latest stable release.
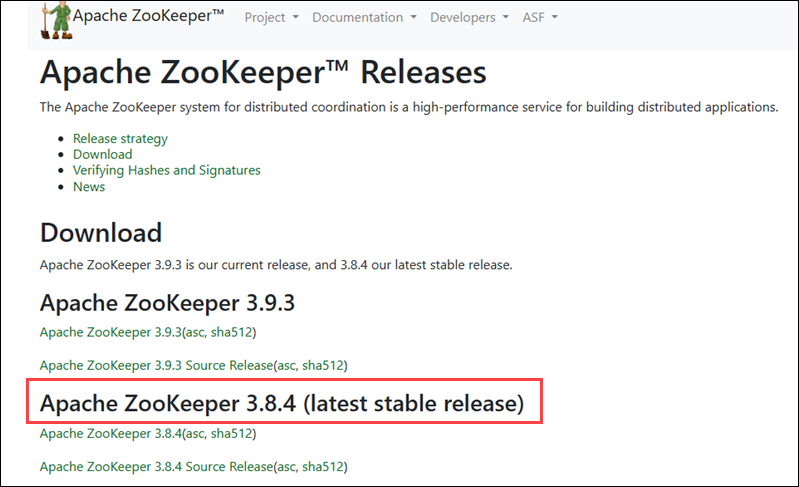
The Apache Zookeeper 3.8.4 is the latest stable release at the time of writing the article. Therefore, use the Apache mirror system to download the binary release.
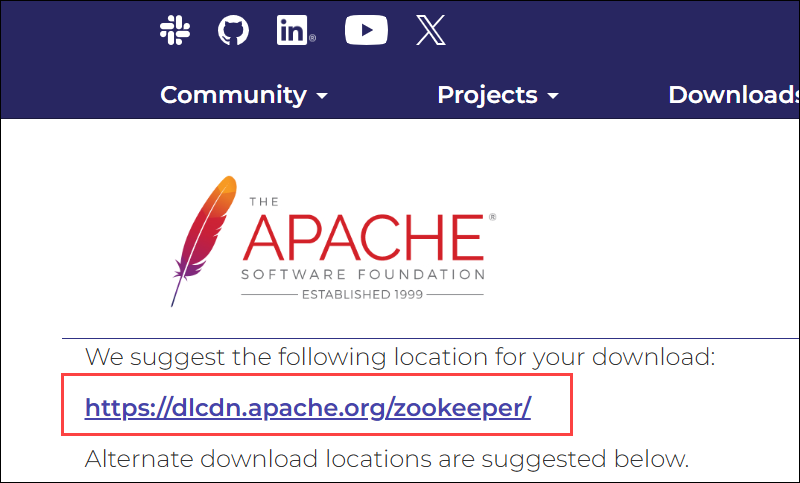
Note: Apache uses mirrors to ensure high-speed downloads by redirecting users to geographically closer servers.
2. Visit the Apache Mirror System website.
3. Click the suggested location for the download:
4. Click the zookeeper-3.8.4/, the latest stable release.
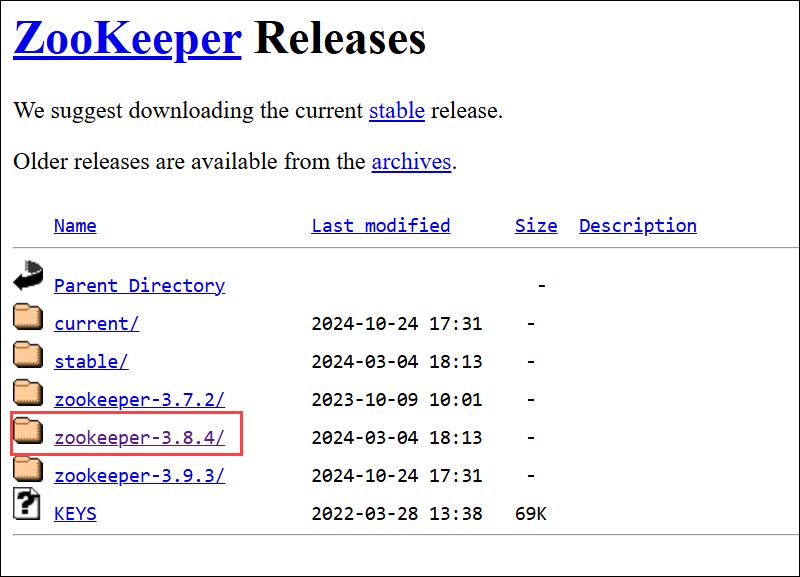
5. Find the binary release and copy the link to the -bin.tar.gz file.
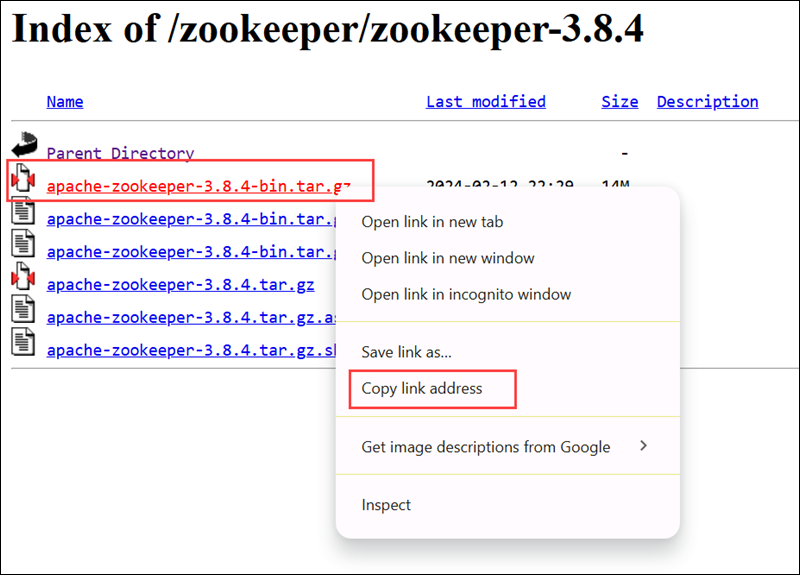
Note: You'll recognize the binary release because it always ends in -bin.tar.gz. The correct binary release for version 3.8.4 is apache-zookeeper-3.8.4-bin.tar.gz.
6. In the terminal, use the cd command to move to the /opt directory:
cd /opt7. Use the wget command to download the .tar file. Paste the link copied from the official Apache web page:
sudo wget https://dlcdn.apache.org/zookeeper/zookeeper-3.8.4/apache-zookeeper-3.8.4-bin.tar.gz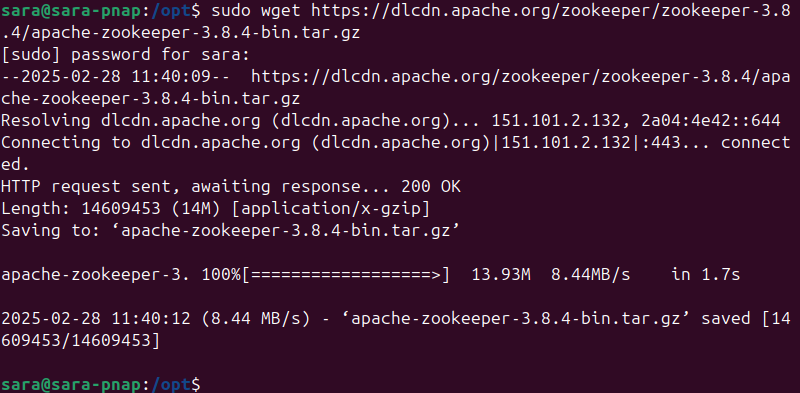
8. Extract the tar file with:
sudo tar -xvf apache-zookeeper-3.8.4-bin.tar.gz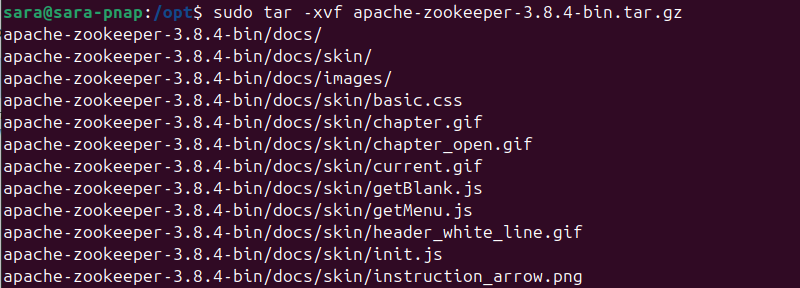
Note: When extracting the file, the ZooKeeper binary package name varies. Make sure it matches the file you downloaded.
9. Use the mv command to rename the extracted file to zookeeper with:
sudo mv apache-zookeeper-3.8.4-bin zookeeperThe command has no output.
10. Assign the directory ownership to the ZooKeeper user:
sudo chown -R zookeeper:zookeeper /opt/zookeeperThe command has no output.
Step 5: Configure ZooKeeper in Standalone Mode
For testing or development purposes, ZooKeeper runs in the Standalone mode. This mode is simpler but lacks redundancy. On the other hand, the Replication mode is more complex, but it provides redundancy, fault tolerance, and scalability, making it the better choice for production environments.
To configure ZooKeeper in the Standalone mode, create a new configuration file called zoo.cfg file in the zookeeper directory.
To accomplish that, take the following steps:
1. Create zoo.cfg using a text editor of choice. In this case, Vim:
sudo vim /opt/zookeeper/conf/zoo.cfgThe command creates and opens the file in the /opt/zookeeper/conf/ directory if it doesn't already exist.
2. Add the following lines:
tickTime = 2000

dataDir = /data/zookeeper

clientPort = 2181

initLimit = 5

syncLimit = 2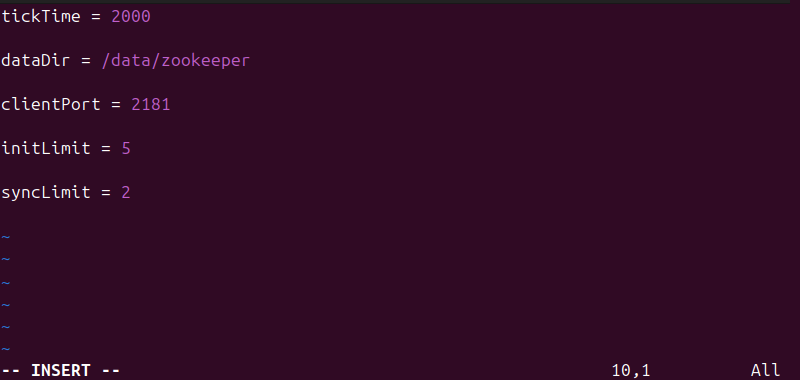
The lines consist of the following:
tickTime: The number of milliseconds of each tick.dataDir: The directory where the in-memory database snapshots and transaction logs for updates are stored.clientPort: The port listening for client connections.initLimit: The number of ticks the initial synchronization phase can take.syncLimit: The number of ticks between sending a request and getting an acknowledgment.
3. Save and exit the text editor.
Note: This configuration is suitable for a single-node cluster and is useful for local testing or development. For production environments with multiple ZooKeeper nodes, you must configure the Replication mode.
Step 6: Start ZooKeeper Service
Once you've completed the configuration, start the ZooKeeper service. Follow these steps to begin running ZooKeeper:
1. Navigate to the directory where ZooKeeper is installed. If you are not already in this directory, use:
cd /opt/zookeeper2. Start the ZooKeeper service:
sudo bin/zkServer.sh start
If successful, the output confirms the ZooKeeper service is running.
Step 7: Connect to ZooKeeper Server
Once the ZooKeeper service is running, connect to the ZooKeeper server. To connect to ZooKeeper, run the following command:
bin/zkCli.sh -server 127.0.0.1:2181
The command starts the ZooKeeper client and connects to the server running at the specified IP address and port. In this case, 127.0.0.1 is the IP address, and 2181 is the default port the ZooKeeper listens on for client connections.
In this example, the output confirms the connection to the ZooKeeper server, as indicated by a new zk prompt.
To see a list of available commands, run the following command in the new command prompt:
help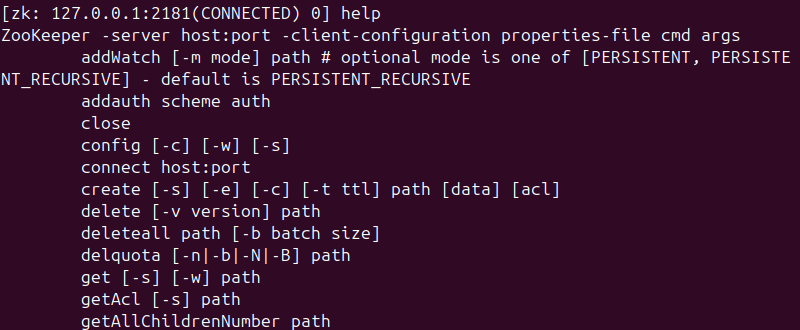
Close the session with:
quitTo stop the ZooKeeper service, run the command:
bin/zkServer.sh stopNote: The command bin/zkServer.sh is run directly from the terminal, not from the ZooKeeper client. Make sure to quit the client before stopping the service.
Step 8: Create System Service File
To ensure ZooKeeper starts automatically with your system and is managed as a service, create a systemd service file for ZooKeeper.
Follow the steps below to create and configure the service file:
1. Create a new zookeeper.service file in Vim or a different text editor. Make sure you use sudo with the command:
sudo vim /etc/systemd/system/zookeeper.service2. Paste the following content into the file:
[Unit]
Description=ZooKeeper
Documentation=http://zookeeper.apache.org
After=network.target

[Service]
Type=forking
User=zookeeper
Group=zookeeper
ExecStart=/opt/zookeeper/bin/zkServer.sh start
ExecStop=/opt/zookeeper/bin/zkServer.sh stop
ExecReload=/opt/zookeeper/bin/zkServer.sh restart
Restart=on-failure
TimeoutSec=60

[Install]
WantedBy=multi-user.target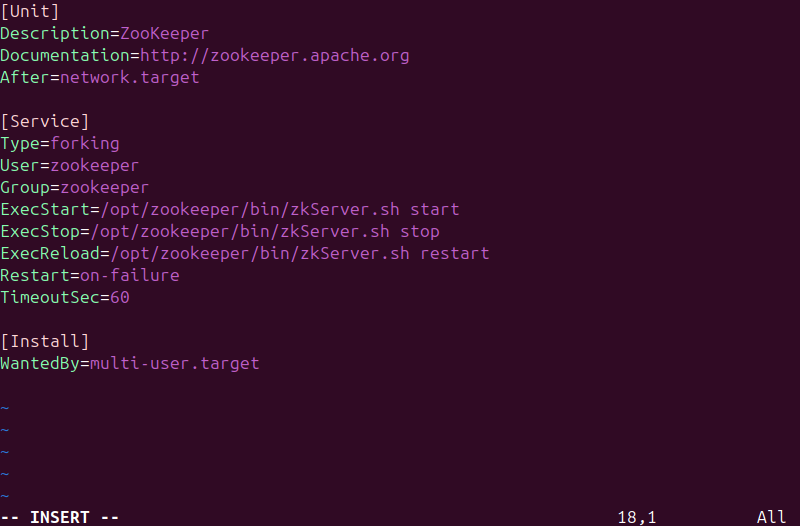
Some key terms in the configuration file that affect how the ZooKeeper service interacts with the systemd service manager are explained below:
After=network.target. Ensures ZooKeeper starts after networking is available.- ExecStart. Starts the ZooKeeper server.
- ExecStop. Stops the ZooKeeper server.
- ExecReload. Reloads the service.
- Restart=on-failure. Automatically restarts the service if it fails.
- TimeoutSec=60. Defines a timeout period for the service startup or shutdown process.
Note: More detailed explanations for other configuration file items are in the official ZooKeeper documentation.
3. Save and exit the file.
4. Reload the systemd to apply the changes:
sudo systemctl daemon-reloadThe command has no output.
5. Enable ZooKeeper to start on boot and start it immediately:
sudo systemctl enable zookeeper
sudo systemctl start zookeeperThe command has no output.
6. Verify the service is up and running with the command:
sudo systemctl status zookeeper
Configuring Replicated ZooKeeper
In a production environment, a replicated ZooKeeper cluster is necessary to ensure high availability and fault tolerance. This configuration allows multiple ZooKeeper nodes (servers) to work together, each maintaining a replica of the data.
Before configuring the replicated cluster, ensure you've installed ZooKeeper and Java and created a ZooKeeper user.
Each ZooKeeper server must have the same configuration file (zoo.cfg), which includes specific settings for replication.
To create the configuration file, take the following steps:
1. Create the zoo.cfg file on each server with:
sudo vim /opt/zookeeper/conf/zoo.cfg2. Paste the following content into the file:
# Basic ZooKeeper settings
tickTime=2000
dataDir=/var/zookeeper
clientPort=2181
initLimit=5
syncLimit=2

# Replication settings: define each ZooKeeper node
server.1=[server_ip_1]:2888:3888
server.2=[server_ip_2]:2888:3888
server.3=[server_ip_3]:2888:3888
A replicated ZooKeeper setup needs extra configuration items for the ZooKeeper servers to communicate and form a cluster. The following list explains the extra configuration options:
- tickTime. The value of a single tick in milliseconds.
- dataDir. Directory where ZooKeeper stores its data.
- clientPort. The port clients use to connect to ZooKeeper.
- initLimit. The maximum number of ticks to allow followers to sync with the leader.
- syncLimit. The maximum number of ticks a follower can lag behind the leader.
- server.X. Defines the ZooKeeper nodes.
3. Save and exit the file.
4. Repeat the process on each server in the group.
Conclusion
This article explained how to install ZooKeeper on your Ubuntu machine. It also elaborated on all the steps to take before running ZooKeeper.
Learn more about this open-source system in our introduction to Apache Storm.