Kubernetes services help applications running in Kubernetes clusters to communicate. A service helps manage internal and external traffic to pods through IP addresses, ports, and DNS records. Service discovery is the process of connecting to a pod's service.
This article explains what Kubernetes service discovery is and provides an implementation example.
Prerequisites
- Access to the command line/terminal.
- Access to a sudo account.
- A text editor, such as nano.
- Minikube installed and configured.
- Basic kubectl commands (grab our kubectl commands cheat sheet to follow along).
Note: Kubernetes deployments quickly become complex.
phoenixNAP's Bare Metal Cloud integrates Rancher as a solution, enabling one-click deployments. Check out how to set up cluster management on BMC using Rancher.
What is Service Discovery in Kubernetes?
Service discovery refers to the process of connecting to a Kubernetes service. Services provide Pods with a network connection, making them discoverable.
Pods represent the basic building block of Kubernetes and are a collection of containers that can move across nodes. Kubernetes assigns each pod with an internal IP address once deployed. A pod's internal IP changes over time due to the movement, creation, and destruction across nodes.
A service binds to Kubernetes deployment pods, creating a DNS service inside the cluster and HTTP endpoints for service discovery. Although the IPs change, the HTTP endpoints remain the same.
Below is an example implementation of service discovery in Kubernetes.
How Does Service Discovery Work in Kubernetes?
This example uses Minikube to deploy a single-node cluster of a simple hello-kubernetes web app.
To start Minikube, run the following command in the terminal:
minikube start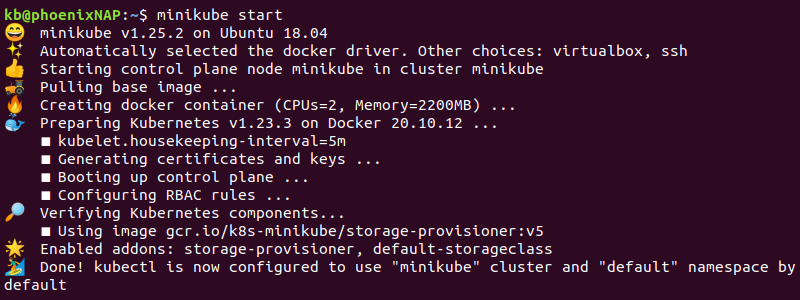
Follow the steps below to see how service discovery works in Kubernetes.
1. Create Namespaces
The example infrastructure consists of two namespaces for development and production.
1. Create a namespace YAML file for development:
nano development-namespace.yml2. Add the following code to the file:
apiVersion: v1
kind: Namespace
metadata:
  name: development
3. Save the file and close nano (CTRL+X, Y, Enter).
4. Create the namespace with:
kubectl apply -f development-namespace.yml
A message appears confirming the namespace creation.
Repeat the same steps for the production namespace. Change the file name to production-namespace.yml and set the name in metadata to production.
5. To confirm both namespaces are active, run:
kubectl get namespaces
The output shows the development and production namespaces on the list as Active.
2. Create Kubernetes Deployment
Deploy the example hello-kubernetes application in both namespaces.
1. Create an app deployment YAML configuration file:
nano app-deployment-development.yml2. Add the following configuration:
apiVersion: apps/v1
kind: Deployment
metadata:
  name: hello
  namespace: development
spec:
  replicas: 2
  selector:
    matchLabels:
      app: hello
  template:
    metadata:
      labels:
        app: hello
    spec:
      containers:
      - name: hello-kubernetes
        image: paulbouwer/hello-kubernetes:1.5
        ports:
        - containerPort: 8080
The deployment consists of two pod replicas.
3. Save and close the file.
4. Apply the deployment configuration with:
kubectl apply -f app-deployment-development.yml
The output confirms the hello deployment creation.
Repeat the deployment steps for the production namespace. Change the file name to app-deployment-production.yml and replace the metadata namespace name with production.
5. Confirm the two deployments are ready with:
kubectl get deployments --all-namespaces
The output shows the hello deployment on development and production namespaces.
3. Ping Pods
To verify the IP addresses work inside the cluster, create a temporary pod in the default namespace for running essential utility commands:
1. Create a busybox.yml configuration file:
nano busybox.yml2. Add the following configuration:
apiVersion: v1
kind: Pod
metadata:
  name: busybox
  namespace: default
spec:
  containers:
  - image: busybox:1.28
    command:
      - sleep
      - "3600"
    imagePullPolicy: IfNotPresent
    name: busybox
  restartPolicy: Always
The busybox pod contains basic shell utilities, such as ping, nslookup, wget, etc.
3. Save the file and close.
4. Apply the file to create the pod:
kubectl apply -f busybox.yml
The command creates the pod and applies the configuration.
5. Check the IP addresses of the nodes with:
kubectl get pod -o wide --namespace=developmentkubectl get pod -o wide --namespace=production
The output shows two addresses per pod (one for each node). Use any of the addresses for the following step.
6. Ping the address from the busybox pod in the default namespace with:
kubectl exec -it busybox -- ping <address>
Replace <address> with the actual address from one of the pods. The ping command works within the cluster, confirming the pod address is correct.
Running nslookup does not resolve to a hostname:
kubectl exec -it busybox -- nslookup <address>
When deploying again, the application changes these addresses. A service helps create a stable endpoint, which makes service discovery straightforward.
4. Create Services
Creating services for the namespaces helps expose the addresses, allowing access from the web. To create a service for development and production, do the following:
1. Create a service file for the development deployment:
nano app-service-development.yml2. Add the following code:
apiVersion: v1
kind: Service
metadata:
  name: hello
  namespace: development
spec:
  type: LoadBalancer
  ports:
  - port: 80
    targetPort: 8080
  selector:
    app: hello
The service connects to the development namespace for the hello deployment on port 80. The service type is LoadBalancer.
Note: Other service types include ClusterIP, NodePort, and ExternalName.
3. Save the file and close.
4. Apply the service with:
kubectl apply -f app-service-development.yml
The output prints a confirmation. Repeat the steps for the production deployment.
5. To view the services, enter:
kubectl get services --all-namespaces
The output shows the hello deployment on development and production namespaces. Both are LoadBalancer types with a set cluster internal address. Connecting using the internal address automatically load balances the requests between two pods.
The external address is <pending> until exposed.
5. Expose the Service
To expose the service on the internet, do the following:
1. In another terminal tab, expose the services to the internet with:
sudo minikube tunnel
Enter the password and leave the tab running.
2. Each service receives an external IP address. Check the IP addresses with:
kubectl get services --all-namespaces
The IP addresses expose the service to the internet, creating an HTTP endpoint and a DNS service.
3. Run nslookup on either address to see the name resolution:
kubectl exec -it busybox -- nslookup 10.99.132.104
The address resolves to hello.development.
4. View the service in the browser by accessing the address.
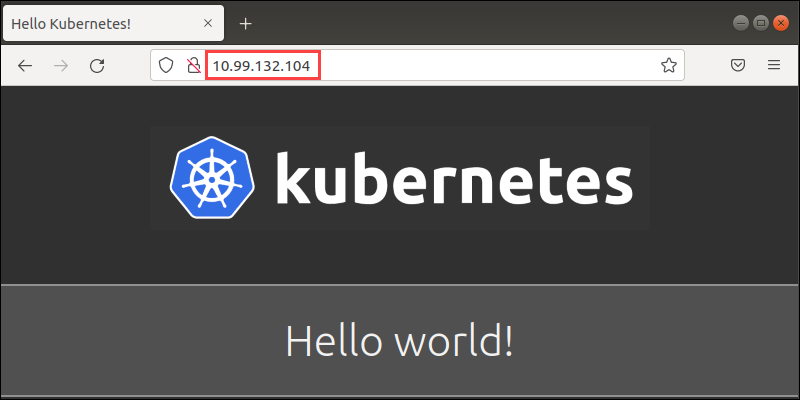
Accessing the address via port 80 also resolves to the same page.
Alternatively, use wget:
kubectl exec -it busybox -- wget -O - http://hello.development sh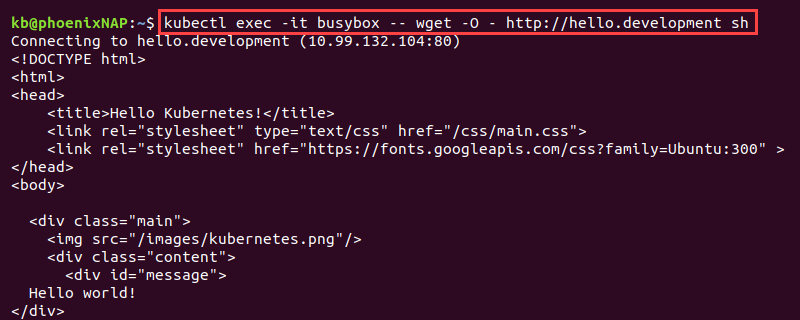
The hello.development page resolves to the 10.99.132.104:80 address and fetches the contents.
Conclusion
After going through this guide, you know what service discovery is in Kubernetes. The example helps demonstrate how service discovery functions and what Kubernetes does behind the scenes.
