Minikube is an open-source tool for setting up a single-node Kubernetes cluster on a local machine. The cluster runs in a virtual machine or container environment, and includes a container runtime, allowing users to run containers on the node.
This tutorial will show you how to install Minikube on Ubuntu.
Prerequisites
- A system running Ubuntu.
- Virtualization support, such as Intel VT-x or AMD-V, enabled in the BIOS or UEFI firmware.
- Virtualization software like Docker, KVM, or VirtualBox installed.
- Command-line access.
- Sudo access to the system.
Note: The steps described in this tutorial have been tested on Ubuntu 26.04.
How to Install Minikube on Ubuntu
Follow the steps below to install Minikube on a local Ubuntu system. The steps show how to set up the required dependencies, download the Minikube binary, and run it.
Step 1: Install Required Packages
Minikube installation requires the curl command to download the Minikube installer and the apt-transport-https package to handle HTTPS connections during package installation.
Proceed with the steps below to install the packages:
1. Update the package information on the system by entering the following command:
sudo apt update2. Install curl and apt-transport-https:
sudo apt install curl apt-transport-https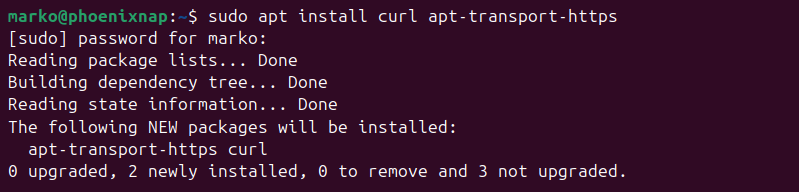
Step 2: Download Minikube Binary
Minikube binaries for all major systems and architectures are available on the Minikube website. The following procedure downloads the binary for X86_64 Ubuntu systems:
1. Use curl to download the latest Minikube binary:
curl -O https://storage.googleapis.com/minikube/releases/latest/minikube-linux-amd64
2. Copy the downloaded file and store it in the /usr/local/bin/ directory:
sudo cp minikube-linux-amd64 /usr/local/bin/minikubeThe command prints no output.
Step 3: Enable Minikube Binary Execution
By default, binaries do not have execute permission. Give the execute permission to the Minikube binary using the chmod command:
sudo chmod +x /usr/local/bin/minikubeVerify the installation by checking the Minikube version:
minikube versionThe output displays the software version number.

Step 4: Install kubectl
Kubectl is the official command-line tool for Kubernetes, which provides an interface for cluster deployment and management. Ubuntu has a kubectl snap package that can be installed by typing:
sudo snap install kubectl --classic
Alternatively, follow the steps below to download and install the kubectl binary directly from the maintainer:
1. Download kubectl with the following command:
curl -LO "https://dl.k8s.io/release/$(curl -L -s https://dl.k8s.io/release/stable.txt)/bin/linux/amd64/kubectl"2. Make the binary executable by typing:
chmod +x ./kubectl3. Move the binary to the path with the following command:
sudo mv ./kubectl /usr/local/bin/kubectlStep 5: Start Minikube
Start Minikube by running the command below:
minikube startMinikube selects the default driver and begins pulling the latest available Kubernetes image.
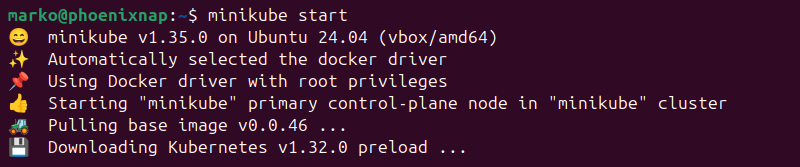
Note: To start Minikube with a non-default driver, use the following command: minikube start --driver=[driver_name].
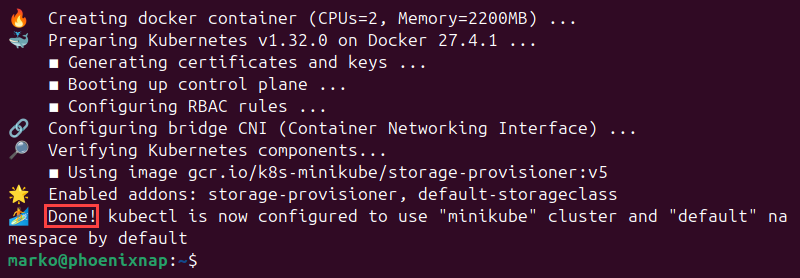
Once Minikube finishes initialization, the output shows the confirmation message, and the shell prompt reappears.
Managing Kubernetes with Minikube
The following sections present minikube commands for managing and monitoring the Minikube cluster.
Common Minikube Commands
The Minikube platform provides the minikube command-line tool for managing and configuring your local Kubernetes cluster. The following are the most commonly used commands:
- Establish an SSH connection to the Minikube container:
minikube sshA container shell prompt appears.

This feature allows users to interact with the container's operating system, run commands, troubleshoot issues, and perform system administration tasks.
- See the status of the Minikube container, the cluster, and the core Kubernetes components:
minikube status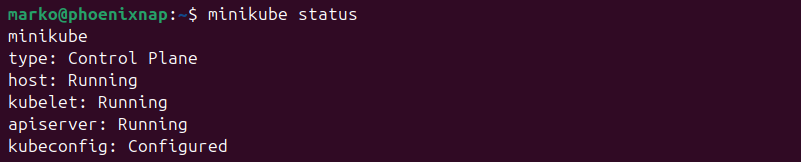
- Display a list of installed Minikube addons:
minikube addons list
- Enable an addon:
minikube addons enable [addon_name]- Stop running the Minikube cluster:
minikube stop
- Delete the Minikube cluster:
minikube delete
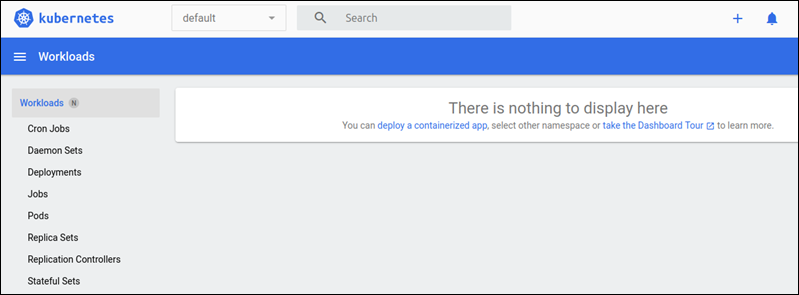
Access Minikube Dashboard
Minikube comes with a dashboard addon enabled by default. The web dashboard allows users to manage the Kubernetes cluster without running terminal commands.
Run the command below to enable and access the Minikube dashboard:
minikube dashboardA web browser instance opens, and the dashboard appears.
To shut down the dashboard process, press Ctrl + D while in the related terminal instance or quit the instance.
Alternatively, to access the dashboard directly via the browser, obtain the dashboard’s IP address:
minikube dashboard --urlThe address appears in the output.

Copy and paste the address in a browser or click the link while holding Ctrl to access the Minikube dashboard.
Conclusion
This tutorial explained how to install and configure a Minikube cluster on Ubuntu. The article also introduced the commands commonly used to monitor and manage Minikube.
You can use Minikube to test-deploy tools on Kubernetes. For example, read how to install Jenkins on a Kubernetes cluster.