Kubernetes is a software deployment platform that allows users to manage containerized applications and scale clusters easily. To further enhance control and ensure consistent operation across the cluster, Kubernetes introduces an object called the DaemonSet.
This article explains what DaemonSets are, when to use them, and how to create them.
What Is Kubernetes DaemonSet?
Kubernetes ensures that an application has sufficient resources, operates reliably, and maintains high availability throughout its lifecycle. The location of the application within the cluster is not a primary concern.
DaemonSets address Kubernetes' scheduling limitations by guaranteeing the deployment of a specific application on every node within the cluster. The pods deployed via DaemonSets usually contain background processes that must be distributed across the entire cluster.
A DaemonSet is normally defined using a YAML file. The fields within the file provide granular control over the pod deployment process. For instance, labels can help deploy specific pods on a restricted subset of nodes.
How Do DaemonSets Work?
A DaemonSet is a controller-managed active Kubernetes object. A user can declare the desired state, indicating that a specific pod must be on every node. The reconciliation control loop compares the desired state with the observed state. If an observed node lacks a matching pod, the DaemonSet controller automatically creates one.
This automated process encompasses existing nodes and all newly created nodes. Pods created by DaemonSet controllers are not subject to Kubernetes scheduling and persist for as long as the node itself.
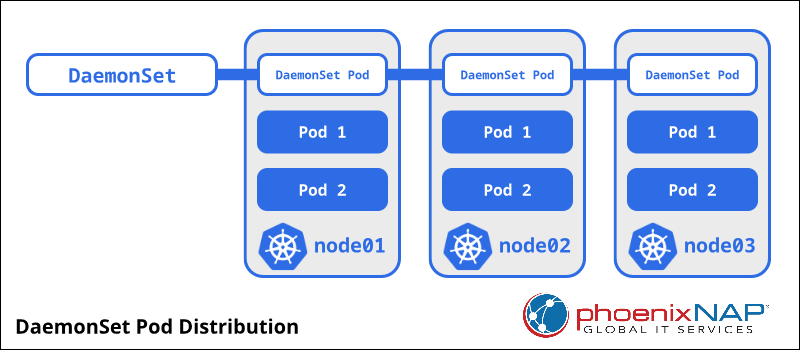
By default, a DaemonSet creates a pod on every node. If necessary, the number of acceptable nodes can be limited using a node selector. The DaemonSet controller creates pods only on nodes that match the predefined nodeSelector field in the YAML file.
Why Use DaemonSet?
DaemonSets improve cluster performance by deploying maintenance pods, specific background processes, Kubernetes monitoring apps, and other agents that must be present throughout the cluster to provide relevant services. They are well suited for long-running services, including:
- Log collection.
- Node resource monitoring (frameworks such as Prometheus).
- Cluster storage.
- Infrastructure-related pods (system operations).
One DaemonSet is commonly used to deploy one daemon type across all nodes. However, multiple DaemonSets can also control one daemon type by using different labels. Kubernetes labels specify deployment rules based on the characteristics of individual nodes.
Note: To ensure the high performance of your clusters, learn how to optimize containers for Kubernetes.
How to Use Kubernetes DaemonSet
The following sections explain how to create, update, and delete DaemonSets. They also provide instructions on how to limit DaemonSets to specific nodes and schedule daemon pods.
How to Create DaemonSet
A DaemonSet is defined using a YAML file, which is applied to a cluster using the kubectl commands.
For example, follow the steps below to deploy a Prometheus node-exporter for monitoring hardware usage metrics on every node in the cluster:
1. Create a namespace for the project:
kubectl create namespace monitoring
2. Create a YAML file using a text editor, for example Nano:
nano node-exporter-ns.yaml3. Paste the following code:
apiVersion: apps/v1
kind: DaemonSet
metadata:
  name: node-exporter
  namespace: monitoring
  labels:
    name: node-exporter
spec:
  selector:
    matchLabels:
      name: node-exporter
  template:
    metadata:
      labels:
        name: node-exporter
      annotations:
         prometheus.io/scrape: "true"
         prometheus.io/port: "9100"
    spec:
      hostPID: true
      hostIPC: true
      hostNetwork: true
      containers:
        - ports:
            - containerPort: 9100
              protocol: TCP
          resources:
            requests:
              cpu: 0.15
          securityContext:
            privileged: true
          image: prom/node-exporter:latest
          args:
            - --path.procfs
            - /host/proc
            - --path.sysfs
            - /host/sys
            - --collector.filesystem.ignored-mount-points
            - '"^/(sys|proc|dev|host|etc)($|/)"'
          name: node-exporter
          volumeMounts:
            - name: dev
              mountPath: /host/dev
            - name: proc
              mountPath: /host/proc
            - name: sys
              mountPath: /host/sys
            - name: rootfs
              mountPath: /rootfs
      volumes:
        - name: proc
          hostPath:
            path: /proc
        - name: dev
          hostPath:
            path: /dev
        - name: sys
          hostPath:
            path: /sys
        - name: rootfs
          hostPath:
            path: /
4. Save the file and exit.
5. Apply the YAML file to the cluster:
kubectl apply -f node-exporter-ds.yamlThe system confirms that the DaemonSet has been created.

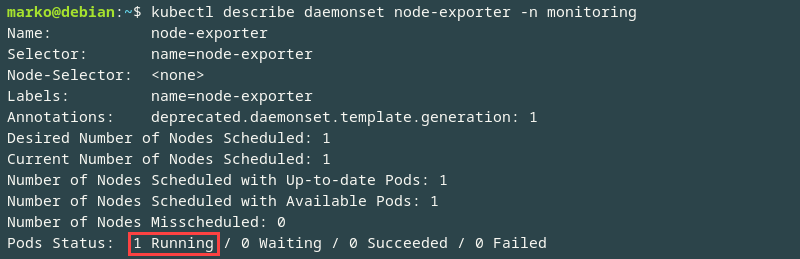
6. Check the current state of the DaemonSet with the kubectl describe command:
kubectl describe daemonset node-exporter -n monitoringThe output offers basic DaemonSet information and indicates that the pod has been deployed on all the available nodes. The pod status shows as Running.
Alternatively, list all running pods in the namespace with the following command:
kubectl get pod -o wide -n monitoringThe output shows the status of the pod.

How to Limit DaemonSet to Specific Nodes
By default, DaemonSets create pods on every node in the cluster unless node selectors constrain them. The following steps show how to limit a DaemonSet to a specific set of nodes:
1. Add the desired set of labels to a subset of nodes using the kubectl label command.
kubectl label nodes [node] [label_key]=[label_value]The example below adds the ssd=true label to the node01 node:
kubectl label nodes node01 ssd=true
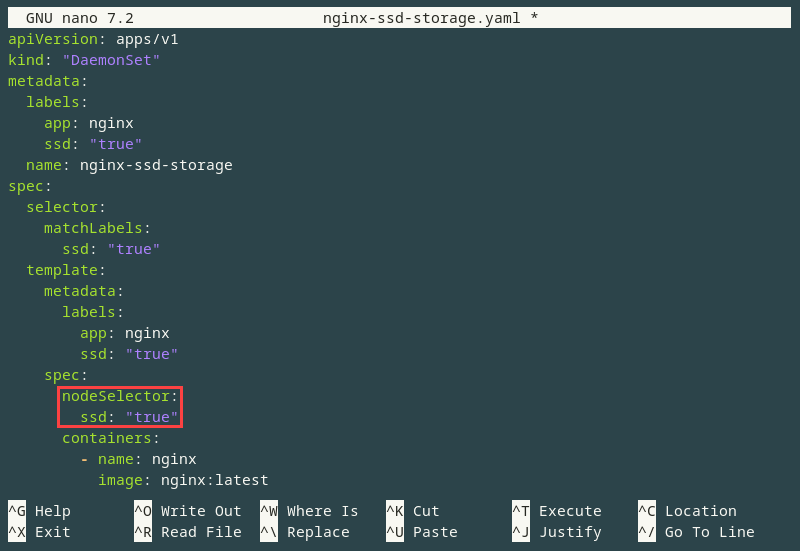
2. Define node selectors in the nodeSelector field of the DaemonSet YAML file. In the following example, a DaemonSet deploys an Nginx web server only on nodes labeled as ssd=true.
apiVersion: apps/v1
kind: "DaemonSet"
metadata:
  labels:
    app: nginx
    ssd: "true"
  name: nginx-ssd-storage
spec:
  selector:
    matchLabels:
      ssd: "true"
  template:
    metadata:
      labels:
        app: nginx
        ssd: "true"
    spec:
      nodeSelector:
        ssd: "true"
      containers:
        - name: nginx
          image: nginx:latest
Place the nodeSelector in the spec.template.spec field.
Adding the ssd=true label to a new node deploys the nginx-ssd-storage pod to that node. If a label is removed from a node, the DaemonSet controller also removes the pod.
How to Schedule Daemon Pod
The system's standard scheduler assumes control of pods created by the DaemonSet. The scheduler assigns the pod to a suitable host using the .spec.nodeName field. If the new pod requires resources that exceed the available capacity of a node, the scheduler may evict existing pods with lower priority to make space for the new one.
To customize this process, specify an alternative scheduler for DaemonSet pods by setting the .spec.template.spec.schedulerName field within the DaemonSet definition.
How Does Communication with Pods in DaemonSet Work?
Communication with pods within a DaemonSet occurs using one of the following models:
- Push Model. DaemonSet pods proactively send updates to a designated service. These pods do not require clients.
- Service Abstraction. A service is created with the same pod selector, allowing clients to reach a daemon on a randomly selected node within the DaemonSet. This method does not provide a way to target a specific node.
- DNS-based Discovery. A headless service is created with the same pod selector as the DaemonSet. Clients can then discover the pods by querying the endpoints resource or retrieving multiple A records from DNS.
- NodeIP and Known Port. Pods utilize a hostPort, making them accessible via their respective node's IP addresses. Clients must independently obtain the list of node IPs and rely on a predefined port.
How to Update DaemonSet
Before Kubernetes version 1.6, the OnDelete update strategy was the only way to update pods managed by a DaemonSet. This approach required users to delete each pod manually before the DaemonSet could create a new pod using the new configuration.
Recent Kubernetes versions use rolling updates by default. The update strategy is defined in the spec.updateStrategy.type field, and the default value is set to RollingUpdate.
The rolling update strategy removes old pods and creates new ones. The process is automatic and controlled. Simultaneously deleting and creating all the pods can lead to unavailability and prolonged downtime.
Two parameters allow the control of the update process:
minReadySecondsdefines the period between pod upgrades. The value is defined in seconds, and setting a reasonable timeframe secures pod health before the system proceeds to update the next pod.updateStrategy.rollingUpdate.maxUnavailableallows you to define the number of pods that can be upgraded simultaneously. The value of this parameter is highly dependent on the type of the deployed application. It is necessary to balance speed and safety to ensure high availability.
Use the kubectl rollout command to check the status of a DaemonSet rolling upgrade:
kubectl rollout status ds/daemonset-node-exporter -n monitoringThe system observes DaemonSet updates and shows the current rollout status of the node-exporter DaemonSet.

How to Delete DaemonSet
Remove a DaemonSet using the kubectl delete command. Provide the name of the DaemonSet you want to delete or specify the original YAML file as in the example below:
kubectl delete -f daemonset-node-exporter.yaml -n monitoring
Warning: Use this command with care. Deleting a DaemonSet also cleans up all the pods the DaemonSet deployed.
DaemonSet Alternatives
The following sections present the alternatives to deploying a DaemonSet in Kubernetes and compare them with DaemonSets.
Init Scripts
Traditional methods like init, upstartd, and systemd can directly start daemon processes on nodes. While functional, they lack the centralized management, monitoring, and resource isolation benefits of Kubernetes DaemonSets, which leverage containers and Kubernetes' declarative approach.
Bare Pods
While you can create pods directly, specifying a particular node for execution, DaemonSets offer superior resilience. DaemonSets automatically replace any pods deleted or terminated due to node failures or maintenance events (e.g., kernel upgrades), ensuring continuous service availability.
Static Pods
Created by placing files in a Kubelet-watched directory, static pods bypass the Kubernetes API server, enabling scenarios like cluster bootstrapping. However, they are not managed by kubectl or other Kubernetes API clients, and their future in Kubernetes is uncertain.
Deployments
While Deployments also create pods, they are better suited for stateless services (e.g., frontends) where scalability and rolling updates are essential. DaemonSets prioritize ensuring a single pod instance runs on every designated node, which is essential for node-level functionalities (e.g., network plugins).
Conclusion
The article explained the function of DaemonSets in a cluster and provided instructions for creating and scheduling Daemon pods. It also gave a brief overview of DaemonSet alternatives.
If you plan to work with complex workloads, consider Kubernetes operators to extend core functionality and simplify management.