PostgreSQL is a reliable and robust relational database system featuring ACID-compliant transactions. It is designed to handle workloads of all sizes, making it a good fit for personal use and large-scale deployments such as data warehouses, big data servers, or web services.
Deploying PostgreSQL on Kubernetes creates a scalable, portable PostgreSQL instance that leverages the strengths of both the RDBMS and the orchestration platform.
This article shows two ways to deploy PostgreSQL on Kubernetes: using a Helm chart or manually creating the configuration.
Prerequisites
- A Kubernetes cluster with kubectl installed.
- Helm 3 installed.
- Administrative privileges on your system.
Deploy PostgreSQL on Kubernetes Using a Helm Chart
Helm is a quick and easy way to deploy a PostgreSQL instance on a Kubernetes cluster. Follow the steps below to deploy PostgreSQL using Helm.
Step 1: Add Helm Repository
Start by adding the PostgreSQL repository and updating the local repo:
1. Search Artifact Hub for a PostgreSQL Helm chart. Add the chart's repository to the local Helm installation. For example, if using the official Bitnami PostgreSQL repo URL, run:
helm repo add bitnami https://charts.bitnami.com/bitnami
The command confirms the addition was successful.
2. Update the local repositories:
helm repo update
The system confirms the successful update.
Step 2: Create and Apply Persistent Storage Volume
Set up the Postgres database storage to persist across pod restarts:
1. Create a Persistent Volume resource in a YAML file using a text editor such as nano:
nano postgres-pv.yaml2. Use the following template as an example:
apiVersion: v1
kind: PersistentVolume
metadata:
  name: postgresql-pv
  labels:
    type: local
spec:
  storageClassName: manual
  capacity:
    storage: 10Gi
  accessModes:
    - ReadWriteOnce
  hostPath:
    path: "/mnt/data"
The configuration defines the Persistent Volume. Adjust the storage capacity (spec. capacity.storage) and the host path (spec.hostPath.path) according to the requirements.
2. Save the file and exit nano.
3. Apply the configuration with kubectl:
kubectl apply -f postgres-pv.yaml
The system confirms the creation of the persistent volume.
Step 3: Create and Apply Persistent Volume Claim
Create a Persistent Volume Claim (PVC) to request and allocate the storage required in the previous step:
1. Create the configuration file using nano:
nano postgres-pvc.yaml2. Add data to the file. Use the following example as a reference:
apiVersion: v1
kind: PersistentVolumeClaim
metadata:
  name: postgresql-pv-claim
spec:
  storageClassName: manual
  accessModes:
    - ReadWriteOnce
  resources:
    requests:
      storage: 10Gi
Adjust the spec.resources.requests.storage amount to match the amount stated in the previous step.
3. Save the file and exit.
4. Apply the configuration with:
kubectl apply -f postgres-pvc.yaml
The system confirms successful PVC creation.
5. Use kubectl get to check if the PVC is connected to the PV:
kubectl get pvc
The PVC's status is Bound, and it is ready for use in the PostgreSQL deployment.
Step 4: Install Helm Chart
Install the Helm chart using the helm install command. Add --set flags to the command to connect the installation to the PVC and enable volume permissions:
helm install psql-test bitnami/postgresql --set persistence.existingClaim=postgresql-pv-claim --set volumePermissions.enabled=true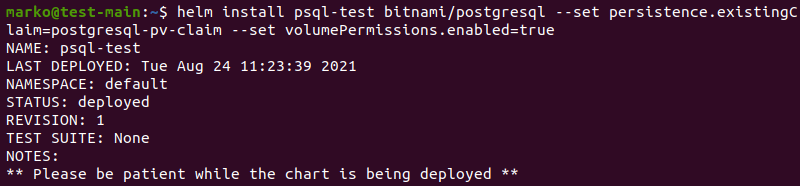
The system displays a report upon successful installation.
Step 5: Connect to PostgreSQL Client
To connect to the PostgreSQL client, do the following:
1. Export the POSTGRES_PASSWORD environment variable that enables logging into the PostgreSQL instance:
export POSTGRES_PASSWORD=$(kubectl get secret --namespace default psql-test-postgresql -o jsonpath="{.data.postgres-password}" | base64 -d)The export command saves the password in the environment variable.
2. To connect to the database from within the cluster, run:
kubectl run psql-test-postgresql-client --rm --tty -i --restart='Never' --namespace default --image docker.io/bitnami/postgresql:16.4.0-debian-12-r0 --env="PGPASSWORD=$POSTGRES_PASSWORD" \
      --command -- psql --host psql-test-postgresql -U postgres -d postgres -p 5432
The command line changes to the postgres client.
3. Alternatively, connect to the PostgreSQL database from outside the cluster. Open another terminal window and type the following port forwarding command to forward the Postgres port:
kubectl port-forward --namespace default svc/psql-test-postgresql 5432:5432
The system starts handling the port connection.
4. Minimize the port-forwarding window and return to the previous one. Type the command to connect to the postgres client:
PGPASSWORD="$POSTGRES_PASSWORD" psql --host 127.0.0.1 -U postgres -d postgres -p 5432
The psql command prompt appears, and PostgreSQL is ready to receive your input.
Note: If you do not have psql, use apt to install it:
sudo apt install postgresql-client-16Deploy PostgreSQL on Kubernetes from Scratch
A manual Postgres deployment on Kubernetes allows you to fine-tune a deployment configuration. See the sections below to create a custom Postgres deployment from scratch.
Step 1: Create and Apply ConfigMap
Create the ConfigMap resource, which contains deployment process data:
1. Create a ConfigMap YAML file in a text editor:
nano postgres-configmap.yaml2. Use the following example configuration:
apiVersion: v1
kind: ConfigMap
metadata:
  name: postgres-config
  labels:
    app: postgres
data:
  POSTGRES_DB: postgresdb
  POSTGRES_USER: admin
  POSTGRES_PASSWORD: test123
In the data section, provide the database name (POSTGRES_DB), username (POSTGRES_USER), and password (POSTGRES_PASSWORD) for logging into the PostgreSQL instance. These parameters are required when connecting to PostgreSQL in the final step.
3. Save the YAML file and exit nano.
4. Apply the resource with kubectl:
kubectl apply -f postgres-configmap.yaml
The system confirms the successful creation of the configuration file.
Step 2: Create and Apply Persistent Storage Volume and Persistent Volume Claim
Create a YAML file containing the storage configuration, including a Persistent Volume (PV) and a Persistent Volume Claim (PVC). See the steps below:
1. Create a YAML file for the storage configuration:
nano postgres-storage.yaml2. Place both configurations in the file, as in the example below:
kind: PersistentVolume
apiVersion: v1
metadata:
  name: postgres-pv-volume
  labels:
    type: local
    app: postgres
spec:
  storageClassName: manual
  capacity:
    storage: 5Gi
  accessModes:
    - ReadWriteMany
  hostPath:
    path: "/mnt/data"
---
kind: PersistentVolumeClaim
apiVersion: v1
metadata:
  name: postgres-pv-claim
  labels:
    app: postgres
spec:
  storageClassName: manual
  accessModes:
    - ReadWriteMany
  resources:
    requests:
      storage: 5Gi
Ensure that the storage amount in the PV and PVC sections matches.
3. Save the file and exit.
4. Apply the resources with kubectl:
kubectl apply -f postgres-storage.yamlThe system confirms the successful creation of both PV and PVC.

5. Check that the PVC is connected to the PV with the following command:
kubectl get pvc
The PVC's status is Bound, and it is ready for deployment.
Step 3: Create and Apply PostgreSQL Deployment
Create a configuration file for the PostgreSQL deployment that contains container and volume specifications:
1. Create a postgres-deployment.yaml file:
nano postgres-deployment.yaml2. Add the following data:
apiVersion: apps/v1
kind: Deployment
metadata:
  name: postgres
spec:
  replicas: 1
  selector:
    matchLabels:
      app: postgres
  template:
    metadata:
      labels:
        app: postgres
    spec:
      containers:
        - name: postgres
          image: postgres:10.1
          imagePullPolicy: "IfNotPresent"
          ports:
            - containerPort: 5432
          envFrom:
            - configMapRef:
                name: postgres-config
          volumeMounts:
            - mountPath: /var/lib/postgresql/data
              name: postgredb
      volumes:
        - name: postgredb
          persistentVolumeClaim:
            claimName: postgres-pv-claim
Adjust the container image and ensure the persistent volume claim name matches the one defined in the postgres-storage.yaml file.
3. Save the file and exit nano.
4. Apply the deployment with kubectl:
kubectl apply -f postgres-deployment.yaml
The system confirms the successful creation of the deployment.
Step 4: Create and Apply PostgreSQL Service
The final configuration file contains the PostgreSQL service data:
1. Create the YAML file to configure the PostgreSQL service:
nano postgres-service.yaml2. The example uses the following configuration:
apiVersion: v1
kind: Service
metadata:
  name: postgres
  labels:
    app: postgres
spec:
  type: NodePort
  ports:
   - port: 5432
  selector:
   app: postgres
Specify the service type and port number.
3. Save the file and exit.
4. Apply the configuration:
kubectl apply -f postgres-service.yaml
The system confirms the successful creation of the service.
4. Use the following command to list all resources on the system.
kubectl get all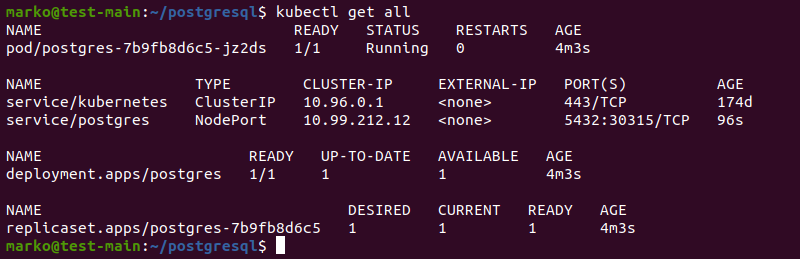
The pod and the deployment show the 1/1 READY status (if not, wait until all resources are ready). The number of replica sets reflects the configuration in the deployment YAML file.
Step 5: Connect to PostgreSQL
To connect to PostgreSQL, do the following:
1. Use kubectl exec to log into the PostgreSQL instance:
kubectl exec -it [pod_name] -- psql -h localhost -U admin --password -p [port] postgresdbReplace [pod_name] and [port] with the actual data.
2. The system prompts for the password. Type in the password defined in Step 1 and press Enter. The psql command prompt appears.

The database is now ready to receive user input.
Note: An easy way to deploy a highly available PostgreSQL cluster is on Bare Metal Cloud using a Rancher-controlled Kubernetes cluster.
Conclusion
This guide shows how to deploy PostgreSQL on Kubernetes using two different methods. Use the Helm chart to quickly deploy PostgreSQL on Kubernetes, or use the manual method to fine-tune configuration details.
Read How to Create a Database in PostgreSQL for information about working with PostgreSQL databases.