A proxy server acts as an internet access intermediary. Businesses implement proxies to secure network traffic and add an additional network security layer. Additionally, individuals use them to bypass network restrictions and improve online privacy.
In this tutorial, you will learn how to set up Ubuntu to work with a proxy server.

Prerequisites
- A system running Ubuntu (we are using Ubuntu 24.04, but the steps are similar for all recent Ubuntu OS versions).
- Access to the terminal and sudo user.
- Proxy info (web or IP address, username, and password).
Note: If you want to set up one of your machines to act as a proxy, refer to How to Set Up & Install Squid Proxy Server on Ubuntu.
Setting up Proxy with Ubuntu Desktop GUI
A simple way to set up a proxy server in Ubuntu is through the desktop GUI. Follow the steps below:
1. Open Ubuntu's main Settings.
2. Select Network->Proxy.
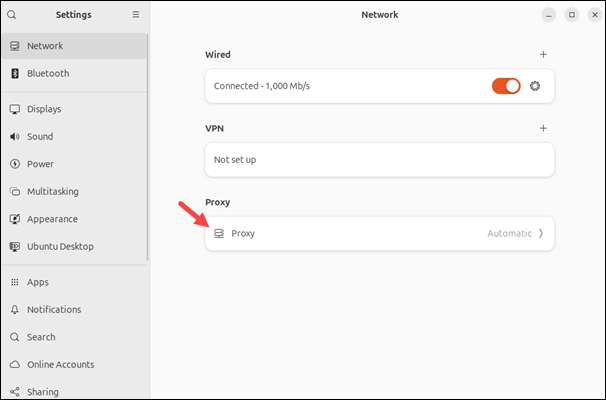
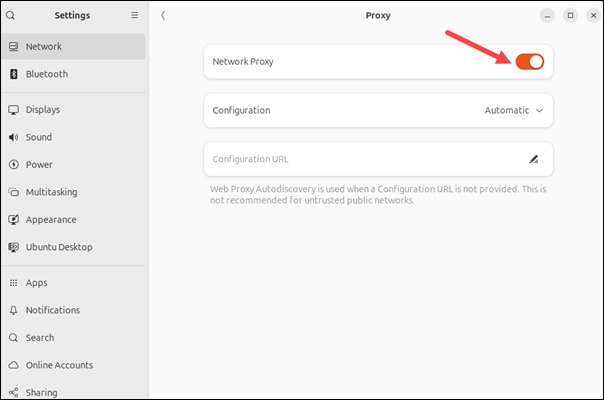
3. Switch the Network Proxy setting to On to activate the sections below it.
4. Switch the configuration settings to Manual.
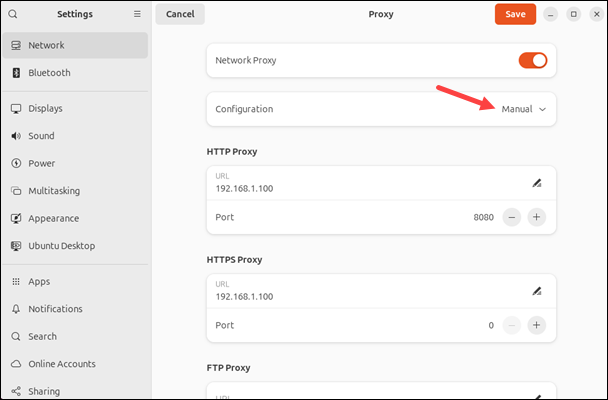
5. In the corresponding fields (HTTP, HTTPS, FTP, and/or SOCKS host), enter the proxy URL and port. In the final section, enter the ignored hosts that should bypass the proxy.
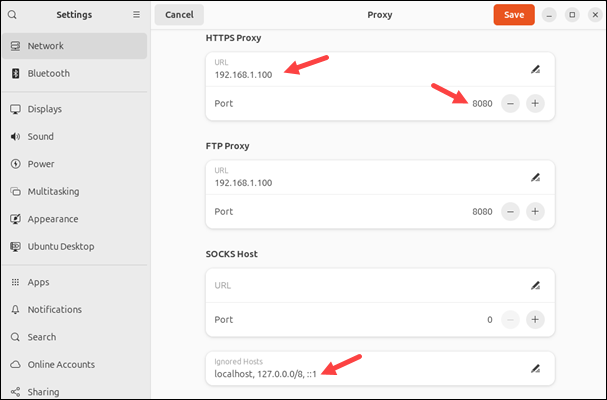
6. Click Save to apply the changes.
Setting up Proxy With Ubuntu Desktop Terminal
Use the terminal for more granular control of proxy settings. This allows you to:
- Make temporary or permanent changes to the proxy.
- Configure the proxy for a single user or system-wide.
The syntax for establishing a proxy connection is:
[variable]="[username]:[password]@[proxy_address]:[port_number]"Omit the username and password if the proxy does not require them. Ubuntu uses the following environment variables to set these parameters:
http_proxy. Proxy server for HTTP connections.https_proxy. Proxy server for HTTPS connections.ftp_proxy. Proxy server for FTP connections.no_proxy. A comma-separated list of addresses and domains that should bypass the proxy (useful for local addresses or intranet).
Older systems use the same variable names in uppercase format. To cover all possible scenarios, use both uppercase and lowercase variable names.
The sections below explain how to set up a proxy via terminal.
Setting up Temporary Proxy for a Single User
A temporary proxy connection resets after a system reboot. Use the export command to set up a temporary proxy for the current user.
For example, to export HTTP and HTTPS proxies on 192.168.1.100 port 8080 without a username or password, and that local traffic should ignore the proxy, run the following three commands:
export http_proxy="192.168.1.100:8080"export https_proxy="192.168.1.100:8080"export no_proxy="localhost,127.0.0.1,::1"
The commands adjust the settings for the current session.
Setting up Permanent Proxy for a Single User
To make permanent changes for a single user, edit the .bashrc file. Follow the steps below:
1. Open the file with a text editor, such as nano:
sudo nano ~/.bashrc2. Add the export commands at the bottom of the .bashrc file. For example:
export http_proxy="192.168.1.100:8080"
export https_proxy="192.168.1.100:8080"
export no_proxy="localhost,127.0.0.1,::1"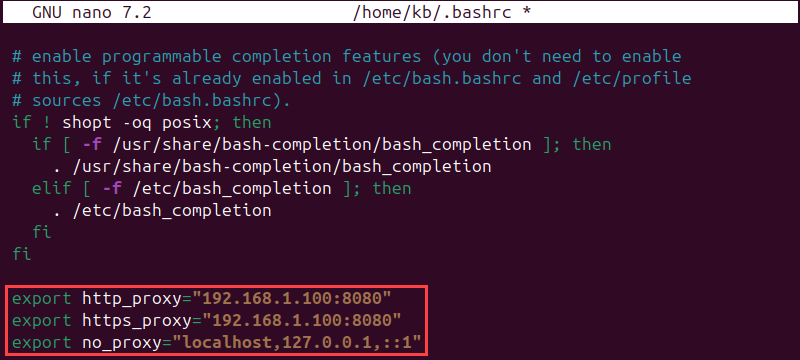
3. Save the file and exit nano.
4. Run the following command to apply the new settings to the current session:
source ~/.bashrcThe command runs the .bashrc file and applies the new settings.
Setting up Permanent Proxy for All Users
To permanently set up proxy access for all users, edit the /etc/environment file:
1. Open the file in a text editor:
sudo nano /etc/environment2. Update the file with the proxy information. For example:
export http_proxy="192.168.1.100:8080"
export https_proxy="192.168.1.100:8080"
export no_proxy="localhost,127.0.0.1,::1"
Adjust the variables to uppercase if using an older system, or add them below the lowercase variables.
3. Save the file and exit. The changes apply on the next log-in.
Setting up Proxy for APT
The apt command requires a separate proxy configuration file on some systems because it does not use system environment variables. To set up proxy settings for APT, do the following:
1. Create or edit (if it already exists) a file named apt.conf in the /etc/apt directory:
sudo nano /etc/apt/apt.conf2. Add data in the following format:
Acquire::http::Proxy "http://[proxy_address]:[port_number]/";
Acquire::https::Proxy "https://[proxy_address]:[port_number]/";
If the proxy requires authentication, add [username]:[password]@ before the proxy address.
3. Save the file and exit nano. The configuration will be applied after a reboot.
Additional Configurations
Various console programs use their own configuration files or commands to apply proxy settings. The sections below show how to set up the proxy settings for wget and git.
Setting up Proxy for wget
Wget is a command-line program that retrieves files from the internet without using a web browser. To configure a proxy server for wget, create a .wgetrc file and add the specific proxy settings:
1. Open or create a configuration file for the wget command:
sudo nano ~/.wgetrc2. Add the proxy settings in the following format:
use_proxy = on
http_proxy = "http://[proxy_address]:[port_number]/"
https_proxy = "https://[proxy_address]:[port_number]/"
ftp_proxy = "ftp://[proxy_address]:[port_number]/"
If the proxy requires authentication, add it before the proxy address in the following format: [username]:[password]@.
3. Save the file and exit the editor. The settings apply immediately.
Setting up Proxy for git
git is a version control system for tracking source code changes and an essential tool for software development. To configure git to use a proxy server for network operations (HTTP and HTTPS), do the following:
1. Use the following commands in the terminal to configure the proxy server:
git config --global http.proxy http://[proxy_address]:[port_number]git config --global https.proxy https://[proxy_address]:[port_number]
If the proxy requires authentication, add [username]:[password]@ before the proxy address.
2. Check if the settings are applied:
git config --global --get http.proxygit config --global --get https.proxy
Each command shows the proxy server address and settings for the specified protocol.
How to Check Whether Ubuntu Proxy Works
Checking whether the Ubuntu proxy is working depends on how it was initially set up. GUI users can navigate to the proxy settings and ensure they are correct and turned on.
Alternatively, you can use the terminal to check the appropriate configuration:
- Environment variables. Check if the environment variables are set with the echo command:
echo $http_proxyecho $https_proxy
Ensure the commands output the variable values.
- Connectivity. Test the connectivity using the curl command:
curl -I http://example.com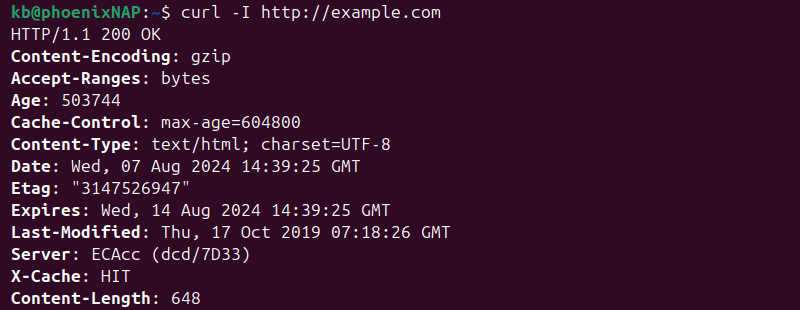
curl -I https://example.com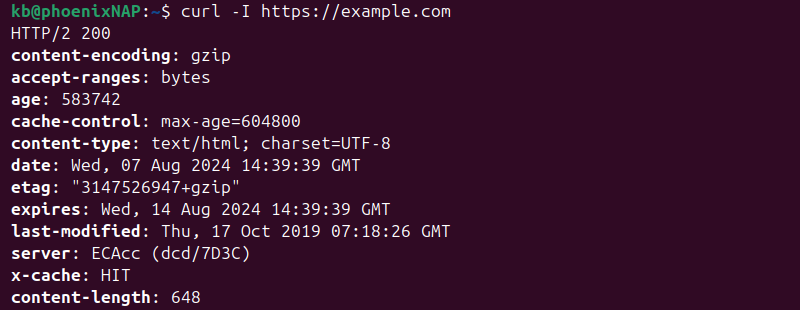
If the commands return headers without errors, the proxy is working.
- APT. Test the APT proxy by running an update:
sudo apt updateMonitor if there are any connection issues.
- Wget. Attempt to download a page:
wget http://www.example.com
If the command downloads the page, the proxy is working correctly.
- git. List remote references:
git ls-remote [remote_name_or_URL]If git connects to the remote repository, the proxy is working as expected.
Troubleshooting Common Ubuntu Proxy Config Issues
If the proxy configuration is not working as expected, check one of the following troubleshooting tips:
- Verify configuration. Ensure there are no typos in the configuration files (.bashrc, .wgetrc, apt.conf, or /etc/environment) and that the proxy settings are correct. Try both lowercase and uppercase variable names.
- Reload configuration. After making changes to configuration files, use the source command to apply the settings.
- Check proxy server. Use a tool like telnet or the nc command to test access to the proxy server directly.
Conclusion
This tutorial provided instructions on how to set up proxy settings on Ubuntu. The steps are different when making temporary or permanent changes to your system's proxy configuration or if the changes affect a single user or the entire system.
Next, see how to set up a reverse proxy using in our Nginx reverse proxy guide.


