System administrators use the Squid Proxy to augment their content delivery. Squid Proxy specifically allows a server to cache frequently visited web pages.
How? When a user seeks a web page or file, the request goes to the proxy server — the intermediary device between the desktop computer and the internet. The proxy server pulls the resource and relays it to the user, by caching the new data and using it for future requests made to the same server.
In this guide, you will learn how to set up, configure, and install a Squid Proxy server on CentOS 7.

Prerequisites
- CentOS operating system
- Access to a terminal window/command-line (Ctrl-Alt-T)
- A CentOS user with root or sudo privileges
- The yum package installer, included by default
- A text editor, such as vim
Steps for Installing Squid Proxy on CentOS
Step 1: Refresh CentOS Software Repositories
Ensure that you are working with the latest software version by updating your repositories.
Launch a terminal window, and enter the following:
sudo yum -y updateStep 2: Install Squid Package on CentOS
To install Squid, type:
yum -y install squidNow start Squid by entering the following command:
systemctl start squidTo set up an automatic start at boot:
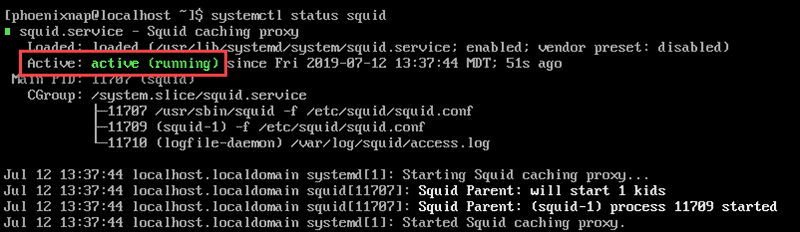
systemctl enable squidReview the status of the service, use:
systemctl status squidIn the example below, we see that the state is ‘Active.’
Note: Our Knowledge Base also has an instruction on Installing and Setting up Squid Proxy Server on Ubuntu.
Configuring the Squid Proxy Server
The Squid configuration file is found at /etc/squid/squid.conf.
1. Open the file in your preferred text editor (vim was used in this example}:
sudo vi /etc/squid/squid.conf2. Navigate to find the http_port option. Typically, this is set to listen on Port 3218. This port usually carries TCP traffic. If your system is configured for traffic on another port, change it here:

You may also set the proxy mode to transparent if you’d like to prevent Squid from modifying your requests and responses.
Change it as follows:
http_port 1234 transparent3. Navigate to the http_acacess deny all option.
It is currently configured to block all HTTP traffic, and no web traffic is allowed as shown below.

Change this to the following:
http_access allow all4. Restart the Squid service by entering:
sudo systemctl restart squidConfigure Squid Client
The Squid proxy server is now configured. To configure the client server switch to your client machine and open your web browser.
If you’re using Firefox, you can find the proxy settings under:
Menu > Options > Network Settings > Settings
Select the radio button for Manual proxy configuration.
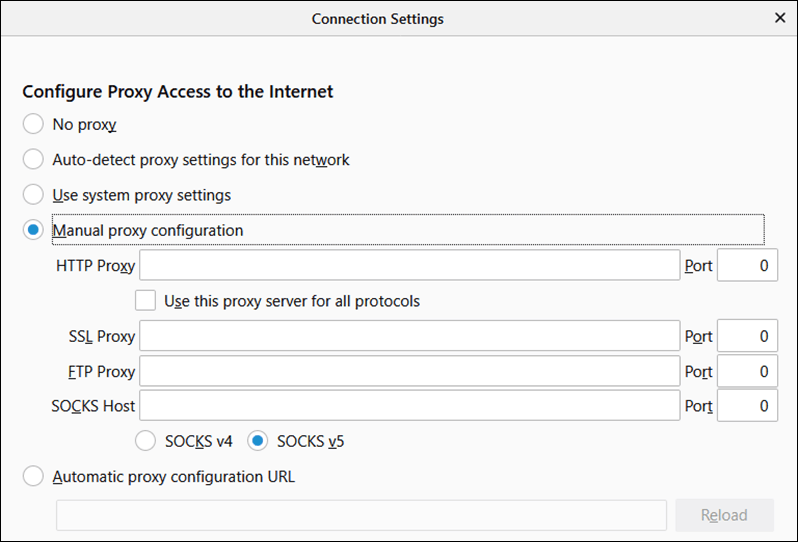
Use the IP address for the system hosting your Squid proxy.
To test, you can visit https://whatismyipaddress.com/ip-lookup. Your IP address appears as the proxy server’s IP address.
Create an Access Control List (ACL)
For connections outside the proxy server’s local network, you need to configure the Access Control Lists (ACL). This may be necessary if you get a ‘refused to connect’ error.
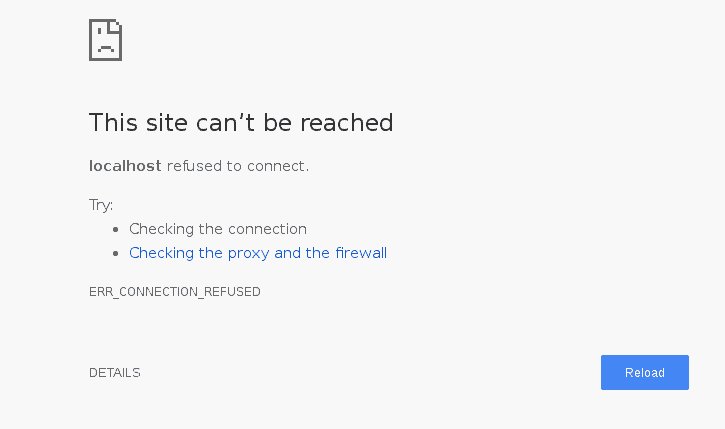
To solve this problem, simply add to your list of safe ports with a new ACL entry.
Note: After each of the following steps, you should save and exit, then restart the Squid service to apply the new configuration.
Edit the /etc/squid/squid.conf file once again. Add a new line as follows:
acl localnet src 192.166.0.10This will create a rule that only allows the system at this IP address to connect.
Comment the line to identify the rule. Text after the # sign is ignored by Squid.
acl localnet src 192.166.0.10 # test computerYou can specify a range of IP address as follows:
acl localnet src 192.166.0.10/30Open Squid Proxy Ports
To open a specific port, add the following:
acl Safe_ports port 123 # Custom portTo save changes, restart Squid:
systemctl restart squidSet Up Proxy Authentication
Squid offers basic authentication alongside supporting other types of authentication.
First, install httpd-tools with the following command:
yum -y install httpd-toolsWith the tool installed, create the new file:
touch /etc/squid/passwd && chown squid /etc/squid/passwdTo create the password, use this command:
htpasswd /etc/squid/passwd newuserExchange the ‘newuser‘ with your user name.
The system will prompt you to enter and confirm a password for ‘newuser.’
Restart the proxy service and re-open your browser by inserting:
systemctl restart squidEdit the /etc/squid/squid.conf file, and add the following command lines:
auth_param basic program /usr/lib64/squid/basic_ncsa_auth /etc/squid/passwd

auth_param basic children 5

auth_param basic realm Squid Basic Authentication

auth_param basic credentialsttl 2 hours

acl auth_users proxy_auth REQUIRED

http_access allow auth_users
From now on when you connect to the Linux proxy server, you will see a prompt for your username and password. Any unauthenticated person will be stopped by an error message.
How to Block Websites with Squid Proxy
1. Create and edit a new text file /etc/squid/blocked.acl by entering:
sudo vi /etc/squid/blocked.acl2. In this file, add the websites to be blocked, starting with a dot:
.facebook.com
.twitter.com
The dot specifies to block all subsites of the main site.
3. Open the /etc/squid/squid.conf file again:
sudo vi /etc/squid/squid.conf4. Add the following lines just above your ACL list:
acl blocked_websites dstdomain “/etc/squid/blocked.acl”http_access deny blocked_websitesConclusion
In this tutorial, you learned how to install, configure and secure a Squid HTTP Proxy server.
Squid improves processing time and streamlines bandwidth use quickly through its unique caching power. In its accelerator mode, your server can work with impressive speed. It significantly enhances your network’s performance, giving your system a competitive edge.