Firewalls have become an essential part of every network that has access to the Internet. Without firewalls, anyone would be able to access your network and servers and infect them with malicious software. Properly configured, a firewall can substantially decrease undesirable network communications in a local network.
The article will explain how to create a firewall rule using firewall MMC and Windows PowerShell. We are using Windows Server 2012, but the procedure applies to other versions of Windows, with slight variations.
What is a Firewall?
A firewall is a piece of hardware or software that controls the flow of data packets, and it is critical on modern computer systems. It protects private networks and devices from malicious actions coming from public networks in the same way a physical firewall prevents fire from spreading from one area to another. A firewall acts as a defense mechanism which controls network traffic according to the implemented firewall rules.
Computers behind a firewall cannot receive data until the data passes all filters. This enhances security by a large margin and reduces the risk of unauthorized access to private networks. A proper firewall configuration provides your system with a crucial layer of security and lowers the risk of successful hacking attacks. Firewalls can perform many tasks:
- Protect the data on your computer by creating a barrier that blocks any undesired incoming or outgoing traffic.
- Notify you if there are any connection requests from other computers.
- Log activity for later inspection and warn you if any application tries to connect to another computer.
How Windows Server Firewalls Work
As the name suggests, a firewall acts like a barrier between your local devices and the external network. When you send a connection request to your computer or server over the internet, a hacker can interrupt that connection and try to gain access to your private network. With a firewall in place, only the network traffic that matches firewall rules can get through.
The sets of firewall rules you define in the firewall settings review every packet for flagged information. To make the most out of your firewall, you should precisely define both inbound and outbound rules in order to avoid any unwanted connections.
For example, you can set an inbound rule defining that the data communicated through a specific port, such as TCP port 80, can pass the firewall. That means if the firewall sees a packet coming towards any other port, it will drop it and the data will not reach its intended destination.
Windows Firewall Server 2012 with Advanced Security
Windows Firewall with Advanced Security is the management console which stores all Windows Firewall configurations. Windows Firewall is a host-based firewall solution embedded with virtually all current Windows operating systems.
Windows Firewall with Advanced Security provides safer inbound and outbound network communications by enforcing rules that control traffic flow for its local machine. There are three available firewall profiles:
- Domain. It is used when a computer connects to the corporate network. It is a network where the device can detect its domain controller.
- Private. We use this profile for computers that connect to a private network, such as home or office. In private networks, the users are always behind a device and not directly exposed to the Internet.
- Public. This profile is used when a computer connects to a public network, such as libraries, airports and other public hotspots. The firewall configurations should be the most restrictive for this profile since these networks are the least secure.
The benefits of using Windows Server Firewall with Advanced Security are numerous:
- It is ready out-of-the-box. It comes preinstalled with personal Microsoft Windows operating systems as well as Server editions. It is also active by default, protecting your operating system from the very first startup.
- It does not need a special license or additional hardware. Once you obtain your copy of a Windows operating system, there are no additional costs.
- It is highly flexible. It offers many advanced functionalities and different levels of controls for the firewall services.
What is the Difference between Windows Firewall and Windows Firewall with Advanced Security?
The difference between the two is the level of functionality available to the end-user, that is, the interface itself. Both of them are the same firewall service. The Windows Firewall is easier to use and more consumer-friendly. It is located in the Control Panel and allows you to perform basic firewall configurations.
The Windows Firewall with Advanced Security offers granular control over the inbound and outbound rules, as well as the default firewall profiles. You can modify all advanced firewall configurations using the Microsoft Management Console (MMC) or Windows PowerShell.
How to Launch Windows Firewall with Advanced Security Console?
You can access the Windows Firewall with Advanced Security console in a few different ways. Whichever method you choose, it will open Windows Firewall MMC where you can make further firewall configurations for all profiles.
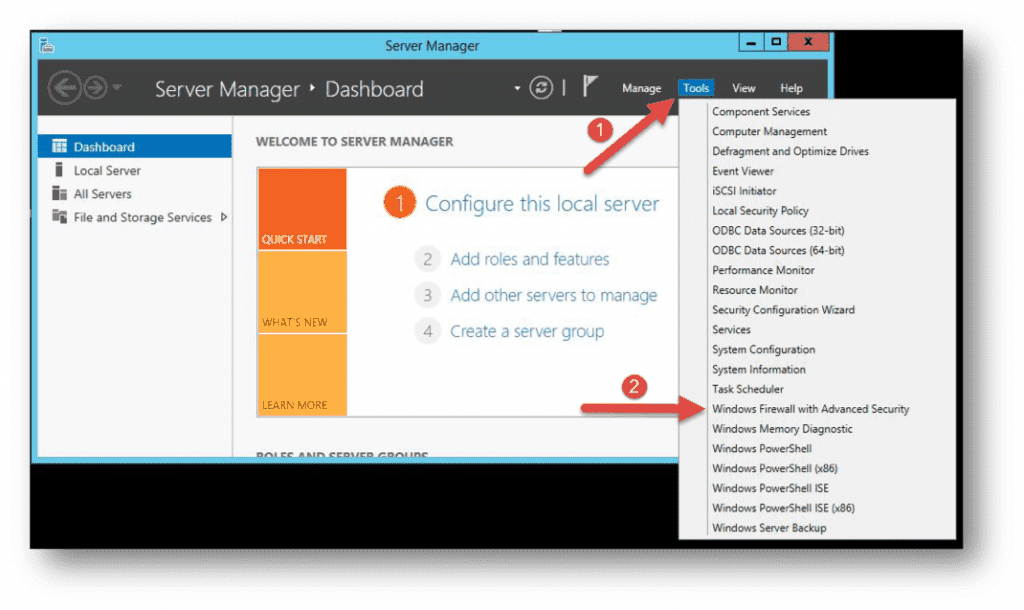
- Use the Server Manager to access the firewall MMC. Once the window opens, go to Tools on the top right side, and locate the Windows Firewall with Advanced Security option toward the bottom of the list.
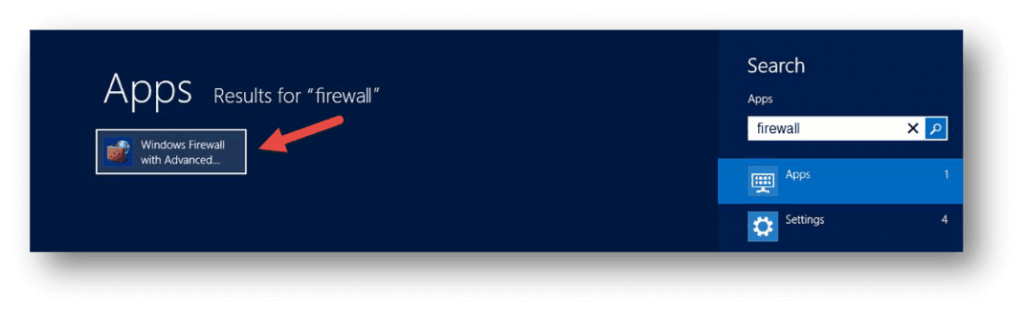
- Open the Start menu (use the Windows key on your keyboard) and type “firewall”. You should see the Windows Firewall with Advanced Security icon appear as one of the search results.
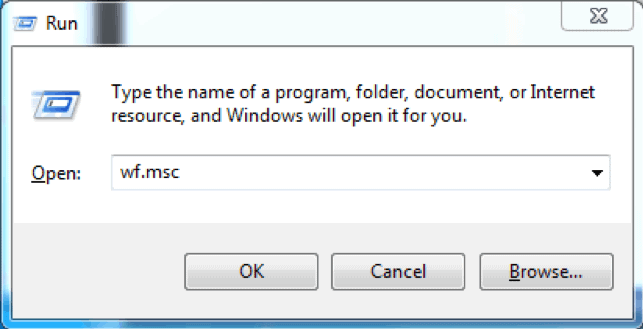
- Use the Run box to launch Windows Firewall with Advanced Security. Press Win + R keys, type in msc and hit Enter to load the console. You can also use Command Prompt or Windows PowerShell to run this command.
Configure Windows Firewall
Now that you have the Windows Firewall with Advanced Security console open, in the middle you can see the summary of the three firewall profiles. Their default configuration is to permit the outgoing traffic and to limit incoming traffic.
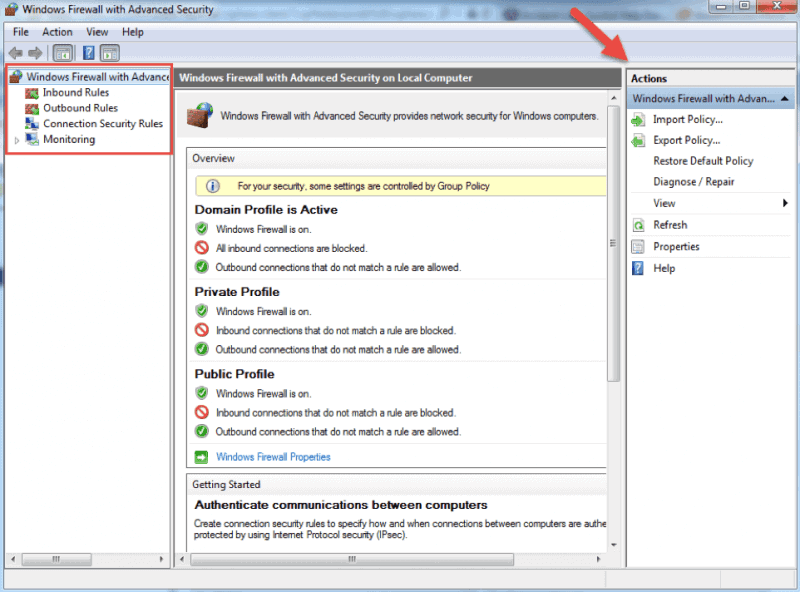
When you select an option from the menu on the left side of the window, you will see its details in the middle section. On the right side, the menu will show the available actions for the option you previously selected.
The Windows Firewall with Advanced Security console allows you to configure inbound and outbound rules, as well as the Internet Protocol security (IPSec) connections. The Monitoring tab allows you to view the active firewall rules and connection security rules for that server.
Firewall Rules
Windows firewall rules allow you to state whether to permit or block specific incoming or outgoing network connections. You can choose between multiple parameters and settings for each individual inbound or outbound rule. This includes selecting a program, a TCP or UDP port, protocol, service, or profile that a rule will apply to.
The procedure is the same when creating inbound rules and outbound rules with Windows Firewall with Advanced Security. I will list the steps for creating an inbound rule and you can follow them in the same order when you want to create an outbound rule.
How to Create Inbound Rules
Launch the Windows Firewall with Advanced Security MMC using the method you prefer. You may want to pin the shortcut to the start menu if you use the console on a regular basis.
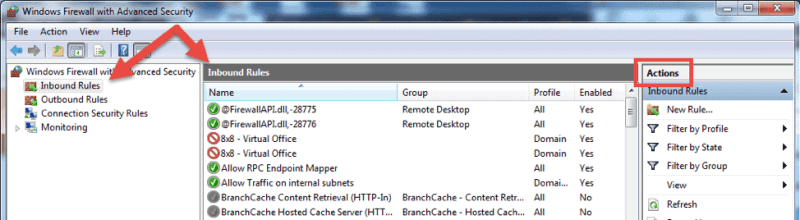
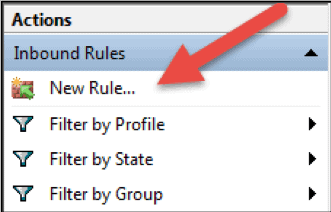
- On the home screen, select the Inbound Rules The console will show all inbound rules in the middle section and available actions in the right pane. You can filter the list by using the available choices.
- Click on New Rule… to start the New Inbound Rule Wizard.The wizard will let you choose the type of rule you want to create. You can choose one out of four types.
- This rule allows or blocks connections for a user-defined program. It allows you to select a path to an executable (*.exe) file. It does not require to insert any program-specific settings.
- A rule based on port settings allows you to permit or block a connection depending on the TCP or UDP port number it uses. You can state multiple ports to apply to this firewall rule.
- This rule contains a list of the most common Windows programs and services. You can select one to allow or block connections for it.
- Custom. This is the most flexible rule in the Wizard. It allows you to create a tailor-made rule with configurations that previous options do not provide. I will proceed with listing the steps for this rule since it covers the most settings.
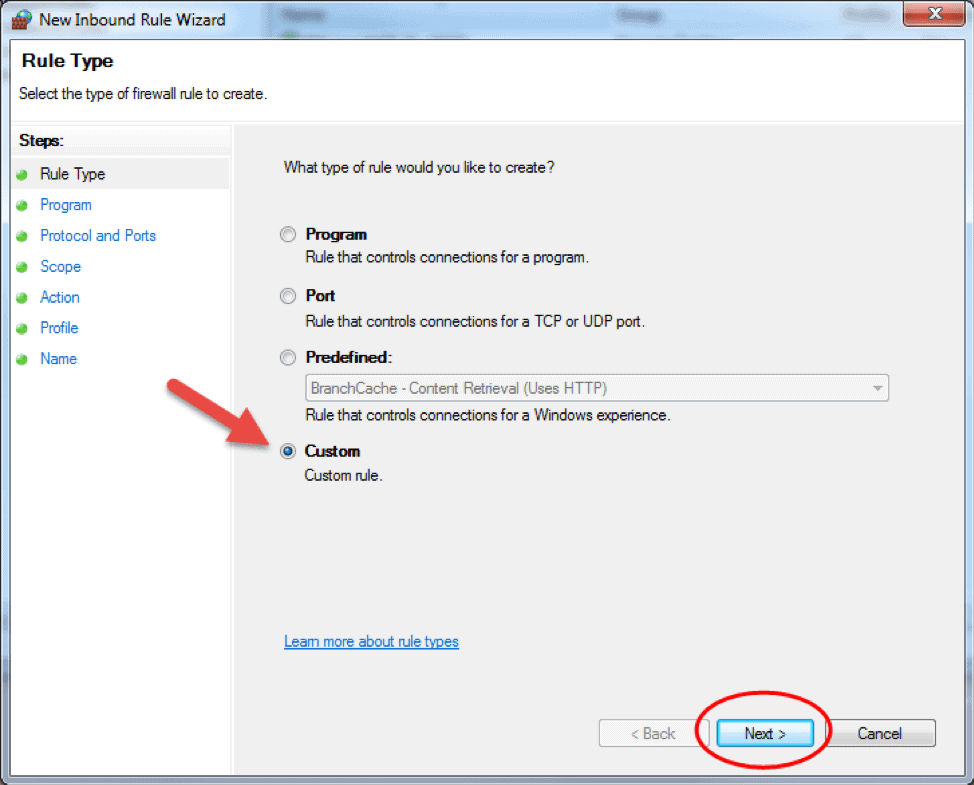
- Click on Custom and click Next to proceed.
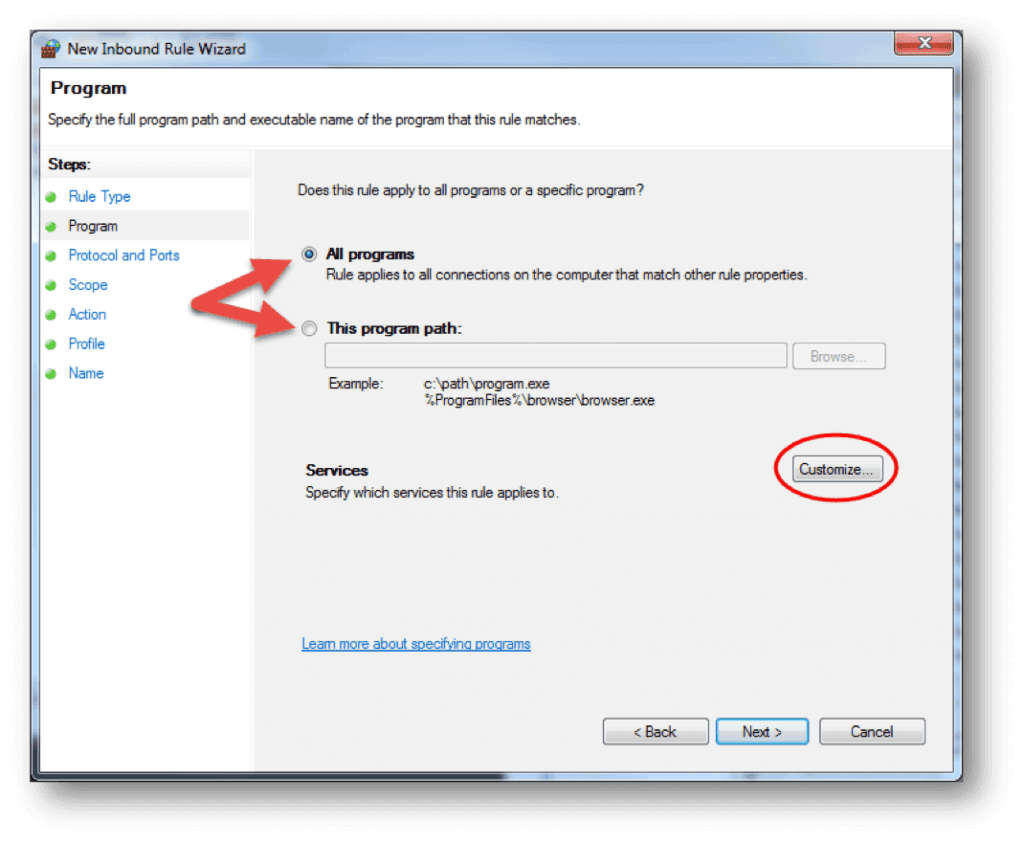
- Choose if the rule will apply to connections for All programs or a specific program on the local machine and click Next. You can click Customize… to select additional settings for the processes of the program you selected.
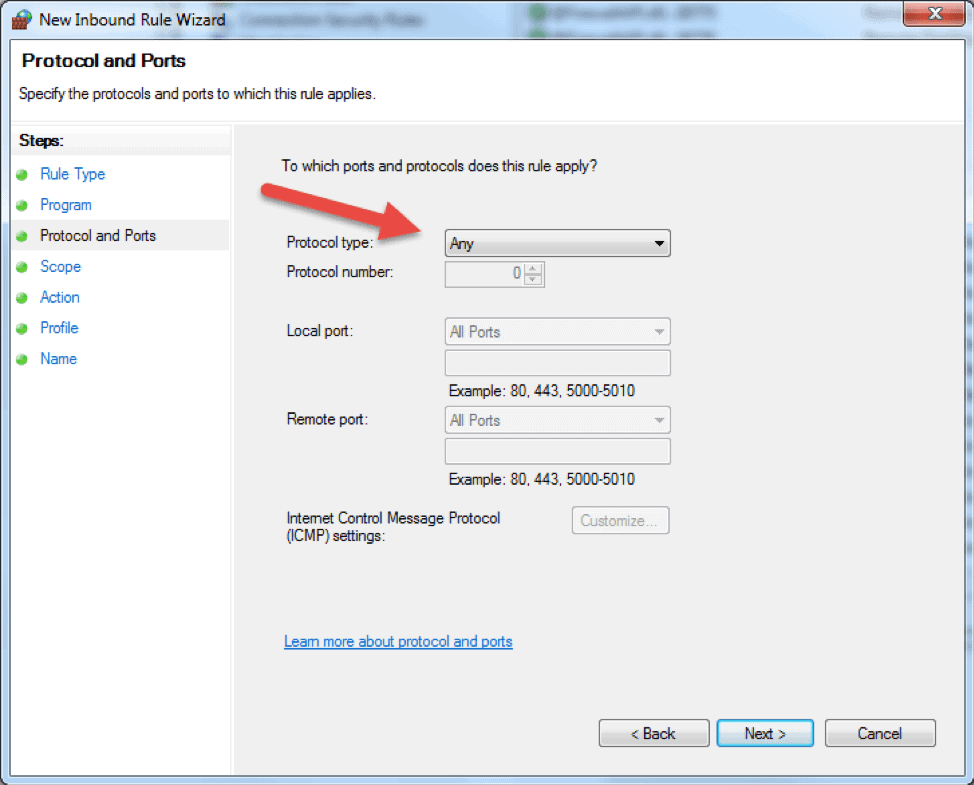
- The following step will allow you to specify the protocol and port for the traffic that this firewall rule will filter. Click Next after you select a protocol type and configure the settings.
- Protocol type. Click on the bar and select the protocol from the dropdown list. You can always select Custom to manually configure the port number. If you select TCP or UDP, you will need to specify local and remote port.
- Protocol number. This field populates automatically after you select a protocol type, and you cannot change it. In order to insert your own port, select Custom in the ‘Protocol type’ dropdown menu.
- Local port. This represents the port on the local machine where you are creating this rule. This section becomes editable if you select TCP or UDP in the ‘Protocol type’ dropdown. Select one of the options from the dropdown box. Note that RPC Endpoint Mapper and RPC Dynamic Ports are available only for TCP inbound rules, and IPHTTPS is available for TCP only. Edge Traversal is available for UDP inbound rules.
- Remote port. This is the port on a remote machine that is trying to establish a connection with the local machine. This section becomes editable if you select TCP or UDP in the ‘Protocol type’ dropdown. Select one of the options from the dropdown box. Note that RPC Endpoint Mapper and RPC Dynamic Ports are available only for TCP inbound rules, and IPHTTPS is available for TCP only. Edge Traversal is available for UDP inbound rules.
- Internet Control Message Protocol (ICMP) settings. You can customize the ICMP settings if you select ICMPv4 or ICMPv6 in the ‘Protocol type’ dropdown list.
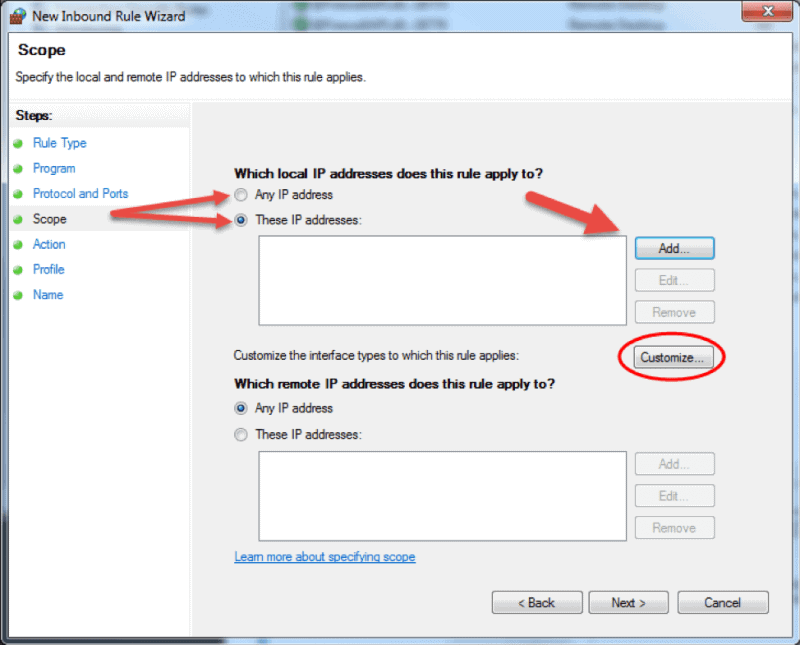
- The Scope step of the wizard allows you to input local and remote IP addresses whose network traffic applies to the current rule.
- Local. If you select ‘Any IP address’ in the local IP addresses section, then the rule applies to the traffic going through the network device that uses a local IP address. This is always the case with the machine where you are creating the rule. Select ‘These IP addresses’ to state that the rule applies to the packets with an address specified in the list. Click Add to insert the IP address to match. You can later edit or remove any of the IP addresses in the list. You can also apply this rule to a specific interface. Click Customize… and select to apply the rule to connections on all interfaces or chose one of the available interfaces listed in the box.
- Remote. If you select ‘Any IP address’ in the remote IP addresses section, then the rule applies to the traffic coming from any IP address included in the list. Select ‘These IP addresses’ to insert the remote IP addresses to which the rule applies. Click Add to specify the IP address to match. You can later edit or remove any of the IP addresses in the list.
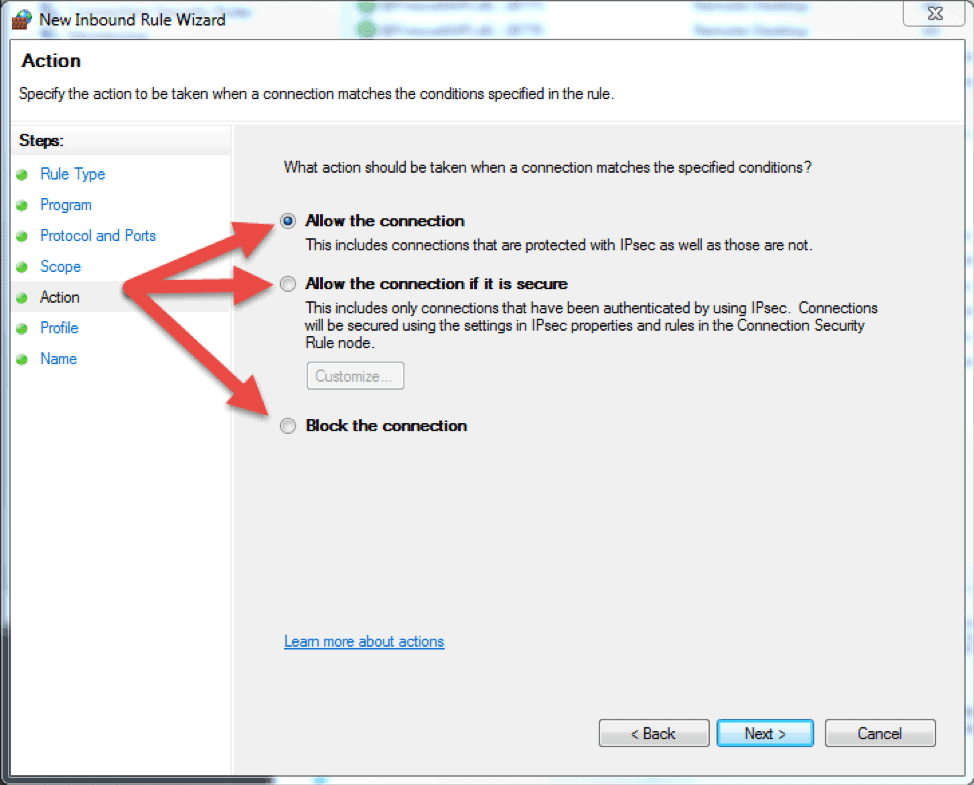
- The next step lets you chose the action the firewall takes when a connection matches the inbound rule configuration. You can select one of the three available options and then click Next to continue.
- Allow the connection. If the connection matches the inbound or the outbound rule configuration, the packets can go through the firewall.
- Allow the connection if it is secure. Select this option to allow only IPSec connections. If you chose this option, two more steps will appear in the wizard: Users and Computers. The additional steps let you chose users and computers you want to block or grant them access. Click on ‘Customize…’ to configure the authentication and integrity requirements.
- Block the connection. This option blocks all network traffic that matches the firewall rule configuration. If a similar rule with ‘allow’ action is in place, then the block action has the priority unless otherwise is stated in the other rule.
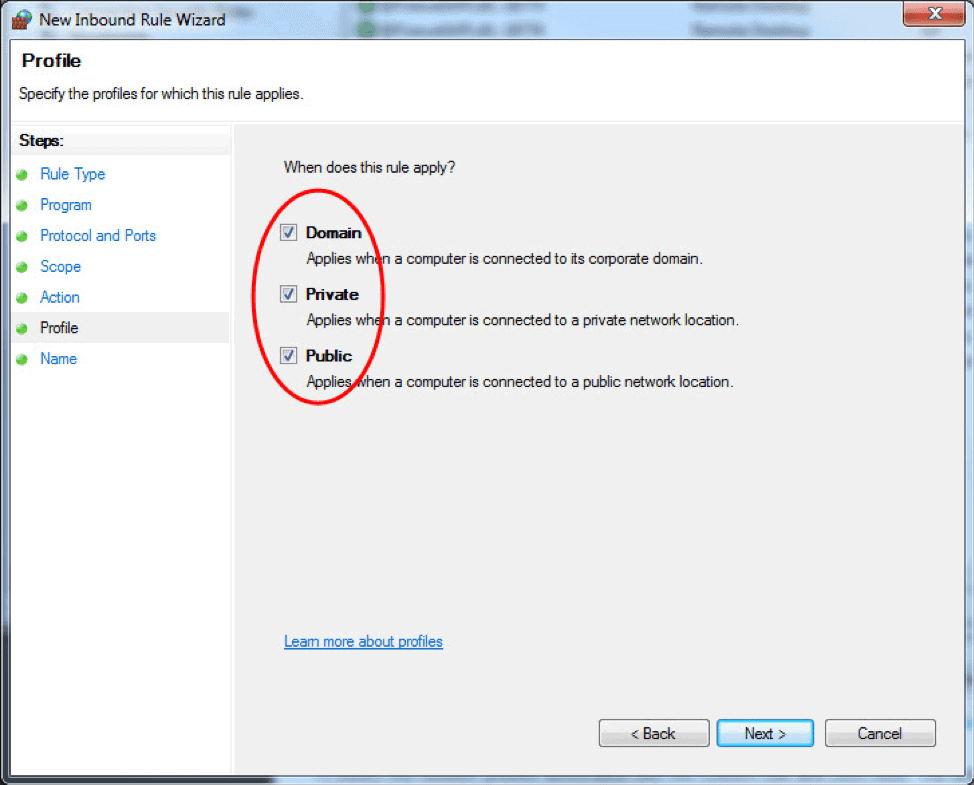
- The Profile step lets you choose the firewall profile the rule will apply to. You can leave everything selected or uncheck a profile that you do not want to include. Click Next to proceed to the final step.
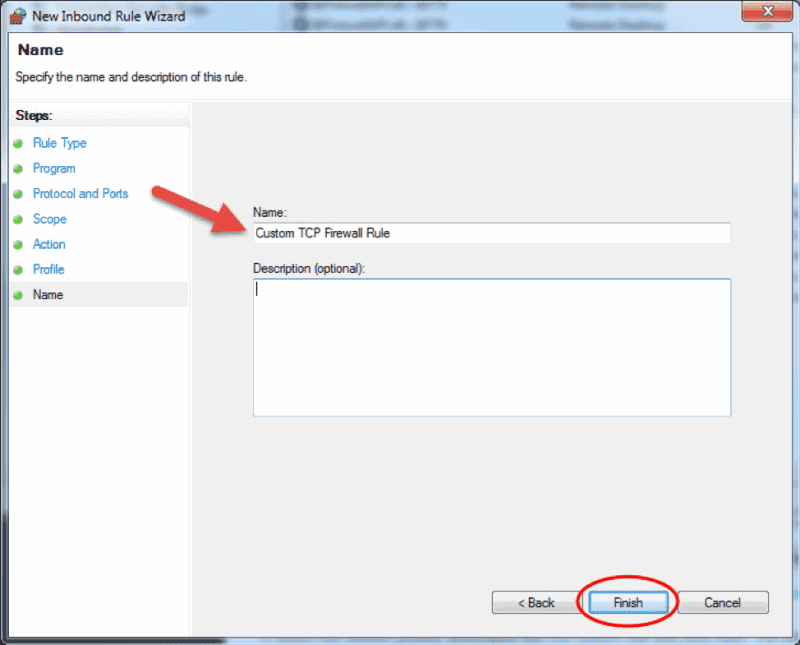
- In the final step, enter the desired name and optional description for this firewall rule, and click Finish.
When you close the wizard, the rule will take effect immediately. You can find the rule in the firewall console when you click on the Inbound rules option. Enabled rules have green checkmark icon while disabled are with grey icons.
How to Edit a Firewall Rule
To edit any existing rule and make additional configuration, open the Windows Firewall with Advanced Security console and select Inbound Rules or Outbound Rules option. Locate and click a rule to see the actions specific to it in the right pane. Select Properties and another window will load where you can edit the rule settings.
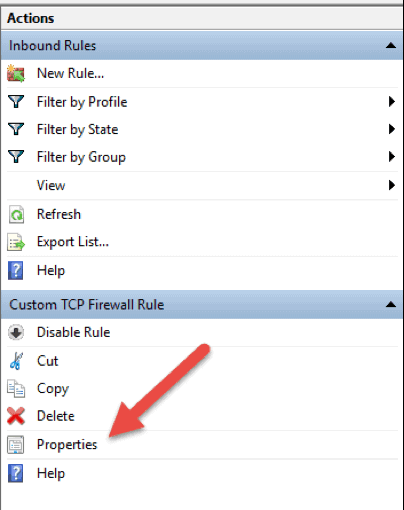
You can also disable, cut, copy, or delete the rule you selected. Make sure you highlight the correct rule to avoid changing firewall configurations for wrong rules.
Tip: you can double click a rule to directly open the Properties window.
How to Create a Firewall Rule with Windows PowerShell
1. Launch the PowerShell command line. You can do so by searching for “powershell” in the start menu, or press Win + R keys on your keyboard and type in “powershell” in the Run box.
2. Insert the following command and hit enter:
New-NetFirewallRule -DisplayName "TCP custom inbound rule" -Enabled:True -Profile Private -Direction Inbound -Action Allow -Protocol TCP -LocalPort 1234New-NetFirewallRule. This command creates a rule. It is followed by a string of parameters and their values.-DisplayName. Specifies the display name of the rule.-Enabled. Enables the rule if set to true. If you omit this parameter, it defaults to true.-Profile. Assigns the rule to the specified profile: Domain, Private, orPublic.-Direction. States if the rule applies to inbound or outbound connections. If you leave it out, it defaults to Inbound.-Action.Specify if the firewall rule will block or allow the connection. If you do not state the action, it defaults to Allow.-Protocol. Specify the protocol for the rule. In this case, we used TCP. Omitting the protocol defaults the setting to Any.-LocalPort. Insert the port where the traffic can go through on the local server. Omitting the port number defaults the setting to Any.
This is only one example of how to add a firewall rule using the Windows PowerShell command line. You can find more examples in the Microsoft PowerShell Documentation.
Conclusion
This article explains the basic functions and different types of firewall and details the steps for managing the Windows Server Firewall within the Windows Firewall with Advanced Security interface. The Windows Firewall Management Console is a powerful tool that allows for creating detailed configurations. If you carefully followed the instructions in the article, you are now able to manage the firewall on your Windows Server.