Using a proxy server to access the internet significantly improves the connection speed and optimizes bandwidth usage. Squid is one of the fastest proxies on the market and a popular solution for both individuals and organizations.
This article will walk you through the steps to install and configure the Squid proxy on Ubuntu.

Prerequisites
- Ubuntu installed (this tutorial uses Ubuntu 26.04).
- Command line access.
- A user with sudo privileges.
What Is Squid Proxy?
Squid is an open-source proxy server that caches frequently visited web pages, filters traffic, and performs DNS lookups. Squid primarily handles HTTP and HTTPS proxy traffic in modern deployments. While Squid still supports FTP, FTP usage is now limited and considered legacy in most environments.
Aside from the typical proxy service that requires the client (e.g., a web browser) to be configured to use the proxy, Squid offers transparency mode, in which the proxy intercepts all HTTP requests sent over the network. This feature is often used in corporate environments, where all the clients access the internet over the same LAN.
Efficient resource caching makes Squid an ideal reverse proxy solution for Apache web servers. The tool provides a way to create routing content clusters and set up load balancing for significant speed gains.
How to Install Squid Proxy on Ubuntu
The Squid package is available in the default Ubuntu repositories. Follow the procedure below to install Squid using the APT package manager:
1. Launch a terminal window.
2. Update the repository list to ensure access to the latest software version available:
sudo apt update3. Install Squid by executing the following command:
sudo apt install squid -y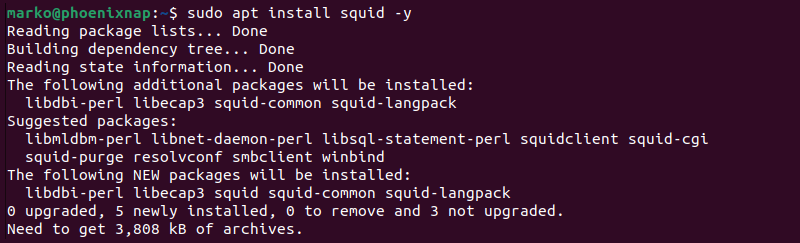
How to Configure Squid Proxy
Squid stores its configuration parameters in the squid.conf file located in the /etc/squid directory. The following sections provide steps for editing the file, configuring a web browser to work with the proxy, and managing the Squid service in Ubuntu.
Step 1: Edit Configuration File
The squid.conf configuration file allows users to adjust proxy parameters, such as the listening port and user access. Follow the steps below to configure Squid:
1. Open the Squid configuration file in a text editor. This tutorial uses Nano:
sudo nano /etc/squid/squid.conf2. Find the http_port option. By default, Squid listens to port 3128, which usually carries TCP traffic. If your system is configured for traffic on another port, replace the port number using the following syntax:
http_port [port-number]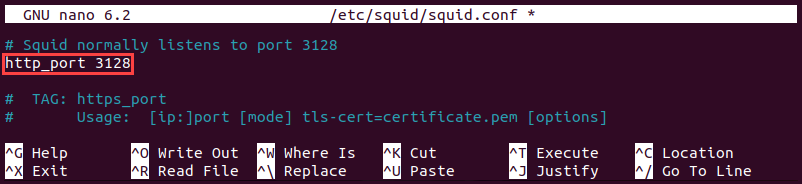
Note: To set the proxy to transparent mode and avoid having to go through proxy configuration in web browsers, type: http_port [port-number] intercept.
3. Find the http_access deny all line in the file. The default parameter configures Squid to block all HTTP traffic. Unblock web traffic by changing the directive to the following:
http_access allow all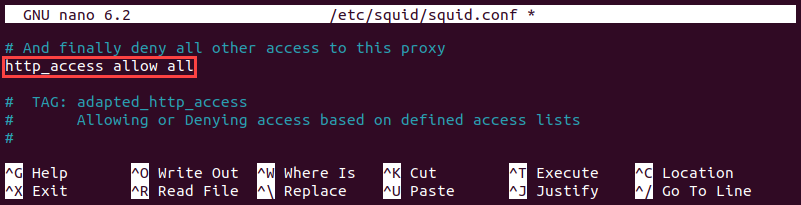
4. Save the file and exit.
Step 2: Restart Squid Service
The changes to squid.conf and other configuration files take effect only after Squid is restarted. To restart the Squid service, type:
sudo systemctl restart squidOther useful Squid management options include:
- Checking the Squid status:
sudo systemctl status squid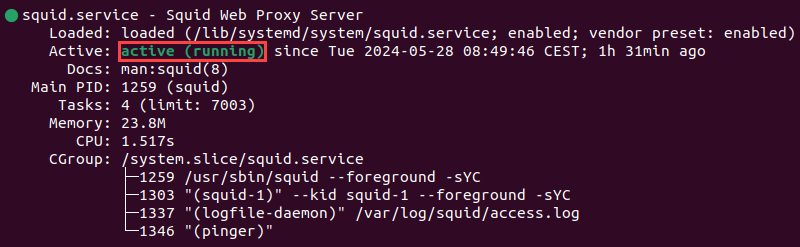
- Starting the Squid service:
sudo systemctl start squid- Setting the Squid service to launch when the system starts:
sudo systemctl enable squid- Stopping the service:
sudo systemctl stop squid- Preventing Squid from launching at startup:
sudo systemctl disable squidStep 3: Configure Squid Client
After you install and configure Squid, set the client web browser to use the proxy when accessing the internet. The following steps show how to edit proxy settings in Firefox:
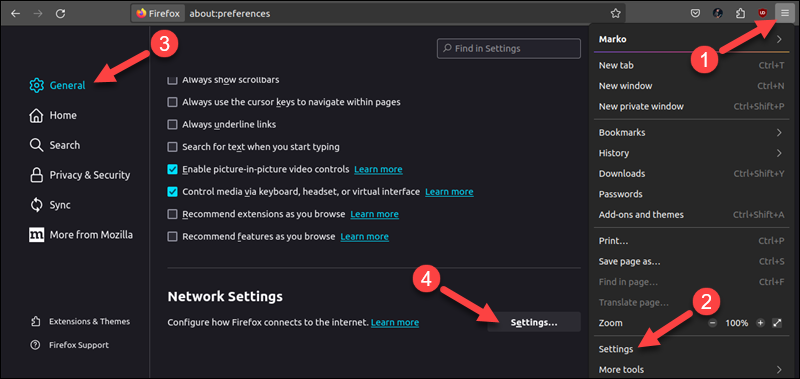
1. Click the hamburger button to open the main menu.
2. Select Settings.
3. Select General in the menu on the left side of the screen.
4. Scroll to the bottom of the page and click the Settings button in the Network Settings section.
5. Choose Manual proxy configuration and type the IP address and port of the Squid proxy.
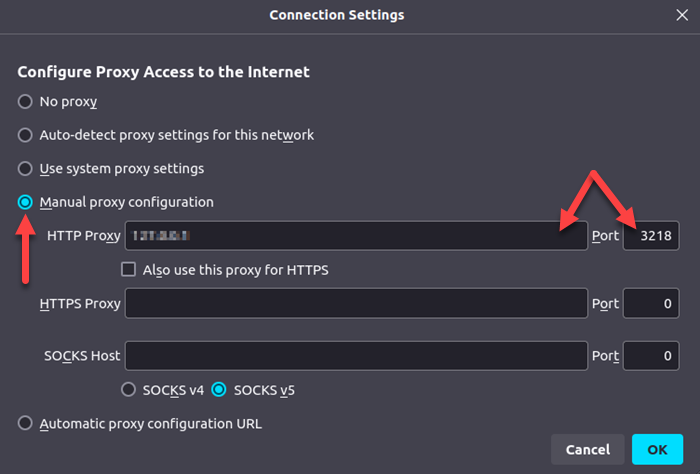
To test the configuration, perform an IP address lookup. If your proxy is working, the result will show the proxy's IP address.
Step 4: Add Squid ACL (Optional)
Access control lists allow you to limit which IP addresses can connect to the internet. Use the following commands to create an ACL for Squid:
- Add the following line to the squid.conf file to allow access to a single IP address:
acl permittedips src [ip-address]For example, to allow the local IP address 192.168.0.15, type:
acl permittedips src 192.168.0.15Note: In large ACLs, consider commenting on each entry to keep track of the allowed systems. To comment, use the (#) symbol: acl permittedips src 192.168.0.15 # [comment].
- Use the following syntax to specify a range of IP addresses:
acl permittedips src [first-ip-address]-[last-ip-address]- Open a specific port by adding the Safe_ports directive:
acl Safe_ports port [port-number]Step 5: Configure Proxy Authentication (Optional)
Setting up authentication for Squid improves network security. Proceed with the following steps to configure proxy authentication:
1. Use the command line to install the apache2-utils package:
sudo apt install apache2-utils -y2. Create a passwd file to store authentication data:
sudo touch /etc/squid/passwd3. Change the ownership to the Squid user proxy:
sudo chown proxy: /etc/squid/passwd4. Add a new user to Squid by typing the following:
sudo htpasswd /etc/squid/passwd [username]The system prompts the user to enter and confirm the password.

5. Open the squid.conf file:
sudo nano /etc/squid/squid.conf6. Add the following lines to the bottom of the file:
auth_param basic program /usr/lib/squid/basic_ncsa_auth /etc/squid/passwd
auth_param basic children 5
auth_param basic realm Squid Basic Authentication
auth_param basic credentialsttl 2 hours
acl auth_users proxy_auth REQUIRED
7. Change the http_access directive to allow authenticated users only:
http_access allow auth_users8. Save the file and exit, and restart Squid for the changes to take effect.
Step 6: Block Websites on Squid (Optional)
Squid can prevent users from accessing certain websites, a feature that is helpful for parental control and for configuring business workstations. Below are the steps to configure Squid to block websites:
1. Create a new text file blocked.acl in the /etc/squid directory:
sudo nano /etc/squid/blocked.acl2. Add the websites you want to block, preceding each entry with a dot. The dot tells Squid to block all subdomains of the main website. For example:
.facebook.com
.instagram.com
When you finish listing the websites, save the file and exit.
3. Open the squid.conf file:
sudo nano /etc/squid/squid.conf4. Add the following lines just above your ACL list:
acl blocked_websites dstdomain "/etc/squid/blocked.acl"
http_access deny blocked_websites
5. Save the file and exit, then restart Squid.
Conclusion
This article explained how Squid works and how to install and configure Squid Proxy on Ubuntu. The article also explains how to use Squid to control user access and block unwanted websites.
Check out our article on how to set up your Ubuntu system to work with a proxy server to configure your Ubuntu machine for a proxy.