Gitea is a self-hosted lightweight Git platform similar to GitHub, GitLab, and Gogs. The Gitea project aims to provide a code hosting tool that focuses primarily on speed and simplicity and offers an alternative to mainstream solutions.
This tutorial will show you how to install and set up Gitea on Ubuntu using Docker.

Prerequisites
- A machine running Ubuntu (this tutorial uses Ubuntu 24.04).
- A user account with root access.
- Docker and Docker Compose installed.
- A domain name pointing to the system's IP address.
How to Install Gitea with Docker on Ubuntu
Gitea's Docker Hub repository contains automatically updated Gitea Docker images that you can use with Docker and Docker Compose to deploy a local Gitea installation. However, before installing Gitea on Ubuntu, ensure the system is properly set up.
Follow the steps below to create a self-hosted Gitea instance on Ubuntu.
Step 1: Create Git User
Gitea Docker deployment communicates with the external OS environment through a dedicated Git system user.
Follow the steps below to create a Git user account:
1. Execute the following adduser command:
sudo adduser --system --shell /bin/bash --gecos 'Git Version Control' --group --disabled-password --home /home/git git2. Make a note of the UID (User ID) and GID (Group ID) numbers in the output:

Step 2: Deploy Gitea with Docker Compose
The most straightforward way to deploy Gitea with Docker is by using Docker Compose. The steps below explain the procedure in detail.
1. Create a directory for the Docker Compose deployment and move to that directory:
mkdir gitea && cd gitea2. Create the docker-compose YAML file using a text editor. The example below uses nano.
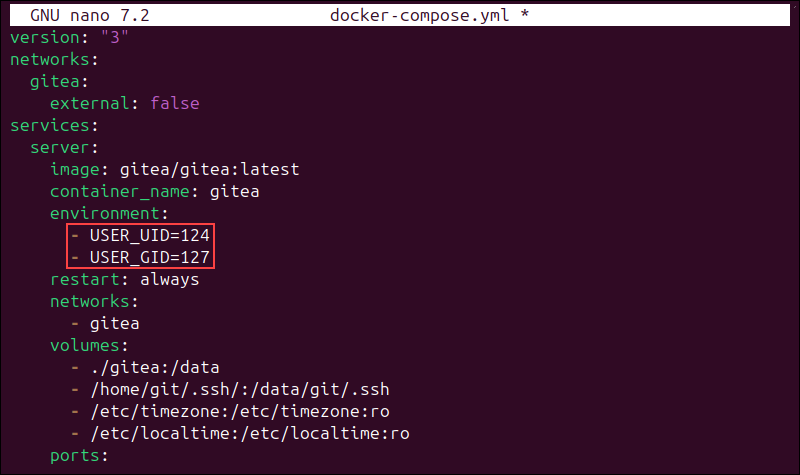
nano docker-compose.yml3. Enter the configuration for a new Gitea instance. The following example creates a deployment with the latest version of the gitea/gitea image and maps the TCP and SSH container ports to the external ports 3000 (TCP) and 2222 (SSH):
version: "3"

networks:
  gitea:
    external: false

services:
  server:
    image: gitea/gitea:latest
    container_name: gitea
    environment:
      - USER_UID=[uid]
      - USER_GID=[gid]
    restart: always
    networks:
      - gitea
    volumes:
      - ./gitea:/data
      - /home/git/.ssh/:/data/git/.ssh
      - /etc/timezone:/etc/timezone:ro
      - /etc/localtime:/etc/localtime:ro
    ports:
      - "127.0.0.1:3000:3000"
      - "127.0.0.1:2222:22"
Assign the UID and GID numbers from Step 1 of this tutorial to the USER_UID and USER_GID environment variables.
4. Save the file and exit.
5. Install Gitea with the command below:
sudo docker-compose upDocker Compose follows the specifications from the file and deploys a containerized Gitea instance.
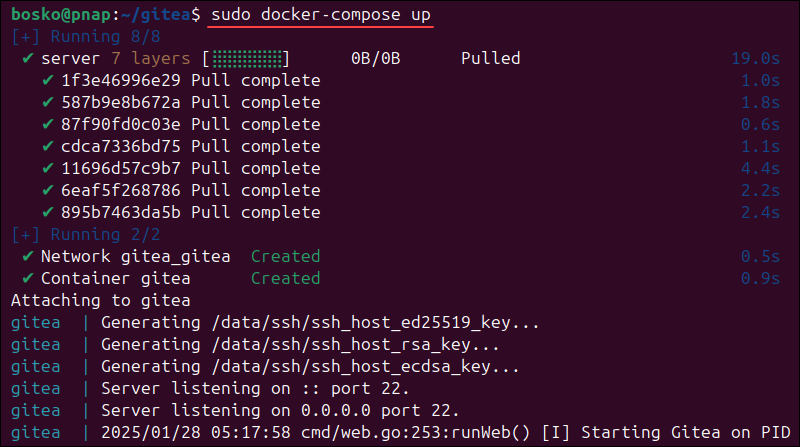
The instance runs in the foreground, so open a new terminal window to continue with the next step. Alternatively, run a detached container in the background by adding the -d option.
sudo docker-compose up -dThe output confirms Gitea has started in the background, and the command prompt appears.
Step 3: Add Reverse Proxy
For the collaboration features to work as expected, the Gitea installation must be accessible from the Internet. Installing a reverse proxy allows you to connect a domain name or an IP address to the Gitea instance.
Follow the steps below to install and set up an Nginx reverse proxy.
1. Install Nginx from the official Ubuntu repository:
sudo apt install nginx -y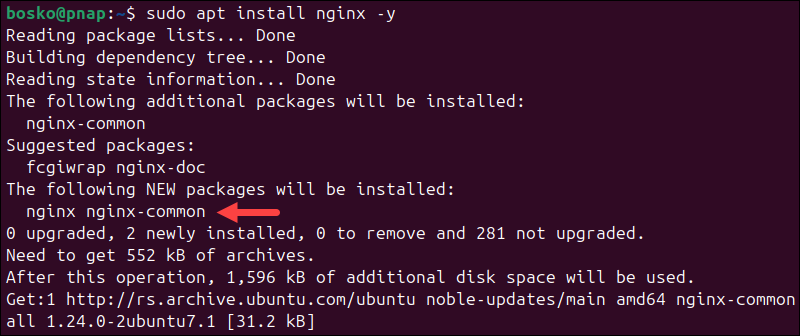
Wait for the process to complete.
2. Create a server configuration file for Gitea:
sudo nano /etc/nginx/sites-available/gitea 3. Add the configuration for the Gitea instance.
server {
    server_name [your-domain];

    root /var/www/html;

    location / {
        proxy_pass http://localhost:3000;
        proxy_set_header HOST $host;
        proxy_set_header X-Forwarded-Proto $scheme;
        proxy_set_header X-Real-IP $remote_addr;
        proxy_set_header X-Forwarded-For $proxy_add_x_forwarded_for;
    }
}
Replace [your-domain] in the file with the actual domain.
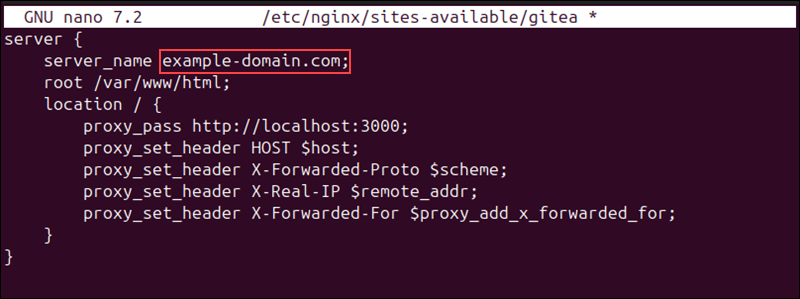
4. Save the file and exit.
5. Create a symbolic link in the sites-enabled directory. The link points to the configuration file in the sites-available directory.
sudo ln -s /etc/nginx/sites-available/gitea /etc/nginx/sites-enabled/gitea6. Test the configuration with the following command:
sudo nginx -tThe output shows that the test is successful.

6. Restart Nginx.
sudo systemctl restart nginxStep 4: Add TLS Encryption
Provide TLS encryption for the Gitea instance to enable HTTPS access:
1. Install certbot, a tool for installing Let's Encrypt certificates:
sudo apt install certbot python3-certbot-nginx -y2. Run certbot with the --nginx flag. Provide your domain name with the -d flag:
sudo certbot --nginx -d [your-domain]3. Enter an email address for security-related notices. Type Y and press Enter to agree to the Terms of Service.
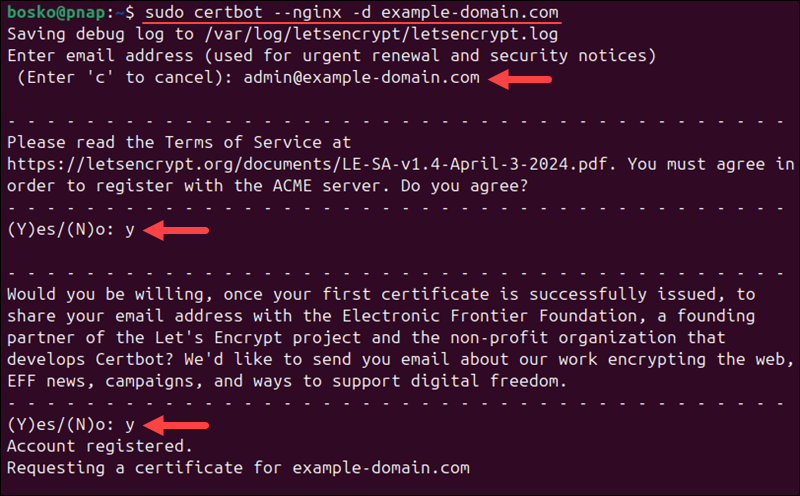
Once certbot generates the certificate, the tool automatically reloads Nginx with the new configuration.
Step 5: Configure Gitea
After you create a system user, install a reverse proxy, and generate a TLS certificate, proceed to configure Gitea:
1. Access the Gitea instance in a web browser. Navigate to:
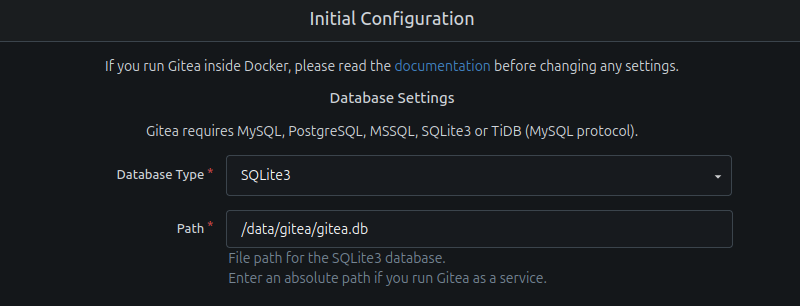
https://[your-domain]The Initial Configuration page appears. Since Gitea is running inside Docker, it is recommended to keep the settings as they are, unless you specifically need to change something. The first part specifies the Gitea database type and path, which is filled out automatically.
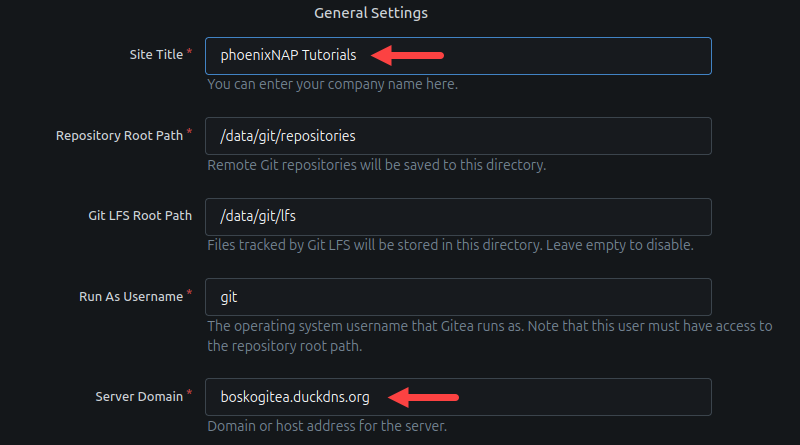
2. Scroll to the General Settings section and change the Site Title and Server Domain fields to your values.
3. Scroll further down and change the Gitea Base URL field.
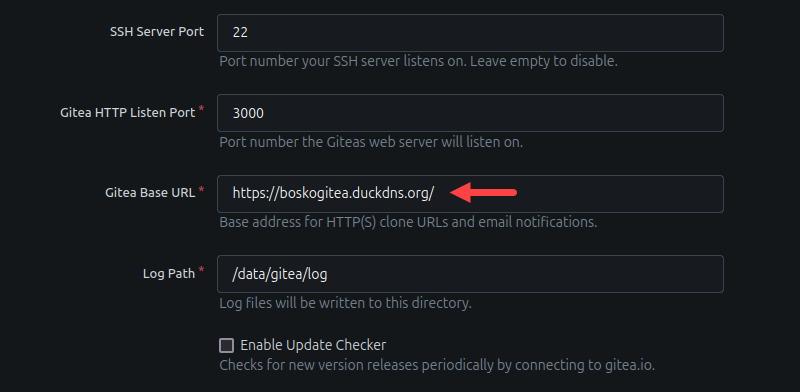
4. Under Optional Settings, expand the Administrator Account Settings menu. This section allows you to create the first administrator account for Gitea. Fill out the necessary details, and, when finished, click the Install Gitea button.
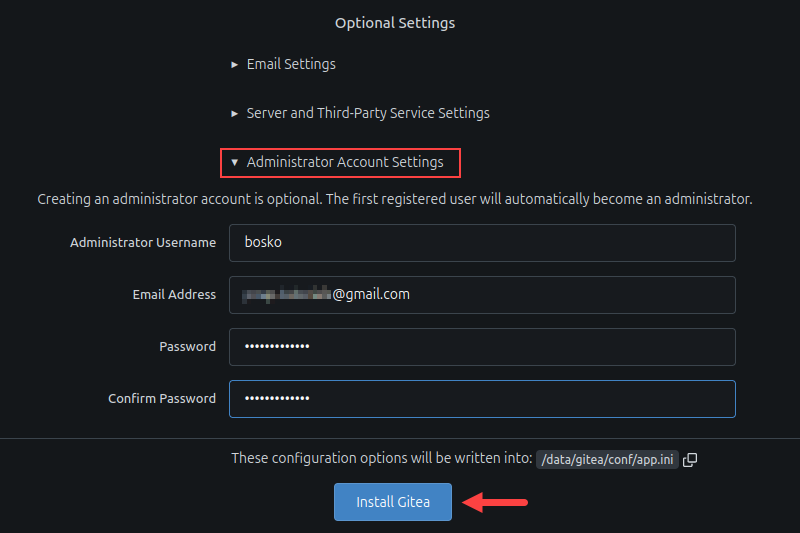
Click the Install Gitea button at the bottom of the page to save the configuration and complete the installation. Wait for the page to load, and it will take you to Gitea's home page.
Step 6: Create Test Repository
Repository management in Gitea is similar to other code-hosting solutions. Follow the steps below to create a repository using Gitea's GUI:
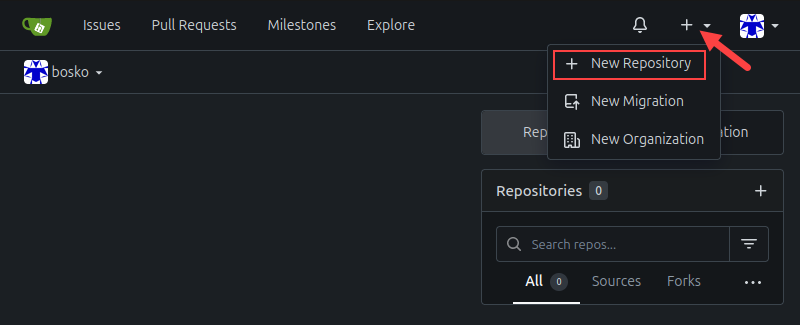
1. Click the + sign in the upper-right corner of the screen and select New Repository to load the repository creation page.
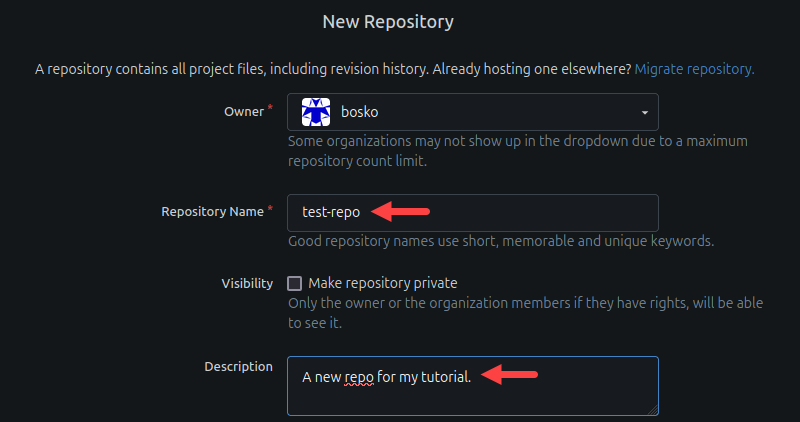
2. Fill out the required information, such as the owner, repository name, and description.
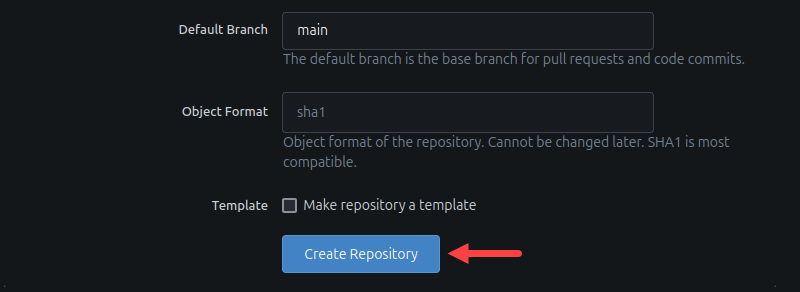
3. Scroll to the bottom of the page and select the Create Repository button.
Step 7: Enable SSH Access
Additional configuration is necessary to enable the SSH connection with the Gitea container.
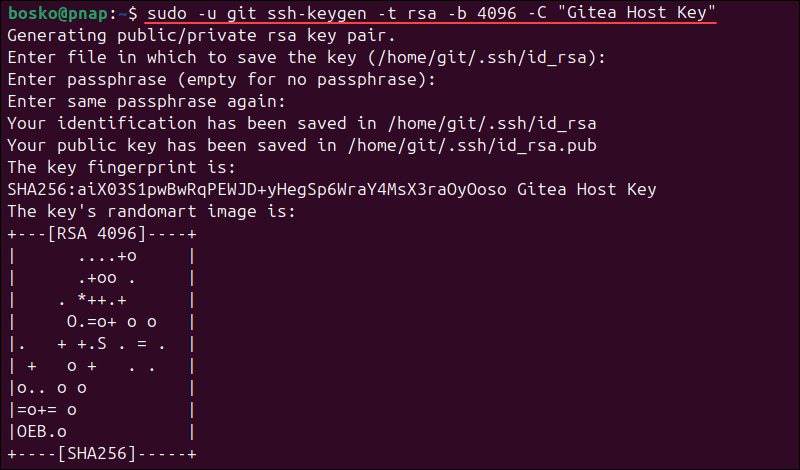
1. Generate an RSA 4096 key for the git user:
sudo -u git ssh-keygen -t rsa -b 4096 -C "[key-name]"Replace [key-name] with a unique name for your SSH key.
2. Press Enter three times to confirm the key location and no passphrase protection for the key. The system generates an SSH key.
3. Add the key to the authorized_keys file in the .ssh directory of the git user with the command:
sudo -u git cat /home/git/.ssh/id_rsa.pub | sudo -u git tee -a /home/git/.ssh/authorized_keys
4. Limit the permissions for the file with the chmod command:
sudo -u git chmod 600 /home/git/.ssh/authorized_keys5. Create the gitea command. This enables the Gitea Docker container to establish an SSH connection through the host.
cat <<"EOF" | sudo tee /usr/local/bin/gitea
#!/bin/sh
ssh -p 2222 -o StrictHostKeyChecking=no [email protected] "SSH_ORIGINAL_COMMAND=\"$SSH_ORIGINAL_COMMAND\" $0 $@"
EOF
6. Make the file executable:
sudo chmod +x /usr/local/bin/giteaStep 8: Add SSH User
Once you configure the Gitea container to accept SSH connections, start authorizing users that will connect to the instance via SSH.
1. Generate an SSH key for the user who needs SSH access.
2. Output the key with the cat command and copy it to the clipboard. For example:
cat .ssh/id_ed25519.pub
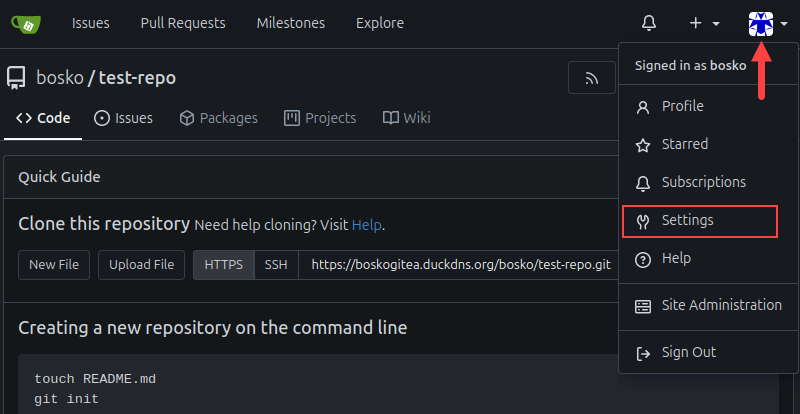
3. In the Gitea GUI, click the user icon in the upper-right corner of the screen.
4. Select Settings in the menu.
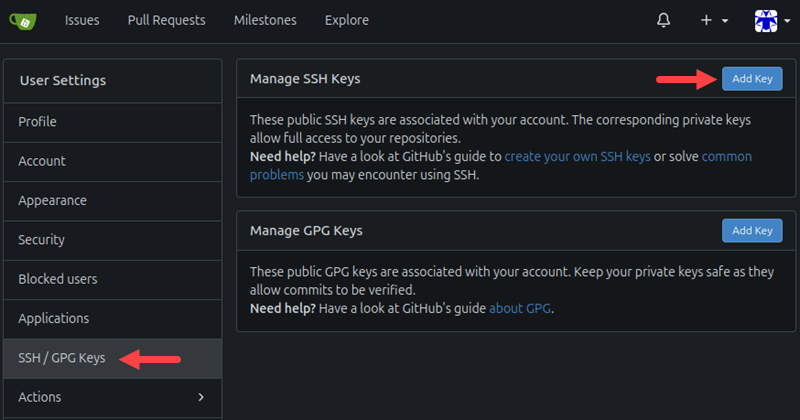
5. Select the SSH / GPG Keys item in the Settings menu and click the Add Key button.
6. Paste the SSH key you copied in the Content field and click the Add Key button in the bottom-left corner.
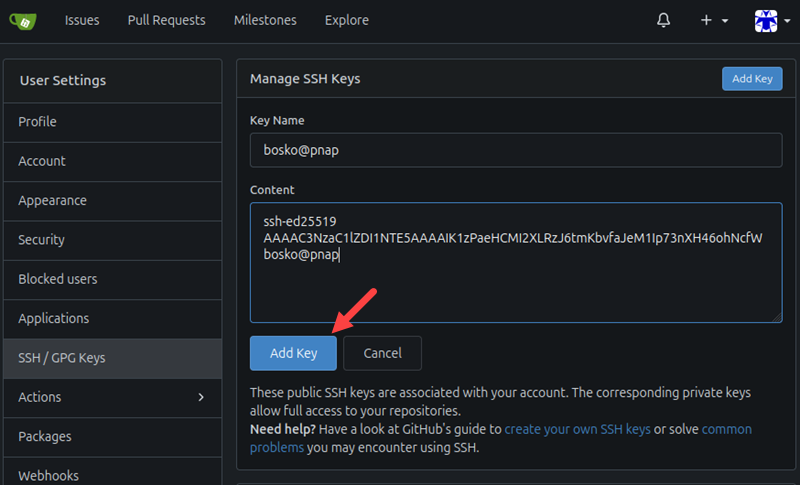
The user is now authorized to use SSH to connect to Gitea.
Conclusion
This tutorial showed how to deploy a Gitea instance using Docker, perform the initial configuration of the instance, and enable SSH access to Gitea. Gitea is a lightweight, self-hosted Git service that is useful for teams or individuals who need a fast, resource-efficient alternative to GitHub, GitLab, or Bitbucket.
If you prefer a mainstream, industry-standard solution, see how to use GitHub in our in-depth tutorial for beginners.


