Git is the world's most popular decentralized version control system. Having a good understanding of Git is essential if you want to code and work on a collaborative software development project.
In this article, you will learn how Git works and how to use its crucial functions.
Prerequisites
- Git installed and configured (see how to Install Git on Windows, Install Git on Mac, Install Git on Ubuntu, Install Git on CentOS 7, or Install Git on CentOS 8)
How Does Git Work?
Git allows users to track code changes and manage their project using simple commands.
The heart of Git is a repository used to contain a project. A repository can be stored locally or on a website, such as GitHub. Git allows users to store several different repositories and track each one independently.
Throughout development, the project has several save points, called commits. The commit history contains all the commits, i.e., changes implemented in the project during development. A commit allows you to roll back or fast forward the code to any commit in the commit history.
Git uses SHA-1 hashes to refer to the commits. Each unique hash points to a particular commit in the repository. Using hashes, Git creates a tree-like structure to store and retrieve data easily.
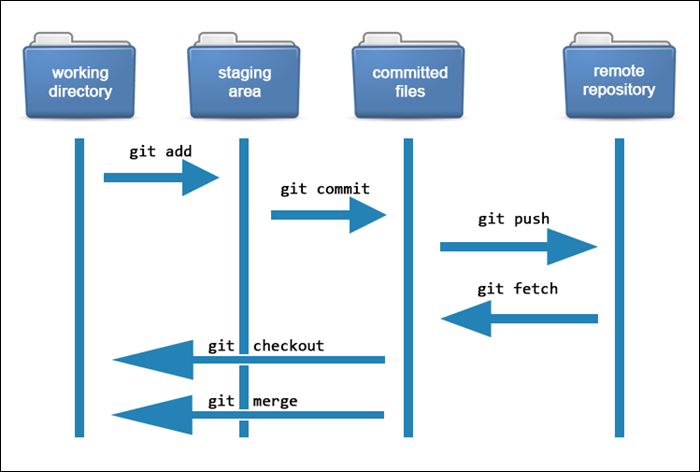
The files in each Git project go through several stages:
- Working directory. Modified files, but untracked and not yet ready for commit.
- Staging directory. Adding modified files to the staging environment means they are ready for commit.
- Committed. Snapshots of files from the staging area saved in the commit history.
The following diagram shows the basic Git workflow:
The following sections explain Git functions in detail.
Staging
When you want Git to track changes you've made to a certain file, you must add it to the staging area. Git recognizes when you modify a file but doesn't track it unless you stage it. The staging area represents a layer of security, allowing you to review the changes before committing them.
Being in the staging area is a prerequisite for files to be later committed, i.e., implemented on the master branch. You can check which files Git tracks by running:
git statusTo add a file to the staging area, use the following syntax:
git add [filename]Replace the [filename] syntax with the actual name of the file.
For example:

Note: You can make staging faster and stage all files in your working directory by running the git add . command. Learn more about git add command.
If you change your mind, you can remove a file from the staging area. To unstage a file, use the following syntax:
git rm --cached [filename]For example:

Making Commits
A commit represents a save point for your work, a snapshot of your code at a particular point in time. Adding files to the staging area means that they are ready to be committed.
To check if you have any files ready to be committed, run:
git statusFor example:

Here we see that three files are ready for commit. To commit them, use the following syntax:
git commit -m "Notes about the commit"Each commit should have a description specified after the -m flag, which will later help you know what the commit was about.
For example:

The output contains the commit and states what was changed.
You can check your commit history by running:
git logThe output shows a log of all the commits you have made, who made the commit, the date, and the commit notes. Adding the --oneline flag shows the commit history condensed in one line. Omitting the flag shows a detailed commit history.

Reverting
If you have made mistakes during your project development or want to revert a commit for any reason, git revert allows you to do so.
The git revert command reverts a particular commit, i.e., undoes the commit you made to remove the changes from the master branch.
Note: The git revert command doesn't remove the commit from commit history. It only adds a new commit specifying that it has reverted the specified commit.
The syntax is:
git revert [commit_ID]Find commit IDs by running git log. The 7-character code is the commit ID.
The following example demonstrates the git revert command:

The git reset command permanently takes you back to a certain point in development. All the files and changes added after that point in time are unstaged if you want to re-add them.
Warning: Use git reset only if you are entirely sure you want to undo/delete parts of your code, as this action is irreversible.
The syntax is:
git reset [commit_ID]Specifying the --hard flag removes the unstaged files, making it impossible to bring them back.
Forking
A fork is a complete copy of an existing repository that allows you to make changes and experiment without affecting the original project. Forking is a way for someone to propose changes to an existing project, or it can be a starting point for a project of your own if the code is open source.
If you want to propose a change or a bug fix for a project, you can fork a repository, make the fix, and make a pull request to the project owner.
The following diagram illustrates how forking works:

To fork a repository, follow the steps below:
1. Sign in to your GitHub account.
2. Visit the repository page on GitHub and click the Fork option.
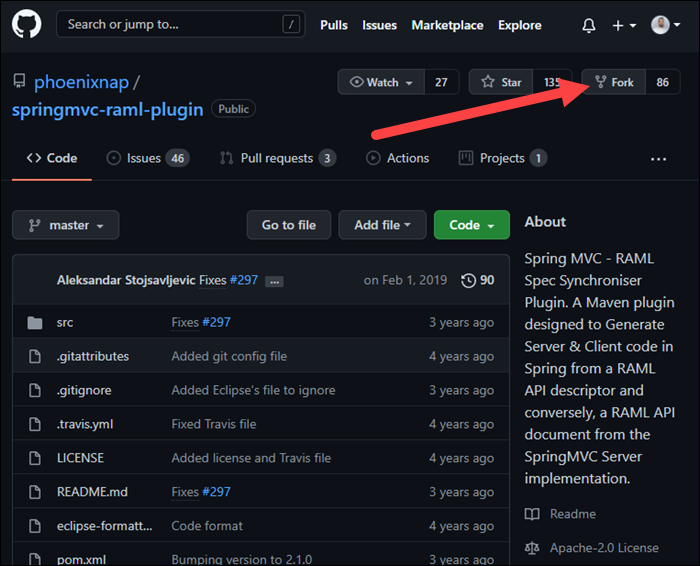
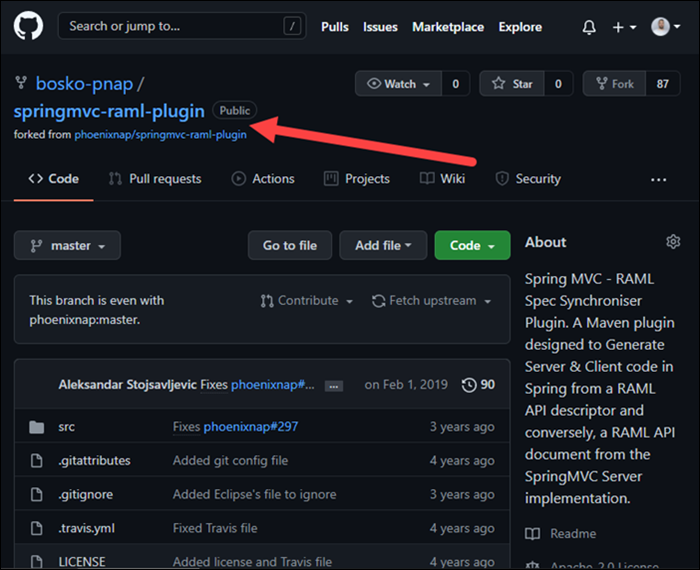
3. Wait for the forking process to complete. When it finishes, you will have a copy of the repository on your GitHub account.
4. The next step is to take the repository URL from the Code section and clone the repository to your local machine.
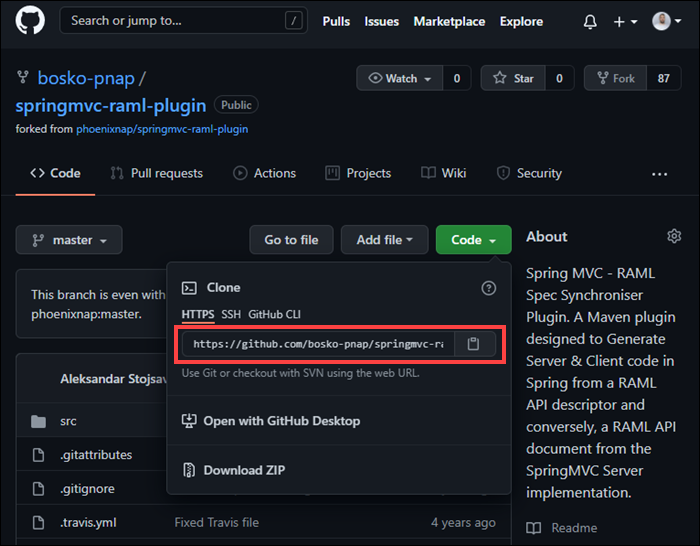
5. Clone the repository using the following syntax:
git clone [repository URL]Enter the URL in place of the [repository URL] syntax.
For example:

In this example, we have created a fork of the springmvc-raml-plugin repository, and now we are free to implement our changes or start building a new plugin on top of the existing one.
Branching
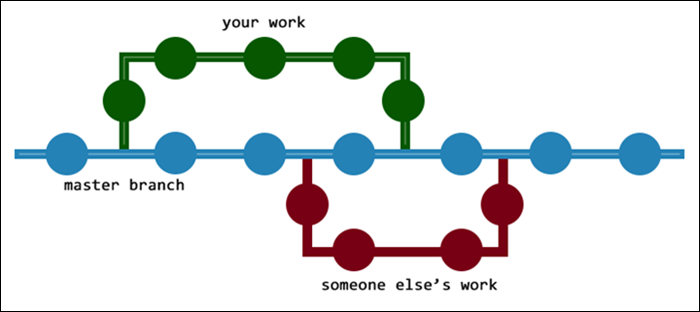
Branching is a feature in Git that allows developers to work on a copy of the original code to fix bugs or develop new features. By working on a branch, developers don't affect the master branch until they want to implement the changes.
The master branch generally represents the stable version of your code, which is released or published. That's why you should avoid adding new features and new code to the master branch if they are unstable.
Branching creates an isolated environment to try out the new features, and if you like them, you can merge them into the master branch. If something goes wrong, you can delete the branch, and the master branch remains untouched.
Branching facilitates collaborative programming and allows everyone to work on their part of the code simultaneously.
The following diagram is a visual representation of branching in Git:
Note: You should delete the branches when you finish making the changes as they are supposed to be temporary. Leaving the branches creates a messy repository.
The syntax to create a new branch in Git is:
git branch [branch-name]Enter a name for your branch in place of the [branch-name] syntax. For example:

In this example, we created a new branch named feature-1.
Merging and Conflicts
The git merge command allows developers working on a new feature or a bug fix on a separate branch to merge their changes with the main branch after they finish. Merging the changes means implementing them into the master branch.
The developers can input their changes using git merge without having to send their work to everyone working on the project.
To see your existing branches, run:
git branch -a
For this tutorial, we have created a separate branch named feature-1. To merge the feature-1 branch with the master branch, follow the steps below:
1. Switch to the master branch. The git merge command requires you to be on the merge-receiving branch. Run the following command to switch to the master branch:
git checkout master2. After switching to the master branch, use the following syntax to merge your changes:
git merge [branch-name]Enter the name of your branch in place of the [branch-name] syntax.
For example:
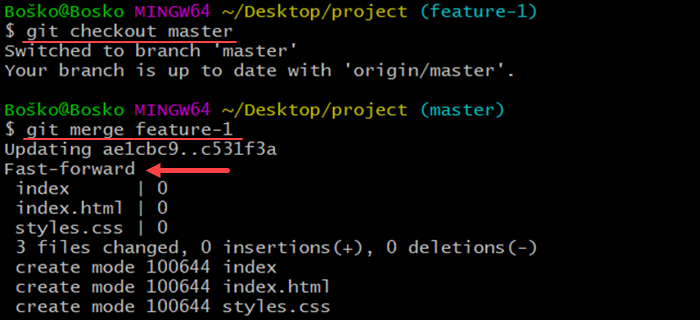
Git automatically inputs your changes to the master branch, visible to anyone working on the project.
However, sometimes you may come across merge conflicts.
For example, a conflict occurs if someone decides to make edits on the master branch while you’re working on another branch. This type of conflict happens because you want to merge your changes with the master branch, which is now different from your code copy.
Our detailed guide offers several different methods for resolving merge conflicts in Git.
Fetching/Pulling Changes
The git fetch and git pull commands are both used to retrieve changes from the remote repository.
The difference is that git fetch only retrieves the metadata from the remote repository but doesn't transfer anything to your local repository. It only lets you know if there are any changes available since your last pull.
In the following example, git fetch informs us that there are some changes in the remote repository, but nothing has changed in the local repository:

On the other hand, git pull also checks for any new changes in the remote repository and brings those changes to your local repository.
So, git pull does two things with one command - a git fetch, and a git merge. The command downloads the changes made to your current branch and updates the code in your local repository.
For example:

In this output, we see that it was a fast-forward merge type and that Git pulled one file to the local repository - README.md.
Note: Read our guide on using git fetch and git pull to pull all branches in Git.
Pushing Changes
The git push command does the opposite of git pull, allowing you to share your changes and publish them in the remote repository.
When you make changes locally and want to push them to a remote repository, run:
git pushFor example:

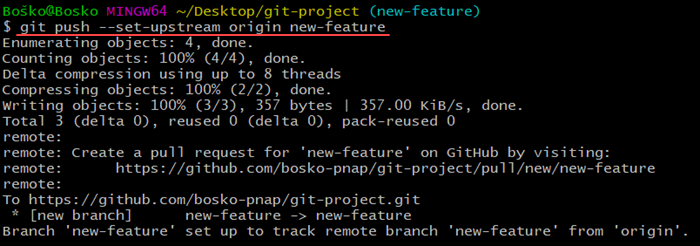
If you have created a new branch locally, which doesn't exist remotely, the command returns an error when trying to push the changes:

Git offers the solution in the output. Run the command specified in the output to push your branch upstream:
Rebasing
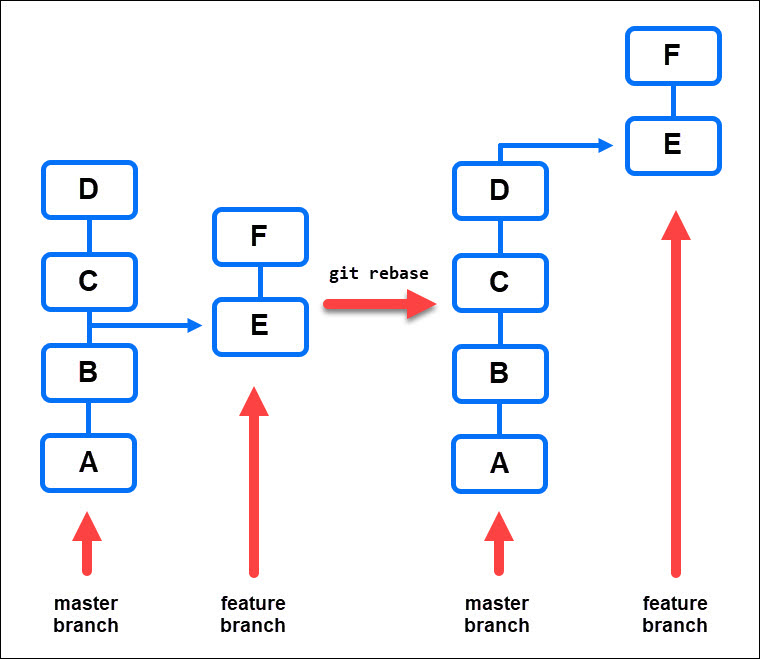
When you create a branch, Git creates a copy of the existing code for you to further develop. Sometimes you may need to incorporate new changes from the master branch to keep up with general development.
Rebasing involves implementing new changes from the master branch into your feature branch. That means that Git replays the new changes from the master branch, creating commits on top of the tip of your feature branch.
Note: Check out the differences between rebasing and merging in our article Git Rebase vs. Git Merge.
Follow these steps to rebase your feature branch:
1. Move to the feature branch using git checkout. The syntax is:
git checkout [branch-name]2. Run the following command to rebase your branch:
git rebase masterThe following diagram shows how the rebase function works:
Note: rebase can also be used to update older commit messages to correct errors or insert additional information. Learn how to use rebase to change commit messages.
Conclusion
You should now have a good grasp of what Git is and how it works. Feel free to create a Git repository and test out the various features to get comfortable using them.
You can also download our Git commands cheat sheet PDF to have all the commands in one place.
