Introduction
SSH (Secure Shell) is a cryptographic protocol for securely connecting to a remote server over an unsecured network. It is essential for managing remote systems, networking, and communicating with remote servers.
The protocol provides a secure connection between a client and a server. It enables managing other computers, transferring files, and executing commands on a remote machine.
This guide explains how to SSH to a remote server from Windows, Linux, or Mac.
Prerequisites
- Active network connection on a remote computer.
- The IP address or the name of the remote machine.
- Permission to access the remote computer.
- Firewall settings to allow SSH connections.
What Is SSH?
Secure Shell, sometimes called Secure Socket Shell, is a protocol that allows you to securely connect to a remote computer or a server using a text-based interface.
When a secure SSH connection is established, a shell session starts. It enables manipulating the server by typing commands using the client on your local computer.
System and network administrators use this protocol to manage remote servers and machines. Anyone who requires managing a computer remotely in a highly secure manner uses SSH.
Note: SSH and SFTP protocols are frequently conflated, but have unique and distinct roles. Learn about the similarities and differences between SSH and SFTP.
How Does SSH Work?
Both the client and server participate in establishing a secure SSH communication channel. Creating an SSH connection relies on the following components and steps:
- Client-side component. A client-side component is an application or program used to connect to another machine. The client uses remote host information to initiate the connection. If the credentials are verified, the program establishes an encrypted connection.
- Server-side component. On the server's side, an SSH daemon constantly listens to a specific TCP/IP port (the default SSH port number is 22) for possible client connection requests. Once a client initiates a connection through the defined port, the SSH daemon responds with the software and the protocol versions it supports. The default protocol version for SSH communication is version two, while version one is deprecated.
- Authentication. When establishing a connection, the client provides identification data to the server (as a username/password, key pairs, or multi-factor authentication). If the provided information is correct, SSH creates a new encrypted communication session.
Note: For more details, check out our comprehensive guide on how SSH works.
How to Enable SSH Connection
Since creating an SSH connection requires both a client and a server component, ensure they are installed on the local and remote servers. The sections below demonstrate how to install a client-side and server-side component depending on the OS.
Install SSH Component on Mac
macOS typically has an SSH client preinstalled. Open the terminal and check with the following command:
ssh -V
The command shows the installed SSH version. To use a third-party SSH application, such as OpenSSH, use the following Homebrew command:
brew install opensshNote: If you don't have Homebrew installed, check out our guide on how to install Homebrew on Mac.
The installation allows managing a separate version from the system's default SSH component. Alternatively, install PuTTY on macOS to use a GUI-based SSH client.
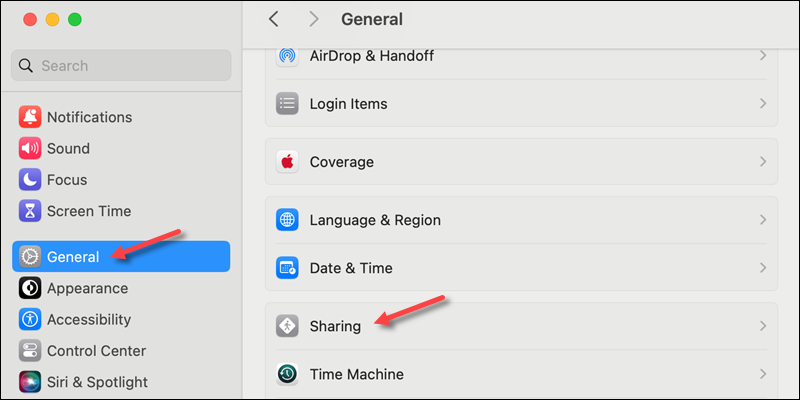
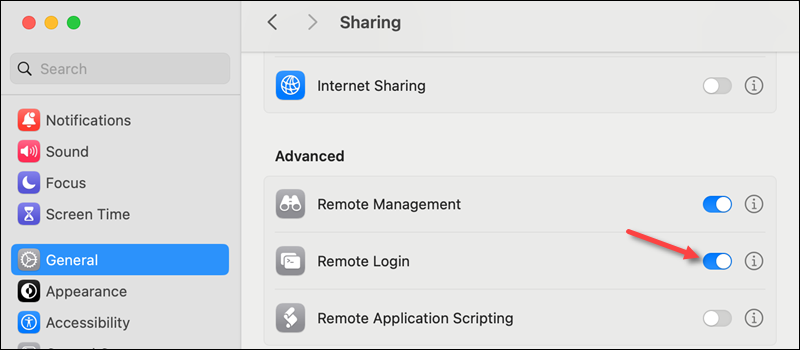
To enable SSH server remote login on a macOS, do the following:
1. Go to System Settings.
2. Click General in the left menu.
3. Locate and open Sharing.
4. Enable Remote Login to allow SSH access to the device.
Install SSH Component on Linux
Some Linux distributions do not have an SSH component installed by default. Typical solutions are installing OpenSSH or a GUI solution, such as the PuTTY client for Ubuntu.
To install the OpenSSH client and server component, use your system's default package manager:
1. Access the command line and enter the installation command for your distribution:
| Distribution | Command to Install SSH Client and Server |
|---|---|
| Debian/Ubuntu | sudo apt install openssh-client openssh-server |
| Fedora/RHEL | sudo dnf install openssh-clients openssh-server |
| Arch Linux | sudo pacman -S openssh |
| openSUSE | sudo zypper install openssh |
| Alpine Linux | sudo apk add openssh-client openssh |
2. The SSH service (sshd) starts automatically after installing the components. To check if the service is running, enter the following command:
systemctl status sshd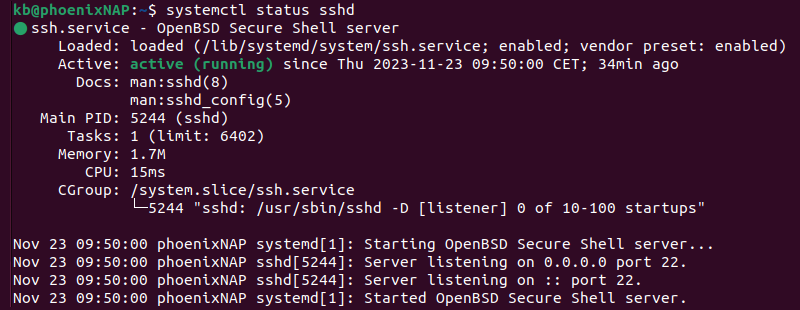
If the service is not running, start it manually with:
sudo systemctl start sshdThe command does not produce output if the service starts successfully.
3. Enable the sshd service to start automatically on boot:
sudo systemctl enable sshdThe sshd service is now configured to start whenever the system boots.
Note: On some systems, sshd may be an alias, and the commands above might not work. In such cases, replace sshd with ssh in the commands.
Install SSH Component on Windows
Many Windows users prefer to use GUI-based clients, like PuTTY, to establish remote connections via SSH. If this is your preference, refer to this short guide on installing PuTTY for Windows.
Note: PuTTY is a dependable terminal emulator, but many PuTTY alternatives offer a broader range of features.
Windows 10 and later versions include a native OpenSSH app. However, users who prefer to use Command Prompt or PowerShell to establish SSH connections may need to manually enable the native OpenSSH client on Windows.
To enable SSH on Windows:
1. Type Add an optional feature in the Windows search bar and press Enter to access the Optional features menu.
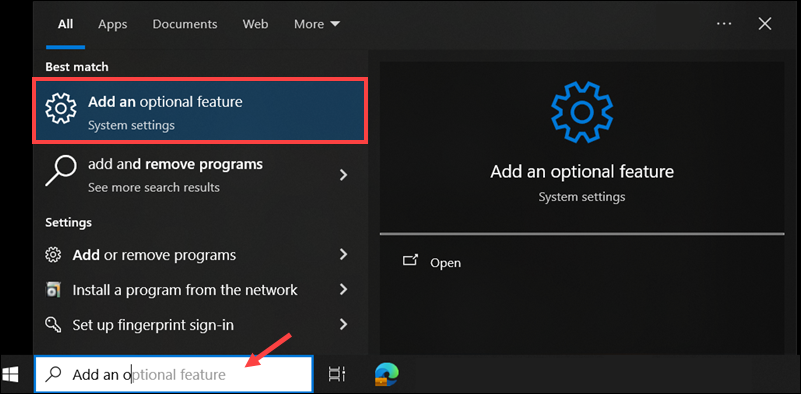
2. Click Add a feature.

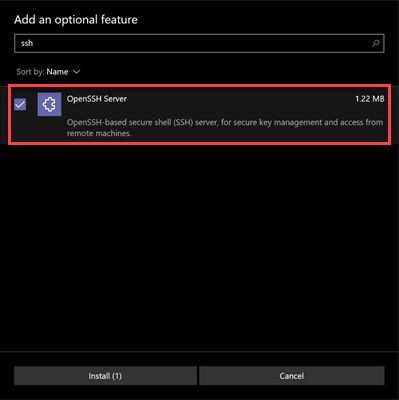
3. Search for and install the OpenSSH app.
Enabling this setting allows you to run Windows Command Prompt or PowerShell SSH commands.
Note: The Windows Subsystem for Linux (WSL2) is becoming a popular alternative for managing Windows systems. It allows you to run a full Linux environment on Windows, which includes native SSH tools.
How to Connect via SSH
After installing and setting up the SSH client and server on each machine, you can establish a secure remote connection. To connect to a server using your credentials, do the following:
1. Open the command line/terminal window and run the following ssh command:
ssh [username]@[host_ip_address]Provide the username and host IP address. If the username is the same as the local machine, omit the username from the command. To test if SSH is installed correctly, try creating an SSH connection to localhost.
2. When connecting to the server for the first time, a message appears asking to confirm the connection. Type yes and press Enter to confirm the remote server identification on the local machine.
3. Provide the password when prompted and press Enter. The screen does not display characters as you are typing.
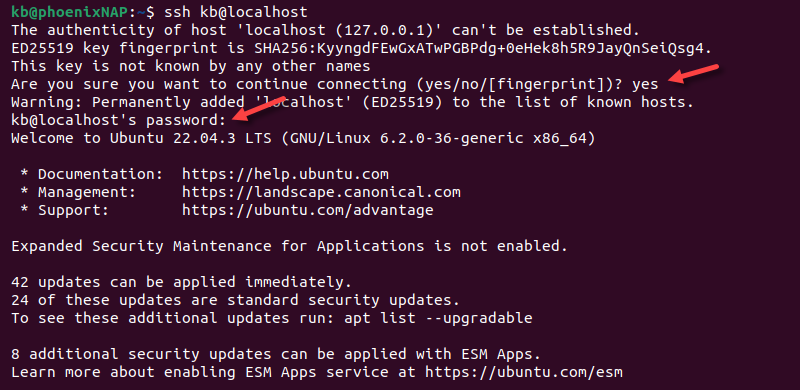
A digital signature ECDSA key fingerprint helps authenticate the machine and establishes a connection to the remote server.
If the computer you are trying to connect to is on the same network, then it is best to use a private IP address instead of a public IP address.
Note: Learn about the differences between a private and public IP address and the roles of each.
Additionally, ensure the correct TCP port listens for connection requests, and that port forwarding settings are correct. The default port number is 22 unless the configuration has been changed. You may also append the port number after the host IP address.
When using a port number, the following two examples are valid:
ssh [username]@[host_ip_address]:[port]ssh [username]@[host_ip_address] -p [port]If there are any issues connecting to the remote server, make sure that:
- The IP address of the remote machine is correct.
- The port the SSH daemon is listening to is not blocked by a firewall or forwarded incorrectly.
- The username and password are correct.
- The SSH software is installed correctly.
Note: If SSH responds with a message "Connection refused", please refer to our article How to Fix The SSH "Connection Refused" Error for possible reasons and solutions.
Securing an SSH Connection to a Remote Server
After establishing an SSH connection, you need to take additional steps to improve SSH security. Leaving default values unchanged makes your server vulnerable to attacks. Some of the suggested steps require editing the SSH configuration file.
Below is a list of practical steps to secure the SSH connection:
- Change the default TCP listening port. Instead of using default port 22, select a high, random port number. Avoid using easy-to-guess numbers, such as 222, 2222, or 22222, as attackers often target these. After changing the port number, ensure it is open in your firewall settings.
- Use SSH key pairs for authentication. Key-based authentication is safer than password authentication. It allows passwordless logins with an SSH key pair, which is more secure and convenient, especially if you want to automate remote tasks.
- Disable password-based logins. If you have set up passwordless SSH logins and verified they work, turn off password access to prevent attackers from using a compromised password to log in to your system.
- Disable root access. Removing default root access on your server makes it harder for attackers to target the root account. Use a regular account with the su - command to switch to a root user when elevated privileges are required.
- Use TCP wrappers. TCP wrappers allow you to restrict access to specific IP addresses or hostnames manually. By editing the /etc/hosts.allow and /etc/hosts.deny files, you can configure which host can connect to the server. Settings in the /etc/hosts.allow file take precedence over those in /etc/hosts.deny, which means you can block entire IP ranges while granting access to individual addresses.
- Employ multilayer security. Use advanced tools like Fail2Ban to block IPs after multiple failed login attempts and automate traffic filtering tasks. You can also implement additional verification tools like MFA to protect SSH administrative and employee accounts.
Implementing these steps significantly reduces the attack surface of your SSH server.
Securing VNC Using SSH
In a Virtual Network Computing (VNC) environment, it is possible to encrypt connections using SSH port forwarding (tunneling) via the ssh command or through PuTTY.
To tunnel VNC connections over SSH, run the following command in the terminal or command line:
ssh -L [local_address]:[local_port]:[VNC_server_address]:[VNC_server_port] -N -f -l [username] [hostname_or_IP]The command does the following:
ssh. Starts the SSH client program on your local machine and enables secure connection to the SSH server on a remote computer.-L [local_address]:[local_port]:[VNC_server_address]:[VNC_server_port]. Forwards the local address and port to the specified VNC server host and port on the remote machine.-N. Forwards ports without executing a remote command.-f. Sends SSH to the background after the password is provided. This allows you to continue typing commands in the local terminal.-l [username]. The username for connecting to the SSH server.[hostname_or_IP]. The hostname or IP of the SSH server.
You can also connect to a remote server via SSH tunnel using PuTTY. In the PuTTY configuration window, do the following:
1. Go to Connection -> SSH -> Tunnels.
2. Enter the local port number in the Source port field.
3. Type the VNC server address and port in the Destination field.
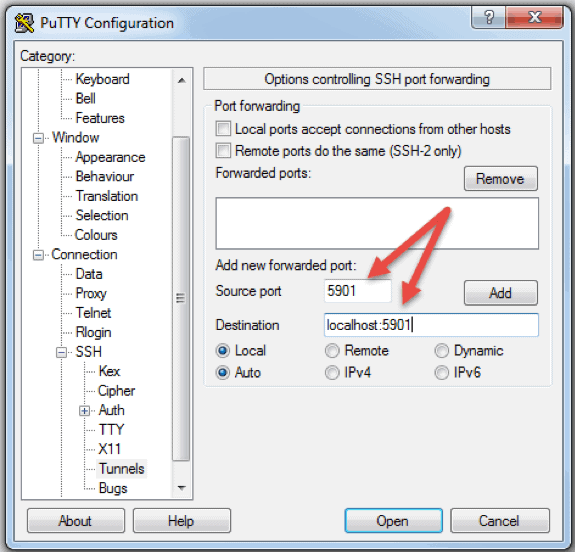
4. Click Add to save the tunnel configuration.
5. Select Open to start the SSH session.
6. Connect to your server with a VNC client of your choice.
The VNC connection is now encrypted and secure by tunneling through SSH.
Conclusion
You should now be able to connect to a remote server via SSH. Follow the section for your operating system to make sure an SSH client is installed correctly.
Next, see how to mount a remote file system using SSH with the SSHFS on Windows and Linux or SSHFS on macOS.
