Port forwarding is a NAT technique that allows proxy firewalls to redirect communication requests from one IP address and port to another. On Linux systems, port forwarding is frequently set up with Iptables, a utility for configuring IP packet filter rules.
This tutorial teaches you how to forward ports using Iptables.
Prerequisites
- Two Linux systems with internet access and connected to the same private network.
- Administrative privileges on both systems.
Iptables Port Forwarding
The proxy firewall plays an essential role in securing web application infrastructure. The application is installed on a proxy server with a dedicated public IP and acts as a gateway that protects the internal network from external threats.
The sections below describe the procedure for setting up a simple Iptables-based firewall that controls network traffic to and from a web server.
Step 1: Set up Web Server
The first step in configuring firewall-based network access is ensuring the web server accepts only the connections made over the private network. Follow the steps below to create an example Nginx web server that only allows access from a private IP address.
Gather Web Server Network Interface Details
Open the terminal on the web server and follow these steps:
1. Enter the following command to list the available IPv4 connections
ip -4 addr show scope globalThe ip command output lists the available network interfaces and the assigned IP addresses.

The output shows the system's private (bond0.10) and public (bond0.3) network interfaces and IP addresses.
3. Write down the interface names and their respective IP addresses.
Set up Nginx
Follow these steps on your web server to install and configure Nginx:
1. Update the repository information on the web server using your Linux distribution's package manager. The tutorial uses APT.
sudo apt update2. Install the Nginx web server package.
sudo apt install nginx
Type Y, press Enter, and wait for the installation to finish.
3. Use a text editor such as Nano or Vim to open the configuration file for the default Nginx server block.
sudo nano /etc/nginx/sites-enabled/default4. Find the server section in the file. The contents should resemble the example below:
server {
    listen 80 default_server;
    listen [::]:80 default_server ipv6only=on;
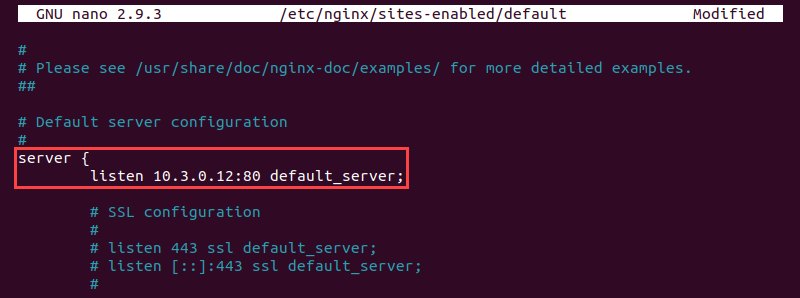
5. Add the server's private IP address before the port number in the section's first line.
listen [web-server-private-ip]:80 default_server;Delete the second line, as it relates to the IPv6 address not covered in this tutorial. The following example shows the server section after editing.
Save the file and exit.
6. Test the syntax of the Nginx configuration by typing:
sudo nginx -tNginx displays syntax errors if any. When there are no errors, Nginx displays the following output:

7. Restart Nginx to apply the new configuration.
sudo systemctl restart nginxTest Web Server Configuration
Confirm that the Nginx server works as intended with the curl command. Run this command from another computer on the same private network:
curl [web-server-private-ip]The output shows the HTML data of the Nginx welcome page.

To confirm the web server does not accept public network connections, use curl with the server's public IP address.
curl [web-server-public-ip]Nginx refuses the connection because it is configured to accept requests only from the private network.

Step 2: Set up Firewall
After setting up the web server, create a proxy firewall on another machine. The example below shows how to set up a firewall with basic Iptables rules.
Gather Firewall Network Interface Details
On the other machine that will act as a firewall:
1. View the available IPv4 network interfaces with this command:
ip -4 addr show scope global
2. Identify and note the public and private network interfaces and the corresponding IP addresses. In our case, the public interface is bond0.2 with IP 131.153.158, and the private interface is bond0.10 with IP 10.3.0.11.
Install Persistent Firewall Package
1. Update the repository information on the firewall system.
sudo apt update2. Install the iptables-persistent package.
sudo apt install iptables-persistent
Type Y and press Enter to start the installation.
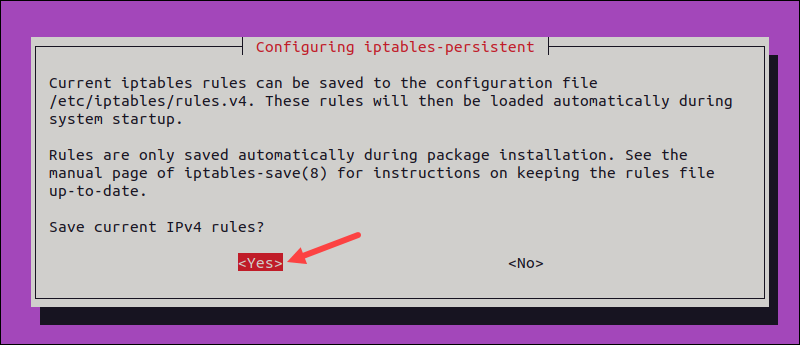
3. When prompted, choose Yes to save the current iptables rules.
Set up Basic IPv4 Rules
After installing the persistent firewall, edit the firewall server's configuration to set up basic IPv4 rules.
1. Open the rules.v4 file in a text editor to add the rules.
sudo nano /etc/iptables/rules.v42. Below is an example configuration, with an explanation of each section provided in the comments.
*filter
# Drop incoming and forwarding packets; allow outgoing packets
:INPUT DROP [0:0]
:FORWARD DROP [0:0]
:OUTPUT ACCEPT [0:0]

# Custom protocol-specific rules
:UDP - [0:0]
# Write UDP rules here
:TCP - [0:0]
# Write TCP rules here
:ICMP - [0:0]
# Write ICMP rules here

# Accept SSH TCP traffic
-A TCP -p tcp --dport 22 -j ACCEPT

# Acceptance policy
-A INPUT -m conntrack --ctstate ESTABLISHED,RELATED -j ACCEPT
-A INPUT -i lo -j ACCEPT

# Drop a packet if it is invalid
-A INPUT -m conntrack --ctstate INVALID -j DROP

# Pass traffic to protocol-specific chains
# Allow only new TCP connections established with new SYN packets
-A INPUT -p udp -m conntrack --ctstate NEW -j UDP
-A INPUT -p tcp --syn -m conntrack --ctstate NEW -j TCP
-A INPUT -p icmp -m conntrack --ctstate NEW -j ICMP

# Reject anything that reached this point
-A INPUT -p udp -j REJECT --reject-with icmp-port-unreachable
-A INPUT -p tcp -j REJECT --reject-with tcp-reset
-A INPUT -j REJECT --reject-with icmp-proto-unreachable

# Commit the changes
COMMIT

*raw
:PREROUTING ACCEPT [0:0]
:OUTPUT ACCEPT [0:0]
COMMIT

*nat
:PREROUTING ACCEPT [0:0]
:INPUT ACCEPT [0:0]
:OUTPUT ACCEPT [0:0]
:POSTROUTING ACCEPT [0:0]
COMMIT

*security
:INPUT ACCEPT [0:0]
:FORWARD ACCEPT [0:0]
:OUTPUT ACCEPT [0:0]
COMMIT

*mangle
:PREROUTING ACCEPT [0:0]
:INPUT ACCEPT [0:0]
:FORWARD ACCEPT [0:0]
:OUTPUT ACCEPT [0:0]
:POSTROUTING ACCEPT [0:0]
COMMIT
Save the file and exit.
3. Check the syntax of the rules.v4 file by typing:
sudo iptables-restore -t /etc/iptables/rules.v4If there are no syntax errors, the command returns no output.
4. Apply the firewall configuration with the following command:
sudo service netfilter-persistent reload
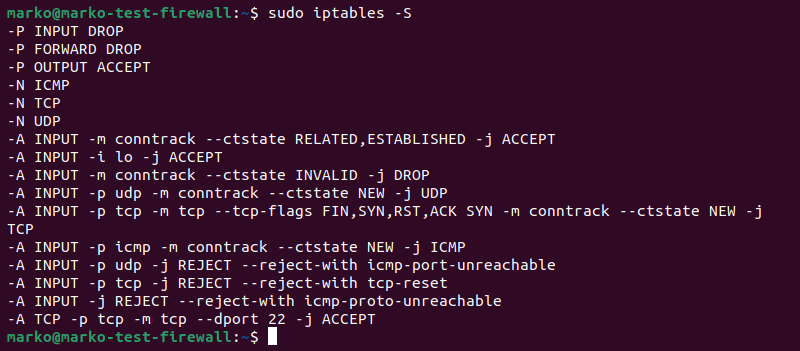
5. Print the currently active rules to confirm that the changes have been applied successfully.
sudo iptables -SThe output shows the rules configured in the rules.v4 file.
Set up Basic IPv6 Rules
Iptables has an accompanying tool named Ip6tables for setting up IPv6 packet rules. Since this tutorial covers only the creation of an IPv4 firewall with Iptables, the following section shows how to block all traffic via IPv6.
1. Open the rules.v6 file in a text editor.
sudo nano /etc/iptables/rules.v62. Instruct Ip6tables to drop all the connections.
*filter
:INPUT DROP [0:0]
:FORWARD DROP [0:0]
:OUTPUT DROP [0:0]
COMMIT

*raw
:PREROUTING DROP [0:0]
:OUTPUT DROP [0:0]
COMMIT

*nat
:PREROUTING DROP [0:0]
:INPUT DROP [0:0]
:OUTPUT DROP [0:0]
:POSTROUTING DROP [0:0]
COMMIT

*security
:INPUT DROP [0:0]
:FORWARD DROP [0:0]
:OUTPUT DROP [0:0]
COMMIT

*mangle
:PREROUTING DROP [0:0]
:INPUT DROP [0:0]
:FORWARD DROP [0:0]
:OUTPUT DROP [0:0]
:POSTROUTING DROP [0:0]
COMMIT
Save the file and exit.
3. Check the configuration syntax.
sudo ip6tables-restore -t /etc/iptables/rules.v64. Apply the new IPv6 rules.
sudo service netfilter-persistent reload5. List the rules with the following ip6tables command to confirm that the new configuration is active.
sudo ip6tables -S
Step 3: Set up Port Forwarding
Once you configure both the web server and the proxy firewall, you can create specific forwarding rules that will:
- Accept traffic requests via the firewall's public IP address.
- Forward the packets to the firewall's private interface.
- Forward the packets further to the web server using the private network.
- Accept and forward the traffic from the web server to the internet.
Enable Forwarding in Kernel
Before using packet forwarding, you must instruct the system to allow it. To enable forwarding for the current session, type:
echo 1 | sudo tee /proc/sys/net/ipv4/ip_forward
Follow the procedure below to enable packet forwarding permanently.
1. Open the sysctl.conf file in a text editor.
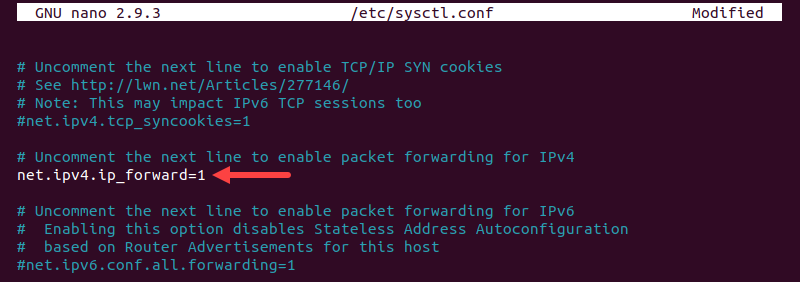
sudo nano /etc/sysctl.conf2. Find the line shown below:
# net.ipv4.ip_forward=13. Uncomment the line by removing the initial # symbol.
Save the file and exit.
4. Load the new file configuration with sysctl:
sudo sysctl -p
5. Apply all the system changes.
sudo sysctl --system
Packet forwarding now works on the system.
Provide Forwarding Rules
Specify the forwarding rules by adding them to the rules.v4 file. Alternatively, use the command line and the syntax below:
sudo iptables [rule]Use the following rules to configure the firewall to forward packets to and from the web server properly:
1. Allow public interface connections to port 80 to be established and forward them to the private interface:
sudo iptables -A FORWARD -i [firewall-public-interface] -o [firewall-private-interface] -p tcp --syn --dport 80 -m conntrack --ctstate NEW -j ACCEPTWith the parameters from our example, the rule looks like this:
sudo iptables -A FORWARD -i bond0.2 -o bond0.10 -p tcp --syn --dport 80 -m conntrack --ctstate NEW -j ACCEPTNote: Issuing the Iptables commands via the command line produces no output.
2. Allow packet traffic marked as ESTABLISHED and RELATED to travel from the public to the private interface.
sudo iptables -A FORWARD -i [firewall-public-interface] -o [firewall-private-interface] -m conntrack --ctstate ESTABLISHED,RELATED -j ACCEPTFor example:
sudo iptables -A FORWARD -i bond0.2 -o bond0.10 -m conntrack --ctstate ESTABLISHED,RELATED -j ACCEPT3. Allow the same traffic to return from the private to the public interface.
sudo iptables -A FORWARD -i [firewall-private-interface] -o [firewall-public-interface] -m conntrack --ctstate ESTABLISHED,RELATED -j ACCEPTUsing the example parameters:
sudo iptables -A FORWARD -i bond0.10 -o bond0.2 -m conntrack --ctstate ESTABLISHED,RELATED -j ACCEPTProvide NAT Rules
NAT rules tell Iptables how to alter the packets to enable proper routing between networks. Simple port forwarding can be achieved with two NAT rules.
1. Alter the packet's destination address, i.e., change it from the firewall's public interface to the web server's private interface.
sudo iptables -t nat -A PREROUTING -i [firewall-public-interface] -p tcp --dport 80 -j DNAT --to-destination [web-server-private-ip]The following is what the command looks like using the example web server data from the article.
sudo iptables -t nat -A PREROUTING -i bond0.2 -p tcp --dport 80 -j DNAT --to-destination 10.3.0.122. Alter the packet's source address to the private IP address of the firewall. This way, the web server sends the packet to the firewall, which forwards it to the source.
sudo iptables -t nat -A POSTROUTING -o [firewall-private-interface] -p tcp --dport 80 -d [web-server-private-ip] -j SNAT --to-source [firewall-private-ip]The command looks like this with our example parameters:
sudo iptables -t nat -A POSTROUTING -o bond0.10 -p tcp --dport 80 -d 10.3.0.12 -j SNAT --to-source 10.3.0.113. Type the following command to save all the Iptables rules.
sudo service netfilter-persistent saveTest Firewall Configuration
To test the final firewall configuration, use curl on another machine to send a request to the public IP address of the proxy firewall.
curl [firewall-public-ip]The output shows that the firewall successfully forwarded the Nginx page served by the web server.

Note: Bare Metal Cloud offers server instances that are ideal for firewalls. Read How to Set up a Firewall on s0.d1.small BMC Instance.
Conclusion
After reading this article, you should know how to create a simple Iptables-based firewall and use port forwarding to forward traffic to and from a web server.
If you are using Ubuntu, you may be interested in learning How to Set Up a Firewall with UFW, a user-friendly Iptables interface.
