All modern operating systems include a firewall, an application that regulates network traffic to and from a computer. Firewalls use rules to control incoming and outgoing traffic, creating a network security layer.
iptables is the primary firewall utility program developed for Linux systems. The program enables system administrators to define rules and policies for filtering network traffic.
In this tutorial, learn how to install, configure, and use iptables in Linux.

Prerequisites
- A Linux system.
- A user account with sudo privileges.
- Access to a terminal window/command line.
What Is iptables?
iptables is a command-line utility for configuring the built-in Linux kernel firewall. It enables administrators to define chained rules that control incoming and outgoing network traffic.
The rules provide a robust security mechanism that defines which network packets can pass through and which should be blocked. iptables protects Linux systems from data breaches, unauthorized access, and other network security threats.
Administrators use iptables to enforce network security policies and protect a Linux system from various network-based attacks.
How Does iptables Work?
iptables uses rules to determine how to handle a network packet. The utility consists of the following components:
- Tables. Tables are files that group similar rules. A table consists of several rule chains.
- Chains. A chain is a string of rules. When a packet is received, iptables finds the appropriate table and filters it through the rule chain until a match is found.
- Rules. A rule is a statement that defines the conditions for matching a packet, which is then sent to a target.
- Targets. A target is a decision of what to do with a packet. The packet is either accepted, dropped, or rejected.
The sections below cover each of these components in greater depth.
Tables
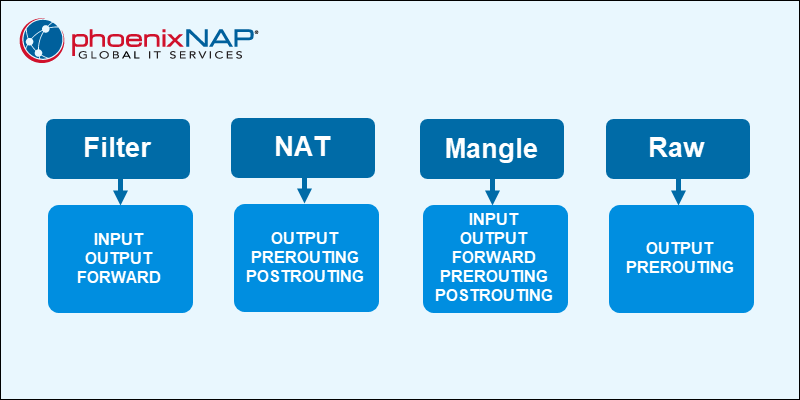
Linux firewall iptables have four default tables that manage different rule chains:
- Filter. The default packet filtering table. It acts as a gatekeeper that decides which packets enter and leave a network.
- Network Address Translation (NAT). Contains NAT rules for routing packets to remote networks. It is used for packets that require alterations.
- Mangle. Adjusts the IP header properties of packets.
- Raw. Exempts packets from connection tracking.
Some Linux distributions include a security table that implements mandatory access control (MAC) rules for stricter access management.
Chains
Chains are rule lists within tables. The lists control how to handle packets at different processing stages. There are different chains, each with a specific purpose:
- INPUT. Handles incoming packets destined for a local application or service. The chain is in the filter and mangle tables.
- OUTPUT. Manages outgoing packets generated on a local application or service. All tables contain this chain.
- FORWARD. Works with packets that pass through the system between network interfaces. The chain is in the filter, mangle, and security tables.
- PREROUTING. Alters packets before they are routed. The alteration happens before a routing decision. The NAT, mangle, and raw tables contain this chain.
- POSTROUTING. Alters packets after they are routed. The alteration happens after a routing decision. The NAT and mangle tables contain this chain.
Rules
Rules are statements that define conditions for matching packets. Every rule is part of a chain and contains specific criteria, such as source or destination IP addresses, port numbers, or protocols. Any packet matching a rule's conditions is forwarded to a target that determines what happens to the packet.
Targets
A target is what happens after a packet matches a rule criteria. Common targets include:
- ACCEPT. Allows the packet to pass through the firewall.
- DROP. Discards the packet without informing the sender.
- REJECT. Discards the packet and returns an error response to the sender.
- LOG. Records packet information into a log file.
- SNAT. Stands for Source Network Address Translation. Alters the packet's source address.
- DNAT. Stands for Destination Network Address Translation. Changes the packet's destination address.
- MASQUERADE. Alters a packet's source address for dynamically assigned IPs.
How to Install iptables on Linux
iptables is installed by default on most Linux distributions. To confirm that iptables is installed, run:
iptables --version
The command shows the version number. If the package is not found, see OS-specific installation steps below.
Debian and Debian-based Distributions (Ubuntu)
For Debian-based distributions (such as Ubuntu), do the following:
1. Install iptables using the APT package manager:
sudo apt install iptables2. To keep iptables firewall rules after reboot, install the persistent package:
sudo apt install iptables-persistentThe installation shows the file path where the rules are saved and asks whether to save the current IPv4 and IPv6 rules.
Note: There are two different versions of iptables, for IPv4 and IPv6. This guide covers the rules for IPv4.
To configure iptables for IPv6, use the iptables6 utility. These two protocols do not work together and must be configured independently.
3. Enable the netfilter-persistent service on restart:
sudo systemctl enable netfilter-persistent
The command enables the service to start on reboot automatically.
RedHat-based Distributions
For RedHat-based distributions, such as Rocky Linux, do the following:
1. Use the yum package manager to install iptables:
sudo yum install iptables2. To persist firewall rules after restart, install the following package:
sudo yum install iptables-servicesThe command installs a service that enables iptables rules on reboot.
3. Enable the service with:
sudo systemctl enable iptables
The command enables the service automatically at system reboot.
iptables Syntax and Options
An iptables command looks as follows:
iptables [options] [chain] [criteria] -j [target]The table below contains common iptables options:
| Option | Description |
|---|---|
-A--append | Append a rule to a chain. |
-C--check | Look for a rule that matches a chain. |
-D--delete | Remove a rule from a chain. |
-F--flush | Remove all rules. |
-I--insert | Add a rule to a chain at the provided position. |
-L--list | Show all rules in a chain. |
-N--new-chain | Create a new chain. |
-V--verbose | Show a more detailed output. |
-X--delete-chain | Delete a chain. |
How to Configure iptables on Linux
The iptables command applies actions to the filters table by default. To use a different table, add the -t option followed by the table name (for example, use -t nat for the NAT table).
The sections below show how to use and configure iptables in practical scenarios.
View Current Rules
To view the current rules, use the command with the -L option:
sudo iptables -L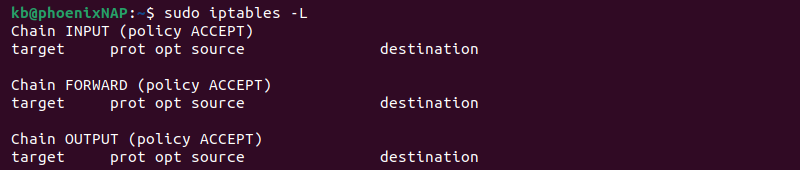
The system displays the status of your chains. The output lists three chains: INPUT, FORWARD, and OUTPUT.
Enable Loopback Traffic
Allowing traffic from your system (localhost) is secure and allows applications to communicate with the localhost interface. Enter the following to append the INPUT chain:
sudo iptables -A INPUT -i lo -j ACCEPT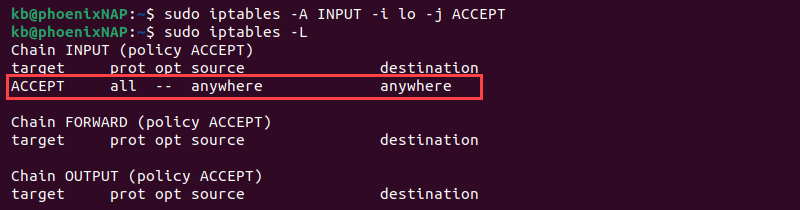
This command configures the firewall to accept traffic for the localhost (lo) interface (-i). Anything originating from the system will pass through the firewall.
Allow Traffic for Specific Services
Allow traffic on different ports to enable various services. See the examples below:
- Allow HTTP web traffic:
sudo iptables -A INPUT -p tcp --dport 80 -j ACCEPT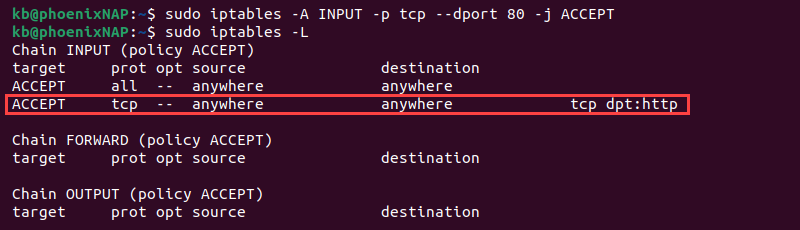
- Allow only incoming SSH (Secure Shell) traffic:
sudo iptables -A INPUT -p tcp --dport 22 -j ACCEPT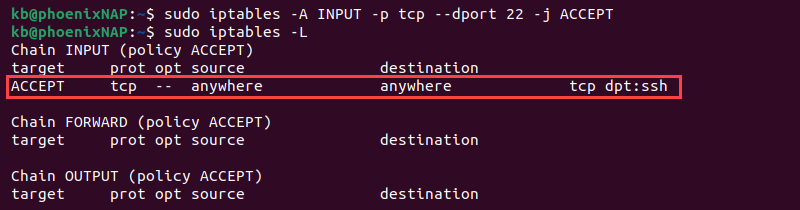
- Allow HTTPS traffic:
sudo iptables -A INPUT -p tcp --dport 443 -j ACCEPT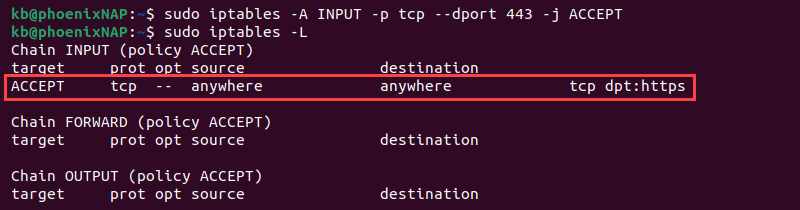
Control Traffic by IP Address
Use the following commands to control traffic based on an IP address:
- Accept all traffic from an IP address:
sudo iptables -A INPUT -s [IP-address] -j ACCEPT
- Drop traffic from an IP address:
sudo iptables -A INPUT -s [IP-address] -j DROP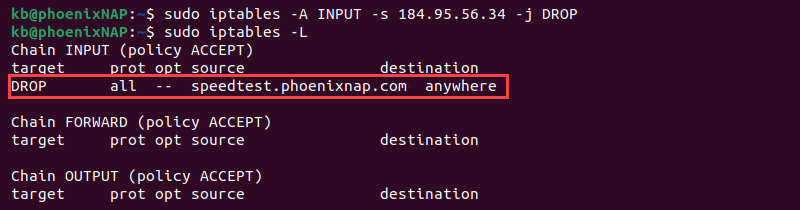
- Reject traffic from an IP address range:
sudo iptables -A INPUT -m iprange --src-range [IP-address-range] -j REJECTReplace the IP addresses in the commands with the actual IP address.
Log Dropped Packets
To log packets, do the following:
1. Use the LOG target and add a message prefix:
sudo iptables -A INPUT -j LOG --log-prefix "Dropped: "2. Add a rule to drop packets after logging:
sudo iptables -A INPUT -j DROP3. To check logs, use the dmesg command to view system logs and grep to filter the output:
sudo dmesg | grep "Dropped"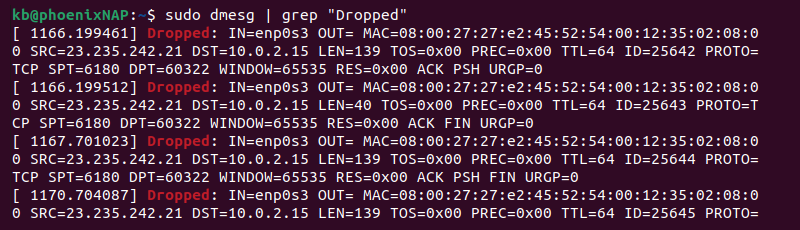
Alternatively, access the syslog file using the tail command:
sudo tail -f /var/log/syslog | grep "Dropped packet"Adjust the path if messages are logged to a different location.
Note: Learn how to set up port forwarding via iptables by referring to our post How to Forward Ports With iptables in Linux.
Delete a Rule
Use the -F option to clear all iptables firewall rules. To delete a specific rule, list all rules:
sudo iptables -L --line-numbers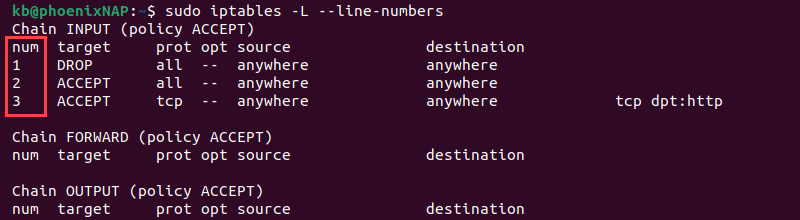
Locate the line number of the firewall rule you want to delete and run:
sudo iptables -D INPUT [number]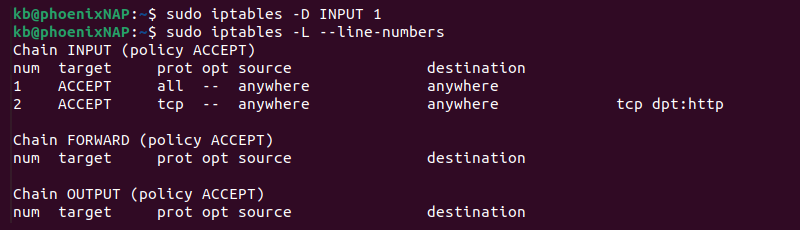
Replace [number] with the rule line number you want to remove.
Note: Refer to our article to learn more about deleting iptables rules.
Block All Incoming Traffic Except SSH
To block all incoming traffic, except for SSH connections, do the following:
1. Set the default policy for the INPUT chain to DROP:
sudo iptables -P INPUT DROPThe INPUT table policy changes to DROP.
2. Allow SSH connections:
sudo iptables -A INPUT -p tcp --dport 22 -j ACCEPTIf the system uses a different port for SSH connections, change the port number in the command.
3. Allow related and established connections:
sudo iptables -A INPUT -m state --state ESTABLISHED,RELATED -j ACCEPT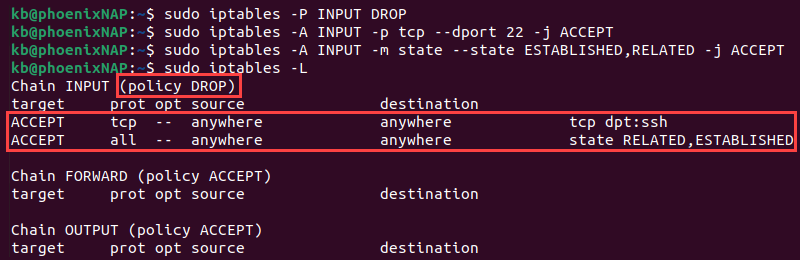
The command allows packets from established connections (such as responses to outgoing requests) and related connections, which is crucial for SSH session data.
Save Your Changes
iptables does not persist rules when the system reboots. All the changes apply only until the first restart. To save the rules, see the commands below:
- Debian-based systems:
sudo netfilter-persistent save
- RedHat-based systems:
sudo service iptables save
On the next restart, iptables will automatically reload the firewall rules.
Conclusion
This guide showed how to install and configure iptables on a Linux system. Add new rules, adjust policies, and perform regular audits to ensure the firewall serves its purpose.
Next, read more about network infrastructure security and check out our list of the best network security tools.