There are two ways to configure network settings in CentOS and Rocky Linux: the command line or the GUI. Both methods allow changing various specifications to perform essential networking tasks, such as setting up a static IP or configuring the network interface to use DHCP.
This tutorial shows how to configure CentOS and Rocky Linux network settings using the terminal or the NetworkManager tool.
Prerequisites
- Access to the command line/terminal.
- A text editor to edit config files (we will use Vi)
How to Configure Network Settings on CentOS and Rocky Linux Using the Terminal
The sections below provide detailed steps to configure network settings using command-line tools on CentOS and Rocky. We will show how to set up a static IP address, enable DHCP, and manage network interfaces.
How Network Interface Naming Works
RHEL introduced a new naming convention for network interfaces in RHEL 6, and it became the default in RHEL 7. The change replaced traditional names, such as eth0 or eth1, with names based on hardware characteristics (such as the device type, adapter, port/ID).
Interface names are now based on:
- en. Ethernet interface.
- wl. WLAN interface.
- ww. WWAN interface.
- sl. Serial line IP (SLIP).
Configuring a Static IP
The steps to configure a static IP address for a network device differ depending on the distribution:
- CentOS. Modify the network-scripts file for the appropriate network device to configure a static IP.
- Rocky Linux. The network-scripts file is deprecated in RHEL 8+. Use
nmcliornmtuiinstead.
Before starting, identify the network device name:
nmcli d
The device name is in the first column (DEVICE). Follow the steps below for your OS.
CentOS Static IP Configuration
Use the legacy configuration to set up a static IP address for a network device:
1. Open the configuration file for the network interface using a text editor. For example, if using vi, run:
vi /etc/sysconfig/network-scripts/ifcfg-[network_device_name]2. Modify the following lines:
BOOTPROTO="static"ONBOOT="yes"The configuration sets the IP address protocol to static and applies it on boot.
3. Add the following configuration:
IPADDR=[IP_address]
NETMASK=[subnet_mask]
GATEWAY=[default_gateway]
DNS1=[primary_DNS_server]
DNS2=[secondary_DNS_server]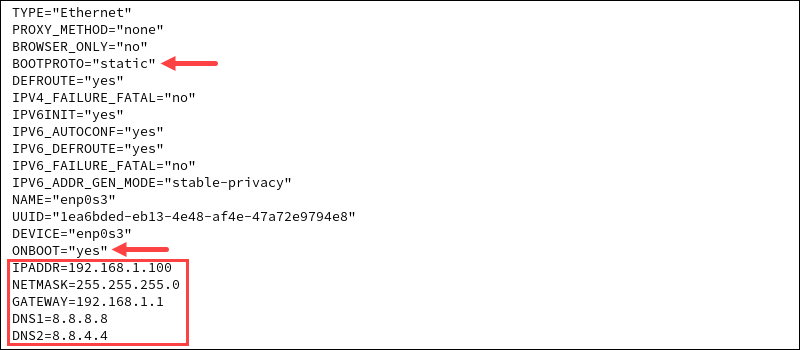
Replace with the desired network details.
Note: If you don't have network details (such as the IP address, gateway, and so on), run the command nmcli dev show [network_device_name]. The output displays all the current information for the network.
4. Save and exit Vi.
5. Restart the network service:
sudo systemctl restart networkThe restart applies the new configuration and sets the static IP address.
Rocky Linux Static IP Configuration
For Rocky, use the recommended nmcli tool:
1. Set a static IP with the following command:
nmcli con mod [connection_name] ipv4.method manual ipv4.address [IP]/[prefix] ipv4.gateway [gateway] ipv4.dns [DNS1,DNS2] connection.autoconnect yesReplace the connection details in the command with the desired values. The command does not produce an output.
2. Restart the network manager service:
sudo systemctl restart NetworkManager
The restart applies the new connection details.
Configuring Network Interface for DHCP
Adjust the network configuration settings to set up a network interface for DHCP. Follow the steps below for your OS.
CentOS DHCP Configuration
To set the DHCP for a connection on CentOS:
1. Open the configuration file for the device:
vi /etc/sysconfig/network-scripts/ifcfg-[network_device_name]Provide the device name instead of the placeholder.
2. Change the following lines:
BOOTPROTO="dhcp"ONBOOT="yes"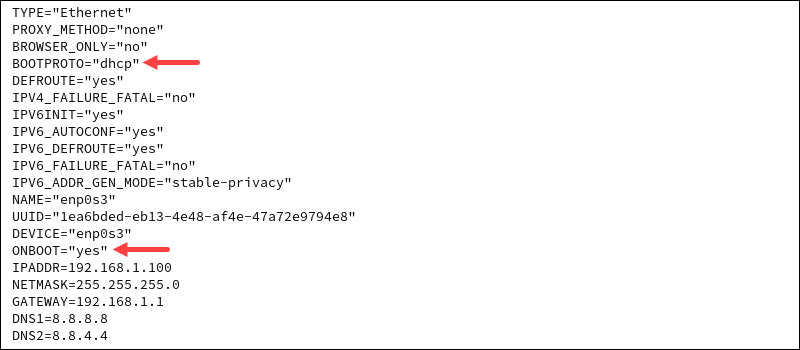
3. Save the file and exit Vi.
4. Restart the network service:
sudo systemctl restart networkThe restart applies the changes.
Rocky Linux DHCP Configuration
Use the NetworkManager CLI (nmcli) tool to enable DHCP:
1. Run the following command to set DHCP for a network interface:
nmcli con mod [network_device_name] ipv4.method auto connection.autoconnect yesProvide the name of the network device in the command.
2. Restart the NetworkManager service:
sudo systemctl restart NetworkManager
The restart applies the new settings.
How to Configure Network Settings on CentOS and Rocky Linux Using GUI
To configure your CentOS or Rocky Linux network interface through the GUI, use the NetworkManager textual interface and modify the configuration:
1. Open the NetworkManager. Run the following in the terminal:
nmtui
The command opens the NetworkManager TUI window.
2. Select Edit a connection to view configuration settings.

Use the arrow keys to navigate and Enter to choose.
3. Choose the network you want to configure, then select Edit.

You can now edit the given connection.
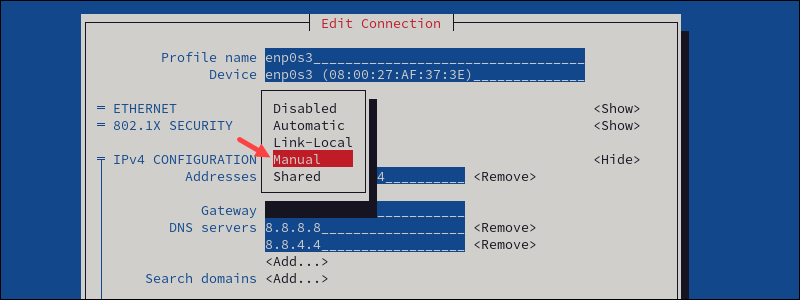
Configuring Static IP
To set a static IP address via the NetworkManager TUI:
1. The IPv4 configuration is set to Automatic by default. Change the configuration to Manual.
2. Provide additional information for the connection (addresses, gateway, DNS servers, and search domains).
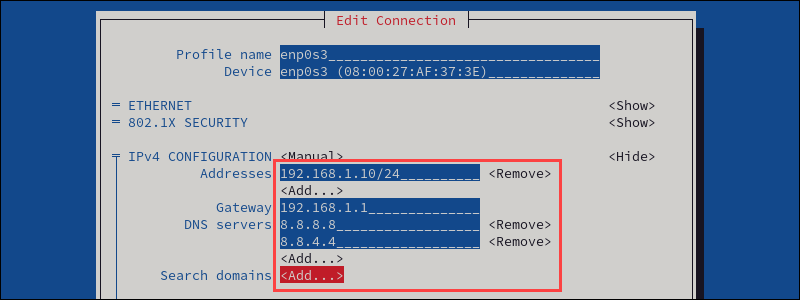
3. Enable the Require IPv4 addressing and Automatically connect options.

4. Select OK to save the changes.
Configuring Network for Using DHCP
To configure a network to use DHCP:
1. Set the IPv4 configuration to Automatic.
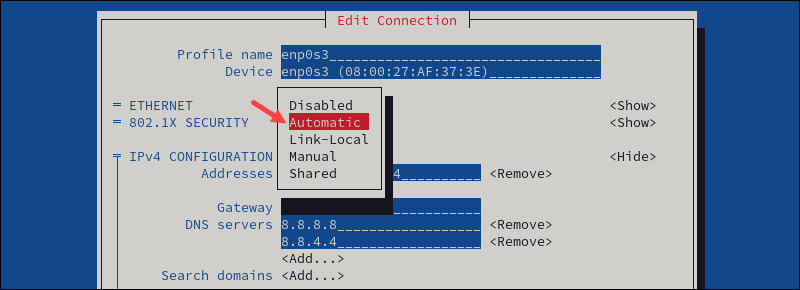
2. Set the connection to Automatically connect.
3. Select OK to save the changes.
Set System Hostname
To change the system's hostname:
1. In the NetworkManager TUI main menu, select Set system hostname.

2. Type the new hostname and select OK to save the changes.
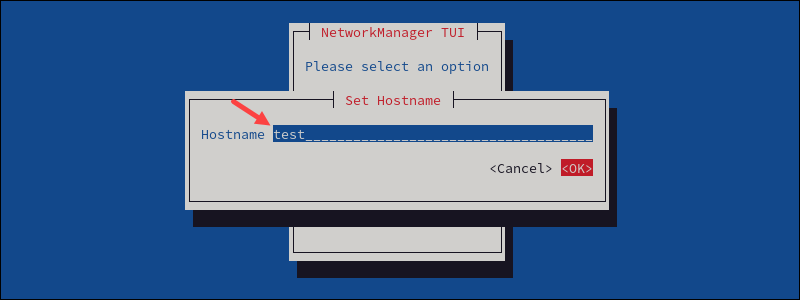
3. If prompted, type the user's password to confirm the change.
Note: For more information on how to change or set a hostname, please refer to our tutorials for CentOS and Rocky Linux or CentOS 8.
Validating Network Settings
Verify your network is working with the new settings. Use the following ip command:
ip a show [network_device_name]
The output shows the current interface information with the new changes.
Note: If the changes did not apply, try restarting the network service.
Conclusion
This guide showed how to configure CentOS and Rocky Linux network settings via the command line or the NetworkManager tool.
Next, see how to install and use ifconfig to configure a network interface.