One of the most common ways to configure a network interface in Linux is using the ifconfig command. The command comes preinstalled on many Linux distributions. However, it has been deprecated in some versions of Rocky Linux and CentOS, so they no longer include it by default.
In this tutorial, you will learn how to install and use ifconfig on CentOS and Rocky Linux.
Prerequisites
- CentOS or Rocky Linux installed.
- Access to the command line.
- A user account with root privileges.
How to Install the ifconfig Command
Before installing the ifconfig command, check if it is already installed on your system. Run:
ifconfigIf the command outputs information about network interfaces, then it is already installed, and you can refer to our tutorial to see how to use the ifconfig command. If the output states "command not found, " follow the steps below to install it.
The ifconfig command is part of the net-tools package available in the YUM repository. Follow the steps below to install net-tools:
1. Open the terminal window and update the existing packages on your system:
sudo yum update -yWait for the process to complete.
2. Next, download and install net-tools with yum:
sudo yum install net-tools -y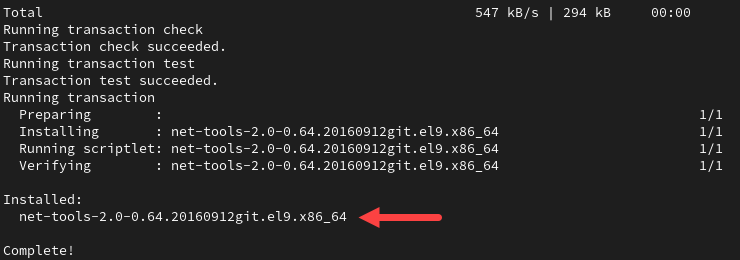
The output confirms the installation is complete.
Note: Distributions that have deprecated ifconfig encourage users to use the ip command instead. To read more about ip, see how to use the IP command in Linux.
Using the ifconfig Command
The ifconfig command is versatile. Some of its capabilities are to:
- Enable or disable a network interface.
- Display information about the system's network configuration.
- Change the MAC address.
- Assign IP addresses, netmask, and broadcast to network interfaces.
- Change the maximum transmission unit (MTU).
- Enable or disable promiscuous mode.
- Create network interface aliases.
Display Network Configuration Information
Run ifconfig without arguments to display information about the current network interfaces. The output shows all the essential information for the active network interfaces, including:
- The hardware MAC address.
- Netmasks.
- IP addresses (inet).
- Information on whether the interface is up or down.
- Broadcast addresses.
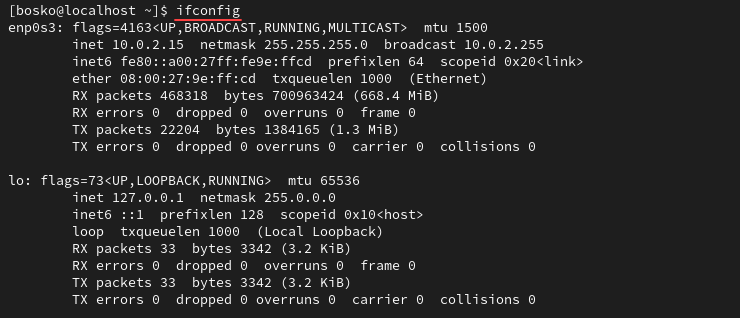
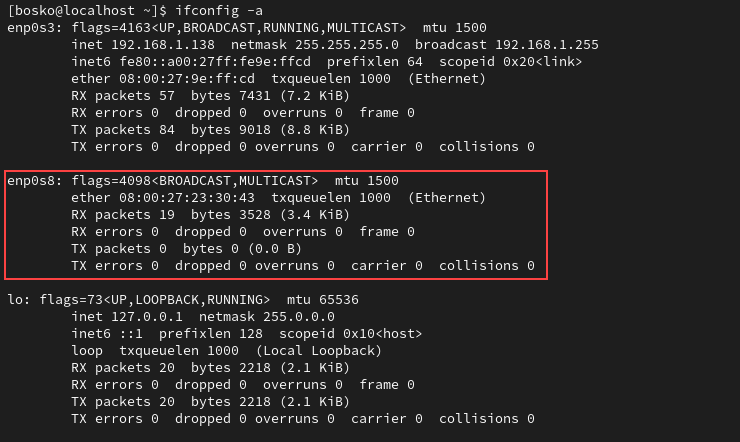
To see all the interfaces, including the inactive ones, add the -a argument:
ifconfig -aIn the example below, the output shows two active and one inactive interface:
To see information about a specific interface, append the interface name to the command:
ifconfig [interface_name]The output displays information for the specified interface:

Enable or Disable a Network Interface
Enable a network interface with the following syntax:
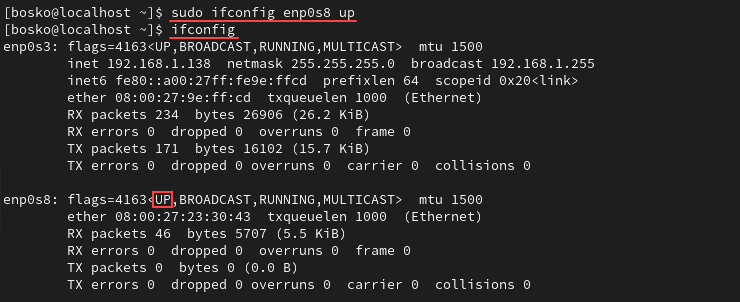
sudo ifconfig [interface_name] upFor example:
sudo ifconfig enp0s8 upThe command produces no output. However, running ifconfig shows that the list of active connections now includes enp0s8:
The syntax to disable an interface is:
sudo ifconfig [interface_name] downAssign the IP Address, Netmask, and Broadcast
The ifconfig command allows you to configure a network interface's IP address, netmask, and broadcast values:
- Assign an IP address with
ifconfigusing the following syntax:
sudo ifconfig [interface_name] [IP_address]- To assign a new netmask value, type:
sudo ifconfig [interface_name] netmask [netmask_value]- Assign a new broadcast by using:
sudo ifconfig [interface_name] broadcast [broadcast_value]Alternatively, you can assign all the values in one line:
sudo ifconfig [interface_name] [IP_address] netmask [netmask_value] broadcast [broadcast_value]Run the ifconfig command to verify the output displays the new values:

Change the Network Interface MAC Address
The MAC address is a unique identifier of a device on a network. To change the MAC address of a network interface, type:
sudo ifconfig [interface_name] hw ether [MAC_address]The ifconfig command output shows the change in the MAC configuration:

Change the Network Interface MTU
The maximum transmission unit (MTU) is the largest packet or frame size that can be sent over the network. The default MTU is 1500.
Increase the network MTU to increase the data transfer rate.
To change the MTU value with ifconfig, use the following syntax:
sudo ifconfig [interface_name] mtu [MTU_value]Check the ifconfig output to confirm the change:

Create Network Interface Aliases
To associate multiple IP addresses with a single network interface, use IP aliases. The ifconfig command allows aliases, with the condition that their IP addresses belong to the same netmask.
An alias name consists of the main interface name and the alias number, separated by a colon. To create an alias, type:
sudo ifconfig [alias_name] [alias_address]Check whether the alias was created successfully with ifconfig:

To remove an alias, use the syntax below:
sudo ifconfig [alias_name] downEnable or Disable Promiscuous Mode
Promiscuous mode allows a network device to intercept and read each network packet as it arrives, in its entirety. It is often used to monitor network activity.
Enable promiscuous mode by typing:
sudo ifconfig [interface_name] promiscCheck if the promiscuous mode is active with ifconfig:

To disable promiscuous mode, use the command:
sudo ifconfig [interface_name] -promiscNote: For a complete list of ifconfig commands, use the man command: man ifconfig
Conclusion
This article provided instructions for installing and using the ifconfig command on CentOS and Rocky Linux. Furthermore, it presented a list of common ifconfig commands for network interface management.
Next, learn how to monitor network traffic in Linux or how to use the Nmap network scanner.
