Type 2 hypervisors, such as VMware Workstation, provide a separation between the host system and its virtual machines, as well as between individual VMs. This isolation allows administrators to test risky scenarios or deploy applications in a VM without endangering the host or other environments.
However, isolation also creates challenges when you need to exchange files or run applications that rely on shared data between the host and a VM. VMware addresses this limitation with its Shared Folders feature.
Learn how to simplify file sharing and system integration between VMs and their host using VMware Shared Folders.
Prerequsites
- VMware Workstation 16 or later installed on the host system.
- A configured Linux or Windows virtual machine.
- Admin or root privileges on the guest VM.
What Is a Shared Folder?
A VMware Shared Folder is a directory on the host system that a virtual machine can access. Depending on the configuration, the VM may have read-only or full read/write permissions for the folder.
Shared Folders can point to a local directory on the host or to a network share accessible through the host. Multiple virtual machines on the same host can also access the same Shared Folder if the feature is enabled.
With Shared Folders, users and applications inside the VM can work directly with files stored on the host system, without needing to duplicate or copy them into the virtual machine.
Note: Shared Folders expose your files to programs in the virtual machine. This may put the host system and sensitive data at risk. Only enable Shared Folders if you trust the virtual machine and its software.
Using Shared Folders with Virtual Machines
Using VMware Shared Folders has significant benefits in a virtual environment:
- Efficient storage. Users do not need to replicate the same data across machines and consume valuable storage space. You can keep large datasets or source code on the host and allow multiple test VMs to access them without duplication.
- No manual copying. There is no need to transfer data from one machine to another manually. This eliminates repetitive, time-consuming file transfers and keeps environments in sync more easily.
- Simplified integration. Integrating systems and applications between the host and its VMs becomes much easier when they can share common files, for example, config files, logs, or datasets. You can maintain a single configuration script on the host and use it across multiple VMs to ensure a consistent setup.
- Access control. Administrators can configure the level of access a VM has to a Shared Folder, for example, read-only or read/write privileges. If a VM is running untrusted code, it can be restricted to read-only access to prevent it from modifying host files.
- Collaboration between VMs. Multiple virtual machines on the same host can use the same Shared Folder. For example, a web server VM, an application server VM, and a database VM can exchange logs or test data through one folder to speed up development and troubleshooting.
- Convenience. Shared Folders provide a built-in way for exchanging data without relying on external devices, network shares, or additional setup. Users can quickly drag and drop installers, security patches, or documents onto the host and access them immediately from the VM.
How to Create and Access Shared Folder on Linux Guest
To enable Shared Folders on VMware, you first need to install VMware Tools on the guest operating system. VMware Tools provide the background services and drivers necessary for Shared Folders, drag-and-drop file transfers, and copy-and-paste functionality between the host and guest.
The following section explains how to install VMware Tools on Linux and create your first Shared Folder.
Install VMware Tools on Linux Guest
On Linux, VMware Tools is available through two open-source packages, open-vm-tools and open-vm-tools-desktop, in the official repositories.
To install these integration components on your Linux VM:
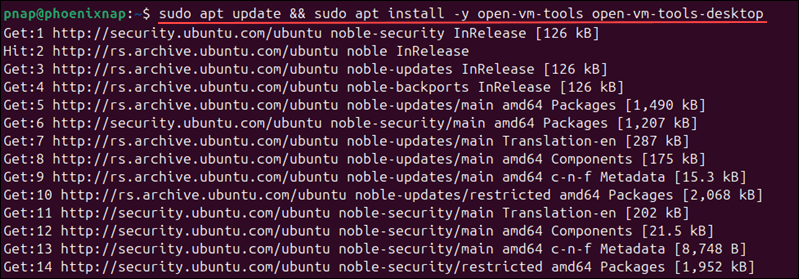
1. Access the terminal and enter the command for your Linux distribution to update the package list and install both integration packages:
| Distribution | VMware Tools Installation Command |
|---|---|
| Ubuntu/Debian | sudo apt update && sudo apt install -y open-vm-tools open-vm-tools-desktop |
| Fedora/RHEL/Rocky Linux | sudo dnf makecache && sudo dnf install -y open-vm-tools open-vm-tools-desktop |
| openSUSE | sudo zypper refresh && sudo zypper install -y open-vm-tools open-vm-tools-desktop |
| Arch Linux | sudo pacman -Syu open-vm-tools |
2. Reboot the system to ensure the VMware Tools services start properly:
sudo rebootThe reboot command is compatible with all Linux distributions.
Create Shared Folder on Linux Guest
To create a Shared Folder for a Linux VM:
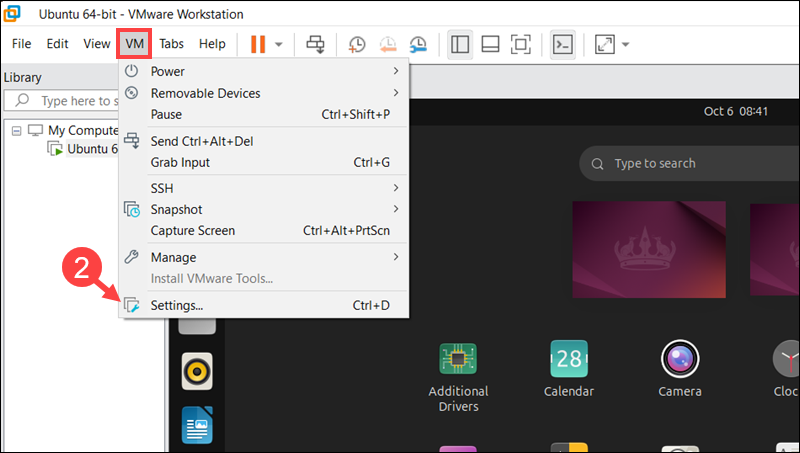
1. Select the Linux VM in VMware Workstation.
2. Access the VM tab in the top menu and select Settings.
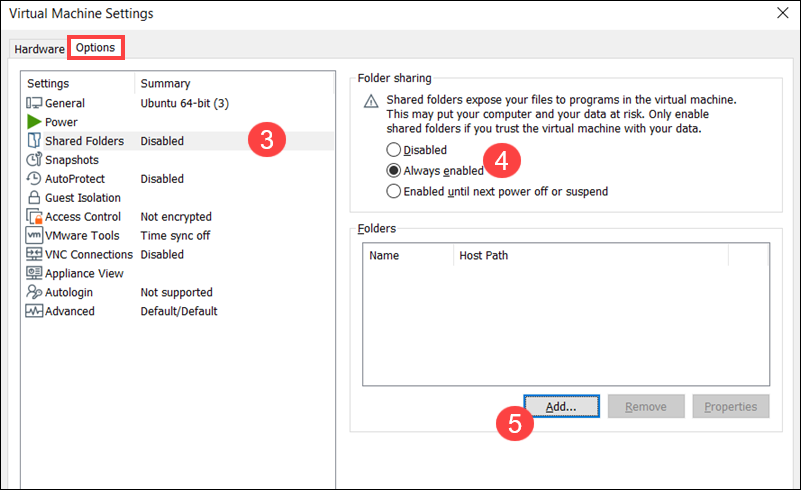
3. Go to the Options tab and click Shared Folders.
4. Check Always enabled to keep the feature active even after the VM restarts. Alternatively, select Enabled until next power off or suspend if you want the feature active for this session only.
5. Click Add to launch the VMware Shared Folder Wizard.
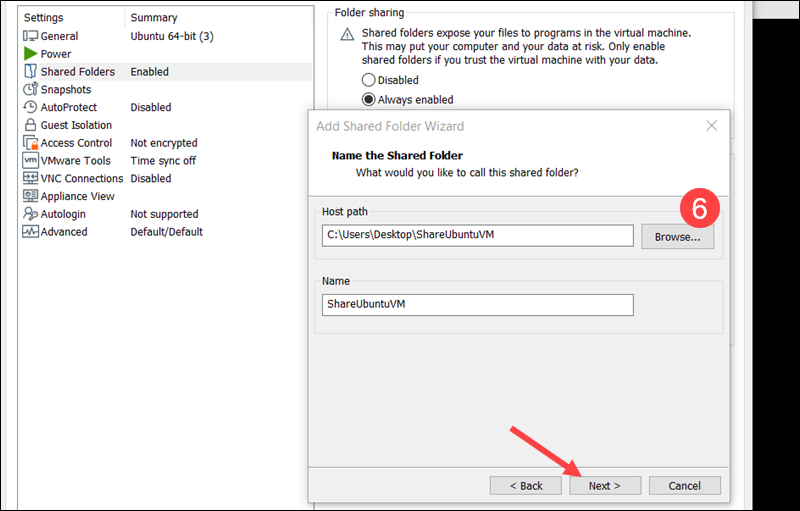
6. Use the Browse option to locate the folder on the host machine that you want to share and click Next. In this example, the path is C:\Users\Desktp\ShareUbuntuVM.
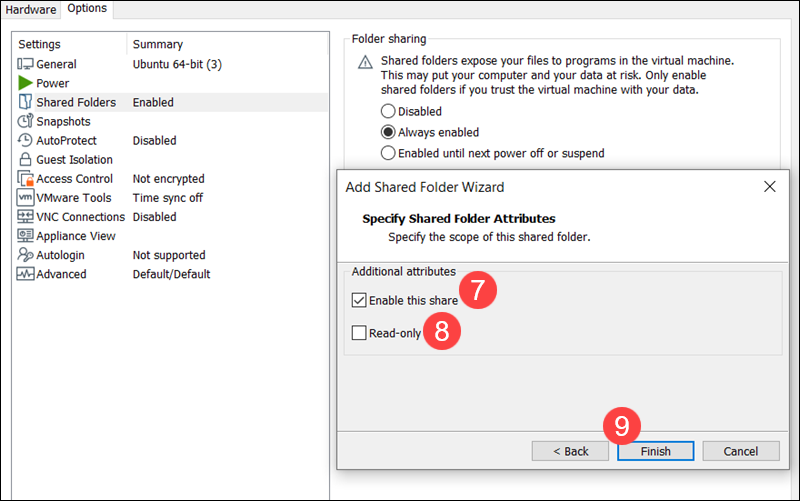
7. Check Enable this share to make the folder visible in the Ubuntu guest.
8. (Optional) Check Read-only to prevent the guest VM from editing or deleting files on the host system. This is good practice for test environments or when security is a concern. The setting can be changed to read/write later if needed.
9. Click Finish, and then OK to apply the shared folder settings.
The folder is now connected, but it may not appear automatically on the guest OS until it is mounted.
Access Shared Folder on Linux Guest
On Linux, VMware mounts shared folders under the /mnt/hgfs/ directory.
To access the Shared Folder on the Linux VM:
1. Open the terminal and enter the following command to check if the shared folder is visible:
ls /mnt/hgfsIf the folder is listed, no further setup is needed. You can use it immediately.
2. If the folder is not listed, it needs to be mounted manually. Enter the following command to mount the shared folder:
sudo vmhgfs-fuse .host:/ /mnt/hgfs3. Enter the ls command again:
sudo ls /mnt/hgfsThe shared folder is now visible.

4. By default, only the root user has access to shared folders. To switch to the root user, enter:
sudo -i5. As root, use the cd command to navigate to the shared folder:
cd /mnt/hgfs/ShareUbuntuVM
Replace ShareUbuntuVM with the name of your shared folder.
6. When finished, exit the root shell by typing:
exitOther users are unable to access shared folders until you explicitly grant them access.
Enable Folder Sharing for All VM Users
In practice, multiple users often need access to the Shared Folder, not just the root user. Use the allow_other flag to enable access to the Shared Folder for all users on the Linux VM:
sudo vmhgfs-fuse .host:/ /mnt/hgfs -o allow_otherThe mount remains active for the entire session while the VM is running. As a security precaution, you must rerun this command each time the VM reboots.
Note: To automate the process, you can add the command to the /etc/fstab file or create a systemd service. However, keep in mind that doing so automatically mounts the Shared Folder at boot. This means that all users on the VM will have read and write access to the host's shared files as soon as the system starts.
Disable Folder Sharing for All VM Users
If you need to restrict access to the shared folder, without restarting the VM:
1. Use the following command to unmount the shared folder:
sudo umount /mnt/hgfs2. Remount the folder for root access only:
sudo vmhgfs-fuse .host:/ /mnt/hgfsNow only the root user can view or modify the files in the shared directory.
How to Create and Access Shared Folders on Windows Guest
VMware Workstation 16 and later editions automatically detect when you are creating a Windows VM. If VMware Tools are missing or outdated, Workstation mounts the VMware Tools ISO and installs it during the first boot.
The following section shows how to create and manage a Shared Folder on a Windows Server 2025 guest operating system.
Create Shared Folder on Windows Guest
To create a Shared Folder on the Windows guest system:
1. Open the Windows virtual machine in VMware Workstation.
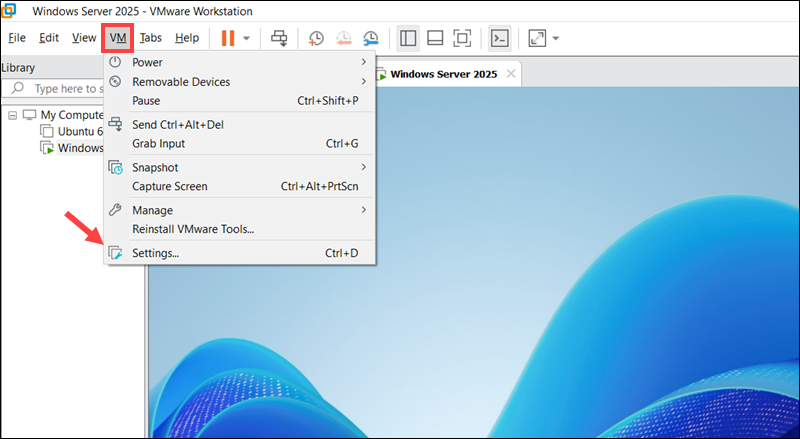
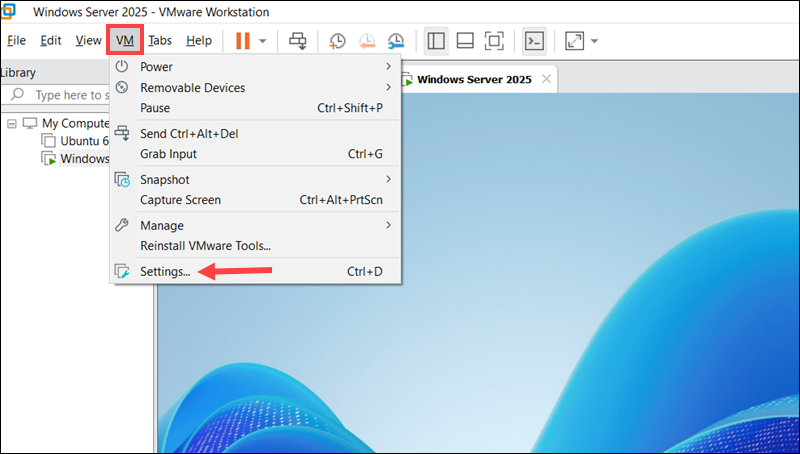
2. Select VM and then Settings.
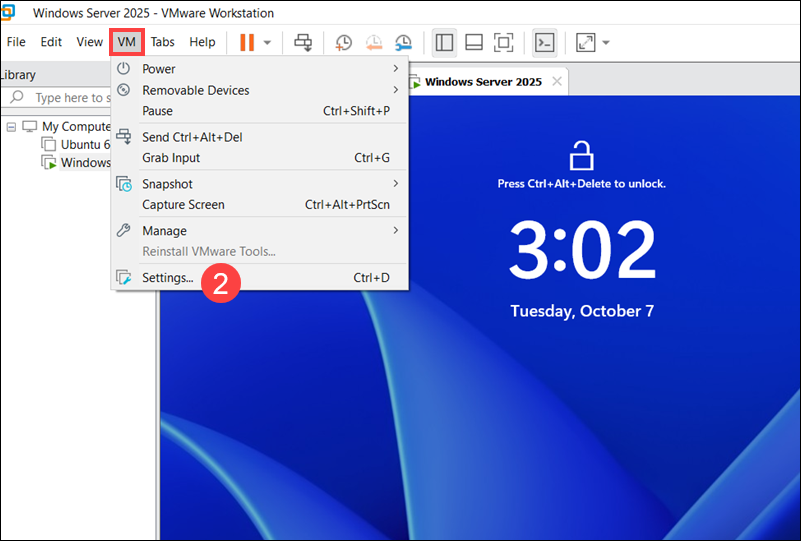
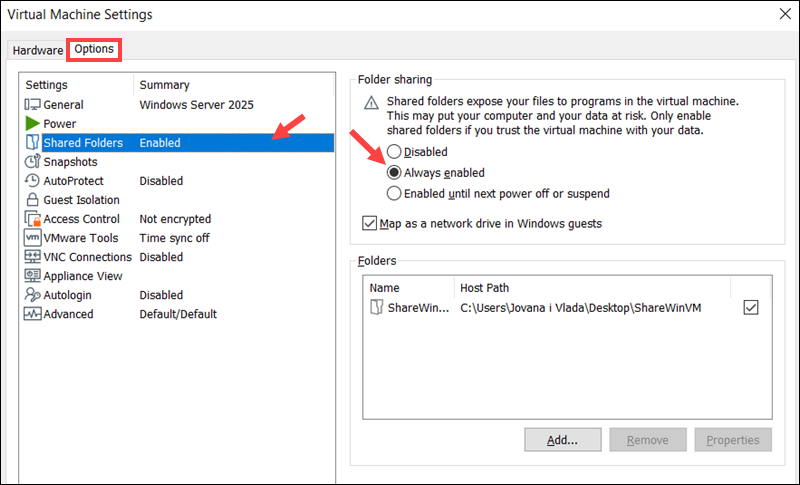
3. Go to Options and click Shared Folders.
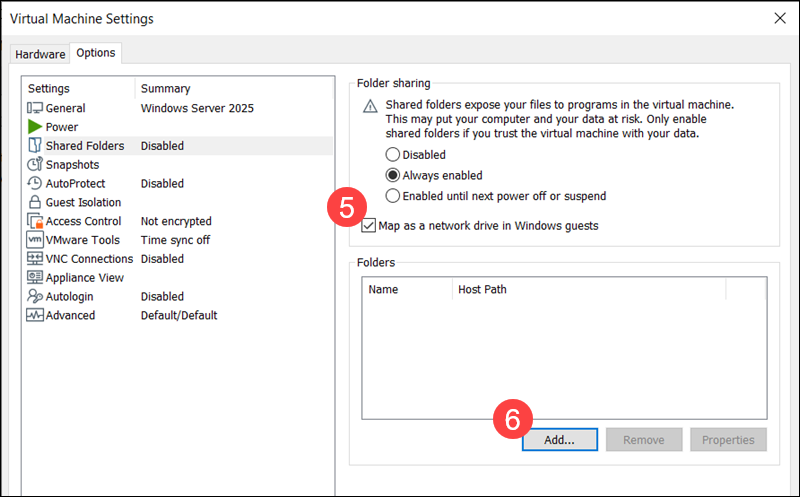
4. Select Always enabled to keep the feature active even after the VM is suspended or restarted.

5. Check Map as a network drive in Windows guests to create a new drive in File Explorer automatically. The shared folder will appear like any other drive on the guest OS.
6. Click Add to launch the Add Shared Folder Wizard.
7. Use Browse to select the folder on the host system that you want to share, then click Next.
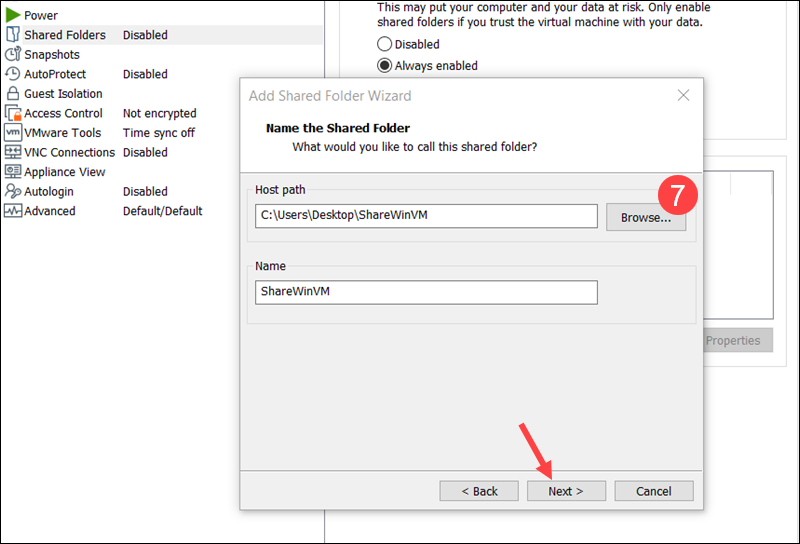
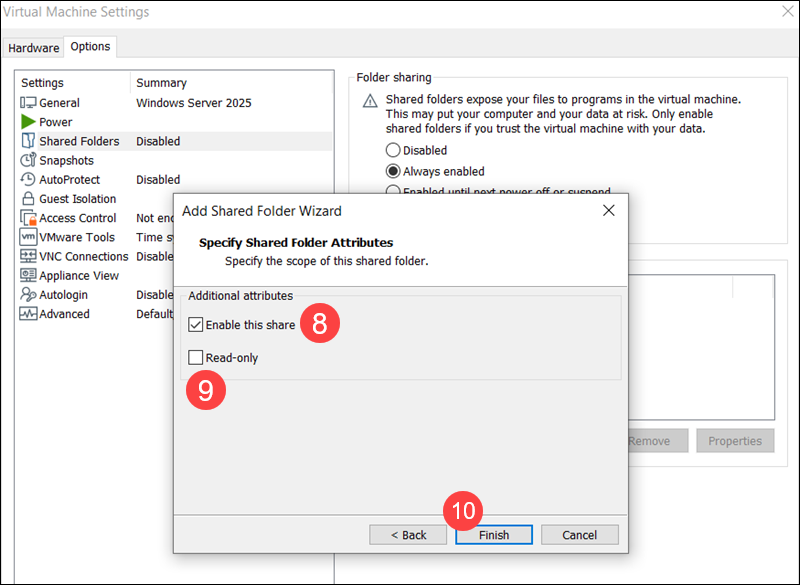
8. Select Enable this share.
9. (Optional) Check the Read-only option if you want the VM to view files in the host folder but prevent it from modifying them.
10. Click Finish, then OK to create and enable the Shared Folder.
Unlike Linux guests, no additional steps are required. The shared folder is ready to use, and no manual configuration is needed.
Access Shared Folders on Windows Guest
To access the Shared Folder on the Windows guest machine:
1. Open File Explorer and select This PC.
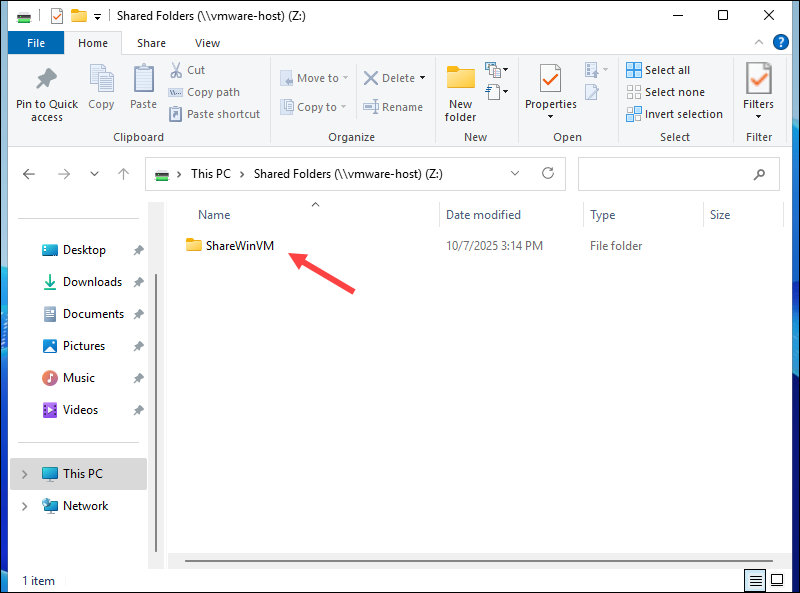
2. Locate the drive labeled Shared Folders (\\vmware-host) (Z:).
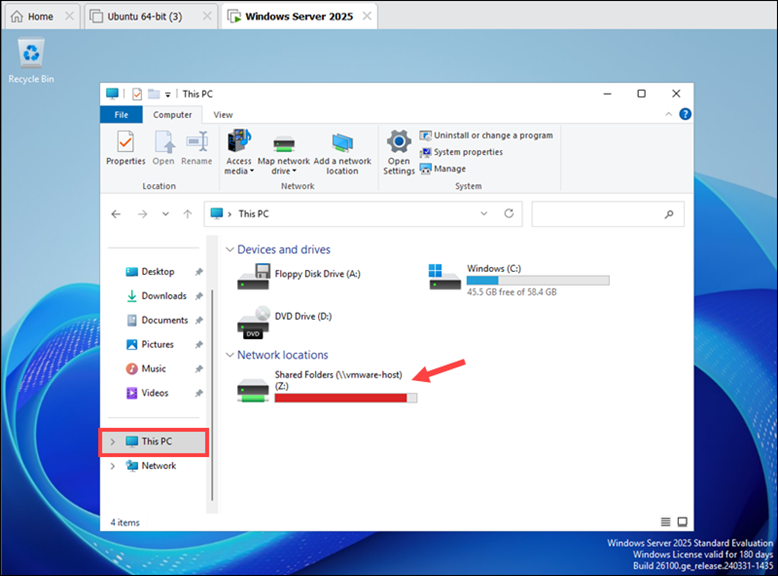
3. Double-click the drive to open the shared folder.
You can now copy, paste, edit, or open files as if they were stored locally.
Note: If you selected Read-only when creating the Shared Folder, the VM will not be able to write to or modify files in it. You can change this setting at any time on the Shared Folder configuration page.
VMware Folder Sharing: Best Practices
To keep host and guest systems secure and operating at optimal levels, follow these recommendations:
- Keep track of file sizes. Do not copy entire drives from one machine to another. Share only the minimum amount of data necessary for the system or application to function. This conserves resources on both the host and guest systems.
- Use read-only access whenever possible. Selecting the Read-only option when creating a Shared Folder limits how much access the guest OS has to your host. Treat write permissions as a privilege. If you are using VMs for testing or isolation, do not let untrusted apps write to your host files.
- Avoid storing sensitive data in shared folders. Shared Folders are designed for convenience, not security. The simplest way to prevent data leaks is to keep sensitive files out of locations accessible to other systems.
- Regularly update software. Hypervisors and virtualization platforms frequently release updates that include new features and security patches. Update both VMware Workstation and your guest operating systems to protect against known vulnerabilities.
- Manage permissions inside the guest OS. Managing access at the VM level can be too broad. Instead, configure user and file permissions within the guest OS itself. Assign access on a per-user or per-application basis when possible for more control.
VMware Shared Folders: Common Issues and Troubleshooting
Shared Folders in VMware Workstation may occasionally fail to appear or function as expected. Some of the most common issues are listed in the sections below.
Shared Folder Not Visible In Guest OS
If a Shared Folder does not appear inside the Windows or Linux guest, it often means that VMware Tools is not running or has not been installed correctly.
To confirm and fix the issue:
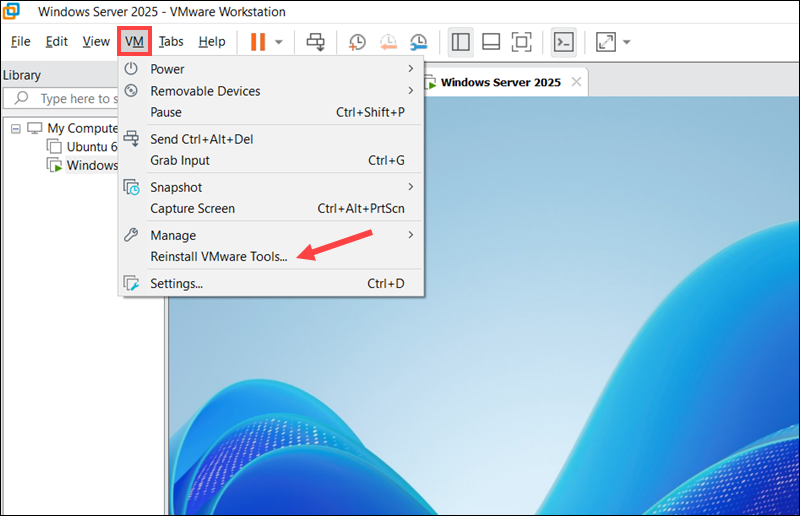
1. Open VMware Workstation and select the affected virtual machine.
2. Expand the VM menu and choose Settings.
3. In the Options tab, select Shared Folders.
4. Verify that the Folder sharing option is set to Always enabled.
5. If it is already enabled, close the windows, and go to VM again and select Reinstall VMware Tools (or use the open-vm-tools and open-vm-tools-desktop packages on Linux).
6. Once the installation is complete, reboot the VM.
Check if the Shared Folder appears in File Explorer (Windows) or in the /mnt/hgfs directory in Linux.
Empty /mnt/hgfs Directory
On Linux systems, Shared Folders may not always mount automatically. If the directory is not visible under /mnt/hgfs, follow these steps:
1. Access the terminal and mount Shared Folders using the following command:
sudo vmhgfs-fuse .host:/ /mnt/hgfs -o allow_other2. Verify that the directory is accessible:
ls /mnt/hgfs
If the directory appears, the mount was successful.
Permission Denied When Accessing /mnt/hgfs
If you receive a Permission Denied error when accessing Shared Folders in Linux, the directory was likely mounted without the -o allow_other option. This means only the root user can access it.
To allow all users to access the shared folder:
1. Unmount the current Shared Folder:
sudo umount /mnt/hgfs2. Remount the directory manually:
sudo vmhgfs-fuse .host:/ /mnt/hgfs -o allow_otherAccess is now enabled for all users on the guest system.
Files Not Updating in Linux Guest
If files appear outdated or changes are not reflected inside the Linux guest, the issue is likely caused by caching or a stale mount.
Complete the following steps:
1. Unmount the current Shared Folder:
sudo umount /mnt/hgfs2. Remount the directory:
sudo vmhgfs-fuse .host:/ /mnt/hgfs -o allow_other3. Restart the VMware Tools service:
sudo systemctl restart vmtoolsdThis refreshes the connection between the host and guest systems, ensuring that files are kept in sync.
Shared Folder not Mapped as Network Drive (Windows)
If the Shared Folder is not showing up as a mapped drive in File Explorer, the mapping option in the Windows guest may be disabled.
To confirm the status of the setting:
1. Open VMware Workstation and select the affected virtual machine.
2. Expand the VM tab and select Settings.
3. Select Options and then Shared Folders.
4. Check the Map as a network drive in Windows guests option and click OK.
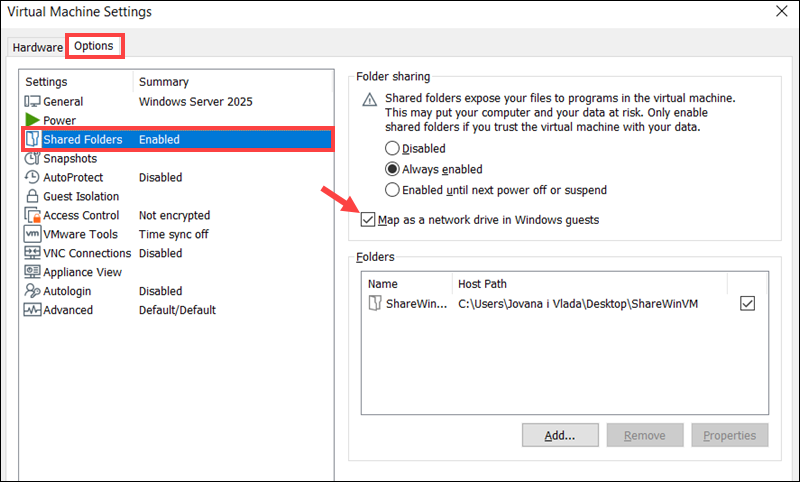
5. Restart the VM and check if the Shared Folder has appeared.
The Shared Folder drive is typically labeled as Shared Folders (\\vmware-host) (Z:).
VM Lags or Crashes During Copy
If a virtual machine has limited resources, copying large files between the host and guest can cause noticeable lag or temporary freezes.
The following optimizations can help improve transfer performance:
- Increase the allocated RAM and virtual disk space for the VM.
- Ensure the host drive has sufficient space for the incoming transfer.
- If the performance remains unstable, disable the virtual machine's 3D acceleration option to reduce GPU-related overhead.
After making these adjustments, large file transfers should be faster and more stable.
Conclusion
You can now access shared folders from both the host and guest operating systems, making it much easier to organize projects within your virtual environment.
If you are planning to extend your VMs into a hybrid cloud environment, learn how VMware Aria can help you manage resources across cloud and on-premise systems.