Ghostty is a fast, GPU-accelerated terminal emulator that delivers smooth scrolling, low latency, and crisp rendering for dense CLI output. This emulator is most useful when your terminal must stay fast and clear when splitting panes, tailing rapid logs, or running noisy commands that flood the screen. It is a natural fit for dev work, remote servers, and log-heavy debugging.
This article will show you how to install and use the Ghostty terminal.
Prerequisites
- A machine running Linux or macOS.
- A user account with root privileges for some Linux installations.
What Is Ghostty?
Ghostty is a lightweight terminal emulator built for people who use the terminal as their primary workspace. It keeps the experience smooth when working with long scrollback, fast log streams, or commands that generate large bursts of text.
It is most useful when responsiveness is non-negotiable, i.e., for debugging live output, jumping between multiple panes, or reviewing dense command results without delay. Instead of adding complexity, it prioritizes defaults that perform well immediately.
Ghostty is the terminal of choice for engineers who multitask across panes and tabs, run remote SSH sessions, or inspect logs that update hundreds of lines per second. It supports modern typography and color capabilities so text stays clear, aligned, and easy to parse, especially in prompts, CLIs, and dashboards that rely on structured or colored output.
Ghostty Background and Philosophy
Ghostty was created to remove a common pain point of modern terminal emulators - the paradox of speed that requires endless configuration. The philosophy rejects "tuning as a lifestyle" and treats the terminal as infrastructure, i.e., something that should stay fast without user intervention. By leveraging stable defaults and hardware-accelerated rendering, Ghostty avoids slowdowns that occur when terminals rely solely on the CPU for intensive text rendering.
Its design approach favors minimal UI, predictable behavior, and reliability under sustained workloads. It does not try to replace a shell, framework, or multiplexer. Instead, it complements them by staying stable when they struggle.
Ghostty Features
Ghostty is built around the idea that performance and readability should not break when terminal output scales. It supports first-class multitasking with native panes and tabs, remains stable with massive buffers, and offers modern text and graphics capabilities that reduce friction in daily CLI work.
The following table summarizes Ghostty's key features that significantly improve real terminal workflows:
| Feature | Importance in daily use |
|---|---|
| Performable keybindings | Context-aware shortcuts prevent accidental interrupts and streamline actions. |
| Tab overview + search | Quickly locate and switch between many sessions. |
| Built-in Nerd Font support | Modern prompts and icons render correctly without extra setup. |
| Search functionality | Find text across output without leaving the terminal. |
| GPU rendering (Metal / OpenGL) | No freezes in long scrollback or rapid logs. |
| Native panes, tabs, windows | Clean multitasking without UI clutter. |
| One-line themes + auto dark/light switching | Instant visual clarity, zero setup overhead. |
| Ligature + font feature control | Better readability in modern dev prompts. |
| Emoji & grapheme clustering | Correct rendering of flags, skin tones, and clusters. |
| Kitty graphics protocol | Images render inside terminal apps that support it. |
| macOS Quick Terminal (menu bar dropdown) | Instant access without context switching. |
| Secure keyboard entry | Protects passwords from other processes. |
How to Install Ghostty
Ghostty terminal is available for macOS and Linux. On Windows, Ghostty is not yet officially released as a binary by the project, but community builds and future official support are planned.
The sections below show how to install Ghostty on Linux and macOS.
Install Ghostty on macOS (Intel and Apple Silicon)
The official Ghostty project provides notarized macOS binaries. You can install the stable release via Homebrew using the following command:
brew install --cask ghosttyAlternatively, download the DMG from the official site and drag Ghostty into your Applications folder.
Install Ghostty on Linux
Linux packaging for Ghostty is not distributed directly by the Ghostty project as a universal standalone binary. Instead, it is available through distribution-specific packages maintained by distros or the community.
Official Packages
You can install Ghostty from the official repositories using the commands below for your Linux distribution:
- Arch Linux
sudo pacman -S ghostty- Alpine Linux
sudo apk add ghostty- Gentoo
sudo emerge -av ghostty- openSUSE
sudo zypper install ghostty- Solus
sudo eopkg install ghostty- Void
sudo xbps-install ghosttyThere is also a Snap package you can install universally on many distributions:
sudo snap install ghostty --classicNote: Snap builds are community-maintained but built using official Ghostty build scripts.
Community Packages
For distributions that do not yet have an official package, there are community options:
- Ubuntu / Debian
You can use a community .deb package or a script to install Ghostty from GitHub releases:
/bin/bash -c "$(curl -fsSL https://raw.githubusercontent.com/mkasberg/ghostty-ubuntu/HEAD/install.sh)"This script downloads and installs the appropriate .deb for your version. To start Ghostty, start it from the terminal or find it in the application drawer, and the basic terminal window opens:

- AppImage
AppImages run without installation and work on almost any Linux distro. Download a universal AppImage from a community repo and make it executable:
chmod +x ghostty*.AppImageReplace the file name with the actual name of the file you downloaded, and run the file:
./ghostty*.AppImageBuild from Source (All Platforms)
If no package is available for your distribution, you can compile Ghostty from source using zig, which provides the latest compatible binary for your system. Follow the official build guide on Ghostty's docs, install dependencies, and then build Ghostty with zig.
Ghostty builds on Linux may fail if the system uses Wayland without xwayland support, or if GPU drivers don't expose OpenGL 4.1+. Additionally, some minimal distros lack libglib2.0-dev, libgtk-4-dev, or libadwaita-1-dev, which are required for compilation.
Important: Building Ghostty from the source is not recommended for most users. It ties its builds to a single, specific zig compiler release. Because zig is evolving quickly, using an older or newer zig version can break the build even if everything else is correct. Make sure to check the official docs to see which zig version you need.
Ghostty Configuration
Configuration controls how Ghostty looks, reacts, and handles input. Fonts, padding, themes, key behavior, and security prompts are all defined in the configuration files. A solid config improves readability, reduces accidental key signals, and keeps sessions predictable across machines.
Follow the steps below to configure Ghostty:
1. Create the config directory (if missing):
mkdir -p ~/.config/ghostty2. Create the config file (if missing):
nano ~/.config/ghostty/config3. Add starter settings:
font-family = "JetBrains Mono"
font-size = 14
theme = "12-bit Rainbow"
window-padding-x = 10
window-padding-y = 10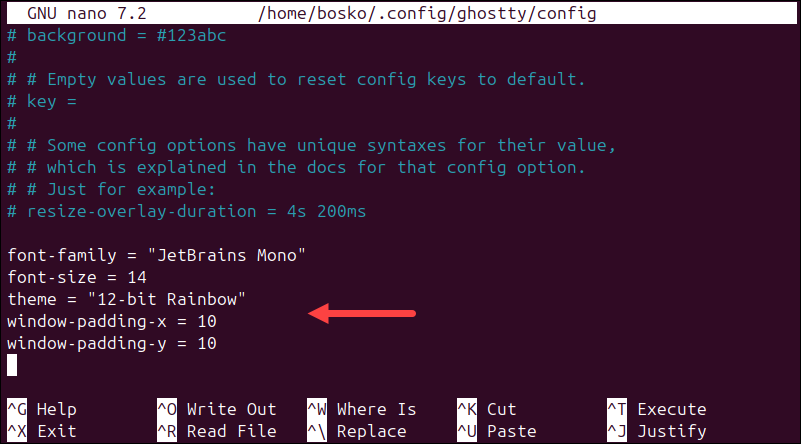
These defaults tune clarity and spacing without adding noise:
font-familysets the terminal font. Ligature-capable fonts improve the readability of symbol-heavy prompts and CLI output.font-sizecontrols text scale for comfortable reading during long sessions.themeapplies a color theme. You can install a new one or select a preinstalled one (usually located at ~/usr/share/ghostty/themes), or keep the default one.window-padding-x / yadds inner spacing so output does not stick to the edges, improving scanability.
4. Save the file and exit.
5. Restart Ghostty to apply changes:

In the example above, we see the effects of our configuration changes in the output.
Ghostty vs. Competitors
Ghostty outperforms classic system terminals during heavy scrolling, log bursts, and large buffers by staying visually smooth and input-fast. Compared to other accelerated terminals, it wins by combining strong performance with a cleaner default UX.
Refer to the table below to see how Ghostty compares to some prominent competitors:
| Competitor | Why Ghostty is better |
|---|---|
| GNOME Terminal / xterm | Stays smooth even when the output is large or updates rapidly. |
| Kitty | No need to maintain extensions, modules, or complex configs. |
| Alacritty | More built-in UX convenience without sacrificing speed. |
| IDE consoles | Faster and less distracting than terminals embedded in full apps. |
| tmux, zellij, etc. | Ghostty includes native panes, reducing the need for multiplexers like tmux or zellij for basic splits. |
Conclusion
This tutorial showed how to install and use the Ghostty terminal emulator. Ghostty proves its value when performance, staying smooth in pane-heavy work, and readability matter more than tweaking.
Next, see which Linux terminal commands are dangerous or learn to clear the terminal in Linux.