The git checkout command is a core Git tool that updates your working directory to match a different commit, branch, or revision. It is commonly used to switch between branches, but it can also restore old file versions or revisit past commits.
Understanding this command is essential for effective version control workflows.
This tutorial explains how to use the git checkout command.
Prerequisites
- Git installed (see how to install Git on Ubuntu, macOS, Windows, or FreeBSD).
- A Git repository.
git checkout Command Syntax
The git checkout command changes what is currently checked out in your working directory. Depending on the arguments you pass, Git interprets the command as a request to switch branches, move to a specific commit, or restore files.
The general syntax is:
git checkout [target] -- [path]The [target] can represent:
- A branch name.
- A commit hash or reference.
- A tag.
- A specific file or directory.
Provide a -- [path] when restoring a file. If no -- [path] is provided, Git switches to the specified branch or commit, or checks out a file/tag.
When switching branches or commits, Git updates the HEAD pointer and rewrites the working directory to match the selected state. If local changes conflict with the checkout operation, Git will block the command to prevent accidental data loss.
Note: Since Git version 2.23, git switch and git restore have been introduced to simplify workflows. This guide focuses on git checkout because it remains widely used and fully supported, but its modern equivalents are:
| Old | Modern equivalent |
|---|---|
git checkout branch |
git switch branch |
git checkout -b branch |
git switch -c branch |
git checkout HEAD -- file |
git restore file |
git checkout Options
The command supports several flags that modify its behavior. These options extend checkout beyond simple branch switching, making it a flexible recovery and navigation tool.
Below are the most commonly used git checkout usage patterns:
| Option | Description |
|---|---|
git checkout [branch_name] | Switches to an existing local branch. |
git checkout -b [new_branch] | Creates a new branch and immediately switches to it. |
git checkout -b [new_branch] [start_point] | Creates a new branch based on [start-point] and switches to it. |
git checkout [commit_hash] | Checks out a specific commit (detached HEAD). |
git checkout [branch] -- [file] | Restores a file from another branch or commit. |
git checkout - | Switches back to the previous branch. |
These options make git checkout versatile for both branch management and file restoration.
git checkout Examples
The following examples demonstrate how git checkout behaves in common development scenarios. Each example shows what happens internally and why the command is useful.
Switch to an Existing Branch
Switching branches is the most common use of git checkout. This operation moves your working directory to another branch so you can continue development there. Git rewrites the project files to match the selected branch and updates the HEAD pointer.
Use the following syntax to switch branches with git checkout:
git checkout [branch_name]Git switches to the specified branch and loads its latest committed state. If uncommitted changes would be overwritten, Git prevents the switch and asks you to resolve the conflict first. For example:

The command switches the branch to feature/login.
Note: Git may refuse to switch branches if untracked files would be overwritten. You can temporarily store untracked changes using git stash.
Create and Switch to a New Branch
When starting new work, you typically create a dedicated branch. Checkout can create and activate the branch in one step, which reduces context switching and speeds up the workflow.
The syntax is:
git checkout -b [branch_name]For example:
git checkout -b bugfix/button-alignment
This command creates a new branch from the current commit and immediately switches to it. It is a shortcut for creating a branch and then running checkout separately. The command is equivalent to the following two:
git branch bugfix/button-alignmentgit checkout bugfix/button-alignmentThe shortcut reduces friction when starting new work.
Checkout a Remote Branch
Sometimes a branch exists only on the remote repository. In that case, checkout can create a local tracking branch so you can work with it like any other branch.
Start with downloading the latest remote references:
git fetchNext, run git checkout on the remote branch:
git checkout -b feature-x origin/feature-x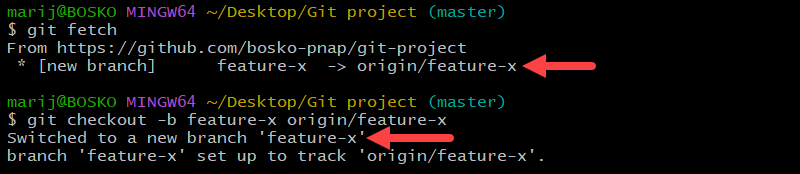
In modern Git versions, this command creates a new local branch that tracks the remote branch. This allows you to pull and push changes normally without manual configuration.
Note: If you end up in a detached HEAD state, refer to the Detached HEAD State section of the article for a solution to the issue.
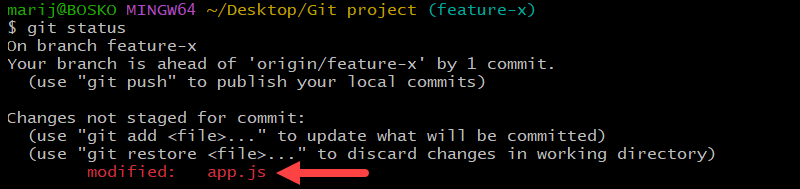
Restore an Individual File
Checkout is not limited to branches. It can also restore files from a previous revision without affecting the rest of the project. This action is useful when you want to discard local edits or recover an earlier version of a file.
For example, here we have a modified file:
We can restore the file to its earlier version using the following command:
git checkout HEAD -- app.js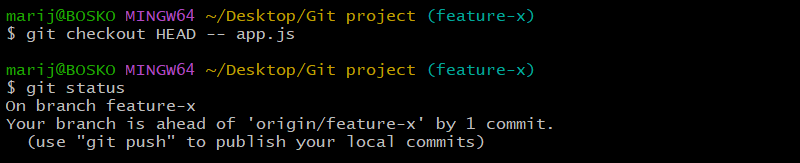
This command restores app.js to the latest committed version and removes its modified state. This permanently discards uncommitted changes. Git cannot recover them unless they were previously committed or stashed. This functionality is useful when experimental edits need to be rolled back without affecting other files.
Advanced git checkout Usage
Beyond branch switching, git checkout exposes internal Git mechanics that are useful for debugging, historical inspection, and targeted recovery. These advanced behaviors give you fine control over repository state, but they also require careful handling to avoid losing work.
Understanding these modes helps you safely explore history and recover files without disrupting your main branches.
Detached HEAD State
A detached HEAD state is not an error, but it often happens accidentally when Git checks out a commit directly instead of switching to a branch. In this mode, HEAD points to a specific commit rather than to a branch tip.
The following example depicts a detached HEAD state:

This situation commonly occurs when:
- Checking out a commit hash.
- Checking out a tag.
- Checking out a remote branch directly.
Detached HEAD is useful for safely inspecting historical versions, testing older code, or debugging regressions without affecting branch history. However, it is not intended for long-term development work. You can view files and run the project, but you are no longer on a branch.
You can make commits in this state, but they are not attached to any branch. If you switch away without saving them, those commits may become difficult to recover.
To continue working normally, create a branch from your current position:
git checkout -b new-branchThis attaches your current state to a branch and exits detached mode.
If a detached HEAD occurred after checking out a remote branch, create a local tracking branch instead. For example:
git checkout -b feature-x origin/feature-xThis reconnects HEAD to a proper branch and restores the standard workflow.
Using Checkout for Historical File Recovery
Historical file recovery lets you restore a single file from a previous commit without switching branches. Instead of rolling back the entire project, it allows users to selectively replace only the necessary file. This approach is useful when recovering deleted content, undoing accidental edits, or reintroducing an older configuration while keeping the rest of the work intact.
To restore a file from history, you first need the commit that contains the version you want. To browse past commits, use:
git log --oneline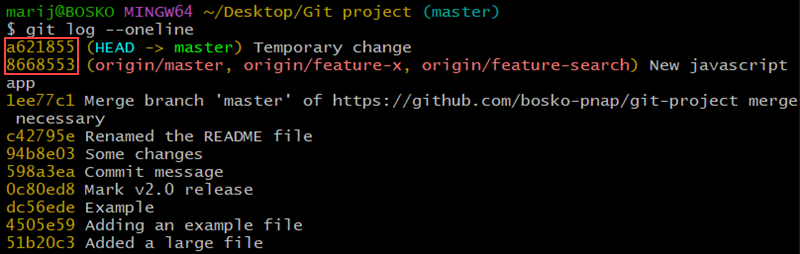
The output shows recent commits along with their short hashes. Once you identify the commit that contains the correct file version, use git checkout to copy that file into your working directory.
For example:
git checkout 8668553 -- app.jsGit restores the app.js file from the specified commit while leaving all other files untouched. The recovered file appears as a local change, allowing you to review it before committing.
Because only targeted files are replaced, this method is safer and more controlled than reverting an entire branch.
Conclusion
This tutorial showed how to use the git checkout command. While newer Git commands, such as <strong>git switch</strong> and git restore, separate some of the command's functionalities, git checkout remains widely used and fully supported. Understanding how it works provides fine-grained control over repository state and helps prevent accidental data loss.
Next, see how to perform Git submodule checkout.