Modern software development relies on Docker and other containerization tools to eliminate the "it works on my machine" problem.
By packaging the application code along with its dependencies, libraries, and configuration files, Docker creates a consistent environment that behaves the same way on a laptop, a testing server, or a production cloud cluster.
This guide will outline the steps required to deploy Docker on macOS.
Prerequisites
- macOS 14 (Sonoma) or newer (Docker supports Docker Desktop app on the current and two previous major macOS releases).
- Homebrew installed (for the CLI method).
- At least 4 GB of RAM.
- At least 5 GB of available disk space.
Installing Docker on macOS
There are two primary ways to install the official Docker Desktop on macOS: using the graphical user interface (GUI) and the command line (Homebrew). The following sections provide steps for both methods.
Note: Because macOS does not natively support the Linux kernel features required by Docker (such as namespaces and cgroups), both methods mentioned in this article install a lightweight Linux virtual machine to run the Docker Engine.
Download Docker Desktop
Docker Desktop provides a graphical interface for managing containers and images. The application installer is available on the official Docker website:
1. Navigate to the Docker Desktop download page.
2. Hover over the Download Docker Desktop button and select the Apple Silicon version for M-series Macs or the Intel Chip version for older models:
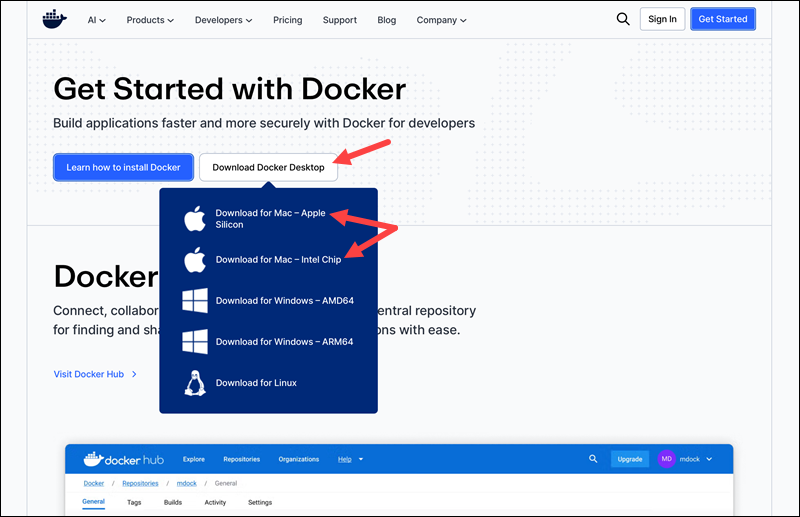
Note: Choosing the correct installer ensures optimal performance and prevents emulation overhead.
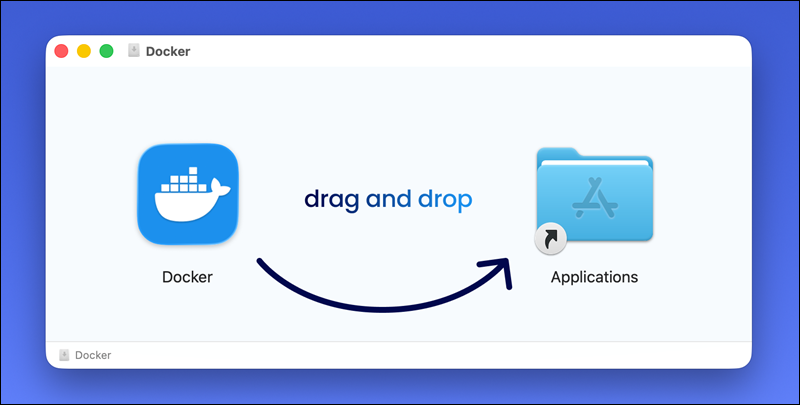
3. Open the downloaded DMG file.
4. Drag the Docker icon into the Applications directory.
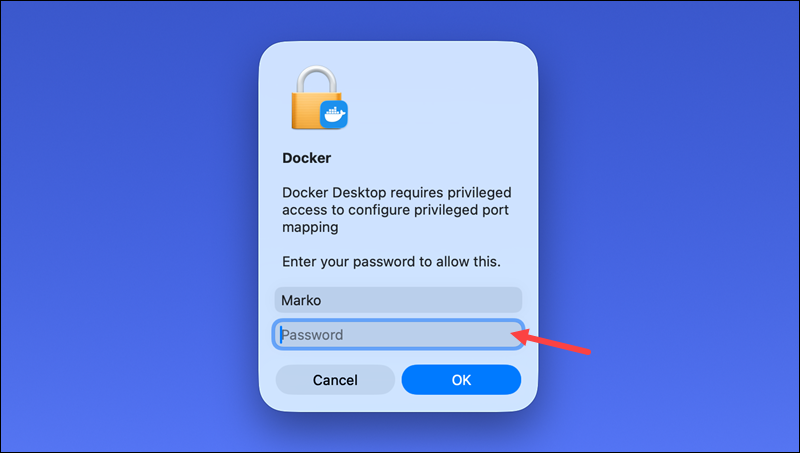
5. Launch Docker from the Applications directory and grant the necessary system permissions.
The Docker Desktop home screen appears.
Install via Homebrew
Using a package manager for Docker installations provides a unified workflow for version control and automated updates. To install Docker on macOS using the Homebrew package manager:
1. Open the Terminal application.
2. Execute the following command:
brew install --cask dockerWhen Homebrew finishes the installation, it displays a confirmation message.

3. Open Docker from the Applications directory to initialize the background service.
Configuring Docker on macOS
Fine-tuning Docker settings improves system stability and resource allocation. Configuration adjustments prevent Docker from consuming excessive CPU or memory during intensive tasks.
The following are essential configuration steps to perform depending on the processor architecture:
- Apple Silicon. Enable the VirtioFS file-sharing implementation, as it significantly improves disk I/O performance compared to older methods. Furthermore, ensure the Use Rosetta 2 for x86_64/amd64 emulation option remains active to run older container images on new Apple hardware.
- Intel chips. Manually allocate CPU cores and RAM within the Docker Desktop Resources menu. Intel Macs lack the efficiency cores found in Apple Silicon, so capping Docker at 50% of total system memory prevents host OS lag.
By default, Docker might take up more (or less) system resources than desired. Follow the steps below to adjust the default values:
1. Click Settings (gear icon) in the top right of the Docker dashboard.
2. Go to Resources.
3. Adjust the values in the CPU Limit and Memory Limit sections. A common starting point is 2 CPUs and 4GB of RAM.

4. If you are running out of space on the main drive, move where Docker stores its data in the Disk Image Location section.
Docker on macOS: Common Post-Installation Errors
Initial setup sometimes triggers permission issues or networking conflicts. Identifying these common hurdles allows for quick resolution of the problem:
- Service not starting. If the Docker icon remains stuck in the "starting" phase, check for conflicting virtualization software, such as VirtualBox or VMware.
- Architecture mismatch. Running an x86 image on an ARM-based Mac without Rosetta 2 results in an "exec format error." Install Rosetta 2 via the terminal using the following command:
softwareupdate --install-rosetta- Permission denied. Command-line tools require access to the Docker socket. Ensure the current user belongs to the staff group or run Docker with administrative privileges during the first launch.
- Port conflicts. Local services running on ports 80 or 443 block Docker containers from binding to those ports. Terminate existing web servers before starting containers.
Conclusion
After following the steps in this article, you will have a working Docker Desktop installation ready for container deployment on macOS. The guide also listed some important configuration steps and offered troubleshooting for post-installation errors.
Next, learn about the docker run, the most important command for running Docker containers.