The docker run command lets you create and execute OCI-compatible containers using container images. Additionally, by appending attributes to the command's basic syntax, the user can customize container storage, networking, performance, and other settings.
In this tutorial, learn how to use the docker run command with practical examples.
Prerequisites
- Command line access.
- Administrative privileges.
- Docker installed.
docker run Syntax
docker run is an alias for the docker container run command. In its most basic form, the command requires only one argument, i.e., an image reference that Docker uses as a template for building and running a container:
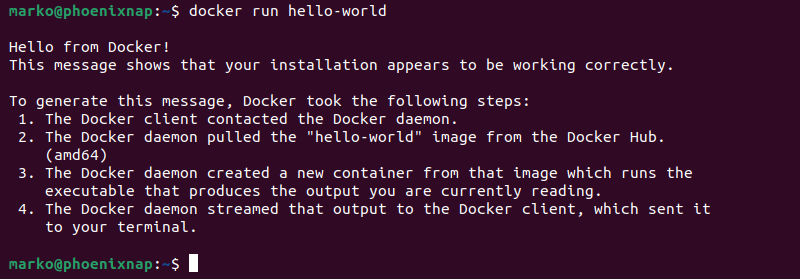
docker run [image]For example, executing the following command runs a container based on the hello-world image:
docker run hello-worldWhen the user runs the command, Docker starts the container that runs the hello-world app and stops it after the app runs.
docker run can be customized with options and commands. Options modify the container properties while commands are executed inside the container. The following is the order of these elements within the docker run command:
docker run [options] [image] [commands]For example, the command below runs an Ubuntu container labeled test. Inside the container, docker run executes an echo command that prints the sentence "This is a test."
docker run -l test ubuntu echo "This is a test."
docker run Options
docker run features many options that extend its functionality. The following sections present the command options sorted by the aspect of the container they customize.
General Options
General docker run options help with basic image and container management. The table below explains each option in more detail:
| Option | Description |
|---|---|
--name | Give a custom name to a container. |
-d, --detach | Run the container in the background. |
--entrypoint | Set a custom entry point for an image. |
--help | Show help. |
-i, --interactive | Keep standard input open. |
--pull | Pull the image before creating a container. |
--platform | Set platform (for multi-platform servers). |
--restart | Set container restart policy. |
--rm | Remove the container when it exits. |
--runtime | Set the runtime to use for a container. |
-t, --tty | Allocate a pseudo-TTY. |
--workdir | Set a working directory in a container. |
Networking Options
The networking options allow the user to set up connectivity between a container and a network. Refer to the list below for the available options:
| Option | Description |
|---|---|
--add-host | Create a custom host-to-IP mapping. |
--hostname | Define a hostname for a container. |
--dns | Set a custom DNS server. |
--dns-search | Set a custom DNS search domain. |
--dns-option | Set a DNS option. |
--ip | Set an IPv4 address for a container. |
--ip6 | Set an IPv6 address for a container. |
--link | Link to another container. |
--link-local-ip | Link a local IPv4/IPv6 address. |
--mac-address | Set a MAC address for a container. |
--network | Connect a container to a network. |
-p, --publish | Publish a container port to a host. |
-P, --publish-all | Publish all exposed ports to random ports. |
Storage Options
The following options configure Docker volumes and mounts for containers that require storage:
| Option | Description |
|---|---|
--mount | Attach a filesystem mount. |
--read-only | Mount the container filesystem as read-only. |
--tmpfs | Mount a directory formatted as tmpfs. |
-v, --volume | Bind-mount a volume. |
Resource Management Options
The docker run command allows the user to control resources a running container can utilize. The available resource management options are listed below:
| Option | Description |
|---|---|
--cpus | Set the number of CPUs. |
--cpuset-cpus | Set CPUs where execution is allowed. |
--cpuset-mems | Set MEMs where execution is allowed. |
--cpu-period | Limit the CFS period for CPUs. |
--cpu-quota | Limit CFS quota for CPUs. |
--cpu-shares | Set the number of CPU shares. |
--kernel-memory | Limit kernel memory. |
-m, --memory | Set a memory limit. |
--memory-swap | Set the swap limit to the combined memory and swap. The value of -1 enables unlimited swap. |
--memory-swappiness | Control memory swappiness. |
--oom-kill-disable | Disable OOM Killer. |
--oom-score-adj | Set OOM preferences. |
--pids-limit | Set the pid limit for a container. The value of -1 allows unlimited pids. |
Security Options
The docker run command allows a user to enable and disable Docker security features, control users, and set user privileges. The following are the available security options:
| Option | Description |
|---|---|
--cap-add | Enable specific Linux security features. |
--cap-drop | Disable specific Linux security features. |
--group-add | Add additional groups. |
--no-new-privileges | Prevent container processes from obtaining new privileges. |
--privileged | Set extended privileges for a container. |
--security-opt | Enable security options. |
--user | Set the user. |
--userns | Set the user namespace. |
Note: Using the --privileged option to run privileged Docker containers can be practical, but it comes with potential security risks. Learn more about this topic in our guide to privileged docker containers
Environment Options
Use the options below to set up environment variables and container metadata:
| Option | Description |
|---|---|
-e, --env | Set an environment variable. |
--env-file | Supply a file with environment variables. |
--label | Set container metadata. |
--label-file | Supply a line-delimited file with labels. |
Container Health Options
Container health options include health-check reporting and health-monitoring customization. Refer to the table below to learn how to configure health checks using docker run options:
| Option | Description |
|---|---|
--health-cmd | Provide a health check command. |
--health-interval | Set the health check interval. |
--health-retries | Set the number of attempts before the container is reported as unhealthy. |
--health-start-period | Provide the container's initialization period before starting health checks. |
--health-timeout | Set the maximum time for the health check. |
Additional Options
Aside from the features listed in the categories above, docker run also includes options related to Docker container logs, GPU configuration, and device management. The table below lists those options:
| Option | Description |
|---|---|
--detach-keys | Set a custom key sequence for detaching a container. |
--device | Add the host device. |
--gpus | Add a GPU device to a container. Passing all as an argument adds all the available GPUs. |
--init | Run an init inside a container. |
--isolation | Set container isolation technology. |
--log-driver | Set the container's logging driver. |
--log-opt | Configure the logging driver's options. |
docker run Examples
The docker run command and its options offer flexibility when starting and executing Docker containers. The examples below illustrate how docker run can be customized for different usage scenarios.
Run Container Under Specific Name
The --name option lets you assign a custom container name. However, if the option is left out, Docker automatically generates a container name consisting of two random words.
The following command assigns a custom name to the container:
docker run --name [container-name] [image]For example, type the following command to run a container called test-container using the hello-world image:
docker run --name test-container hello-worldTo confirm that the container was created, view the list of all the containers on the system:
docker ps -aThe named container appears in the output.

Since remembering generic names can be difficult in multi-container deployments, creating custom container names is recommended.
Run Container in Background (Detached Mode)
There are two ways of running a container – in the foreground (attached mode) or in the background (detached mode). By default, Docker runs containers in attached mode, i.e., the running container takes over the terminal window, making it unusable for issuing host system commands.
Run the container in the background using the -d option to keep the container and current terminal session separate. The detached mode also allows the user to exit the terminal session without stopping the container.
The command for running a container in the background is:
docker run -d [image]The following example runs a container based on the hello-world image in the detached mode.
docker run -d hello-worldDocker prints the container ID in the output and exits to the shell prompt. The container runs in the background and stops without displaying any output in the terminal session.

Run Container Interactively
Docker provides a way to execute commands inside the container. In interactive mode, the user can access a shell prompt inside the running container.
Activate the interactive mode by adding the -i and -t options to the docker run command:
docker run -it [image] [command-or-shell]Replace [command-or-shell] with a command to execute inside the container. Alternatively, provide the path to an interactive shell to access it and enable execution of multiple consecutive commands within the same container.
For example, the command below runs an Ubuntu container and opens a Bash shell prompt inside it:
docker run -it ubuntu /bin/bashDocker runs the container and displays the Bash shell. The commands executed in the shell will affect the system inside the Docker container.

Exit the interactive session by typing exit and pressing Enter.
Run Container and Publish Container Ports
A running container is an isolated, self-sufficient unit whose processes are accessible only from within. To allow external connections to the container, publish a container port and connect it to a host port using the -p option, as shown below:
docker run -p [host-port]:[container-port] [image]For example, execute the following command to run a container based on the nginx:latest image, and map container port 80 to host port 8080:
docker run -p 8080:80 nginx:latest
Use the lsof command to check port 8080 on the host system:
sudo lsof -i:8080The output shows that a Docker process uses port 8080.

Run Container and Mount Host Volumes
As soon as the container stops running, all the changes are deleted since Docker containers do not store user-created data. Therefore, enable storage volumes to make data persist after the container stops.
To mount a volume, use the -v option and specify the location of the directory that will store the data. Furthermore, provide the path to a directory that will be used to access the stored data from inside the container:
docker run -v [path-on-host]:[path-inside-container] [image]For example, the command below runs an Ubuntu container in interactive mode. The /home/marko/test directory is mounted to the test-volume directory inside the container.
docker run -it -v /home/marko/test:/test-volume ubuntuOnce Docker starts the container successfully, the shell prompt appears. To conclude, list the contents of the root directory using the ls command:
lsThe test-volume directory appears in the list.

Run Docker Container and Remove it Once the Process is Complete
The Docker container stops once it executes its tasks, and all the modifications are removed. However, the container's file system remains on the host, taking up space.
If you only need a container to execute a single task and have no use for it or its file system afterward, use the --rm option to remove it when it stops:
docker run --rm [image]The following example runs a container named rm-test based on the hello-world image and sets the --rm option.
docker run --name rm-test --rm hello-worldOnce the container stops, use the following command to list all the containers on the system:
docker ps -aThe output shows an empty list, confirming that Docker removed the container once all its processes were finished.

Note: Want to remove other unnecessary containers from the system? Check out our guide on how to remove Docker containers, images, networks, and volumes.
Conclusion
This tutorial introduced the docker run command and provided a comprehensive list of its options. The article demonstrated how docker run can be customized to suit specific container deployments through several examples.
If you are new to Docker, check out our Docker Commands Cheat Sheet and use this resource to improve your Docker CLI skills.
