The sudo apt update command refreshes the local package index on Debian-based systems. It ensures your system has the latest information about available packages and updates from repositories.
This guide will explain the command's purpose, usage, and differences from apt-get update and apt upgrade.
What Does sudo apt update Do?
The sudo apt update command refreshes the local package index by downloading the latest package lists from all repositories.
When you run the command, apt:
- Connects to each configured repository over HTTP or HTTPS.
- Retrieves metadata files that describe available packages, their versions, and dependencies.
- Updates the local cache stored in /var/lib/apt/lists/.
The command runs with sudo because it modifies system files, but it does not install or upgrade any packages. It only refreshes repository data, so the system knows which updates are available.
Without sudo apt update, the system sometimes attempts to install outdated package versions. For instance, if you install a recently released package without updating first, it leads to version conflicts or dependency issues.
sudo apt update vs. sudo apt-get update
Both apt and apt-get refresh the local package index. The apt-get command still works and is fully supported. However, apt is introduced as a more user-friendly front-end with better output format, progress bars, and simplified syntax.
The following table shows similarities and differences between the two commands:
| Feature | sudo apt update | sudo apt-get update |
|---|---|---|
| Command type | Modern front-end. | Legacy CLI tool. |
| Output | Cleaner, with progress bars and summaries. | Minimal, more technical, plain text. |
| Functionality | Refreshes package metadata. | Refreshes package metadata. |
| User experience | Easier to read and interpret. | More verbose and traditional. |
| Recommended usage | Interactive use and modern scripts. | Legacy scripts or backward compatibility. Not used in the latest versions. |
For updating package indexes, both commands perform the same function. The main reason to switch to apt is improved usability and readability, which is still compatible with Debian-based systems.
sudo apt update vs. sudo apt upgrade
While sudo apt update only refreshes the local package index, sudo apt upgrade installs available updates for your system.
The table below compares the two commands to clarify their differences and usage:
| Feature | sudo apt update | sudo apt upgrade |
|---|---|---|
| Purpose | Refreshes package metadata. | Installs newer versions of packages based on the updated index. |
| System impact | No changes to installed packages. | Updates packages and modifies system files when necessary. |
| Dependencies | Checks available dependencies, but does not install. | Resolves and installs package dependencies. |
| User interaction | Minimal, only fetches metadata. | Sometimes prompts for confirmation before you apply upgrades. |
| Recommended usage | Run before installing or upgrading packages. | Run after sudo apt update to apply updates. |
Why Use sudo apt update
Keeping your system's package metadata up to date is essential to install software safely and correctly. The sudo apt update command ensures your system knows about the latest available packages, their versions, and dependencies.
Run sudo apt update to:
- Avoid outdated packages. Ensures the latest software versions are available for installation.
- Resolve dependencies. Prevents errors caused by missing or incompatible library versions.
- Recognize new repositories. Required after adding Personal Package Archive (PPA) or third-party sources, so packages from those repos can be installed.
- Maintain system security and stability. Keeps track of security updates and bug fixes.
How to Use sudo apt update
sudo apt update refreshes your system's local package information because it retrieves the latest metadata from all configured repositories. This ensures your system knows which packages are available, their current versions, and any dependencies, without actually installing or upgrading.
Run the command before installing any package.
For example, to install Vim, do the following:
1. Update the package index :
sudo apt update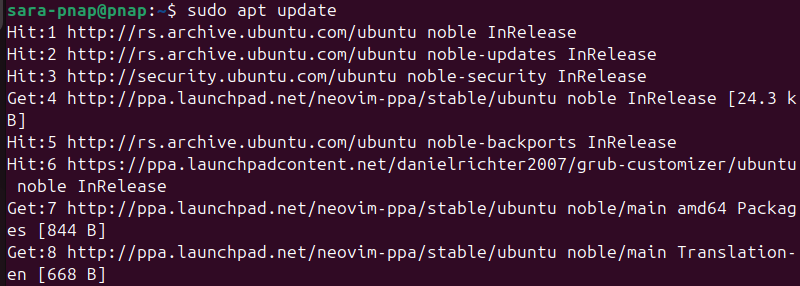
After you run sudo apt update, the terminal output shows which repositories were contacted and how many package lists were updated. This ensures the latest versions are available and prevents issues caused by outdated packages or missing dependencies.
2. Install the software:
sudo apt install vim
3. To see which packages have updates pending, use:
apt list --upgradable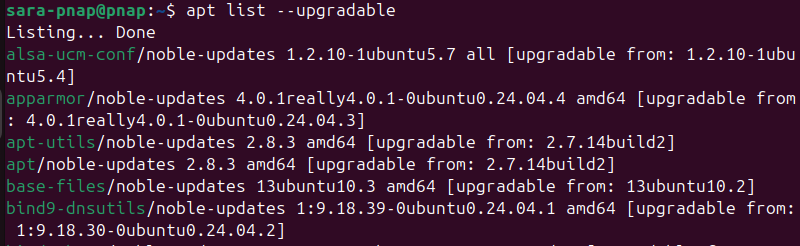
It's also important to run sudo apt update after you add a new repository or PPA. A PPA is a repository that allows developers to distribute newer or customized versions of software for Ubuntu and other Debian-based systems.
After adding a PPA, run sudo apt update so that apt recognizes the new packages and their versions. For instance, to install the latest version of Neovim, a modern fork of the Vim text editor, from its PPA, take these steps:
1.. Add the Neovim PPA:
sudo add-apt-repository ppa:neovim-ppa/stable
This command registers the PPA with your system, so apt is able to access packages provided by the repository.
2. Update the package index:
sudo apt update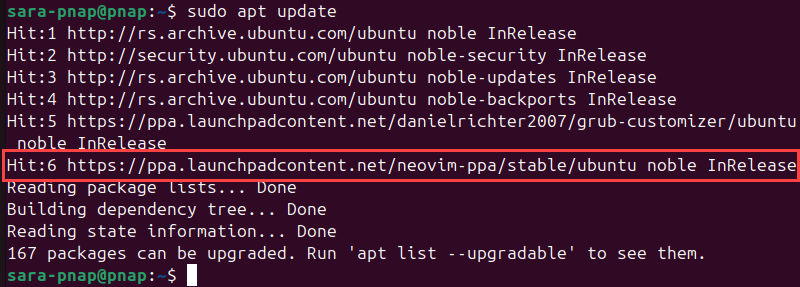
After adding the PPA, your local package metadata is refreshed, so apt is aware of the new packages and their latest versions.
3. Install Neovim:
sudo apt install neovim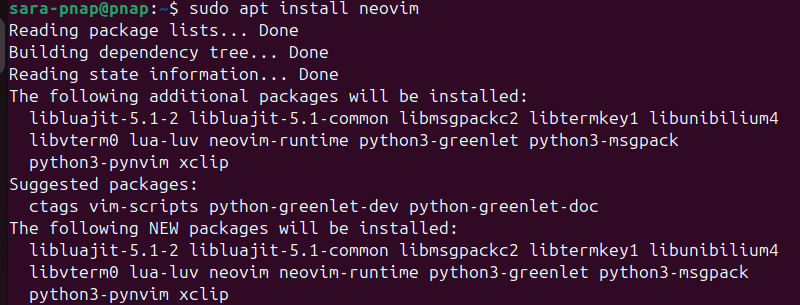
With the updated index, apt installs the latest version of Neovim from the newly added PPA, which ensures you get the most recent features and fixes.
sudo apt update Options
The sudo apt update command provides several options that modify how updates are fetched or displayed. These options reduce output verbosity, automate responses, handle repository changes, or adjust configuration settings temporarily.
The following table summarizes common sudo apt update options and their usage:
| Option | Description |
|---|---|
-q | Reduces output verbosity and hides unnecessary details. Useful for scripts or when minimal output is preferred. |
-y | Automatically answers yes to prompts. |
-o <key>=<value> | Temporarily overrides configuration settings. Used to change cache paths or enable debugging. |
--print-uris | Prints URLs of package lists, but does not download them. Useful for inspection or repository mirroring. |
--allow-releaseinfo-change | Accepts repository metadata changes without manual confirmation. |
--no-list-cleanup | Prevents deletion of old package lists after an update. Useful for debugging or comparing list data. |
sudo apt update: Common Errors & Troubleshooting
Even though sudo apt update is a straightforward command, various issues prevent it from completing successfully. Errors occur due to network problems, invalid repositories, or missing GPG keys.
The following sections explain the most common apt update errors, their causes, and how to fix them.
GPG Error: The Following Signatures Couldn't Be Verified
A GNU Privacy Guard (GPG) key is a cryptographic signature that verifies the authenticity of software packages and repositories. Each repository provides its own key to ensure downloaded packages originate from a trusted source and have not been tampered with.
When sudo apt update encounters a missing or invalid GPG key, it stops updates to prevent unverified data from being used.
This issue usually appears as an error "The following signatures couldn't be verified" or "NO_PUBKEY", followed by a hexadecimal string.
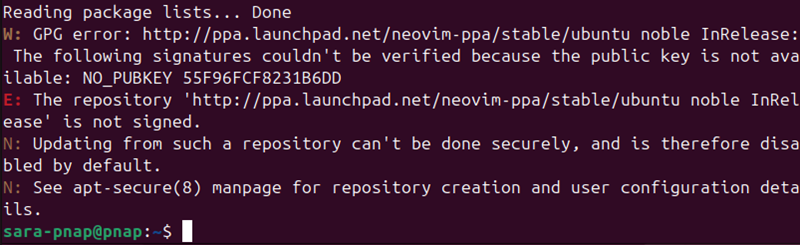
That string represents the missing key ID. For instance, in the error message above, the key ID you need is 55F96FCF8231B6DD.
To resolve the issue, import the missing key with a keyserver. On older systems that still support apt-key, run:
sudo apt-key adv --keyserver keyserver.ubuntu.com --recv-keys 55F96FCF8231B6DDHowever, since apt-key is deprecated, newer Ubuntu and Debian releases require you to store keys directly in /etc/apt/trusted.gpg.d/.
To fix this on newer systems, take the following steps:
1. Import the missing key from the Ubuntu keyserver:
gpg --keyserver hkps://keyserver.ubuntu.com --recv-keys 55F96FCF8231B6DD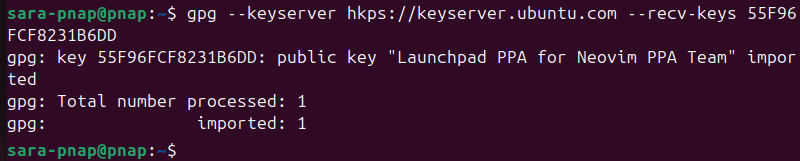
Note: Replace the key ID with the one from your error message.
2. Export the key and save it under /etc/apt/trusted.gpg.d/.
gpg --export 55F96FCF8231B6DD | sudo gpg --dearmor -o /etc/apt/trusted.gpg.d/neovim.gpgThe command has no output
3. Update the repositories again.
sudo apt updateIf the error persists, the repository is obsolete or misconfigured. In that case, remove its entry from the sources.list.d/ directory to prevent future update failures.
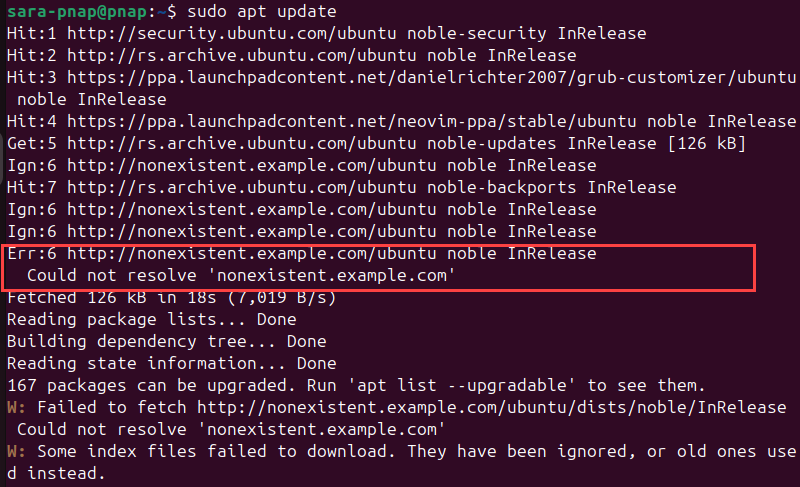
404 Not Found: Repository Does not Exist
A 404 error occurs when sudo apt update tries to access a repository URL that doesn't exist on the server. This happens if the repository has been removed, the distribution codename in the repository line is incorrect, or there's a typo in the URL.
The error message looks like this:
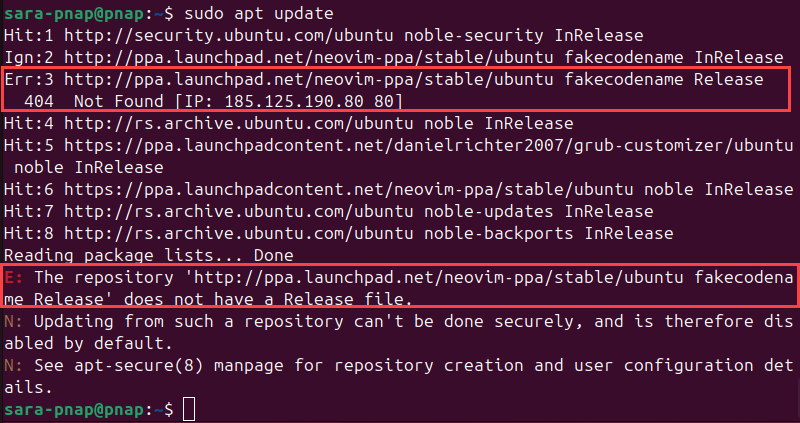
The output contains two important lines:
- The
Errline. Shows which repository URL failed and the server's response (404 Not Found), along with the server IP address. - The
E:line. Summarizes the problem forapt, which indicates the repository cannot be used because it has no Release file, so updates from it are disabled. The Release file is a signed index that tells your system which packages and versions are available.
Note: The mock Neovim PPA is used here for demonstration purposes because it produces a visible 404 when paired with a fake distribution codename.
To solve the error, do the following:
1. Open the repository file in sources.list or sources.list.d/ and verify it matches the correct URL for your Ubuntu version. For example, run cat:
cat /etc/apt/sources.list.d/mock-neovim.list
The output confirms the repository file no longer exists on your system.
Note: Replace
mock-neovim.listwith the actual repository file you are checking in your system if needed.
2. If this is the case, comment it out with a # at the beginning of the line in /etc/apt/sources.list.d/ or remove it entirely:
sudo rm /etc/apt/sources.list.d/mock-neovim.listThe command has no output.
3. Update the package list again to confirm the 404 error is resolved:
sudo apt updateNote: Always confirm the repository supports your Ubuntu codename (e.g., noble for 24.04) before adding a PPA or third-party repository.
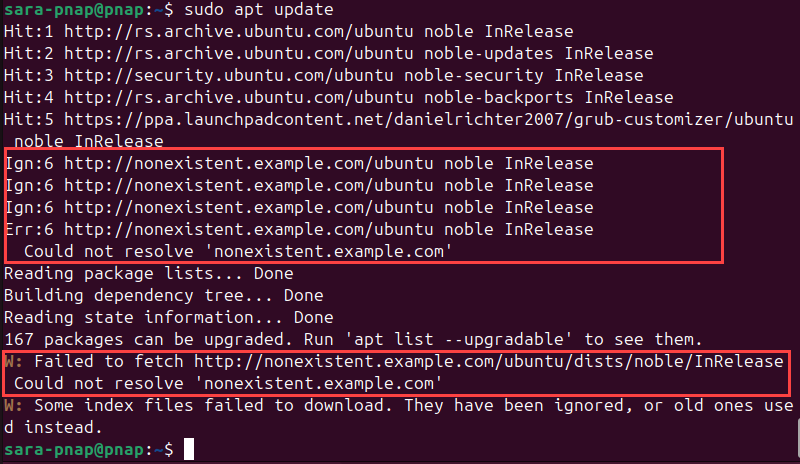
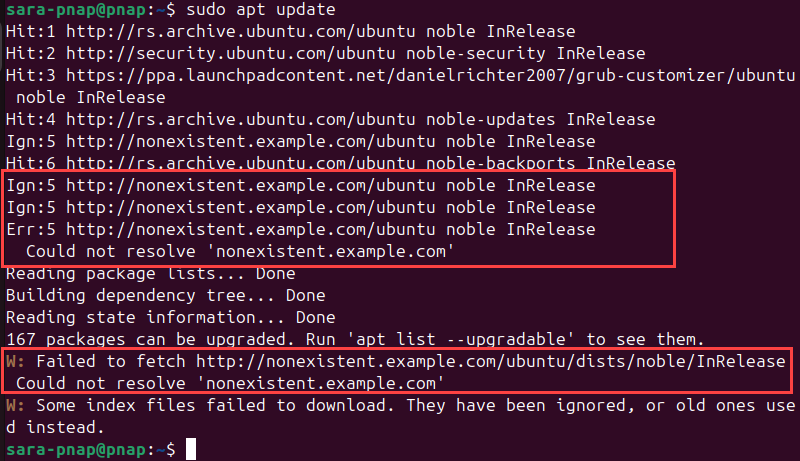
Failed to Fetch: Network or Connectivity Issues
The Failed to fetch error occurs when sudo apt update cannot retrieve package lists from one or more repositories. This happens due to network connectivity issues, incorrect repository URLs, temporary server downtime, or firewall/proxy restrictions that block access.
The error output looks like this:

In this example, http://nonexistent.example.com/ubuntu failed, and the reason given by apt was Could not resolve 'nonexistent.example.com'.
This confirms that the issue is with the repository URL itself, not the local system, which determines whether the problem is server-side or a misconfigured source.
Fix the issue with these steps:
1. Ping a public server to confirm the network connection is working:
ping -c 3 archive.ubuntu.com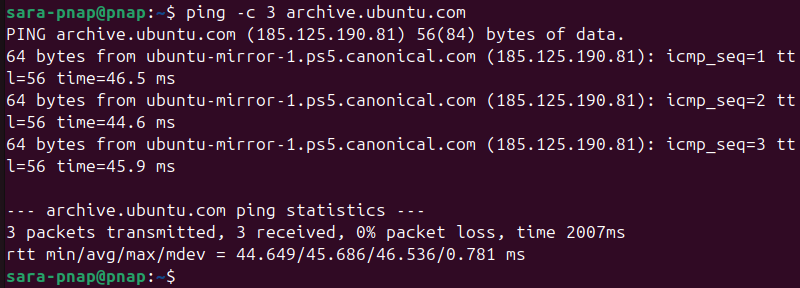
The output confirms the network connection and DNS resolution work, so the error is likely caused by a misconfigured or unreachable repository rather than a local connectivity issue.
If there was a network or DNS problem, the output shows packet loss, timeouts, or unknown host messages instead of successful replies.
2. Open the main sources file with:
cat /etc/apt/sources.list
This indicates the repository is either obsolete or already removed, and is not the cause of the Failed to fetch error. If the main source's files were causing the error, the error message would contain the repository URL.
3. List the repository files in the sources.list.d directory with ls:
ls /etc/apt/sources.list.d/
The output shows all repository files currently present. In this case, the mock-fail.list file is causing the Failed to fetch error. This is the only repository mentioned in the error message in the sudo apt update output with the error:
Any other repository listed by ls /etc/apt/sources.list.d/ is not present in the output and is not causing issues.
4. In case of temporary connectivity problems, rerun:
sudo apt update5. If a repository URL is incorrect or unreachable, comment it out with a # at the start of the line in the .list file, or remove the file entirely:
sudo rm /etc/apt/sources.list.d/<repo>.list6. Once corrected, rerun the command to confirm the error is resolved.
sudo apt updateRelease File Expired or Not Valid Yet
A Release file expired or not valid yet error occurs when sudo apt update encounters repository metadata that is either outdated or has a timestamp in the future.
The Release file is a signed index that informs the system about the packages and versions available. If the timestamp on this file doesn't match the system time or has passed its validity period, apt refuses to update from that repository.
The error looks like this:

The output shows a missing or incomplete repository metadata, which apt treats as a security risk.
It happens if the repository has not been updated recently, if your system clock is incorrect, or if the Release file has expired.
To resolve the issue:
1. Check your system clock and date to ensure they are accurate with the date command. For example:
date
In this case, the time is correct.
2. If incorrect, set the time correctly with timedatectl or sync with an NTP server. For instance:
sudo timedatectl set-ntp onThe command has no output.
3. Update the package lists again:
sudo apt updateIf the error persists, it may indicate that the repository itself has an outdated Release file. In that case, contact the repository maintainer or use a different, up-to-date repository.
Note: The error sometimes appears briefly if a repository is updating its Release file. Retry after a few hours to resolve it without further action.
Repository Changed Its "Suite" or "Codename" Value
This error occurs when the repository metadata no longer matches the distribution codename defined in your system's sources list. This issue occurs after an Ubuntu upgrade, when a repository has not yet been updated to support the new release.
The suite (for example, stable, testing,) or codename (jammy, noble, etc.) in the repository definition no longer aligns with the repository's current metadata.
The error message looks like this:
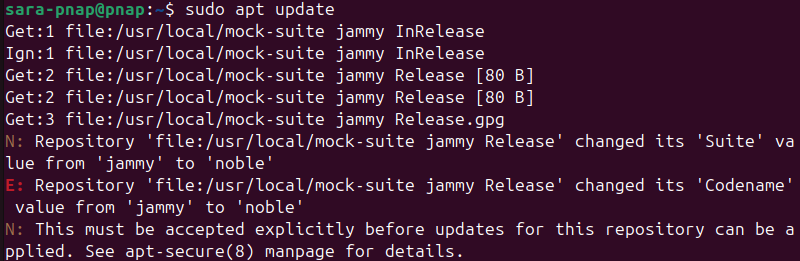
This means apt detected a mismatch between your repository file and the server, and blocks updates until you accept the change.
Note: This example uses the Neovim PPA because it triggers this warning when the suite or codename in its metadata differs from the one in your local sources.
To resolve the issue:
1. Run the following command to accept the repository change:
sudo apt update --allow-releaseinfo-change
2. Run the command again to refresh and make this acceptance permanent:
sudo apt update3. If you encounter this issue frequently, check the repository definition and ensure the codename matches your Ubuntu release:
cat /etc/apt/sources.list.d/neovim-ppa.list
If there is a mismatch, replace any mismatched codename with the one appropriate for your system, if needed. For example, this output shows the codename (jammy) differs from the system (noble)
Invalid or Missing Repository Entry
An invalid or missing repository entry occurs when sudo apt update fails to access a repository due to a nonexistent URL, a typo, or a completely missing .list file. That way, apt is unable to retrieve package information from that source.
The error message looks like this:
The output highlights the repository that failed (http://nonexistent.example.com/ubuntu) and the reason (Could not resolve). This helps users identify whether the issue is caused by a nonexistent or incorrect URL, a missing .list file, or a local network/DNS problem.
Note: In this example, we use a mock repository file named mock-invalid.list to simulate this error.
To resolve the issue:
1. Open the repository file in /etc/apt/sources.list.d/ and verify the URL is correct:
cat /etc/apt/sources.list.d/mock-invalid.list
The output confirms the repository file exists and shows the URL that apt attempted to access. If the URL is incorrect or the repository is no longer valid, this file needs to be corrected or removed.
2. Review what software it provides or check if any installed packages depend on it to confirm whether the repository is required.
3. If the repository URL is wrong or the repository is unnecessary, comment out the line with a # at the beginning or remove the file entirely:
sudo rm /etc/apt/sources.list.d/mock-invalid.listThe command has no output.
4. Update the package lists again to confirm the error is resolved:
sudo apt updateTemporary Failure Resolving Host (DNS Errors)
A Temporary failure resolving host occurs when sudo apt update cannot connect to a repository because the system cannot resolve its domain name. This is caused by DNS misconfigurations, network connectivity issues, or an unavailable DNS server.
The error message looks like this:
The output shows which repository failed and the reason, so users can determine whether the issue is due to a local network problem or a server-side DNS issue.
To resolve the issue:
1. Open the /etc/resolv.conf file and verify your DNS servers are correctly configured:
cat /etc/resolv.conf
The output indicates the error is not caused by a server-side DNS issue. However, if DNS is misconfigured, the system shows missing or incorrect nameserver entries.
This causes apt to fail with a Temporary failure resolving host error. Fix the upstream DNS, or restart systemd-resolved to resolve this issue.
2. Check your network connectivity with ping:
ping -c 3 8.8.8.8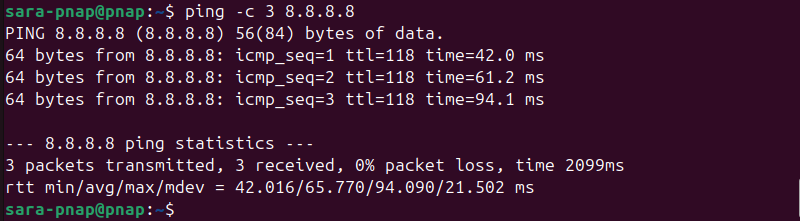
The output shows the network connectivity is good.
3. Test DNS resolution for a domain using nslookup:
nslookup archive.ubuntu.com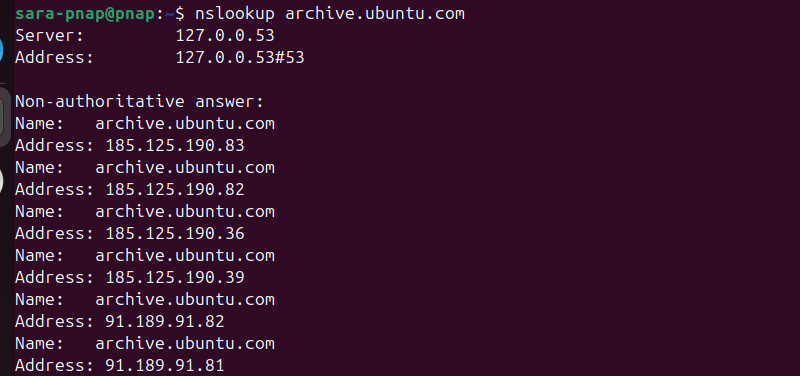
The output shows DNS resolution is working correctly. However, if DNS resolution fails, update /etc/resolv.conf or configure your network settings to use a working DNS server (for example, Google DNS 8.8.8.8 or Cloudflare 1.1.1.1).
4. After fixing the DNS issue, run:
sudo apt updateOther Common and Advanced Issues
In addition to the main errors covered, there are some less frequent issues that still prevent sudo apt update from completing successfully.
The following list presents these issues and likely solutions:
- Hash sum mismatch. Happens when the checksum of a downloaded package metadata does not match the expected checksums. It is caused by interrupted downloads, corrupted cache files, or repository inconsistencies. If you encounter this, run:
sudo rm -rf /var/lib/apt/lists/*
sudo apt update- Disk space or permissions errors. Occurs when
aptcannot write to its cache or list directories due to low disk space or incorrect permissions. Check free space withdf -hand correct permissions in /var/lib/apt/lists/ and /var/cache/apt/archives/ fixes the issue. - Conflicting or duplicate sources. Multiple entries for the same repository cause warnings or prevent updates. Inspect
/etc/apt/sources.list.d/ and /etc/apt/sources.list for duplicates, then remove or comment out redundant entries to restore normal operation. - Temporary failure resolving host (DNS Errors). Network or DNS resolution issues block access to a repository. Check your DNS configuration or run the following to identify and fix connectivity problems:
ping archive.ubuntu.com Conclusion
This tutorial explained what the sudo apt update command does and why to use it. It also elaborated on the differences between this utility and commands such as sudo apt-get update and sudo apt upgrade. The article also presented common issues with sudo apt update and adequate solutions.
Next, learn how to use the APT package manager.