Python is a widely used programming language for automation, data analysis, and web development. Modern Python versions include pip, the package installer for Python used to download and manage third-party Python packages.
This tutorial will explain how to update pip on Windows, Linux, and macOS, as well as how to troubleshoot common updating errors and downgrade pip.
Prerequisites
Update pip on Windows
Modern Python installers for Windows include pip by default and add it to the system PATH. Updating pip ensures compatibility with the latest packages, security patches, and new features.
There are two ways to update pip on Windows: either via the command prompt or via the GUI.
Update pip on Windows via the Command Prompt
Use the Command Prompt to update pip on Windows quickly. This method works across all recent Python versions and is the most direct way to ensure pip is up to date.
Take the following steps:
1. Check the current pip version:
pip --version
This confirms whether pip is installed and shows the currently installed version. In this case, the version is 25.0.1.
2. Update pip using the Python module:
python -m pip install --upgrade pip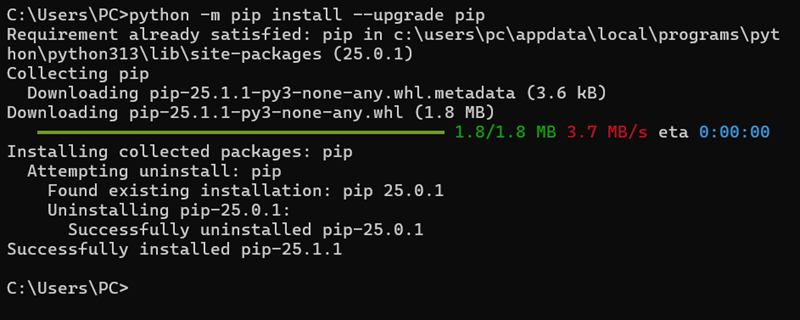
This method ensures pip is upgraded in the correct Python environment.
3. Verify the update with:
pip --version
The output confirms the version number has changed and reflects the latest release, 25.1.1.
Note: The pip update in Windows can be done using PowerShell.
Update pip on Windows via GUI
Using the official Python installer is the simplest way to upgrade pip alongside Python without manually modifying system settings. To accomplish that, take the following steps:
1. Go to the official Python downloads page and locate the Python release you want. In this case, it's Python 3.13.3.

2. Scroll down to the Files section and select the appropriate installer for your system. In this case, the 64-bit version for Windows 11.

3. Run the installer.
4. Double-click the downloaded file to launch the setup wizard.
5. Click Upgrade Now.
6. Wait until the update finishes.
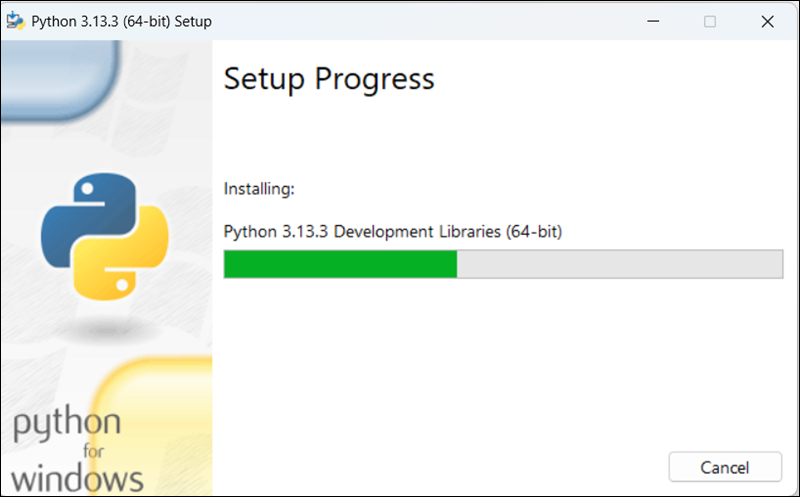
This replaces your current Python version and upgrades pip without changing your settings.
7. Verify the update in the command prompt:
python -m pip --versionConfirm the displayed version matches the latest pip release.
Note: The example uses python -m pip instead of pip --version to ensure compatibility, since the latter command is not always added to the system PATH after installing Python via the installer.
Update pip in Linux
Update pip on Linux to ensure compatibility with the latest Python packages and security patches. Most Linux distributions include pip by default with Python, but the bundled version is often outdated.
There is no standard GUI method for updating pip on Linux. Therefore, updates are performed via the terminal. Take the following steps to update pip on Linux:
1. Check the current pip version with:
pip --version
The output shows the current pip version is 24.0.
Note: If the version is outdated, do not use apt to update pip. The apt package manager installs older versions.
2. Update pip using the python3 command. You might need to use sudo, depending on the system. Run the following command:
sudo python3 -m pip install --upgrade pipHowever, while this works on some distros, on newer Debian-based systems, this command often fails with the following error:
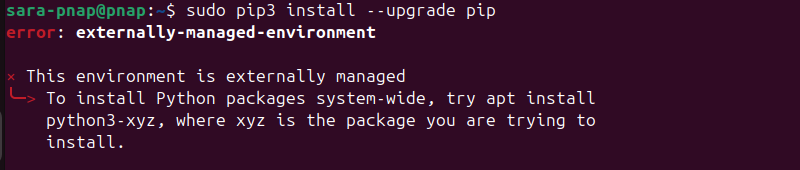
This happens because these systems use a protected Python environment. It prevents users from modifying system-managed Python packages with pip. To bypass this error, you have two options.
One way is to use a virtual environment, which isolates packages from the system Python, which is discussed in later sections.
Another is to force the update with:
python3 -m pip install --upgrade pip --break-system-packages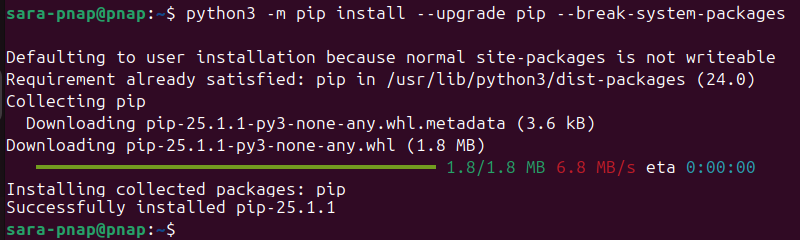
3. If you use the force update, sometimes pip installs properly, but does not work unless you add the installation path to your system's PATH variable. Verify this by checking the previous command output. If it contains a message similar to the one below, you need to add pip to PATH:

To temporarily fix this in your current session, run the export command:
export PATH=$PATH:$HOME/.local/binTo make it permanent, add the same line to your ~/.bashrc or relevant shell configuration file.
4. Confirm the new version with:
pip --version
Update pip on macOS
macOS includes Python and pip by default, especially if Python was installed via the official installer or Homebrew. The update process is simple and consistent across recent macOS versions. You can update pip on macOS via the command line or GUI.
Update pip on macOS via Command Line
Use the macOS Terminal to update pip using built-in Python tools. This method works if Python is preinstalled on macOS or installed via Homebrew.
Take the following steps if Python was preinstalled:
1. Use Spotlight or Finder to open the Terminal app.
2. Check the current pip version.
python3 -m pip --version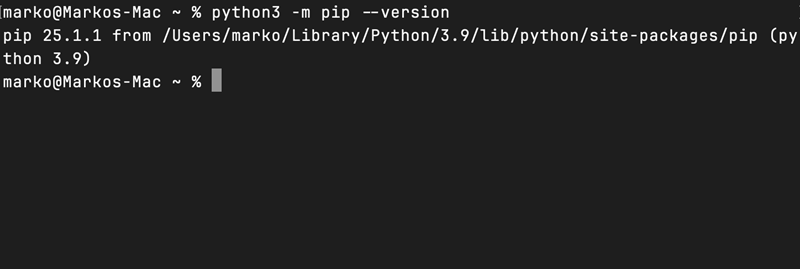
3. Update pip with:
python3 -m pip install --upgrade pip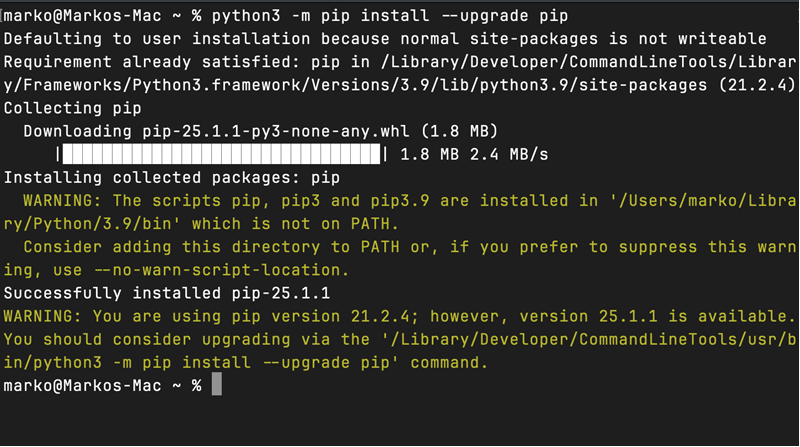
4. If you get a permission error, add the --user flag:
python3 -m pip install --upgrade pip --user5. Verify the update.
python3 -m pip --version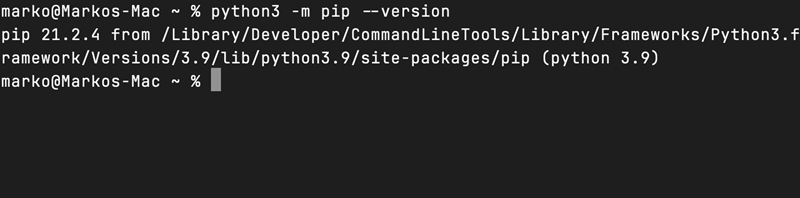
If you installed Python using Homebrew, pip updates are handled by upgrading Python with:
brew upgrade pythonUpdate pip on macOS via GUI
Use the GUI method to update pip if Python was installed using the official Python macOS installer. This process upgrades both Python and pip through the installer interface.
Take the following steps:
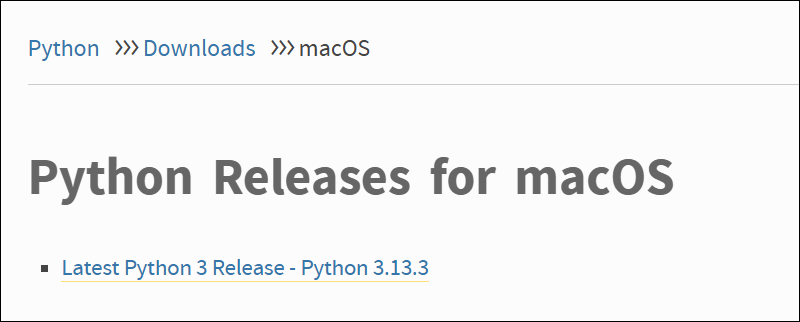
1. Go to the official Python Releases for macOS page and select the Python version you want.
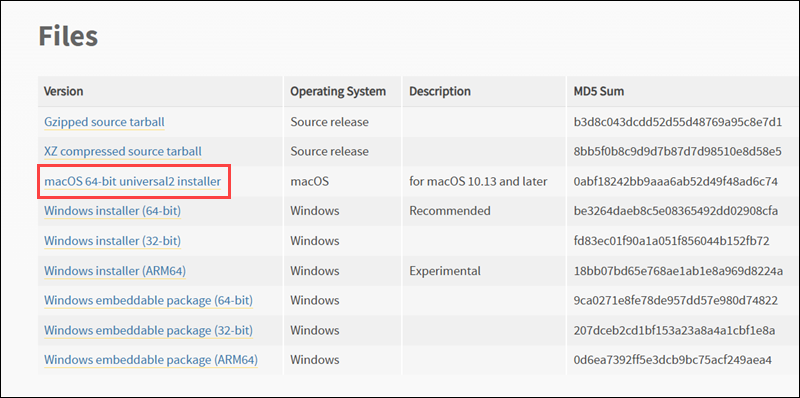
2. Scroll down to the Files section and select the latest macOS 64-bit universal2 installer.
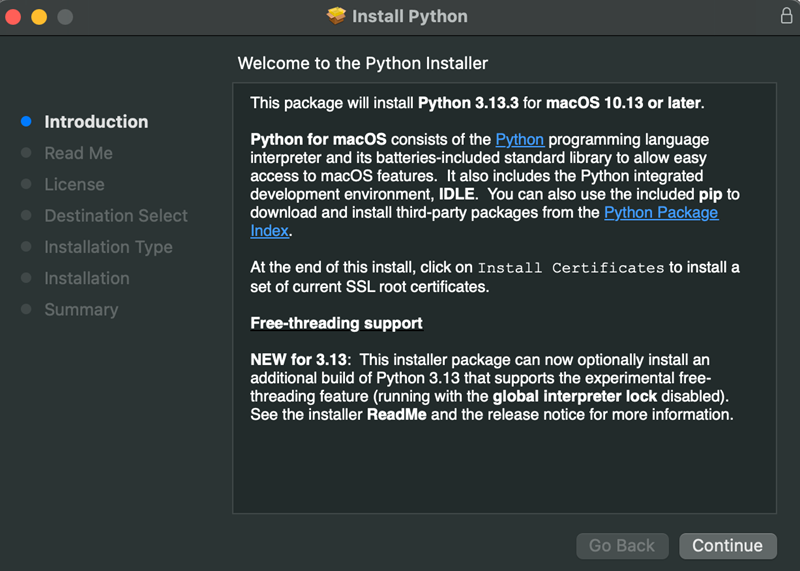
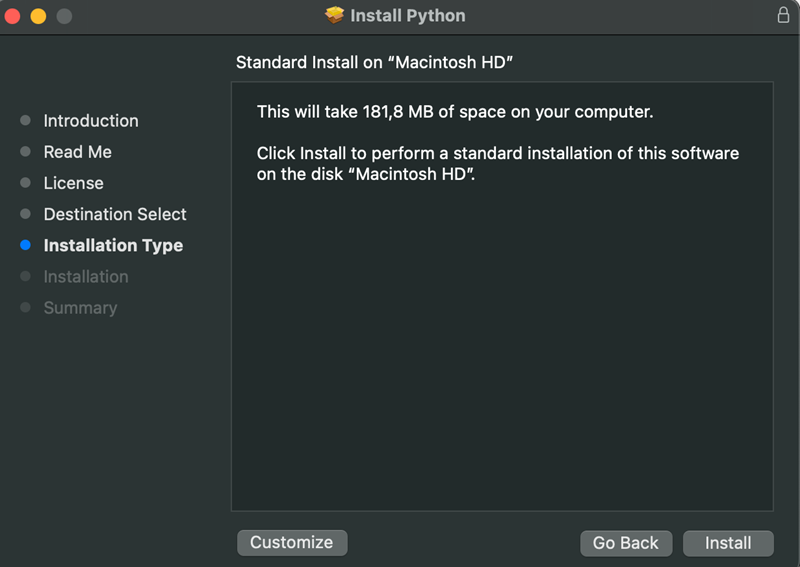
3. Launch the installer and click continue until you reach the Installation Type window.
4. Click Install.
5. Verify the pip version in Terminal. Run the following:
python3 -m pip --versionUpdating pip in Different Virtual Environment Systems
Virtual environments in Python provide isolated spaces for project-specific dependencies, ensuring package installations and updates do not interfere with system-wide configurations or other projects.
Keeping pip updated within these environments is crucial for compatibility, security, and access to the latest features. The method to update pip varies depending on the virtual environment system in use.
The following text presents methods for updating pip in some virtual environments.
Update pip in venv (Standard Python Virtual Environment)
venv is Python's built-in module for creating lightweight, isolated environments for managing project-specific dependencies. It is available on all major operating systems and is the recommended method to manage Python packages in isolated projects.
If the virtual environment is not already created, and you're running a Debian-based distribution, such as Ubuntu, ensure the required packages are installed:
sudo apt install python3-venv python3-full
On most other Linux distributions and operating systems, venv is included with Python 3.3 and later. If it's missing, install the appropriate system packages using your platform's package manager, such as dnf, pacman, or Homebrew. In Windows, venv is bundled with the official Python installer and requires no additional setup.
Next, to create the environment on Linux or macOS, run:
python3 -m venv ~/[environment-name]If you're using Windows, execute:
python -m venv C:\Users\YourName\[environment-name]In this example, we'll create the myenv environment on Linux with:
python3 -m venv ~/myenvThe command has no output.
Once the environment is created, take the following steps to update pip:
1. Activate the virtual environment. To do so in Linux or macOS, run:
source /path/to/venv/bin/activateTo activate the environment in Windows, run:
\path\to\venv\Scripts\activate.batIn this case, the command is:
source ~/myenv/bin/activate
2. Upgrade pip with:
python -m pip install --upgrade pip
3. Verify the update:
pip --version
Note: Each new venv environment may start with the version of pip bundled with your Python installation. Upgrade pip immediately after creating the environment to ensure the latest version is used.
Update pip in virtualenv
virtualenv is an older but still widely used tool for creating isolated Python environments. It works similarly to venv but is more flexible and supports older Python versions and more advanced use cases.
The best way to install virtualenv is to use pipx. Install it with this command if it is not already installed:
sudo apt install pipx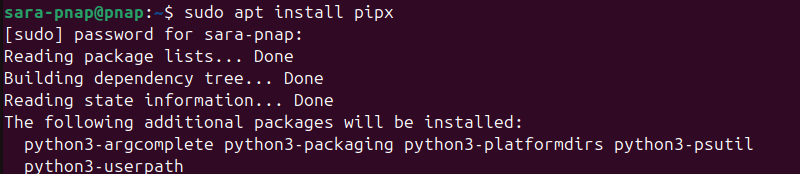
To ensure the pipx binary directories are added to your PATH environment variable, run:
pipx ensurepath
The output confirms that the default install location is already in your PATH.
Install virtualenv using pipx with:
pipx install virtualenv
Note: The alternative commands to install virtualenv are pip install virtualenv and python3 -m pip install --user virtualenv. However, these often fail on newer Debian-based distributions due to PEP 668 protections. These systems block system-wide Python installs outside of virtual environments to avoid breaking the system's Python.
Next, create the environment on Linux or macOS with:
virtualenv ~/[environment-name]If you're using Windows, execute:
virtualenv C:\Users\YourName[environment-name]In this example, we'll create the myenv1 environment on Linux with:
virtualenv ~/myenv1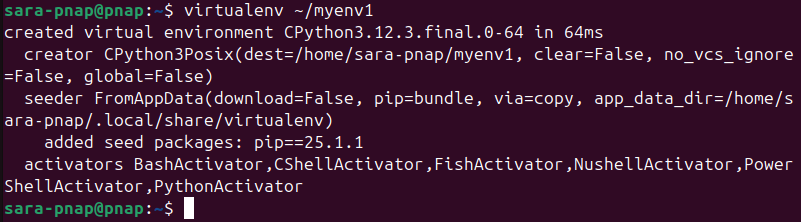
Once the environment is created, update pip by taking the following steps:
1. Activate the virtual environment. To do so in Linux or macOS, run:
source /path/to/env/bin/activateTo activate the environment in Windows, run:
\path\to\env\Scripts\activate.batIn this case, the command is:
source ~/myenv1/bin/activate
2. Once the environment is active, upgrade pip with
python -m pip install --upgrade pip
In the example above, pip is already at its latest version, which is why there was no need for an update. However, this method works on all platforms and keeps your system environment untouched
3. Verify pip is on its latest version with:
pip --version
Update pip in pipenv
pipenv is a tool for managing Python environments and project dependencies that combines Pipfile management with virtual environment creation. It's a convenient way to manage project-specific Python dependencies.
If pipenv is not already installed, install it using pip or pipx.
To install pipenv via pip, run:
pip install --user pipenvNote that this command triggers the PEP 668 restriction in newer Ubuntu or other Debian-based distributions. The restriction prevents installing packages globally in system-managed environments to avoid breaking the system's Python installation. To avoid it, use pipx:
pipx install pipenv
Once pipenv is installed, create a new environment for your project. To do so, run:
pipenv --python 3.xFor example, to create an environment with Python 3.12, run:
pipenv --python 3.12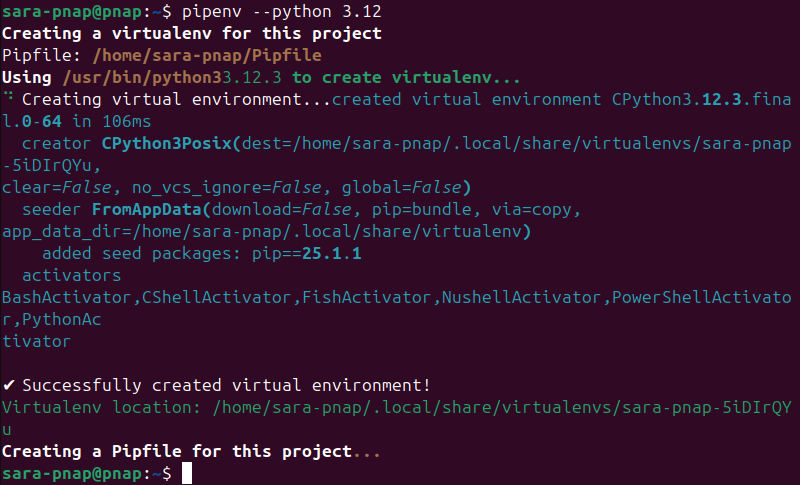
This creates a virtual environment and installs the specified Python version.
To update pip within the pipenv environment, take the following steps:
1. Activate the environment with:
pipenv shell
2. Once the environment is activated, upgrade pip with:
python -m pip install --upgrade pip
The command updates pip or confirms it's already the latest version.
3. Verify pip is updated with:
pip --version
This process ensures pip is up-to-date within your pipenv environment.
Update pip in conda
Conda is a powerful environment and package management tool used in scientific and data science workflows. It manages Python versions, dependencies, and environments across platforms.
To use conda, first install Miniconda (a minimal conda installer) or Anaconda (a larger distribution that includes conda and many preinstalled packages). There are several ways to install either version, depending on your system. Follow the official instructions to install Miniconda or Anaconda for your system.
Note: Check out our instructions on how to install Anaconda on an Ubuntu system.
Once conda is available, create a new environment with a specific Python version:
conda create --name [environment-name] python=[version]For example, to create a new environment named myenv2 with Python 3.12, run:
conda create --name myenv2 python=3.12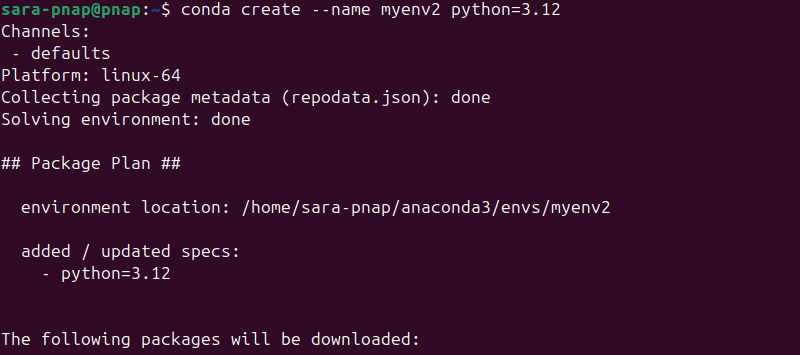
When prompted, confirm the package installation.

To initialize conda, run the following and restart the terminal:
conda initTake the following steps to update pip:
1. Activate the new environment with:
conda activate [environment-name]In this example, the command is:
conda activate myenv2
2. Once the environment is active, upgrade pip with:
python -m pip install --upgrade pip
If pip is already up to date, you'll see a message stating that the current version is already installed. Otherwise, this installs the latest pip version in the isolated conda environment.
3. Check the version with:
pip --version
pip Update: Troubleshooting Common Errors
Updating pip is straightforward, but a few common errors sometimes occur. This section covers these issues and how to resolve them.
Permission Denied: sudo Required
When running some commands, an error like this may appear:
PermissionError: [Errno 13] Permission denied: '/usr/lib/python3.x/site-packages/pip'This issue arises when you're trying to install or update pip system-wide but lack sufficient permissions. To fix it, use sudo to grant the necessary permissions for system-wide updates.
pip is already up-to-date
After attempting to upgrade pip, you might receive the message:

This message means pip is already at the latest version, and there is no need for an update. To confirm this, check the installed version:
pip --versionIf pip is already up-to-date, there's nothing further to do.
Externally Managed Environment Error
When trying to update pip, sometimes this error appears:
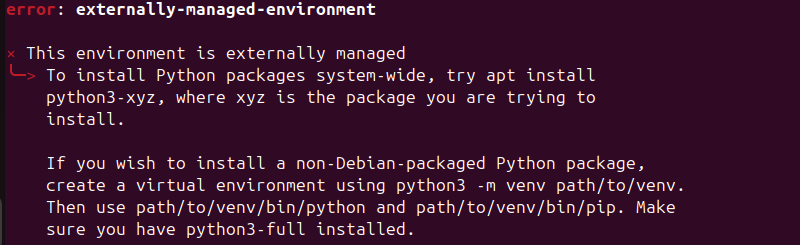
This error occurs on Linux systems using an environment where system-level Python is managed by the distribution (e.g., Ubuntu). It prevents pip from being upgraded in the global environment.
To bypass this error, either use apt for system-wide updates and install and use pipx, or create a new virtual environment to manage Python packages separately. Another option is to force the update.
SSL Errors or Connection Issues
Another common issue is encountering SSL or connection errors, such as:
Could not fetch URL https://pypi.org/simple/pip/: There was a problem confirming the ssl certificateThis happens due to incorrect or missing certificates, proxy issues, or network connectivity problems.
To fix this error, ensure your system has the necessary SSL certificates and check if you're behind a proxy.
On Ubuntu, update the certificates with:
sudo apt install --reinstall ca-certificates
In some cases, your internet traffic is routed through a proxy server, and direct internet access may be blocked, causing connection or timeout errors.
To allow pip to work through a proxy, configure the terminal to route requests via the proxy:
export https_proxy=http://user:password@proxyserver:portexport http_proxy=http://user:password@proxyserver:portIn the commands above, replace the following parameters:
Replace:
user:passwordwith your proxy credentials (if required).proxyserverwith your proxy address.portwith the proxy port (commonly 8080 or 3128).
No Matching Distribution Found Error
You might encounter this error when trying to install or upgrade a package:
Could not find a version that satisfies the requirement pip==This happens when the specified pip version is not available or compatible with your Python version.
To fix the error, check the pip versions available for your Python version. Alternatively, upgrade pip to the latest version without specifying a version using the methods stated above.
If you need a specific version of pip, check the official PyPI repository to confirm which versions are supported for your version of Python.
Pipenv or Conda Conflicts
If you're using tools like pipenv or conda, you may encounter conflicts when updating pip.
These tools manage their own environments, sometimes causing confusion when trying to update pip system-wide or within the virtual environment.
To ensure this does not happen, always activate the environment before running pip commands.
Python Version Incompatibility
If you're trying to upgrade pip, but the Python version you're using is not supported by the latest pip release, you may see errors related to version compatibility.
To avoid this, check which Python version is installed:
python3 --versionEnsure your Python version is compatible with the version of pip you're trying to install. If necessary, update your Python version or use a version manager like pyenv to switch between Python versions.
Downgrade pip
To downgrade pip, install a specific older version using the --upgrade flag followed by the version number. This is useful if a newer version causes compatibility issues with certain packages or environments.
The command is:
python3 -m pip install --upgrade pip==[version]For example, to downgrade to version 23.2.1, run:
python -m pip install --upgrade pip==23.2.1This replaces the current version with the specified one.
In case this causes the externally-managed-environment error, use either a virtual environment or force system downgrade (which is not recommended).
To use a virtual environment, run the following:
python3 -m venv myenv
source myenv/bin/activate
pip install pip==23.2.1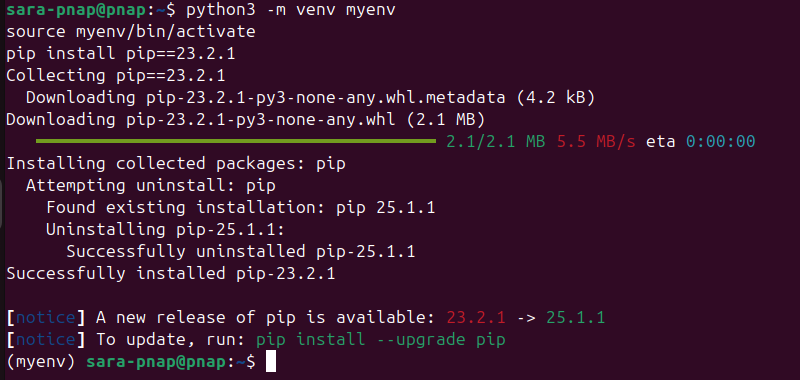
To force a system downgrade, run:
python3 -m pip install --upgrade pip==23.2.1 --break-system-packageUse the following to confirm the change:
pip --version
Conclusion
This tutorial explained how to update pip for Python using different methods on Windows, Linux, and macOS systems. It also presented common updating issues and elaborated on possible solutions. The text also explained how to downgrade pip.
Next, learn how to install NumPy, a powerful Python library for numerical computing on Windows, Linux, and macOS.