Laravel is an object-oriented PHP framework for creating modular web applications. It is flexible and fast, allowing developers to build anything from small websites to robust enterprise solutions.
Docker is a frequent choice for Laravel application deployment. Creating a multi-container Docker setup for a Laravel app simplifies development, testing, and the transition to production.
This article will show you how to set up a Laravel application to work in Docker.
Prerequisites
- A Laravel application to containerize.
- Docker installed.
- Docker Compose installed.
Why Use Docker for Laravel?
Docker facilitates the development of Laravel applications by eliminating the need to manually install and configure Laravel's dependencies, such as PHP and web servers (Apache or Nginx). All dependencies already exist as images on Docker Hub, and they can be added to deployment as separate container services.
Another significant benefit of using Laravel in Docker is that it eliminates many deployment issues by allowing developers to create dev Docker environments and reuse the images for production.
How to Deploy Laravel App with Docker?
To prepare a Laravel app for a containerized Docker deployment, you must:
- Adjust the Laravel environment parameters.
- Configure the web server.
- Create the necessary Docker files.
Follow the steps below to create a multi-container Laravel app deployment with Docker.
Step 1: Configure .env File
Laravel stores its environment configuration in the .env file located in the main app directory. The following section describes how to edit the file to prepare it for a Docker deployment.
1. Navigate to the main app directory:
cd [laravel-app-directory]2. Use a text editor to open the .env file. This tutorial uses Nano.
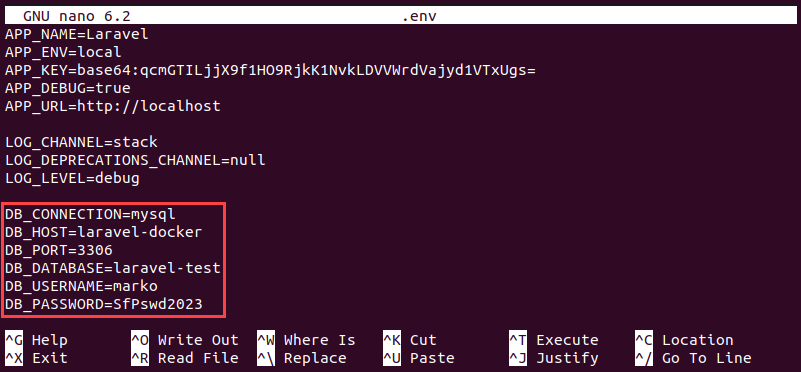
nano .env3. Scroll to the database section of the document. The section contains the following fields:
DB_CONNECTION. The DBMS (MySQL, MariaDB, PostgreSQL, SQLite, or SQL Server) listed here are used for the deployment.DB_HOST. When deploying a Laravel app in Docker, this field should contain the name of the database service.DB_PORT. The database port, with 3306 as the default value.DB_DATABASE. The name of the database.DB_USERNAMEandDB_PASSWORD. The database credentials.
Change the values to correspond to your deployment. The example below uses MySQL as the DBMS and names the service laravel-docker.
Save the file and exit.
Step 2: Create Dockerfile
After configuring the necessary environment parameters, proceed to create the Dockerfile for the application image. To create the Dockerfile, execute the steps below.
1. Use a text editor to create a file named Dockerfile in the main app directory:
nano Dockerfile2. Copy and paste the following code into the file.
FROM php:8.2-fpm

ARG user
ARG uid

RUN apt update && apt install -y \
    git \
    curl \
    libpng-dev \
    libonig-dev \
    libxml2-dev
RUN apt clean && rm -rf /var/lib/apt/lists/*
RUN docker-php-ext-install pdo_mysql mbstring exif pcntl bcmath gd

COPY --from=composer:latest /usr/bin/composer /usr/bin/composer

RUN useradd -G www-data,root -u $uid -d /home/$user $user
RUN mkdir -p /home/$user/.composer && \
    chown -R $user:$user /home/$user

WORKDIR /var/www

USER $user
Save the file and exit.
When executed, the code above instructs Docker to install the necessary packages and set up the user account inside the container to match the current user.
Step 3: Configure Nginx
Configure a web server to ensure that it correctly serves the containerized Laravel app. The following section explains how to configure Nginx and prepare it for a Docker Compose deployment.
1. Create a directory for the Nginx configuration by executing the command below in the main app directory:
mkdir -p docker-compose/nginx2. Use a text editor to create an Nginx configuration file. The filename should correspond to the name of your app:
nano docker-compose/nginx/[app-name].conf3. Copy and paste the following code into the file.
server {
    listen 80;
    index index.php index.html;
    error_log  /var/log/nginx/error.log;
    access_log /var/log/nginx/access.log;
    root /var/www/public;
    location ~ \.php$ {
        try_files $uri =404;
        fastcgi_split_path_info ^(.+\.php)(/.+)$;
        fastcgi_pass app:9000;
        fastcgi_index index.php;
        include fastcgi_params;
        fastcgi_param SCRIPT_FILENAME $document_root$fastcgi_script_name;
        fastcgi_param PATH_INFO $fastcgi_path_info;
    }
    location / {
        try_files $uri $uri/ /index.php?$query_string;
        gzip_static on;
    }
}
Save the file and exit.
Step 4: Create docker-compose.yml
With all the preparatory steps complete, create a Docker Compose YAML file that defines the service network and three separate containerized services that make up the deployment. Follow the steps below to set up the file:
1. Create the Docker Compose file in the main app directory:
nano docker-compose.yml2. Paste the following code and replace the values in square brackets with your actual values:
version: "3.7"
services:
  app:
    build:
      args:
        user: [current-user]
        uid: 1000
      context: ./
      dockerfile: Dockerfile
    image: [image-name]
    container_name: [container-name]
    restart: unless-stopped
    working_dir: /var/www/
    volumes:
      - ./:/var/www
    networks:
      - [network-name]
  db:
    image: mysql:8.0
    container_name: [db-container-name]
    restart: unless-stopped
    environment:
      MYSQL_DATABASE: ${DB_DATABASE}
      MYSQL_ROOT_PASSWORD: ${DB_PASSWORD}
      MYSQL_PASSWORD: ${DB_PASSWORD}
      MYSQL_USER: ${DB_USERNAME}
      SERVICE_TAGS: dev
      SERVICE_NAME: mysql
    volumes:
      - ./docker-compose/mysql:/docker-entrypoint-initdb.d
    networks:
      - [network-name]
  nginx:
    image: nginx:alpine
    container_name: [nginx-container-name]
    restart: unless-stopped
    ports:
      - 8000:80
    volumes:
      - ./:/var/www
      - ./docker-compose/nginx:/etc/nginx/conf.d/
    networks:
      - [network-name]
networks:
  [network-name]:
    driver: bridge
Save the file and exit.
The file has four sections:
services.app. The app section tells Docker Compose to use the main app directory as the context and the Dockerfile as instructions to create a Docker image.services.db. This section provides information about the DBMS image and assigns the values provided in the app's .env file to the database's environment variables.services.nginx. The web server section maps the internal Docker port 80 to the external port 8000. It also connects the Nginx configuration directory created in a previous step with the Nginx's conf.d directory inside the service container.networks. All the previous sections specify the network that enables them to connect. The network section defines the driver for that network.
Step 5: Build Application
With the Docker Compose file complete, proceed to create the Docker image for the app. Type the command below while in the main app directory:
docker-compose build appWait for the procedure to finish. If there are no errors, Docker Compose outputs the success messages.

Step 6: Start Application
The final step involves using Docker Compose to create the containers for all three services. Execute the following command to start the procedure:
docker-compose up -dNote: The -d option enables the detached mode, allowing you to continue working in the same terminal window.
The output confirms that the containers have been created successfully.

You can also execute the ps command to check the state of the containers.
docker-compose psIf everything is in order, the State column shows the Up status for all three containers.

Finally, navigate to the following address in a web browser:
localhost:8000The app you deployed shows up in the window.

Conclusion
After reading this tutorial, you should know how to deploy a Laravel app using Docker and Docker Compose. The tutorial covered the steps necessary to set up the app, its database, and the web server that handles the networking.
Next, if you work on a large project, you should learn How to Optimize Docker Performance.
