n8n is an open-source platform for workflow automation. It enables developers to visually connect apps, services, and APIs through a simple drag-and-drop editor. Users can build workflows without coding or extend them with JavaScript when more control is needed.
n8n Cloud offers a hosted option, but you can also run n8n locally or on your server for full control.
This article will show you how to install n8n on your local machine.
Prerequisites
- A machine running Linux (Debian/Ubuntu), macOS, or Windows.
- A user account with admin/sudo privileges.
- (Option 1) Docker installed on Ubuntu/Debian, Windows, or macOS.
- (Option 2) Node.js and npm installed on Ubuntu/Debian, Windows, or macOS.
- Network access to port 5678 (open by default for localhost use).
Why Run n8n Locally?
A local n8n installation provides users with:
- Full control over workflows. You can develop, test, and scale the automation environment without depending on third-party infrastructure or worrying about subscription costs.
- Data privacy. Sensitive data stays on your machine. In regulated industries, this ensures compliance and allows you to conduct tests with real in-house datasets.
- Direct access to local applications. You can integrate directly with local applications and databases without uploading data to the cloud. This can result in lower latency and better performance.
- Developer-friendly environment. Automations keep running even without internet access. You can experiment with custom nodes, debug workflows, or test new features without ever deploying them to a production environment.
Note: If you are still evaluating hosting options, read the following article to explore the pros and cons of keeping data on-premise or in the cloud.
How to Install n8n Locally
There are two primary methods to install n8n on a local machine:
- Docker installation. Works across operating systems and is ideal for users who want to keep n8n and its dependencies isolated from the rest of the system.
- Node.js and npm installation. Installs n8n directly on the operating system without the container overhead. This option is quick and practical for small-scale deployments or development environments. However, this installation does not preserve workflows and data between restarts by default. Persistence needs to be set up separately.
Note: The n8n Desktop App was a popular method for installing and using n8n. However, it was discontinued on August 15th, 2025.
Install n8n Locally via Docker
With Docker, you can deploy the same n8n setup on any system. Libraries, dependencies, configurations, and runtime behaviour remain consistent across environments.
Docker Compose, which is included in most Docker installations, allows you to run n8n persistently far more easily than with raw Docker commands.
To install n8n via Docker:
1. Open a terminal and create a dedicated project directory to keep all n8n-related files organized:
mkdir n8n-dockerChange to the directory:
cd n8n-docker
2. Create a docker-compose.yml file in the n8n-docker directory using the default text editor for your operating system.
On Ubuntu, Debian, and macOS, you can use the nano text editor to create the file:
nano docker-compose.ymlOn Windows (Command Prompt or PowerShell), use Notepad:
notepad docker-compose.yml3. Paste the following code in the file:
services:
  n8n:
    image: n8nio/n8n
    container_name: n8n
    ports:
      - "5678:5678"
    volumes:
      - ~/.n8n:/home/node/.n8n
    restart: unless-stopped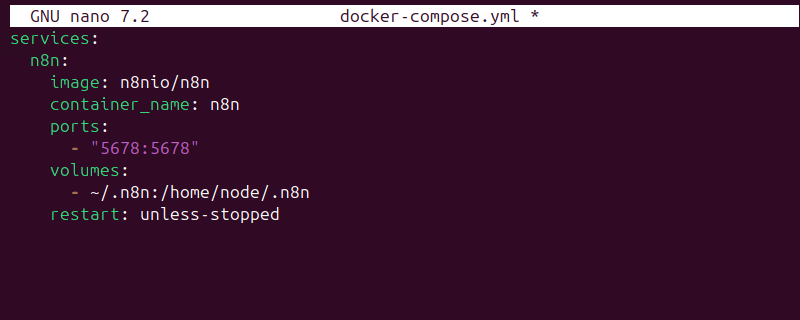
In Windows, replace ~/.n8n, under the volumes tag, with the full path to your user folder. For example:
- C:\Users\User1\.n8n:/home/node/.n8n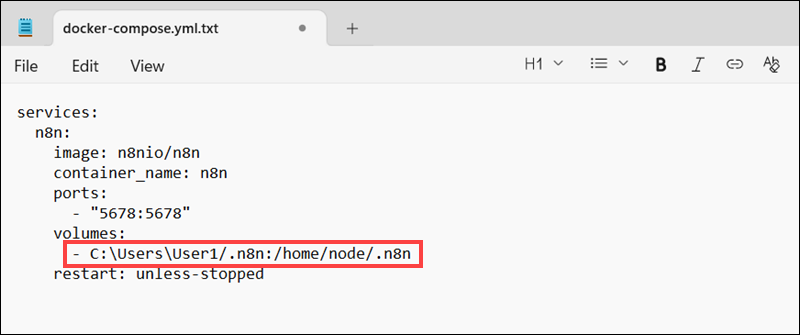
4. Save and exit the file.
5. Before running n8n in containers, ensure Docker is running.
- On Ubuntu/Debian, Docker starts automatically after installation and on reboot.
- On macOS and Windows, you must start the Docker Desktop application manually.
6. Use Docker Compose to run the container in detached mode so it continues running in the background. The command is the same for all operating systems:
docker compose up -d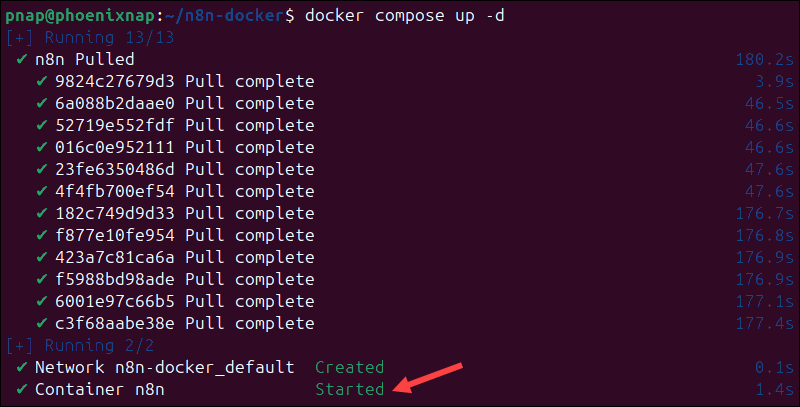
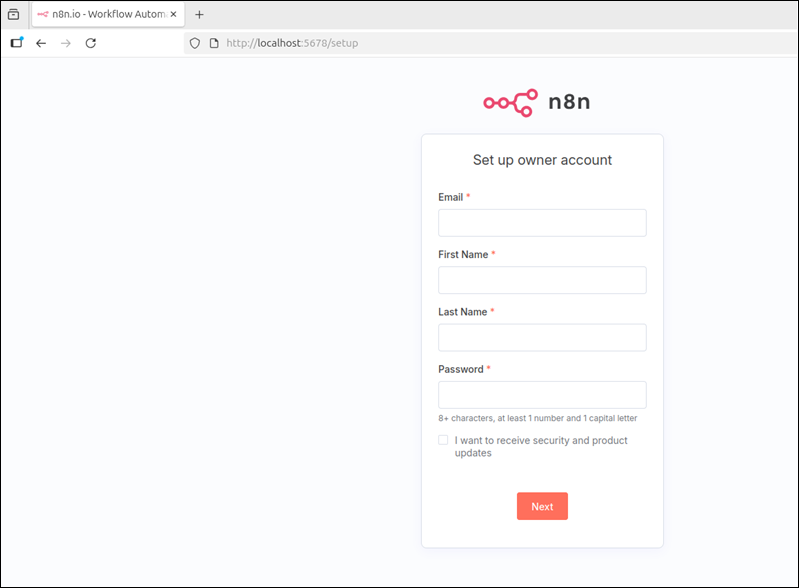
7. Once the container is running, open your browser and access the n8n UI:
http://localhost:5678Note: The EACCES: permission denied, open '/home/node/.n8n/config', is a common error on Ubuntu when installing n8n via Docker. It occurs because the container runs as user UID 1000 (node), but the mounted host directory may be owned by root. This causes a permissions mismatch. If you encounter this error, you can fix permissions on the host directory using the following commands:
mkdir -p ~/.n8nsudo chown -R 1000:1000 ~/.n8nchmod -R u+rwX ~/.n8n
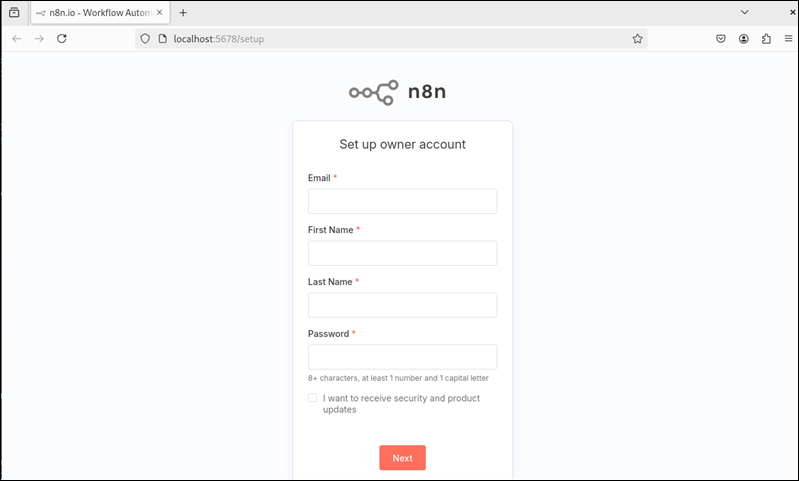
8. When launched for the first time, n8n prompts you to create the owner account. Enter your email, name, and password.
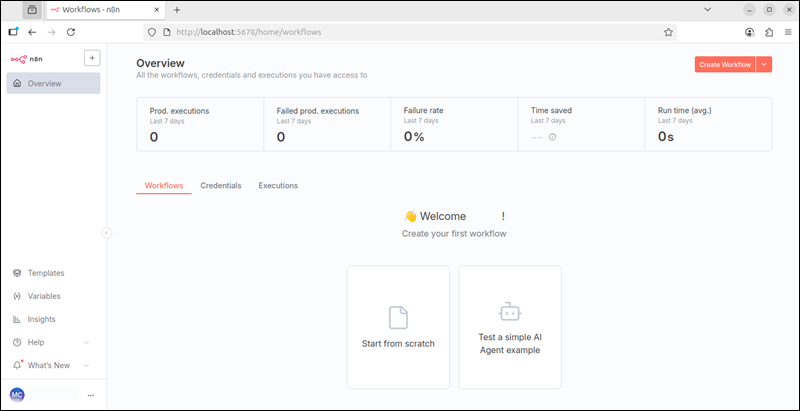
After completing the setup, you are redirected to the n8n dashboard.
9. To stop n8n from the terminal, enter the following command:
docker compose down
This command stops and removes all running containers but keeps their associated persistent data on disk.
Install n8n Locally via npm (Node.js)
This method installs n8n directly on your system using Node.js and npm.
Unlike Docker Compose, this type of installation does not preserve data and workflows between system restarts by default. It is best suited for testing or temporary setups where persistence is not required.
Note: To preserve data and workflows between restarts, you must manually configure n8n as a background service. For example, using the systemd service unit on Linux, or the NSSM tool on Windows.
To install n8n via Node.js and npm:
1. Use the npm command to install n8n globally so it can be run from any directory:
| Operating System | Install n8n Globally |
|---|---|
| Ubuntu/Debian | sudo npm install -g n8n |
| Windows (PowerShell) | npm install -g n8n |
| macOS | npm install -g n8n |
2. Enter the following command to start n8n (applies to all operating systems):
n8n3. Press o in the terminal to open the setup page. Alternatively, open your browser and go to http://localhost:5678 to access the n8n UI.
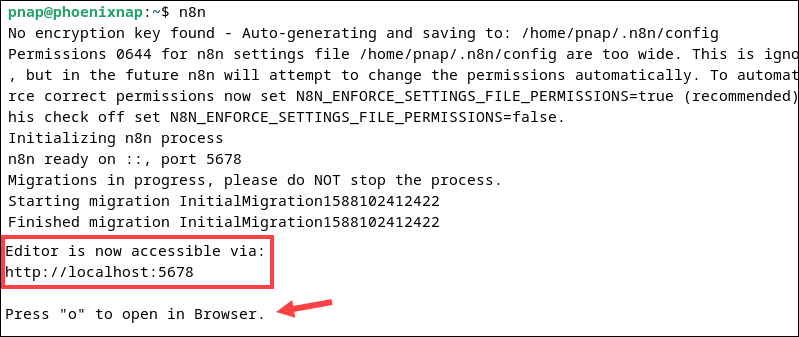
Note: n8n listens on port 5678 by default.
4. Fill out the required details to set up the n8n owner account. Provide your email, name, last name, choose a password, and click Next.
You now have access to the n8n dashboard, where you can start creating and managing workflows.
Tips for Local Testing with n8n
Use the tips from the sections below when testing n8n workflows on your local machine.
Run n8n in Development Mode
One of the main benefits of n8n is its ability to easily connect to external third-party services, like payment processors or GitHub.
To make the local n8n instance accessible to these services, run it in development mode with a public tunnel:
n8n start --tunnelThe secure tunnel exposes the local n8n instance so external services can reach it. You can safely test integrations before deploying workflows to production.
View Logs in Real Time
During development, it's important to monitor what n8n is doing while you make changes. Use the commands below to stream live logs as workflows execute in real time.
If you installed n8n via Docker and Docker Compose, enter:
docker compose logs -fUse the following command if you installed n8n via npm:
n8n start --log-level=debugTest Individual Nodes
Instead of executing the entire workflow, right-click a node and select the Execute Step or Execute Node option to run only that node.
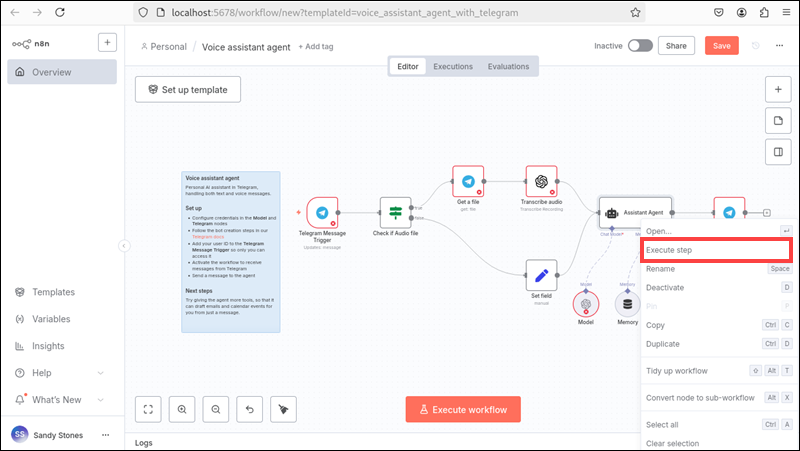
You can isolate the step when and where issues occur and quickly verify the inputs, outputs, and logic for the problematic node.
Isolate Sensitive Data
Small mistakes in test workflows can modify or delete critical records or interfere with real transactions. If using live data for testing, be careful not to corrupt or accidentally overwrite it during experiments.
Keep test and production data isolated in separate databases or environments.
Review n8n Executions
The Executions tab in the Overview section of the n8n UI contains a history of workflow runs. By selecting a workflow execution, you can view the raw JSON data for every node and step in the flow.
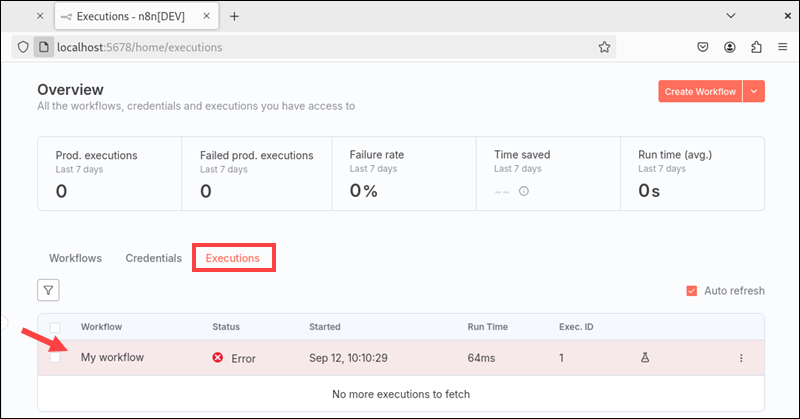
If a workflow stops midway without an apparent cause, this tab provides detailed information for debugging.
External API Testing Tools
To avoid real charges and hitting request rate limits when integrating a third-party API, like a payment processor, use online API tools such as Postman.
These tools allow you to send mock JSON payloads to verify that triggers fire, nodes correctly parse and transform incoming data, and workflows start as expected.
Delete Old Executions
n8n saves all previous executions and lists them in the Executions tab. Although this history is helpful for analysis and tracking, it can, over time, clutter the view and even slow down the system.
You can delete old executions manually from the Executions tab in the n8n UI to keep it tidy and focused. Alternatively, run the following command in the terminal to delete all stored executions:
n8n execute --delete-executionsStore Configurations in .env File
Create an external .env text file to store configuration values, such as ports, database credentials, and webhook URLs, instead of hardcoding them. For example:
N8N_PORT=5678
DATABASE_NAME=n8n_test_database
DATABASE_USER=n8n_database_user
DATABASE_PASSWORD=323eaxd%%
DATABASE_HOST=test.example.com
DATABASE_PORT=3306
API_KEY=api-key-here
WEBHOOK_URL=https://example.com/webhook
n8n automatically loads the .env file from the current working directory each time it starts. You can reference these values inside workflows using expression syntax:
{{$env.DATABASE_PASSWORD}}This setup is portable and reproducible across systems. You are also less likely to accidentally expose credentials in workflows.
Duplicate Workflows Before Major Changes
If working on an important workflow, create a copy first to preserve the original in case new changes break something.
To make a copy in the n8n UI:
1. Open the Overview pane and locate the workflow to duplicate.
2. Click the ⋮ button (three vertical dots) next to the workflow to open more options.
3. Select Duplicate.
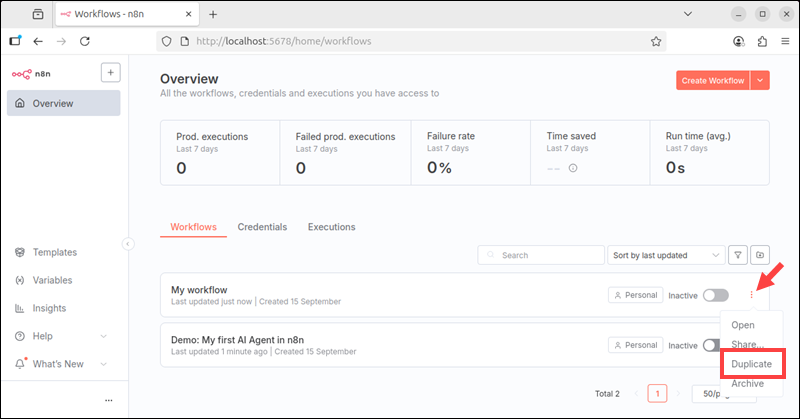
4. Enter a new name for the copied workflow.
The duplicated workflow appears in the main list, separate from the original.
Conclusion
You have successfully set up n8n on your local machine using Docker or via a direct Node.js installation. The best way to learn is to start building simple workflows right away.
Before integrating with external services and building real-world automations, secure your setup by configuring Nginx as a reverse proxy for a Docker container and then enabling HTTPS with Let's Encrypt on a Nginx reverse proxy.