Working on multiple projects in a complex microservices environment takes time and strains the available resources. Jenkins is a continuous integration (CI) tool that aims to solve this problem by automating the software development process.
A Kubernetes cluster adds another automation layer to Jenkins. It ensures that Jenkins always has the right amount of resources available.
This tutorial shows how to install Jenkins on a Kubernetes cluster.
Prerequisites
- Command-line access.
- A working Kubernetes cluster.
- The kubectl CLI installed on the local system.
Install Jenkins on Kubernetes Cluster Using YAML Files
The YAML files for installing Jenkins on Kubernetes are easily tracked and edited. They are reusable, which is why YAML files are often used to deploy apps on Kubernetes.
Follow the steps below to install Jenkins on a Kubernetes cluster using YAML manifests.
Warning: The YAML files in this article illustrate the Jenkins deployment process. They should not be used in a production environment without being modified to accommodate cluster-specific settings and network resources.
Step 1: Create Namespace for Jenkins Deployment
A distinct namespace provides an additional isolation layer and control over the continuous integration environment. Create a namespace for the Jenkins deployment by typing the following command in your terminal:
kubectl create namespace [name]The name of the namespace should be a DNS-compatible label. The example below uses the name jenkins.

Use the following command to list existing namespaces:
kubectl get namespacesThe output confirms that the jenkins namespace was created successfully.

Step 2: Create Service Account
Service accounts provide identities that are used to control Kubernetes pod processes. Follow the steps below to create a service account on a local cluster:
1. Use a text editor to create a file for storing the service account declarations:
nano sa-jenkins.yaml2. Paste the following code into the file:
---
apiVersion: rbac.authorization.k8s.io/v1
kind: ClusterRole
metadata:
  name: admin
rules:
  - apiGroups: [""]
    resources: ["*"]
    verbs: ["*"]
---
apiVersion: v1
kind: ServiceAccount
metadata:
  name: admin
  namespace: jenkins
---
apiVersion: rbac.authorization.k8s.io/v1
kind: ClusterRoleBinding
metadata:
  name: admin
roleRef:
  apiGroup: rbac.authorization.k8s.io
  kind: ClusterRole
  name: admin
subjects:
- kind: ServiceAccount
  name: admin
  namespace: jenkins
Save the file and exit.
The file defines a cluster role with administrative permissions. It also creates a new service account named admin and binds it with the previously defined cluster role.
3. Apply the configuration with kubectl apply:
kubectl apply -f sa-jenkins.yamlThe output confirms the creation of three Kubernetes objects: a cluster role, a cluster role binding, and a service account.

Note: Learn about the key differences between Jenkins and Kubernetes.
Step 3: Create Jenkins Persistent Volume and Persistent Volume Claim
The role of a persistent volume is to store basic Jenkins data and preserve it beyond a pod's lifetime. Proceed with the below steps to create a YAML file that defines storage-related components of the deployment:
1. Create a YAML file:
nano volume-jenkins.yaml2. Paste the code below into the file:
apiVersion: storage.k8s.io/v1
kind: StorageClass
metadata:
  name: local-storage
provisioner: kubernetes.io/no-provisioner
volumeBindingMode: WaitForFirstConsumer

---
apiVersion: v1
kind: PersistentVolume
metadata:
  name: jenkins-pv
  labels:
    type: local
spec:
  storageClassName: local-storage
  claimRef:
    name: jenkins-pvc
    namespace: jenkins
  capacity:
    storage: 10Gi
  accessModes:
    - ReadWriteOnce
  local:
    path: /mnt
  nodeAffinity:
    required:
      nodeSelectorTerms:
      - matchExpressions:
        - key: kubernetes.io/hostname
          operator: In
          values:
          - minikube

---
apiVersion: v1
kind: PersistentVolumeClaim
metadata:
  name: jenkins-pvc
  namespace: jenkins
spec:
  storageClassName: local-storage
  accessModes:
    - ReadWriteOnce
  resources:
    requests:
      storage: 3Gi
Save the file and exit.
In the first section, the file declares the local-storage storage class. The second section defines the jenkins-pv persistent volume, and the third creates a persistent volume claim jenkins-pvc that binds to the jenkins-pv volume.
The values item in the nodeAffinity section should provide the name of the node Jenkins will use. The example above uses minikube, so the node's name is minikube.
3. Create the volume by applying the file with kubectl:
kubectl apply -f volume-jenkins.yamlStep 4: Compose and Create Jenkins Deployment
A deployment object controls the number of pods deployed and handles scalability and pod updates. Create a Jenkins deployment by following the procedure below:
1. Create a YAML file to store deployment information:
nano deploy-jenkins.yaml2. Paste the following code into the file:
apiVersion: apps/v1
kind: Deployment
metadata:
  name: jenkins
  namespace: jenkins
spec:
  replicas: 1
  selector:
    matchLabels:
      app: jenkins-server
  template:
    metadata:
      labels:
        app: jenkins-server
    spec:
      securityContext:
            fsGroup: 1000
            runAsUser: 1000
      serviceAccountName: admin
      containers:
        - name: jenkins
          image: jenkins/jenkins:lts
          resources:
            limits:
              memory: "2Gi"
              cpu: "1000m"
            requests:
              memory: "500Mi"
              cpu: "500m"
          ports:
            - name: httpport
              containerPort: 8080
            - name: jnlpport
              containerPort: 50000
          livenessProbe:
            httpGet:
              path: "/login"
              port: 8080
            initialDelaySeconds: 90
            periodSeconds: 10
            timeoutSeconds: 5
            failureThreshold: 5
          readinessProbe:
            httpGet:
              path: "/login"
              port: 8080
            initialDelaySeconds: 60
            periodSeconds: 10
            timeoutSeconds: 5
            failureThreshold: 3
          volumeMounts:
            - name: jenkins-data
              mountPath: /var/jenkins_home
      volumes:
        - name: jenkins-data
          persistentVolumeClaim:
              claimName: jenkins-pvc
Save the changes and exit nano.
The deployment file in this example utilizes the jenkins/jenkins:lts Docker image and creates one replica that will be exposed on port 8080.
The volumeMounts section of the file mounts the persistent volume created in the previous step. The livenessProbe and readinessProbe sections declare probes that restart failed pods and detect when pods are ready.
3. Use the newly created file to deploy Jenkins:
kubectl apply -f deploy-jenkins.yamlStep 5: Compose and Apply Jenkins Service File
A Kubernetes Service is an abstraction that exposes Jenkins to the broader network. It allows the user to maintain a persistent connection to the pod regardless of the changes taking place within the cluster.
1. Create a YAML file in which you will define the service:
nano service-jenkins.yaml2. Add the following content to the file:
apiVersion: v1
kind: Service
metadata:
  name: jenkins-svc
  namespace: jenkins
  annotations:
      prometheus.io/scrape: 'true'
      prometheus.io/path:   /
      prometheus.io/port:   '8080'
spec:
  selector:
    app: jenkins-server
  type: NodePort
  ports:
    - port: 8080
      targetPort: 8080
      nodePort: 32000
Save the file and exit.
3. Create the service by typing:
kubectl apply -f service-jenkins.yamlJenkins is now accessible in a web browser.
Step 6: Install Jenkins Operator Using YAML Files (Optional)
The Jenkins Operator is a native Kubernetes software extension that manages Jenkins on Kubernetes. Install it by executing the two kubectl apply commands below:
kubectl apply -f https://raw.githubusercontent.com/jenkinsci/kubernetes-operator/master/config/crd/bases/jenkins.io_jenkins.yamlkubectl apply -f https://raw.githubusercontent.com/jenkinsci/kubernetes-operator/master/deploy/all-in-one-v1alpha2.yamlWatch the operator become ready by adding the -w option to the kubectl get command below:
kubectl get pods -w
Install Jenkins on Kubernetes Cluster via Helm
Helm is a package manager designed to facilitate installing applications in a Kubernetes cluster. Follow the steps below to install Jenkins using the official Helm chart.
Step 1: Add Jenkins Repository
1. Add the Jenkins repository to the local repository list with the following Helm command:
helm repo add jenkins https://charts.jenkins.io
2. Update local chart repository data:
helm repo update
3. Search for Jenkins in the locally available repositories and note the chart name:
helm search repo jenkinsThe output lists the Jenkins chart alongside basic chart information.

Step 2: Prepare Cluster for Deployment
Before using the Helm chart to install Jenkins on a cluster, ensure the cluster meets all the requirements.
1. Create a namespace for the deployment:
kubectl create namespace jenkins2. Create a YAML describing a persistent volume:
nano jenkins-volume.yaml3. Save the following code in the file:
apiVersion: v1
kind: PersistentVolume
metadata:
  name: jenkins-pv
  namespace: jenkins
spec:
  storageClassName: jenkins-pv
  accessModes:
  - ReadWriteOnce
  capacity:
    storage: 20Gi
  persistentVolumeReclaimPolicy: Retain
  hostPath:
    path: /data/jenkins-volume/

---
apiVersion: storage.k8s.io/v1
kind: StorageClass
metadata:
  name: jenkins-pv
provisioner: kubernetes.io/no-provisioner
volumeBindingMode: WaitForFirstConsumer
4. Create a persistent volume by entering the following command:
kubectl apply -f jenkins-volume.yaml5. Create a YAML that will define a cluster role, a cluster role binding, and a service account:
nano jenkins-sa.yaml6. Paste the following contents into the file:
---
apiVersion: v1
kind: ServiceAccount
metadata:
  name: jenkins
  namespace: jenkins
---
apiVersion: rbac.authorization.k8s.io/v1
kind: ClusterRole
metadata:
  annotations:
    rbac.authorization.kubernetes.io/autoupdate: "true"
  labels:
    kubernetes.io/bootstrapping: rbac-defaults
  name: jenkins
rules:
- apiGroups:
  - '*'
  resources:
  - statefulsets
  - services
  - replicationcontrollers
  - replicasets
  - podtemplates
  - podsecuritypolicies
  - pods
  - pods/log
  - pods/exec
  - podpreset
  - poddisruptionbudget
  - persistentvolumes
  - persistentvolumeclaims
  - jobs
  - endpoints
  - deployments
  - deployments/scale
  - daemonsets
  - cronjobs
  - configmaps
  - namespaces
  - events
  - secrets
  verbs:
  - create
  - get
  - watch
  - delete
  - list
  - patch
  - update
- apiGroups:
  - ""
  resources:
  - nodes
  verbs:
  - get
  - list
  - watch
  - update
---
apiVersion: rbac.authorization.k8s.io/v1
kind: ClusterRoleBinding
metadata:
  annotations:
    rbac.authorization.kubernetes.io/autoupdate: "true"
  labels:
    kubernetes.io/bootstrapping: rbac-defaults
  name: jenkins
roleRef:
  apiGroup: rbac.authorization.k8s.io
  kind: ClusterRole
  name: jenkins
subjects:
- apiGroup: rbac.authorization.k8s.io
  kind: Group
  name: system:serviceaccounts:jenkins
Save the file and exit.
7. Create the Kubernetes object listed in the file by using kubectl apply:
kubectl apply -f jenkins-sa.yamlStep 3: Modify jenkins-values.yaml File
The jenkins-values.yaml is a pre-generated file with default values for a Jenkins deployment. The steps below show how to customize the file to fit the cluster's needs.
1. Download the file from the Jenkins GitHub page.
2. Open the file in a text editor:
nano jenkins-values.yaml3. Edit the nodePort line by adding 32000 as the port number.
nodePort: 32000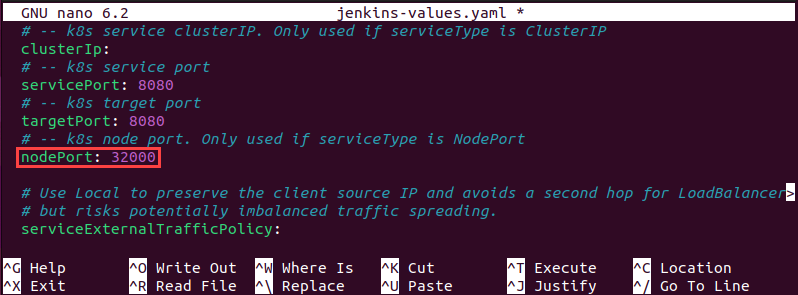
4. Modify the storageClass line to contain a reference to the persistent volume created earlier in the tutorial:
storageClass: jenkins-pv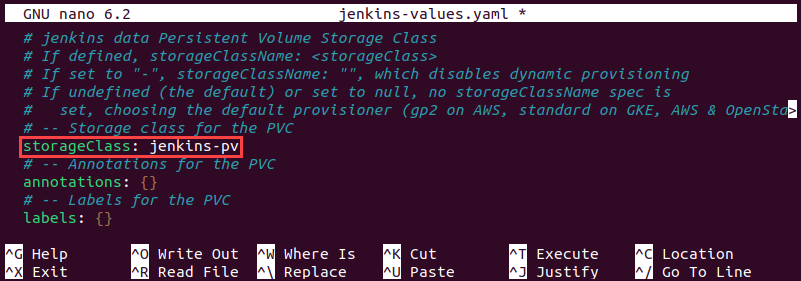
5. Ensure the sub-items of the serviceAccount item have the following values:
serviceAccount:
  create: false
  name: jenkins
  annotations: {}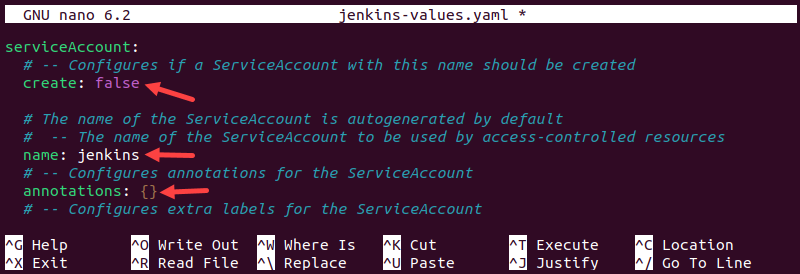
Step 4: Install Jenkins
After setting up the cluster, use Helm to install Jenkins.
1. Define the chart variable to be the Jenkins chart name:
chart=[chart_name]2. Use the helm install command:
helm install jenkins -n jenkins -f jenkins-values.yaml $chart
Step 5: Install Jenkins Operator via Helm (Optional)
Proceed with the steps below to install the Jenkins operator using a Helm chart:
1. Create a namespace for the operator:
kubectl create namespace jenkins-operator2. Add the Jenkins operator repository:
helm repo add jenkins-operator https://raw.githubusercontent.com/jenkinsci/kubernetes-operator/master/chart3. Update the repositories on the system:
helm repo update4. Search for the Helm chart:
helm repo search jenkins-operator5. Define the chart variable:
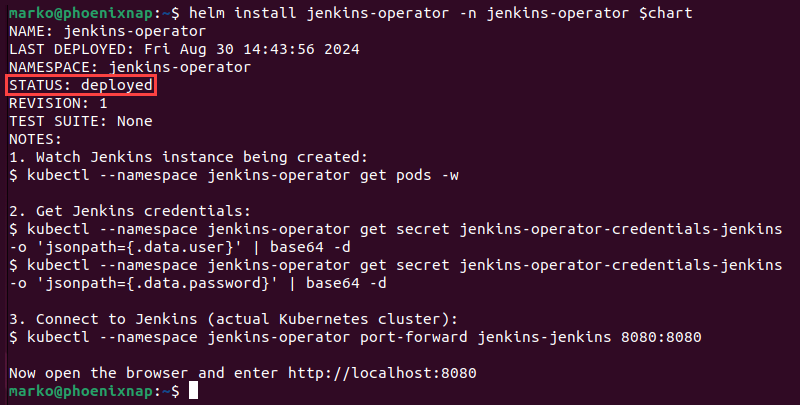
chart=[chart_name]6. Install the operator with the following command:
helm install jenkins-operator -n jenkins-operator $chartWhen Helm finishes deploying the operator, the output confirms the deployment's success.
Jenkins on Kubernetes: Post-Installation Setup
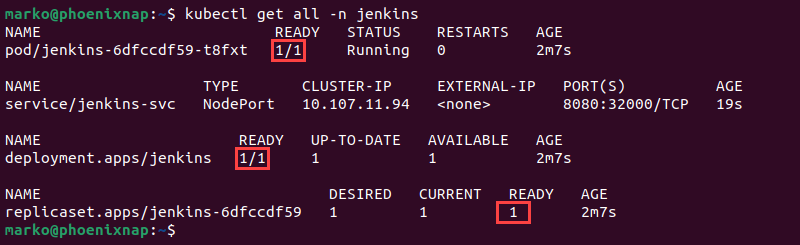
Before starting Jenkins, check if all deployed components are working. Use the kubectl get all command and specify the namespace:
kubect get all -n jenkinsThe example shows a properly functioning deployment:
- The pod is marked as
READYandRunning. - The service's Cluster IP and ports have been successfully allocated.
- The deployment is marked as
READYandAVAILABLE. - The desired number of replicas (1) has been reached.
Set Up Jenkins After Installing with YAML Files
Proceed with the following steps after installing Jenkins using YAML files:
1. Open a web browser and access the node using its IP address and the port defined in the service file. To find the IP address of the node, run:
kubectl get nodes -o yamlThe node IP address is located in the status section of the output.

Using the information from the example, the address of the Jenkins dashboard is:
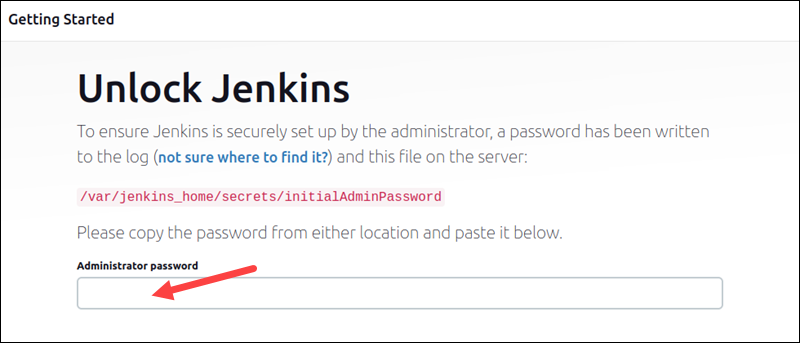
http://192.168.49.2:32000Upon first access, the prompt to unlock Jenkins appears.
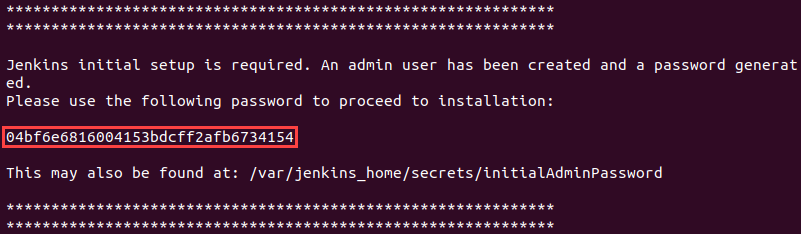
3. To obtain the password, find the name of the pod in the output of the command below:
kubectl get pods -n jenkins4. Access the pod's logs:
kubectl logs [pod_name] --namespace jenkins5. Find the password at the end of the log, formatted as a long alphanumerical string.
6. Paste the password into the Administrator password field to unlock Jenkins.
Set Up Jenkins After Installing via Helm
Use the steps below to configure a Helm installation of Jenkins:
1. Find the administrative password with the following kubectl command:
kubectl exec --namespace jenkins -it svc/jenkins -c jenkins -- /bin/cat /run/secrets/additional/chart-admin-password && echoThe password appears in the command output.

2. Forward the port of the Jenkins service using the following kubectl port-forward command:
kubectl --namespace jenkins port-forward svc/jenkins 8080:8080
Set Permissions for minikube
When deploying Jenkins with Helm on a minikube test cluster, the user must change the minikube permissions to allow Jenkins to write data:
1. Use the command below to enter the minikube container using SSH:
minikube ssh
2. Enter the following chown command to change the permissions of the jenkins-volume directory:
sudo chown -R 1000:1000 /data/jenkins-volume3. Exit the minikube container:
exitUsing Jenkins on Kubernetes
After successfully logging into a Jenkins administrative account, the user can customize their Jenkins installation and create the first admin user. The following sections provide instructions for those actions.
Note: Check out our detailed Jenkins tutorial to learn everything you need to know about using Jenkins.
Customizing Jenkins on Kubernetes
Jenkins supports plugins that customize its functionalities, look, and feel. Users can install recommended plugins on the first login or choose their own.
1. Click Select plugins to install to start customizing the Jenkins installation.
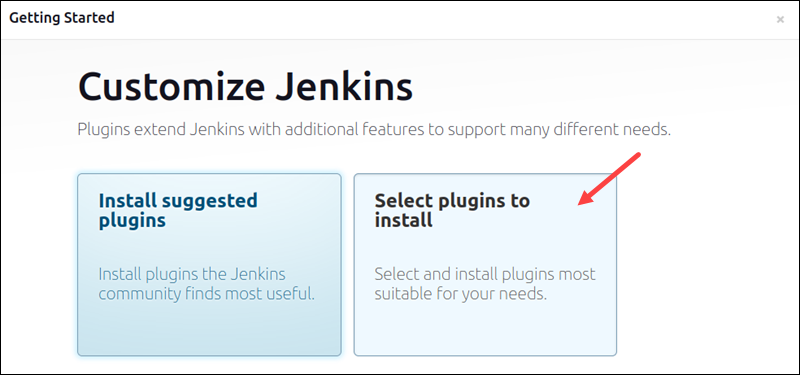
A list of plugins appears, with categories on the left side of the page.
2. Select the plugins to use and click Install.
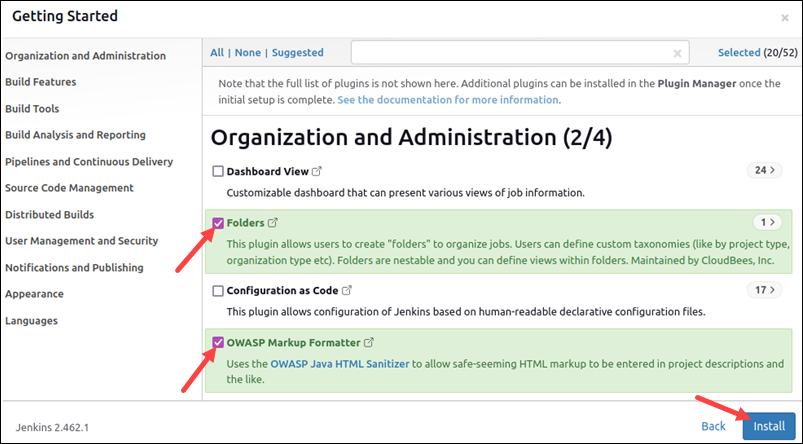
Note: Jenkins sometimes requires a restart while troubleshooting or installing plugins. Refer to our article How to Restart Jenkins Manually to learn more.
Creating First Administrator-Level User
The last step of the Jenkins setup is to create the first admin user. Fill out the user creation form by providing the necessary credentials.
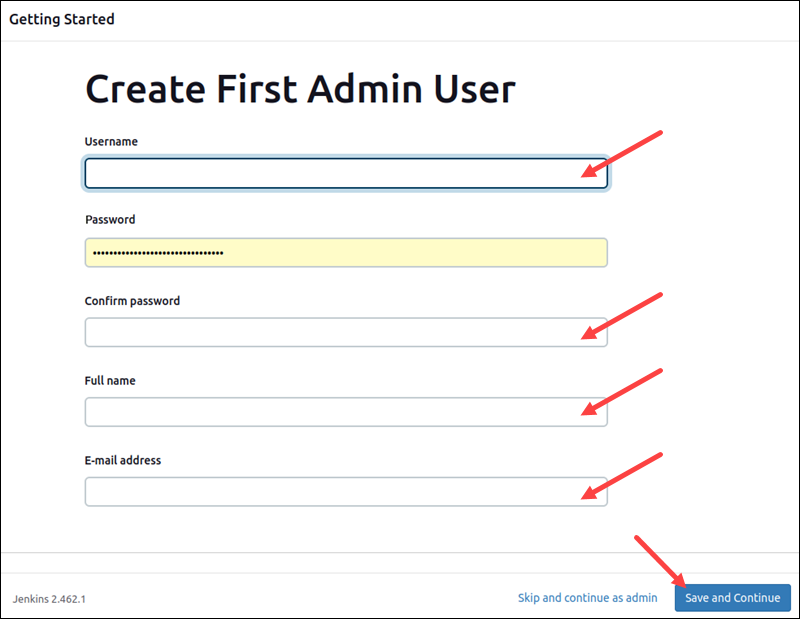
To finish creating the user, click the Save and Continue button at the bottom left side of the page.
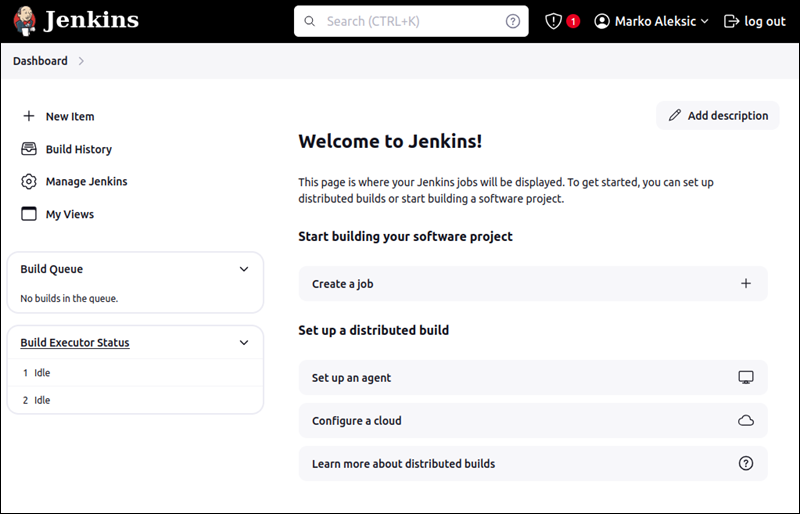
You have successfully installed Jenkins on your Kubernetes cluster and can use it to create new and efficient development pipelines.
Conclusion
After reading this article, you can install Jenkins on a Kubernetes cluster. Jenkins can automate many tasks and help developers submit code efficiently and consistently.
Jenkins on Kubernetes, combined with the cloud agility of Bare Metal Cloud, can help you fully automate your workflow and improve the speed and quality of your software.