REST has long been the standard for building APIs. However, this approach is not always ideal for modern mobile and web apps. Facebook introduced GraphQL to let clients request exactly what they need, rather than have the server decide which data to return.
This flexibility helped GraphQL become a popular alternative to traditional REST APIs.
In this tutorial, learn how GraphQL works, set up a working environment, and practice using schemas, queries, and arguments through hands-on examples.
What Is GraphQL?
GraphQL is a query language for APIs and a runtime that executes those queries. The client describes what data it needs and sends a query to the GraphQL endpoint. The server returns a response that matches the request.
This is how the process works:
1. Developers build a backend application and integrate GraphQL using a library or framework like Apollo Server or Graphene. In the backend code, they define a schema that describes the data and how the frontend client can request it.
2. In the same backend application, developers also write resolver functions. These functions tell the server how to fetch the requested data.

3. Frontend developers build web or mobile apps and write queries that match the schema defined by the backend team.
4. The client application sends a query to the GraphQL endpoint exposed by the backend.
Note: Most GraphQL APIs expose a single HTTP endpoint, for example, /graphQL.
5. The server checks the query against the schema to make sure the requested fields are valid.
6. For each field in the query, the server calls a resolver function. Each resolver knows how to retrieve the data for that field from a database, another API, or a different service.
7. The server combines the results from all resolvers into a single response that matches the structure of the original query and sends it back to the client.
This method is called declarative data fetching.
GraphQL Use Cases
Organizations use GraphQL to:
- Build mobile applications. Mobile apps and IoT devices often run on limited data plans and slower networks. With GraphQL, the client requests only the fields it needs. This reduces the payload size and the number of network requests.
- Support multiple frontend clients. Large platforms like Facebook and Shopify usually have a web app, mobile app, admin dashboard, and lots of third-party integrations. Each of these clients needs the same core data, but in different shapes. They can all use the same GraphQL API and send queries to a single endpoint.
- Aggregate data from multiple services. Clients do not have to call multiple backend services, like a user service, product service, or payment service, separately. A GraphQL server can sit in front of them and combine the requested data into a single response. This pattern is common in microservices architectures.
- Speed up frontend development. GraphQL became popular in ecosystems like React because it allows frontend teams to work more independently. If the required fields are already defined in the schema, developers can experiment with features and UI design without waiting for the backend team to create new endpoints.
- Simplify API design. As REST APIs grow, you often end up with many overlapping or custom endpoints. GraphQL reduces this complexity by exposing one flexible query interface instead of multiple fixed endpoints.
- Add new fields without breaking clients. REST APIs often introduce
/v1,/v2, /v3 in their endpoint URLs as they evolve. Adding new fields to the GraphQL schema does not break existing client queries. With GraphQL, you do not have to create multiple versioned endpoints.
GraphQL Advantages & Disadvantages
The GraphQL approach to API design has many advantages, but it also introduces trade-offs that teams should understand before adopting it.
Advantages
The benefits of GraphQL include:
- Clients can request only the data they need.
- Clients can fetch multiple related pieces of data in a single request.
- Clients do not have to call multiple endpoints to build one view in an application.
- Adding new fields to the API does not break applications. Existing clients will continue to request the fields they already use.
- Frontend and backend teams can work independently, which results in faster development cycles.
- GraphQL is not tied to a specific programming language.
- You can use it alongside existing backend systems without rewriting the entire backend.
Disadvantages
The disadvantages of GraphQL include:
- You have to design schemas, resolvers, and query handling logic, which makes the server implementation more complex. If you are developing a small CRUD application, a REST API is often easier to build and maintain.
- Traditional HTTP caching is not as simple as with REST because most requests go through a single endpoint.
- Poorly written queries can request deeply nested data, slowing the server down. You need to limit query depth and complexity to prevent performance issues and potential abuse.
- Teams must learn schemas, resolvers, and the GraphQL language. If a team is new to the ecosystem, the learning curve can be steep.
- Traffic patterns going through the same endpoint are more difficult to monitor and analyze.
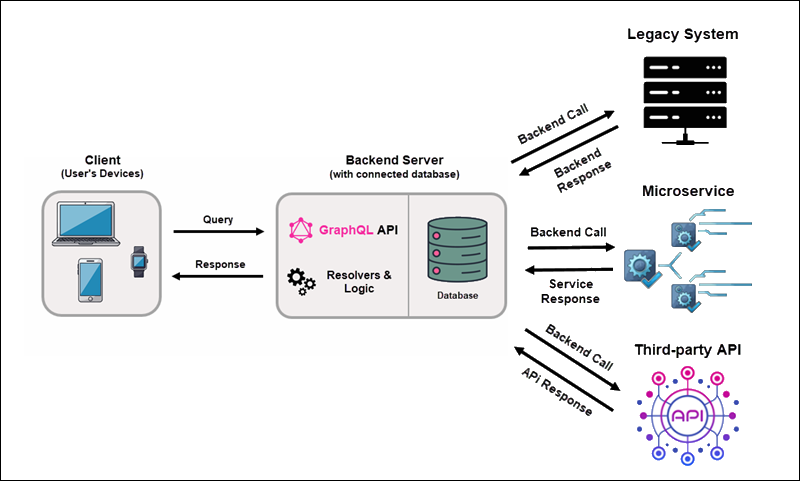
GraphQL Architecture
There are several ways to deploy GraphQL. The most common setups include:
- A single backend application that runs GraphQL and connects directly to a database.
- GraphQL sits in front of multiple services and combines their data into a single API endpoint.
- A hybrid approach connects GraphQL directly to a database for part of the data, while also allowing it to call other backend services or APIs for additional data.
GraphQL Server with Connected Database
If you are building a smaller project or working in a local development environment, you need a setup that is quick and easy to deploy. A good approach is to use a single backend application that runs GraphQL and connects directly to a database.
The process is straightforward:
1. The client sends a GraphQL query to the backend application.
2. The server validates the query against the schema.
3. Resolver functions retrieve the requested data from the database.
4. The server assembles the response and sends it back to the client.
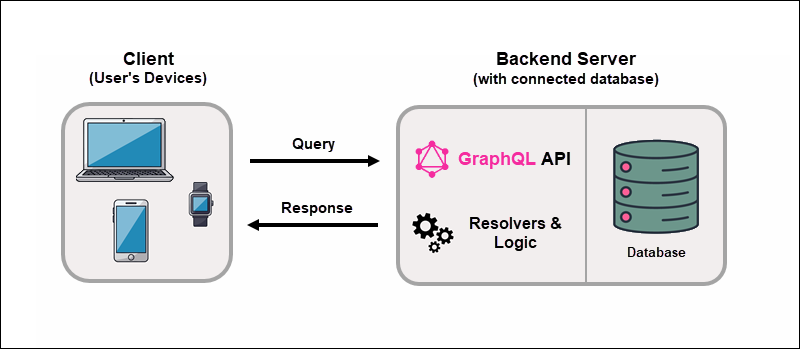
GraphQL does not depend on a specific database type or communication protocol. It can work with relational databases, NoSQL databases, or any data source.
GraphQL Server Integrating Existing Systems
Modernizing an existing system is slow, expensive, and sometimes you need to rewrite large parts of the application. Instead of a complete rewrite, you can place a GraphQL layer in front of a legacy system and expose a single, unified API to clients.
When you place GraphQL in front of existing systems:
1. The client sends a GraphQL query to the backend application.
2. The backend validates the query against the schema.
3. Resolver functions run on the server for each requested field. They make the necessary backend calls, such as database queries or HTTP requests to legacy systems, microservices, or third-party APIs. The client never sees these internal calls.
4. The server combines the data into a single response that matches the structure of the query and sends a response to the client.
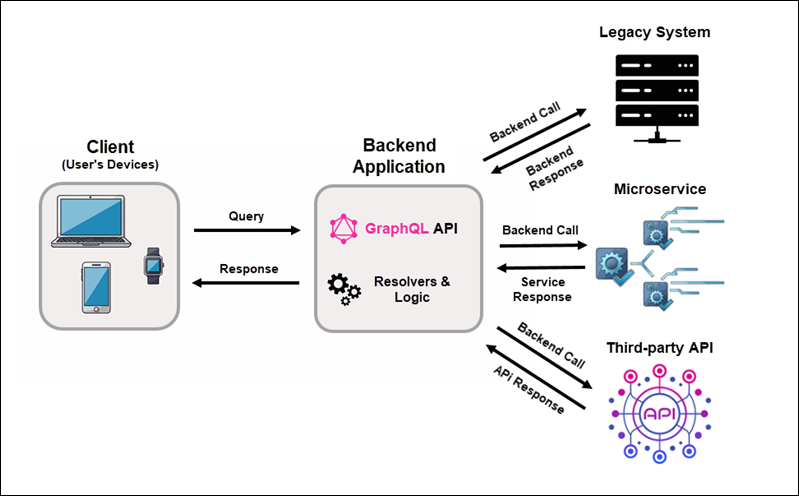
GraphQL did not replace existing systems. It unified access to data spread across multiple technologies.
GraphQL Server Hybrid Approach
Organizations rarely decide to change their architecture all at once. Instead, they tend to adopt GraphQL gradually. Modern systems often combine connected databases with integrations to external platforms and legacy systems.
In this model, GraphQL is a data layer that connects the new and existing systems:
1. A client sends a GraphQL query to the backend application.
2. The server validates the query against the schema.
3. Resolver functions retrieve the requested data from connected databases, internal services, legacy systems, or external APIs.
4. The server assembles the data into a single response that matches the structure of the query and returns it to the client.
With a hybrid approach, you can keep your current setup, add new applications and services, and use GraphQL to unify access to them.
How to Install GraphQL?
This section explains how to prepare an Ubuntu 24.04 machine to run a GraphQL server.
Set Up GraphQL Environment
To build a GraphQL server on Ubuntu, you need to install Node.js and set up a workspace for your project.
Step 1: Update the System
Open the terminal and run this command to update package lists and install available upgrades:
sudo apt update && sudo apt upgrade -yStep 2: Install Node.js
To install the latest stable version of Node.js:
1. Use curl to add the NodeSource repository:
curl -fsSL https://deb.nodesource.com/setup_lts.x | sudo -E bash -
2. Install Node.js and the npm package manager:
sudo apt install nodejs -y3. Check Node.js and npm versions:
node -vnpm -v
If you see the version numbers, the installation was successful.
Step 3: Create a Project Directory
Create a new directory for your GraphQL project:
1. Enter the following command to create a graphql-testserver directory:
mkdir graphql-testserver2. Use the cd command to move to the new directory:
cd graphql-testserver3. Initialize the Node.js project:
npm init -y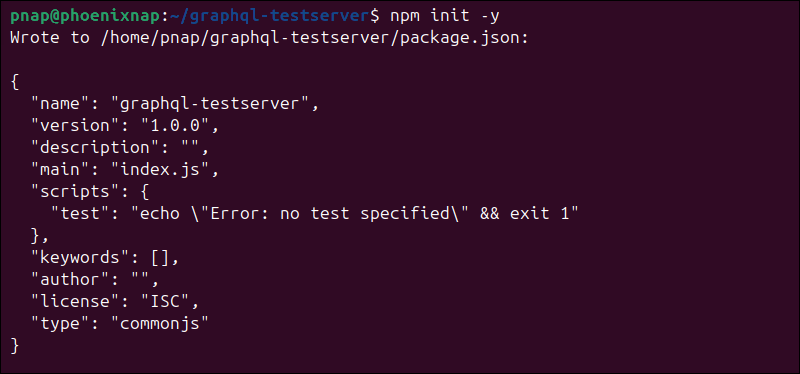
This command creates a package.json file. This file keeps track of your project's dependencies.
Install GraphQL
After creating the Node.js project, you need to install the packages required to run a GraphQL server.
Step 1: Install Required Packages
To install the necessary packages, enter the following command from inside the project directory:
npm install graphql @apollo/server express@4 @as-integrations/express4 cors
The command installs:
graphql. The core GraphQL specification.@apollo/server. The GraphQL server engine (Apollo Server) for executing queries.express@4. Express.js is a lightweight web framework that handles HTTP requests and exposes API endpoints. This guide uses Express 4 because it offers the most stable GraphQL compatibility.@as-integrations/express4. Connects Apollo Server with Express.cors. Allows you to send browser requests during development.
Step 2: Enable ES Modules
Modern Node.js apps use ES modules (import/export) instead of the older require() syntax. To enable ES modules in your project:
1. Open the package.json file in a text editor like nano:
nano package.json
2. Look for the "type": "commonJS", module type setting, and change it to:
"type": "module",
Note: If you do not see this line, add "type": "module", near the top of the JSON file, just below the opening curly brace.
3. Save the changes and exit the file.
Step 3: Create Server File
The server file defines how the GraphQL API runs.
1. Create a new server file:
nano testserver.js2. Add the following code:
import express from "express";
import cors from "cors";
import { ApolloServer } from "@apollo/server";
import { expressMiddleware } from "@as-integrations/express4";

async function startServer() {
  const app = express();

  app.use(cors());
  app.use(express.json());

  // GraphQL schema
  const typeDefs = `
    type Query {
      hello: String
    }
  `;

  // Resolver functions
  const resolvers = {
    Query: {
      hello: () => "Greetings! This is your GraphQL server on Ubuntu 24.04!"
    }
  };

  // Create Apollo Server
  const server = new ApolloServer({
    typeDefs,
    resolvers
  });

  await server.start();

  // GraphQL endpoint
  app.use("/graphql", expressMiddleware(server));

  // Start HTTP server
  app.listen(8000, () => {
    console.log("Server running at http://localhost:8000/graphql");
  });
}

startServer();
You now have a fully working GraphQL API server that includes:
- A GraphQL schema.
- Resolver functions.
- An Express web server.
- Apollo Server.
- A
/graphqlAPI endpoint for sending queries.
Step 4: Start the Server
To start the server, enter:
node testserver.jsIf everything is configured properly, the terminal displays:
Server running at http://localhost:8000/graphql
Step 5: Test the GraphQL Endpoint
1. Open a web browser and go to:
http://localhost:8000/graphqlApollo Server has a built-in GraphQL interface called Apollo Sandbox.
2. Once Apollo Sandbox opens, enter the following query in the Operation panel and click Run:
{
   hello
}
Based on the server file, you should see this response:
{
  "data": {
    "hello": " Greetings! This is your GraphQL server on Ubuntu 24.04!"
  }
}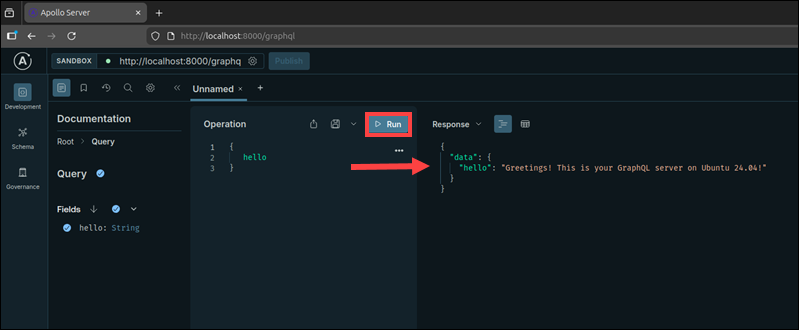
The GraphQL server is now up and running, with a built-in interface for testing and running queries.
GraphQL Schema Overview
A GraphQL schema acts as the blueprint for your API. It defines:
- What data exists.
- How clients can read it (queries).
- How clients can change it (mutations).
- What types and rules the API follows.
Schemas are written in the Schema Definition Language (SDL), a simple syntax for describing the structure of an API.
For small projects, you can place schemas directly inside the server.js file. But most developers keep them in separate files as they are easier to maintain.
Create a new schema file:
nano paymentschema.graphqlIn this example, the schema describes an application that stores payment transactions:
type Query {
  payments: [Payment!]!
}

type Payment {
  id: ID!
  amount: Float!
  currency: String!
}
Based on the schema, GraphQL knows that:
- There is a
Querytype. - Clients can request a list of payments using the
paymentsquery. - The
Paymentobject includes theid,amount, andcurrencyfields.
At this stage, there is no database or application logic. You only define the shape of the API. Once you add a resolver, it will fetch the data from a data source and return the structure defined by the schema.
GraphQL Type System
A schema is made up of types that define the data your API can accept and return. Every field in a schema must have one declared type.
Scalar Types
Scalars are basic values that define what kind of data each field can contain. GraphQL has several built-in scalar types:
| Type | Accepted Value |
|---|---|
String | Text values |
Int | Whole numbers |
Float | Decimal numbers |
Boolean | true or false values |
ID | Unique identifiers |
From the previous schema example, you can see that each field uses a scalar type:
type Query {
  payments: [Payment!]!
}

type Payment {
  id: ID!
  amount: Float!
  currency: String!
}
The scalars define the data format for each field in the Payment object:
| Field | Type | Description |
|---|---|---|
id | ID! | A unique identifier for the payment transaction. |
amount | Float! | The payment amount stored as a decimal number. |
currency | String! | The currency code in text (USD, EUR, etc.) |
The ! symbol means that the field should always contain a value. Since a payment without an ID or amount would not be useful, these fields are marked as required. This is called non-nullability.
Non-Nullable Types
Every field in GraphQL is nullable by default. This means a field can return either a value or null if there is no value.
By adding an exclamation mark (!) after a type, the field becomes non-nullable. Instead of returning null, GraphQL will generate an error if the field is missing. In effect, the field becomes required.
 type Payment {
  id: ID!
  amount: Float!
  currency: String!
}
Using a non-nullable type for every field in the Payment object means that all of them have become required.
Object Types
Instead of returning a single value, GraphQL groups related fields into objects. Object types are the real entities in your system.
In this example, the Payment object represents a payment transaction with the following fields:
type Payment {
  id: ID!
  amount: Float!
  currency: String!
  status: String!
  createdAt: String!
}
The Query type exposes these objects to clients:
type Query {
  payments: [Payment!]!
}
When a client requests the payments field on the Query type, the query must specify which fields it wants returned:
{
payments {
     id
     amount
     currency
   }
}
GraphQL then returns structured data that matches the query:
{
  "data": {
    "payments": [
      {
        "id": "71",
        "amount": 11.99,
        "currency": "EUR"
      }
    ]
  }
}
Notice that the Payment object includes more fields than what the server actually returned. This is because GraphQL only sends back the fields the client requested in the query.
List Types
GraphQL uses square brackets [] to represent a list of values. When you use [], the field returns multiple items instead of a single object.
type Query {
  payments: [Payment!]!
}
The brackets indicate that the payments field returns multiple Payment objects. However, the expression also includes non-nullable markers (!):
[Payment] | Returns a list of payments. |
[Payment!] | Returns a list that cannot contain null items. |
[Payment!]! | Returns a list that itself cannot be null and cannot contain null items. |
The client sends the following query to request multiple payments:
{
  payments  {
    id
    amount
    currency
   }
}
The resolver returns multiple Payment objects:
 {
  "data": {
    "payments": [
      { "id": "14", "amount": 19.99, "currency": "USD" },
      { "id": "65", "amount": 9.99, "currency": "EUR" }
    ]
  }
}
Because the field is defined as a list in the schema, GraphQL returns the data as an array rather than a single object.
GraphQL Operations
GraphQL operations define how clients interact with the schema. For now, the focus is on queries and mutations. Subscriptions will be covered later in the guide.
Queries
Every GraphQL schema must include a Query type. It is the entry point for retrieving information and defines how clients read data from a GraphQL API.
In this example, the payment field accepts an id argument that identifies which payment to fetch:
type Query {
  payment(id: ID!): Payment
}
type Payment {
  id: ID!
  amount: Float!
  currency: String!
}
The client sends the following query:
{
  payment(id: "2321") {
     id
     amount
     currency
   }
}
This returns the id, amount, and currency fields for the 2321 payment:
{
  "data": {
    "payment": {
       "id": "2321",
       "amount": 199.99,
       "currency": "JPY"
    }
  }
}
Queries can only read data. To modify data, you need to use mutations.
Mutations
The Mutation type defines how clients modify data in a GraphQL API. It is used for write operations to:
- Create new records.
- Update existing records.
- Delete or cancel records.
For example, you can extend the Payment type to add a billing address:
type Payment {
  id: ID!
  amount: Float!
  currency: String!
  billingAddress: String!
}
You can define the following mutation:
type Mutation {
  updateBillingAddress(id: ID!, billingAddress: String!): Payment!
}
This mutation:
- Identifies the payment through
id. - Updates the billing address.
- Returns the updated
Paymentobject.
When a client sends the following mutation request:
mutation {
  updateBillingAddress(
    id: "2321",
    billingAddress: "1-6-1 Nagata-cho, Chiyoda-ku, Tokyo"
  ) {
    id
    amount
    currency
    billingAddress
  }
}
The resolver performs the update and returns the data that matches the schema:
{
  "data": {
    "updateBillingAddress": {
      "id": "2321",
      "amount": 199.99,
      "currency": "JPY",
      "billingAddress": "1-6-1 Nagata-cho, Chiyoda-ku, Tokyo"
    }
  }
}
Passing individual arguments works for simple mutations, but larger APIs require structured inputs and better data modeling using input types.
GraphQL Schema Design
The following types are used to structure data and model relationships between objects in a GraphQL schema.
Input Types
If a mutation requires multiple arguments, passing each value individually clutters the schema. Input types solve this problem by grouping related values into a single argument.
Instead of passing arguments one by one, you can use an input object:
input UpdateBillingAddressInput {
  id: ID!
  billingAddress: String!
}
Add the UpdateBillingAddressInput object to the mutation:
type Mutation {
  updateBillingAddress(input: UpdateBillingAddressInput!): Payment!
}
Now, the mutation accepts a single structured argument, called input. This is an example of a mutation request the client can send:
mutation {
  updateBillingAddress(
    input: {
      id: "2321"
      billingAddress: "1-6-1 Nagata-cho, Chiyoda-ku, Tokyo"
    }
  ) {
    id
    billingAddress
  }
}
The server processes the mutation and returns the data that matches the requested fields.
Enum Types
An enum type restricts a field to a fixed set of options. You can use enums to prevent invalid data from being set to or returned from the API. For example, in a payment system, you can use an enum to control which currency values are allowed:
enum Currency {
  USD
  EUR
  JPY
}
Now, the API accepts only these 3 currency values, and inputs like usd, dollar, or bitcoin are not valid.
You can also include the Currency enum in an object:
type Payment {
  id: ID!
  amount: Float!
  currency: Currency!
  billingAddress: String
}
The currency field can now contain only one of the defined enum values. Enums are also used in input types and mutations. For example, when a client sends a currency value, it must use one of the predefined enum values:
mutation {
  updatePaymentCurrency(
    id: "2321",
    currency: JPY
  ) {
    id
    currency
  }
}
Because enum values are predefined, they are not sent as strings. Instead, the enum value itself is used.
Interface Types
An interface is a template that lists fields that multiple object types can share. Many systems have objects that share an identifier. For example, Payment and Refund objects may both have an id field.
Because they are two separate object types, you would have to expose them as separate fields and query them independently. You can create a shared Node interface to avoid duplication:
interface Node {
  id: ID!
}
The Node interface declares that any type implementing it must have an id field. To use this interface, add the implements keyword:
type Payment implements Node {
  id: ID!
  amount: Float!
  currency: Currency!
}

type Refund implements Node {
  id: ID!
  refundAmount: Float!
}
Both Payment and Refund must include the id field because they implement the Node interface. To expose objects to clients, add a field that returns the interface type:
type Query {
  node(id: ID!): Node
}
Clients can now query the fields defined on the interface:
{
  node(id: "2321") {
    id
  }
}
Since every type implementing Node has an id, this query works regardless of whether the returned object is a Payment or Refund.
Union Types
Union types let you group multiple return types, even when they do not share common fields.
For example, a search operation can return Payment and Refund objects together:
union SearchResult = Payment | RefundYou can expose the union through a query:
type Query {
  search(term: String!): [SearchResult!]!
}
Because union members do not share fields, clients must specify which field each type belongs to using inline fragments.
In real applications, search features often return mixed results, depending on what matches:
{
  search(term: "2321") {
    ... on Payment {
      id
      amount
      currency
    }

    ... on Refund {
      id
      refundAmount
    }
  }
}
Example response:
{
  "data": {
    "search": [
      {
        "id": "2321",
        "amount": 199.99,
        "currency": "JPY"
      },
      {
        "id": "877",
        "refundAmount": 19.99
      }
    ]
  }
}
Each result in the response matches one of the object types included in the union.
How to Write GraphQL Queries?
Once you have defined a schema, you can start writing queries. A query is a request the client sends to retrieve a specific set of fields from the GraphQL API.
It is written as a selection set inside curly braces and consists of:
| Root field | An entry point defined on the Query type. |
| Subfields | The fields you want returned (e.g., id, amount, currency). |
| Optional arguments | Values such as filters, IDs, and pagination parameters used to refine the request. |
Note: Comments in GraphQL are preceded by the # symbol. Any text after this symbol is ignored when the query runs.
GraphQL Fields
A field is a single piece of data that the client wants to retrieve from the server. The sections below list different field types.
Basic Field Selection
In GraphQL, you only request the fields you need:
{
  payments {          # Root field defined on the Query type that returns a list of payments
    transactionId     # Requests the unique transaction identifier
    status            # Requests the payment status (for example, APPROVED or DECLINED)
    createdAt         # Requests the payment timestamp then the payment was created
  }
}
The response will match the structure of the requested fields:
{
  "data": {
    "payments": [
      {
        "transactionId": "6574832",
        "status": "APPROVED",
        "createdAt": "2026-02-01T10:30:00Z"
      },
      {
        "transactionId": "6574833",
        "status": "DECLINED",
        "createdAt": "2026-02-02T14:12:00Z"
      }
    ]
  }
}
GraphQL returns only the fields you requested.
Nested Fields
Fields can contain other fields. This enables clients to represent relationships between data and fetch related information in one request. In this example, the customer field is nested inside the payments query:
{
  payments {          # Root field that returns a list of payments
    transactionId     # Subfield that requests the unique transaction identifier
    amount            # Subfield that requests the payment amount
    customer {        # Nested fields that retrieves the related customer object
      name            # Subfield that requests the customer's name
      email           # Subfield that requests the customer's email
    }
  }
}
GraphQL returns the related data in one request:
{
  "data": {
    "payments": [
      {
        "transactionId": "6574832",
        "amount": 299.99,
        "customer": {
          "name": "Takeshi Kitano",
          "email": "takesi@example.com"
        }
      }
    ]
  }
}
The nested fields are included in the response because they were requested in the root field.
Field Arguments
Fields can also accept arguments that allow clients to request specific data. You can use arguments to fetch a single record, sort data, or filter results.
In this example, the payment field accepts a transactionId argument telling GraphQL which payment the client wants to retrieve:
{
  payment(transactionId: "6574832") {   # Root field with an argument to select a specific payment
    status                              # Subfield that requests the payment status
    amount                              # Subfield that requests the payment ammount
    currency                            # Subfield that requests the payment currency
  }
}
The server returns only the requested payment and only the selected fields:
{
  "data": {
    "payment": {
      "status": "APPROVED",
      "amount": 299.99,
      "currency": "JPY"
    }
  }
}
With arguments, you can control what data is returned without requiring multiple API endpoints.
GraphQL Operation Name
An operation name is an optional label you give to a query, mutation, or subscription. Instead of using shorthand syntax, operations can be written explicitly and given a name.
In this example, query specifies the operation type, and GetPayments is the operation name:
query GetPayments {          # Operation type (query) followed by the operation name
  payments {                 # Root field defined on the Query type
    status                   # Subfield that requests the payment status (for example, APPROVED or DECLINED)
    amount                   # Subfield that requests the payment ammount
  }
}
Operation names are required when a request contains multiple operations, because the client must specify which operation to execute:
query GetPayments {          # First named query operation
  payments {
    status
  }
}

query GetCustomers {         # Second named query operation
  customers {
    email
  }
}
They are also very useful in production environments for logging requests and debugging errors.
GraphQL Variables
Variables allow you to pass dynamic values into queries and mutations. This means you do not have to hardcode values inside the query. You can define them separately.
Without variables, you have to write values directly inside the query:
query GetPayment {                         # Named query operation
  payment(transactionId: "6574832") {      # Argument value hardcoded in the query
    status
    amount
  }
}
This is not practical for real applications, because you would have to rewrite the query for every new value. Instead, you can define a variable after the operation name:
query GetPayment($id: ID!) {       # Variable definition added after the operation name
                                   # $id  variable name
                                   # ID   variable type
                                   # !    indicates the variable is required (non-null)
  payment(transactionId: $id) {    # Variable used as the argument value
    status
    amount
  }
}
You need to use a named operation, so GraphQL knows where the variables are defined. The variable values are sent alongside the query inside the same HTTP request body as JSON:
{
  "id": "6574832"
}
The GraphQL server combines the query and the variable values during execution.
{
  "data": {
    "payment": {
      "status": "APPROVED",
      "amount": 299.99
    }
  }
}
GraphQL Aliases
If you query the same field more than once with different arguments and use the same field name, you will get an error. GraphQL cannot merge the results because both fields would have the same name in the response.
Aliases allow you to rename fields in the response:
query GetPayments {
  firstPayment: payment(transactionId: "647382") {   # Call the payment field
                                                     # Return the result under the name "firstPayment"
    amount                                           # Get amount for first payment
  }

  secondPayment: payment(transactionId: "647383") {  # Call the same payment field again
                                                     # Return this result as "secondPayment"
    amount                                           # Get amount for second payment
  }
}
The response contains the alias names instead of the original field name:
{
  "data": {
    "firstPayment": {
      "amount": 49.99
    },
    "secondPayment": {
      "amount": 19.99
    }
  }
}
Aliases do not change the schema. They only affect how data appears in the response.
GraphQL Fragments
Large queries often request the same fields repeatedly. Instead of repeating the same fields over and over, you can define them once and reuse them with fragments.
To create a fragment, first give it a name:
fragment PaymentFields on Payment {   # Define a reusable group of fields for the Payment type
  transactionId                       # Include the transaction ID
  amount                              # Include the payment amount
  currency                            # Include the payment currency
}
You can use the fragment in your query with the spread operator (…):
query GetData {
  payments {
    ...PaymentFields                  # Insert fields from the fragment here
  }

  recentPayments {
    ...PaymentFields                  # Reuse the same fields again
  }
}
Fragments do not change the structure of the response. They just help you organize and reuse field selections, as shown in this response:
{
  "data": {
    "payments": [
      {
        "transactionId": "647382",
        "amount": 49.99,
        "currency": "USD"
      }
    ],
    "recentPayments": [
      {
        "transactionId": "647383",
        "amount": 19.99,
        "currency": "EUR"
      }
    ]
  }
}
GraphQL Inline Fragments
Sometimes a field returns different object types. For example, a search query can return either Payment or Refund, each with different fields.
Inline fragments allow you to select fields conditionally based on the object's type, so you do not need to create a separate fragment:
query SearchResults {
  searchResults {                       # Field that may return multiple object types
    __typename                          # Built-in GraphQL field that returns the actual object type name (Payment or Refund)

    ... on Payment {                    # Apply these fields only if the result is a Payment
      transactionId                     # Field specific to Payment
      amount                            # Field specific to Payment
    }

    ... on Refund {                     # Apply these fields only if the result is a Refund
      refundId                          # Field specific to Refund
      reason                            # Field specific to Refund
    }
  }
}
The server returns fields that match the actual object type:
{
  "data": {
    "searchResults": [
      {
        "__typename": "Payment",
        "transactionId": "647383",
        "amount": 49.99
      },
      {
        "__typename": "Refund",
        "refundId": "r200",
        "reason": "Duplicate charge"
      }
    ]
  }
}
GraphQL Directives
GraphQL directives allow you to conditionally include or exclude fields in a query based on certain conditions. They are added using the @ symbol and applied directly to fields or fragments.
The most common built-in directives are:
@include. Includes a field only if the condition istrue.@skip. Skips a field if a condition istrue.
@include Directive
The @include directive returns a field when a condition evaluates to true:
query GetPayment($showCurrency: Boolean!) {     # Define the variable that controls field visibility
  payment(transactionId: "647382") {
    amount                                      # Always returned
    currency @include(if: $showCurrency)        # Include currency only is variable is true
  }
}
The variable value is sent alongside the query inside the same HTTP request body as JSON:
{
  "showCurrency": true
}
When the variable evaluates to true, the server includes this field in the response:
{
  "data": {
    "payment": {
      "amount": 49.99,
      "currency": "USD"
    }
  }
}
If the variable is false, the currency field is omitted from the response.
@skip Directive
The @skip directive removes a field when the condition evaluates to true:
query GetPayment($hideAmount: Boolean!) {      # Variable that controls whether the amount is skipped
  payment(transactionId: "647382") {
    amount @skip(if: $hideAmount)              # Skipped if the variable is true
    currency                                   # Always returned
  }
}
The client sends the variable value alongside the query:
{
  "hideAmount": true
}
Because the condition evaluates to true, the amount field is excluded from the response:
{
  "data": {
    "payment": {
      "currency": "USD"
    }
  }
}
If the variable is false, GraphQL returns the amount field normally.
How to Write GraphQL Mutations?
A mutation is a GraphQL operation that updates or modifies data on the server. Unlike queries, which only fetch information, mutations perform write operations.
Clients can perform three kinds of mutations:
- Create new data.
- Update existing data.
- Delete existing data.
Mutations are defined in the schema inside the Mutation type. The schema lists all operations allowed to modify data, similar to how the Query type lists ways to get data.
Creating New Data
You can use a mutation to add new records to the server. In this example, the client creates a new payment:
mutation CreatePayment {                          # mutation tells GraphQL this is a write operation
                                                  # CreatePayment is the operation name
  createPayment(amount: 9.99, currency: "USD") {  # createPayment is a mutation field defined in the Mutation type
                                                  # amount and currency are data sent to the server to create a new payment
    transactionId                                 # Return the generated transaction ID
    status                                        # Return the payment status
    amount                                        # Return the payment amount
  }
}
This is an example response:
{
  "data": {
    "createPayment": {
      "transactionId": "556921",
      "status": "PENDING",
      "amount": 9.99
    }
  }
}
The mutation performs the write operation and returns the resulting data in a single request.
Updating Existing Data
You can also use mutations to update existing records. For instance, here's how to change the status of a payment from PENDING to APPROVED:
mutation UpdatePayment {         # mutation indicates this is a write operation
                                 # UpdatePayment is the operation name
  updatePayment(                 # updatePayment is the mutation field defined in the Mutation type
    transactionId: "556921"      # Tells GraphQL which payment to update
    status: "APPROVED"           # New value sent to the server
  ) {
    transactionId                # Returns the payment identifier
    status                       # Returns the updated status
  }
}
After updating the record, GraphQL returns the requested fields:
{
  "data": {
    "updatePayment": {
      "transactionId": "556921",
      "status": "APPROVED"
    }
  }
}
The response confirms that the status has changed from PENDING to APPROVED.
Deleting Data
Mutations can also delete records from the server. Applications often need to remove records they no longer need, like test transactions.
mutation DeletePayment {                   # mutation indicates this is a write operation
                                           # DeletePayment is the operation name
  deletePayment(transactionId: "556921")   # deletePayment is the mutation field defined in the Mutation type
                                           # transactionID identifies which payment to delete
}
Delete operations return Boolean values true if the deletion worked, or false if the record could not be found or removed:
{
  "data": {
    "deletePayment": true
  }
}
Some APIs return the full record, but returning a Boolean is more common.
Mutations With Variables
In the earlier examples, the values were written directly inside mutations. But in practice, applications rarely hardcode values. They send dynamic data such as user input, payment amounts, or form values. Here's an example:
mutation CreatePayment($amount: Float!, $currency: String!) {   # mutation indicates this is a write operation
                                                                # CreatePayment is the operation name
                                                                # $amount and $currency are client variables that need to be passed
  createPayment(amount: $amount, currency: $currency) {         # Use variables provided by the client as input values for the createPayment mutation
    transactionId                                               # Return generated transaction ID
    status                                                      # Return payment status
  }
}
The client sends the variable values separately from the mutation, as JSON in the HTTP request:
{
  "amount": 9.99,
  "currency": "USD"
}
The GraphQL server combines the mutation definition and the variable values, then runs the operation. This is an example response:
{
  "data": {
    "createPayment": {
      "transactionId": "556921",
      "status": "PENDING"
    }
  }
}
Using GraphQL variables lets you run the same mutation with different input values each time.
How to Write GraphQL Subscriptions?
Instead of continuously polling the API for updates, your app can subscribe to a GraphQL endpoint to get real-time updates from the server.
Subscriptions are common in chat apps, collaborative tools, payment notifications, and other scenarios that require live updates.
How Subscriptions Work?
In queries and mutations, the client sends a request over standard HTTP and gets a response. After the interaction, the connection closes.
Subscriptions keep the connection between the client and server open. Most GraphQL subscriptions use WebSocket connections instead of standard HTTP because they support continuous, two-way communication.
Here's how the process works:
1. The client opens a WebSocket connection with the GraphQL server to set up a channel for updates.
2. The client sends a subscription request to let the server know what updates it wants to receive.
3. The server watches for events in the system, like a transaction status change or a payment being approved.
4. When one of these events happens, the server automatically sends updated data through the open connection.
The client gets updates right away, without needing to send another request.
Writing a Subscription
Subscription, like queries and mutations, need to be defined in the GraphQL schema. This tells GraphQL which real-time events clients are allowed to subscribe to.
The Subscription type in the schema lists all the real-time operations available in the API:
type Subscription {                                    # Defines available real-time updates
  paymentStatusUpdated(transactionId: ID!): Payment!   # Events clients can subscribe to
                                                       # transactionId selects a specific payment
                                                       # Server sends updated Payment data automatically
}
Based on the schema, the client can send a subscription request:
subscription WatchPaymentStatus {                   # subscription starts a real-time connection
                                                    # WatchPaymentStatus is the operation name
  paymentStatusUpdated(transactionId: "556921") {   # Listen for updates for this specific payment
    transactionId                                   # Return the payment identifier when an update occurs
    status                                          # Return the updated payment status
    updatedAt                                       # Return the timestamp when the update occurred
  }
}
When an update for transaction 556921 occurs, the server sends the requested fields:
{
  "data": {
    "paymentStatusUpdated": {
      "transactionId": "556921",
      "status": "APPROVED",
      "updatedAt": "2026-02-24T09:18:00Z"
    }
  }
}
The server keeps sending new responses each time the payment status changes, until the client disconnects.
Subscriptions With Variables
Variables allow clients to reuse the same subscription for different values, instead of hardcoding them. Here is an example:
subscription WatchPaymentStatus($id: ID!) {   # subscription is the real-time operation defined in the Sybscription type
                                              # WatchPaymentStatus is the operation name
                                              # $id is the variable provided by the client
  paymentStatusUpdated(transactionId: $id) {  # Use variable to select which payment to watch
    transactionId                             # Return payment identifier
    status                                    # Return payment status
    updatedAt                                 # Return timestamp of the update
  }
}
The client sends the subscription and its variable values as JSON through the WebSocket connection:
{
  "id": "556921"
}
When the subscription starts, the GraphQL server combines the subscription definition with the provided variable values. If there is an event regarding transaction 556921, the client gets this response:
{
  "data": {
    "paymentStatusUpdated": {
      "transactionId": "556921",
      "status": "APPROVED",
      "updatedAt": "2026-02-24T10:05:00Z"
    }
  }
}
The subscription stays active until the WebSocket connection is closed.
GraphQL Resolvers
When a client requests a field using a query, mutation, or subscription, GraphQL calls a resolver function for each requested field to retrieve data. Resolvers connect the GraphQL schema to databases, services, external APIs, or other data sources.
Resolver Execution Flow
This is a schema for a payment API that allows clients to query payments:
type Query {
  payments: [Payment!]!           # Returns a non-null list of Payment objects
}

type Payment {
  transactionId: ID!              # Unique payment identifier
  amount: Float!                  # Payment amount
  status: String!                 # Payment status
}
A resolver function tells GraphQL how to fetch the data for a field:
// Example data source (simulates a database or external API)
const payments = [
  { transactionId: "654370", amount: 29.99, status: "APPROVED" },
  { transactionId: "654371", amount: 5.99, status: "PENDING" }
];

// Resolver map: connects schema fields to the data-fetching logic
const resolvers = {
  Query: {
    payments: () => payments    // Resolver for Query.payments
                                  // GraphQL passes each result to child field resolvers
  }
};
If the client sends the following query:
{
  payments {
    transactionId
    status
  }
}
GraphQL runs the resolver functions and builds the response one step at a time:
Step 1: Validation
Before doing anything else, GraphQL checks the request against the schema. It makes sure that:
- Requested fields exist.
- Argument types match the schema.
- Query structure is valid.
If any of these checks fail, GraphQL stops and returns an error.
Step 2: Run the Root Resolver
GraphQL starts execution at the root operation type: Query, Mutation, or Subscription.
In our example, the operation is a query:
Query.payments()The resolver retrieves a list of payment objects from the data source, which is the payments array in this example, and returns:
[
  { transactionId: "654370", amount: 29.99, status: "APPROVED" },
  { transactionId: "654371", amount: 5.99, status: "PENDING" }
]
Step 3: Resolve Requested Fields
Next, GraphQL resolves each requested field for every payment object:
Payment.transactionId(payment1)
Payment.status(payment1)

Payment.transactionId(payment2)
Payment.status(payment2)
Each payment object that is returned becomes the parent value to its field resolvers.
Step 4: Assemble the Response
Once all the requested fields are resolved, GraphQL combines the results into a response that matches the structure of the query:
{
  "data": {
    "payments": [
      {
        "transactionId": "654370",
        "status": "APPROVED"
      },
      {
        "transactionId": "654371",
        "status": "PENDING"
      }
    ]
  }
}
Up to this point, the examples have returned simple values, like IDs and status fields. However, GraphQL fields can also return other objects.
Field Resolvers and Nested Data
In the previous example, you saw a resolver that returns a list of payments:
// Root resolver: returns a list of payments
const resolvers = {
  Query: {
    payments: () => payments
  }
};
However, GraphQL queries often request nested data, and each nested field can have its own resolver. Here is an example schema where each Payment includes a related Customer:
type Query {
  payments: [Payment!]!            # Non-null list of non-null Payment objects
}

type Payment {
  transactionId: ID!
  amount: Float!
  status: String!
  customer: Customer!              # Nested object field
}

type Customer {
  id: ID!
  email: String!
}
With this setup, a client can request nested data in a single query:
{
  payments {
    transactionId
    customer {
      email
    }
  }
}
This is how the resolver is implemented:
// Example data sources (simulate database tables)
const payments = [
  {
    transactionId: "654370",
    amount: 29.99,
    status: "APPROVED",
    customerId: "custx1"
  }
];

const customers = [
  { id: "custx1", email: "customer@example.com" }
];

const resolvers = {
  Query: {
    // Root resolver runs first
    payments: () => payments
  },

  Payment: {
    // Field resolver for Payment.customer
    // "payment" is the parent object returned from Query.payments
    customer: (payment) => {
      // GraphQL calls this resolver once for EACH payment
      return customers.find(
        customer => customer.id === payment.customerId
      );
    }
  }
};
GraphQL goes through each field step by step and combines the results together into one structured response:
{
  "data": {
    "payments": [
      {
        "transactionId": "custx1",
        "customer": {
          "email": "customer@example.com"
        }
      }
    ]
  }
}
You do not have to write a resolver function for every field. GraphQL has default resolvers that return values automatically.
Default Resolvers
GraphQL has default resolvers that can resolve a field automatically when its name matches a property on the returned object. For example, if the resolver returns the following payment object:
// Object returned from a resolver
const payment = {
  transactionId: "654370",
  amount: 29.99,
  status: "APPROVED"
};
And the schema defines:
type Payment {
  transactionId: ID!
  amount: Float!
  status: String!
}
Because the object already contains properties that match the schema fields, GraphQL automatically does the following:
payment.transactionId
payment.amount
payment.status
Even if you only define a root resolver:
const resolvers = {
  Query: {
    payments: () => [payment]   // Returns a list containing the payment object
  }
};
GraphQL will use the default resolvers to handle the requested fields. If the client sends:
{
  payments {
    transactionId
    status
  }
}
GraphQL will return the fields requested in the query:
{
  "data": {
    "payments": [
      {
        "transactionId": "654370",
        "status": "APPROVED"
      }
    ]
  }
}
You do not need any extra field resolvers.
Resolver Function Arguments
Every resolver function takes four arguments:
parentargscontextinfo
Each one gives you different information about the current request.
parent
The parent argument holds the value returned by the previous resolver:
const resolvers = {
  Payment: {
    customer: (payment) => {
      // "payment" is the parent object returned from Query.payments
      return customers.find(
        c => c.id === payment.customerId
      );
    }
  }
};
For example, if a client requests:
{
  payments {
    customer { email }
  }
}
GraphQL will first resolve payments, then pass each payment as the parent value to Payment.customer.
args
The args argument includes any arguments the client provided for the field. For example:
{
  payment(transactionId: "654370") {
    status
  }
}
This is the resolver implementation:
const resolvers = {
  Query: {
    payment: (_, args) => {
      // args.transactionId comes directly from the query
      return payments.find(
        p => p.transactionId === args.transactionId);
    }
  }
};
The args object matches the field arguments you define in your schema.
context
The context argument holds shared data that all resolvers can use during a single request. It's often used for user authentication flows or for issuing OTP tokens. For example:
payment: (_, { transactionId }, context) => {
  // context.user might be set if the request is authenticated
  if (!context.user) {
    throw new Error("Not authenticated");
  }
  return context.db.payments.findById(transactionId);
}
The context object is created once for each request and passed to every resolver involved.
info
The info argument gives you metadata about the query, such as field names, schema details, and selection sets. Most beginners don't use info. It is mainly for advanced cases, like building generic resolvers or optimizing queries.
Writing Custom Resolvers
A custom resolver is a function that tells GraphQL how to get data for a field. You create custom resolvers when you want to:
- Fetch data from a database.
- Combine data from multiple services.
- Apply custom business logic.
- Enforce authentication and authorization.
Usually, resolvers need to query a database instead of just sending back fixed values:
const resolvers = {
  Query: {
    payment: async (_, { transactionId }, context) => {
      // 1. The client sends a transactionId argument
      // 2. The resolver queries the database
      const payment = await context.db.payments.findById(transactionId);

      // 3. The payment record is returned to GraphQL
      return payment;

     // 4. GraphQL automatically sends only the requested fields
     //    back to the client
    }
  }
};
A payment might point to a customer that is stored in another table or in a different service:
const resolvers = {
  Payment: {
    customer: async (payment, _, context) => {
      // "payment" is the parent object returned by Query.payment
      // Read the related customerId
      const customerId = payment.customerId;

      // Load the related customer record
      return context.db.customers.findById(customerId);
    }
  }
};
Resolvers can also change or format values before sending them back:
const resolvers = {
  Payment: {
    formattedAmount: (payment) => {
      // Apply business logic before returning data
      return `$${payment.amount.toFixed(2)}`;
    }
  }
};
For example, the schema might define:
type Payment {
  amount: Float!
  formattedAmount: String!
}
The value is not saved in the database. Instead, the resolver computes it dynamically. Resolvers can return:
- values
- objects
- arrays
- promises
This is an example using a Promise:
payment: async (_, { transactionId }, context) => {
  // GraphQL waits for this Promise to resolve automatically
  return context.db.payments.findById(transactionId);
}
You do not need to take any additional steps. GraphQL will wait for any asynchronous tasks to finish before sending the response.
Resolvers in Mutations
Resolvers are not used only for queries. They also work with mutations and subscriptions. A mutation resolver handles write operations, like creating, updating, and deleting data.
The following schema defines a mutation:
type Mutation {
  updatePaymentStatus(
    transactionId: ID!
    status: String!
  ): Payment!
}
The following resolver implements the mutation:
const resolvers = {
  Mutation: {
    updatePaymentStatus: async (
      _,
      { transactionId, status },
      context
    ) => {
      // 1. The client sends a mutation request
      // 2. GraphQL calls the mutation resolver

      const payment =
        await context.db.payments.findById(transactionId);

      // 3. Update the data
      payment.status = status;

      // 4. Persist the change in the database
      await context.db.payments.save(payment);

      // 5. Return the updated object
      return payment;

      // GraphQL sends only the requested fields to the client
    }
  }
};
Mutation resolvers work the same way as query resolvers, except they change the data before returning it.
Resolvers in Subscriptions
Subscription resolvers are different from query and mutation resolvers because they handle real-time events. Instead of sending data just once, they set up a stream of updates.
The following schema defines a subscription:
type Subscription {
  paymentStatusUpdated(transactionId: ID!): Payment!
}
Here is an example subscription resolver:
const resolvers = {
  Subscription: {
    paymentStatusUpdated: {
      subscribe: (_, { transactionId }, { pubsub }) => {
        // 1. Client starts a subscription
        // 2. Resolver creates a listener for matching events
        // 3. GraphQL keeps the connection open

        return pubsub.asyncIterator(
          `PAYMENT_UPDATED_${transactionId}`
        );

        // Updates are pushed automatically to connected clients
      }
    }
  }
};
Unlike query or mutation resolvers, subscription resolvers do not return data right away. They wait for a mutation to trigger an update. When a payment is updated, the mutation resolver publishes an event:
await pubsub.publish(
  `PAYMENT_UPDATED_${transactionId}`,
  {
    paymentStatusUpdated: payment
  }
);
GraphQL proceeds to notify all the subscribed clients in real time.
GraphQL Server Best Practices
Designing an API can be overwhelming at first. Here is a set of practical guidelines to help you along the way:
- Use input types for mutations. Long argument lists can become hard to read and maintain, especially as your API grows. Group related data into an input type to avoid passing countless individual arguments.
- Keep resolvers simple. Resolvers should fetch or modify data. If you find yourself adding a lot of business logic, move that code into a service or helper layer instead.
- Limit the number of database calls. Use tools like DataLoader to fetch data in batches instead of one request at a time. If every user sends separate requests, your database will slow down.
- Protect your API. To keep your server healthy, limit the query depth and complexity, and add rate limiting. An intrusive query can slow down or crash the server. Setting limits on how many queries a client can make in a short time helps guard against slow services and abusive traffic, such as DDoS attacks.
- Validate and sanitize inputs. Do not just rely on GraphQL types. Always validate business rules, such as allowed ranges, values, and formats.
- Return useful error messages. The error messages need to clearly explain what went wrong. If a client understands the reason for the error, they are less likely to repeat it. Be careful not to include sensitive details like stack traces in your error messages.
- Turn off or limit introspection in production. It's fine to keep this enabled for development or staging, but consider restricting it for public production APIs.
Conclusion
The examples in this guide showed you how GraphQL schemas describe data, how operations let clients read and modify it, and how resolvers execute requests step by step.
Try these concepts in your Apollo Sandbox and start building GraphQL APIs for web, mobile, and other modern applications.