The git fetch command downloads objects to the local machine without overwriting existing local code in the current branch. The command pulls a record of remote repository changes, allowing insight into progress history before adjustments.
Read on to learn how to use the git fetch command through hands-on examples.
Prerequisites
- Git installed, updated, and configured.
- Access to the command line/terminal.
- A remote repository link or a Git remote configured.
What is git fetch?
The git fetch command retrieves commits, files, branches, and tags from a remote repository. The general syntax for command is:
git fetch <options> <remote name> <branch name>Git isolates the fetched content from the local code. Therefore, the fetch provides a safe way to review the information before committing to your local branch.
Note: The automation oriented Bare Metal Cloud servers are an excellent integration environment created by DevOps for DevOps. With support for custom APIs and CLI utilities, Git helps keep track of the fine tuned environment, making it easy to automate processes such as fetching.
Check out the preconfigured instances and use them as build and testing servers.
How Does the git fetch Command Work?
The git fetch command gets all the changes from a remote repository. The fetched metadata resides in the .git directory, while the working directory stays unaltered.
Effectively, git fetch retrieves the metadata without applying changes locally. The git pull command combines git fetch and git merge functions into one.
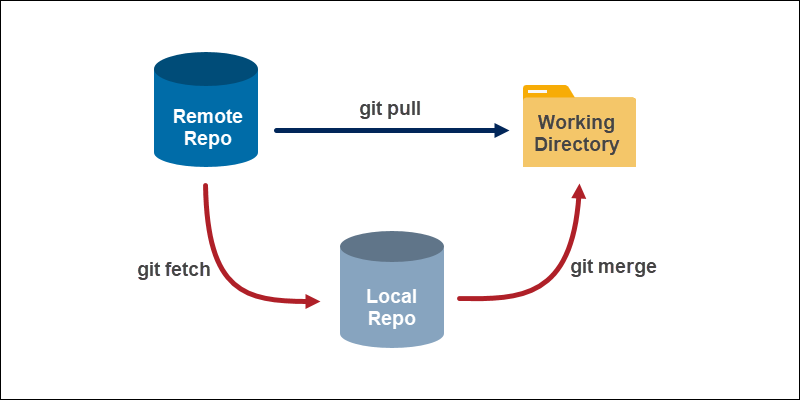
Since the working directory state remains unaffected, the fetched contents must be checked out with the git checkout command or merged with git merge.
However, since joining contents is a manual process, git fetch allows reviewing code before changing anything. The review process helps avoid merge conflicts.
Git Fetch Options
Below is the list with commonly used options when working with git fetch:
--all- Fetch all remotes.--append(-a) - Appends to existing fetched contents without overwriting.--depth=<depth>- Limit to a specific number of commits starting from the tip of each remote branch history.--deepen=<depth>- Limit to a specific number of commits starting from the current boundary of each remote branch history to the tip.--shallow-since=<date>- Include all reachable commits after specified date.--shallow-exclude=<revision>- Excludes commits from a specified remote branch or tag. Use the option multiple times to specify multiple exclusions.--dry-run- The option added to any command shows what happens without running the command as a demo.--multiple- Allows multiple<repository or group>arguments.--no-tags- Disable automatic tag following.--tags- Fetch all tags from a remote.--set-upstream- Add upstream tracking.
To see all the available options, run the following command in the terminal:
git fetch --helpThe command shows the full help page with a detailed description of all the available options.
Fetch Git Repositories
The examples require an added remote repository. If you already have a remote set up, skip to the next section. Otherwise, add a Git remote by following the steps below:
1. Open the terminal and create a directory for the project:
mkdir <directory name>2. Enter the directory using the cd command:
cd <directory name>3. Initialize the local repository with:
git init
4. Use the following command to add a remote URL to the local repo:
git remote add <short remote name> <remote URL>For example:
git remote add origin git@github.com:phoenixNAP-KB/test.gitNote: The command accepts many different URL formats depending on the platform and protocol. The remote host provides the URL in most cases.
5. Confirm the remote added successfully:
git remote -v
Follow the examples in the sections below to see how the git fetch command works for various use cases.
Fetch a Remote Repository
The simplest way to use the git fetch command is to fetch a remote repository:
git fetch <remote name>For example:
git fetch origin
Note: The git fetch command without the remote name retrieves data from an origin. If the remote has a different name, state the name in the command.
The output shows the command fetched all the contents from the remote repository, including branches and tags.
List all the fetched remote branches with:
git branch -r
To list all the fetched tags, run:
git tag
Use the git checkout command to make the contents locally available to a new branch or use git merge to synchronize local repository information.
Fetch A Specific Branch
To fetch a specific branch from a repository, run this command:
git fetch <remote name> <branch name>For example, to fetch a branch named test from the origin, run:
git fetch origin test
The command only fetches the contents for the specific branch. To checkout the fetched content to a new branch, run:
git checkout -b test_branch origin/test
The contents are now locally available in the branch test_branch.
Fetch All the Branches from All Remotes
In cases where there are multiple remotes, git fetch offers a command to retrieve information from all the remotes.
To see all the remotes, run:
git remote
Note: Keep the workspace clean and easy to manage. If there's an unnecessary branch listed, you can delete the remote branch. Likewise, remove redundant git remotes.
Fetch all the contents from all remotes with:
git fetch --all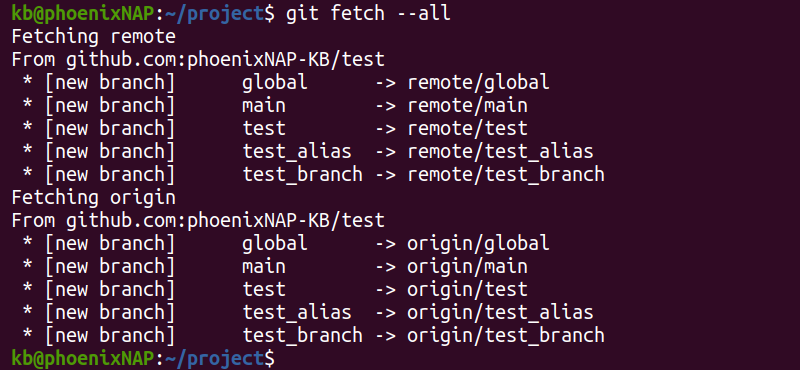
The output shows the fetching process from all remote repositories.
Note: Learn how to use fetch and pull to pull all branches in Git.
Synchronize The Local Repository
Use the git fetch command with git merge to synchronize the local repository. Follow the steps below to see how the example works:
1. Fetch the remote repository with:
git fetch <remote name>2. Compare the local branch to the remote by listing the commit differences with git log:
git log --oneline <local branch>..<remote name>/<remote branch name>For example, if the local branch is test_branch and the remote is at origin/test, the following command lists the differences:
git log --oneline test_branch..origin/test
The output lists the commits and the associated messages.
3. Checkout the local branch where you want the changes merged:
git checkout <local branch>For example:
git checkout test_branch4. Sync the local branch with the git merge command:
git merge origin/main
The contents are now up to date with the remote repository. If there's a conflict warning, follow our tutorial to resolve the merge issues: How to Resolve Merge Conflicts in Git.
git fetch Vs. git pull
The table below outlines how the git fetch and git pull commands compare.
git fetch | git pull |
|---|---|
| Downloads new information from a remote repository without merging into the current branch. | Downloads all the changes from a remote repository and merges them into the current branch. |
| Updates the repository data in the .git directory. | Updates the local repository directly. |
| Allows reviewing commits and changes from other developers before committing the code. | Allows bringing and updating changes to the local repository immediately. |
| No possibility of merge conflicts when running the command. | Possible merge conflicts which need an immediate resolution. |
Out of the two commands, git fetch is the safer option when retrieving code changes from a remote repository.
Conclusion
After reading this tutorial, you know what the git fetch command is, when to use it, and how it compares to the git push command.
Next, check our Git Commands Cheat Sheet, which features the git fetch command.